| This content applies solely to Government Clause Automation, which must be purchased separately from the Appian base platform. |
IntroductionCopy link to clipboard
At some point, you may need to update the clauses in a clause set you previously created. This may involve completing missing fill-ins in one or more clauses or entering required information into clauses that have been identified as incomplete during a clause set validation. GCA provides flexible tools and workflows that allow you to quickly edit clauses in a clause set, which reduces the time it takes you to finalize a clause set.
To get started editing a clause, you may want to perform a validation on your clause set to identify any clauses that need your attention. Alternatively, you can view, search, or filter the Applied Clauses list from the Clause Set Summary page to locate the clause or group of clauses you need to update.
Editing a clause in a clause setCopy link to clipboard
There are two types of clause edits that you can perform: fill-ins edits and non fill-in edits.
Fill-ins include any text, tables, or checkboxes within a clause that a contracting officer is required to complete with information that applies to their specific acquisition. Any edits that cannot be defined as one of these fill-in types, is a non fill-in edit.
For many clauses, GCA provides the flexibility of deciding between manually editing clause fill-ins using GCA's built-in clause editor or using the Complete Fill-ins feature, which is GCA's editing workflow that includes intelligent automation. The Complete Fill-ins workflow allows you to quickly edit clause fill-ins, reducing the time it takes to update a clause set. Non fill-ins do not leverage GCA's intelligent capability. You must manually edit clause sections using the clause editor. For example, if you need to add or delete an entire paragraph in a clause, you must perform a manual edit.
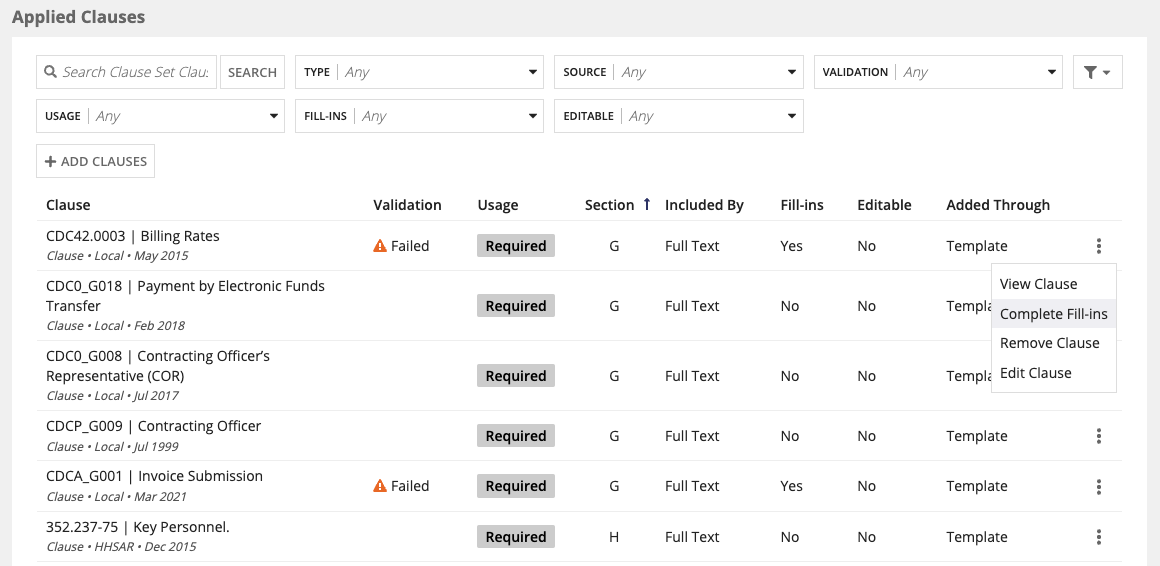
From the Applied Clauses list, you can quickly and easily determine which clauses utilize the Complete Fill-in workflow and which clauses you must manually edit using the clause editor. If the value for the Fill-ins column for a clause is Yes, you can edit the clause using the Complete Fill-in workflow. If the value for the Fill-ins column for a clause is No or designated with an empty state, you must manually edit the clause. Note that if both columns have a No value or an empty state, you cannot manually edit the clause using the clause editor. The only exception to this rule is if the Editable column was manually set to No by a user in a previous edit.
The following table lists the available options for editing fill-ins and non fill-ins based on the values in the Fill-in column and Editable column for the associated clause.
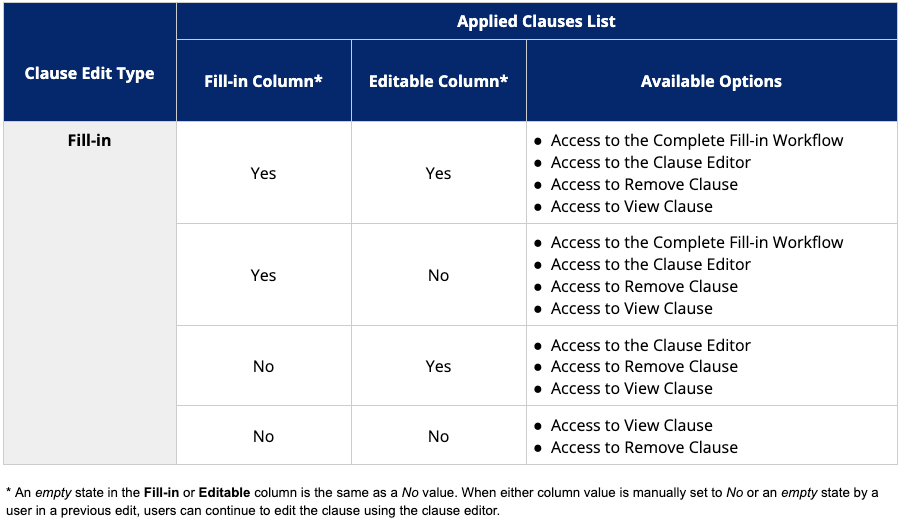
Note that any edits you make to a clause in the clause set will override the existing clause and any information associated with it.
Editing a clause with automated fill-insCopy link to clipboard
The Complete Fill-ins feature is an automated clause fill-in workflow that allows you to complete two types of clause fill-ins, including:
- Quick Fills: Allows you to review a list of auto-suggested text selections GCA provided. Select the correct auto-suggested text to complete the highlighted fill-in.
- Checkboxes: Allows you to type an X to complete a highlighted checkbox requirement for a clause fill-in.
After locating the clause you want to edit in the Applied Clauses list, you can use Complete Fill-ins (if available) to quickly edit the clause fill-ins.
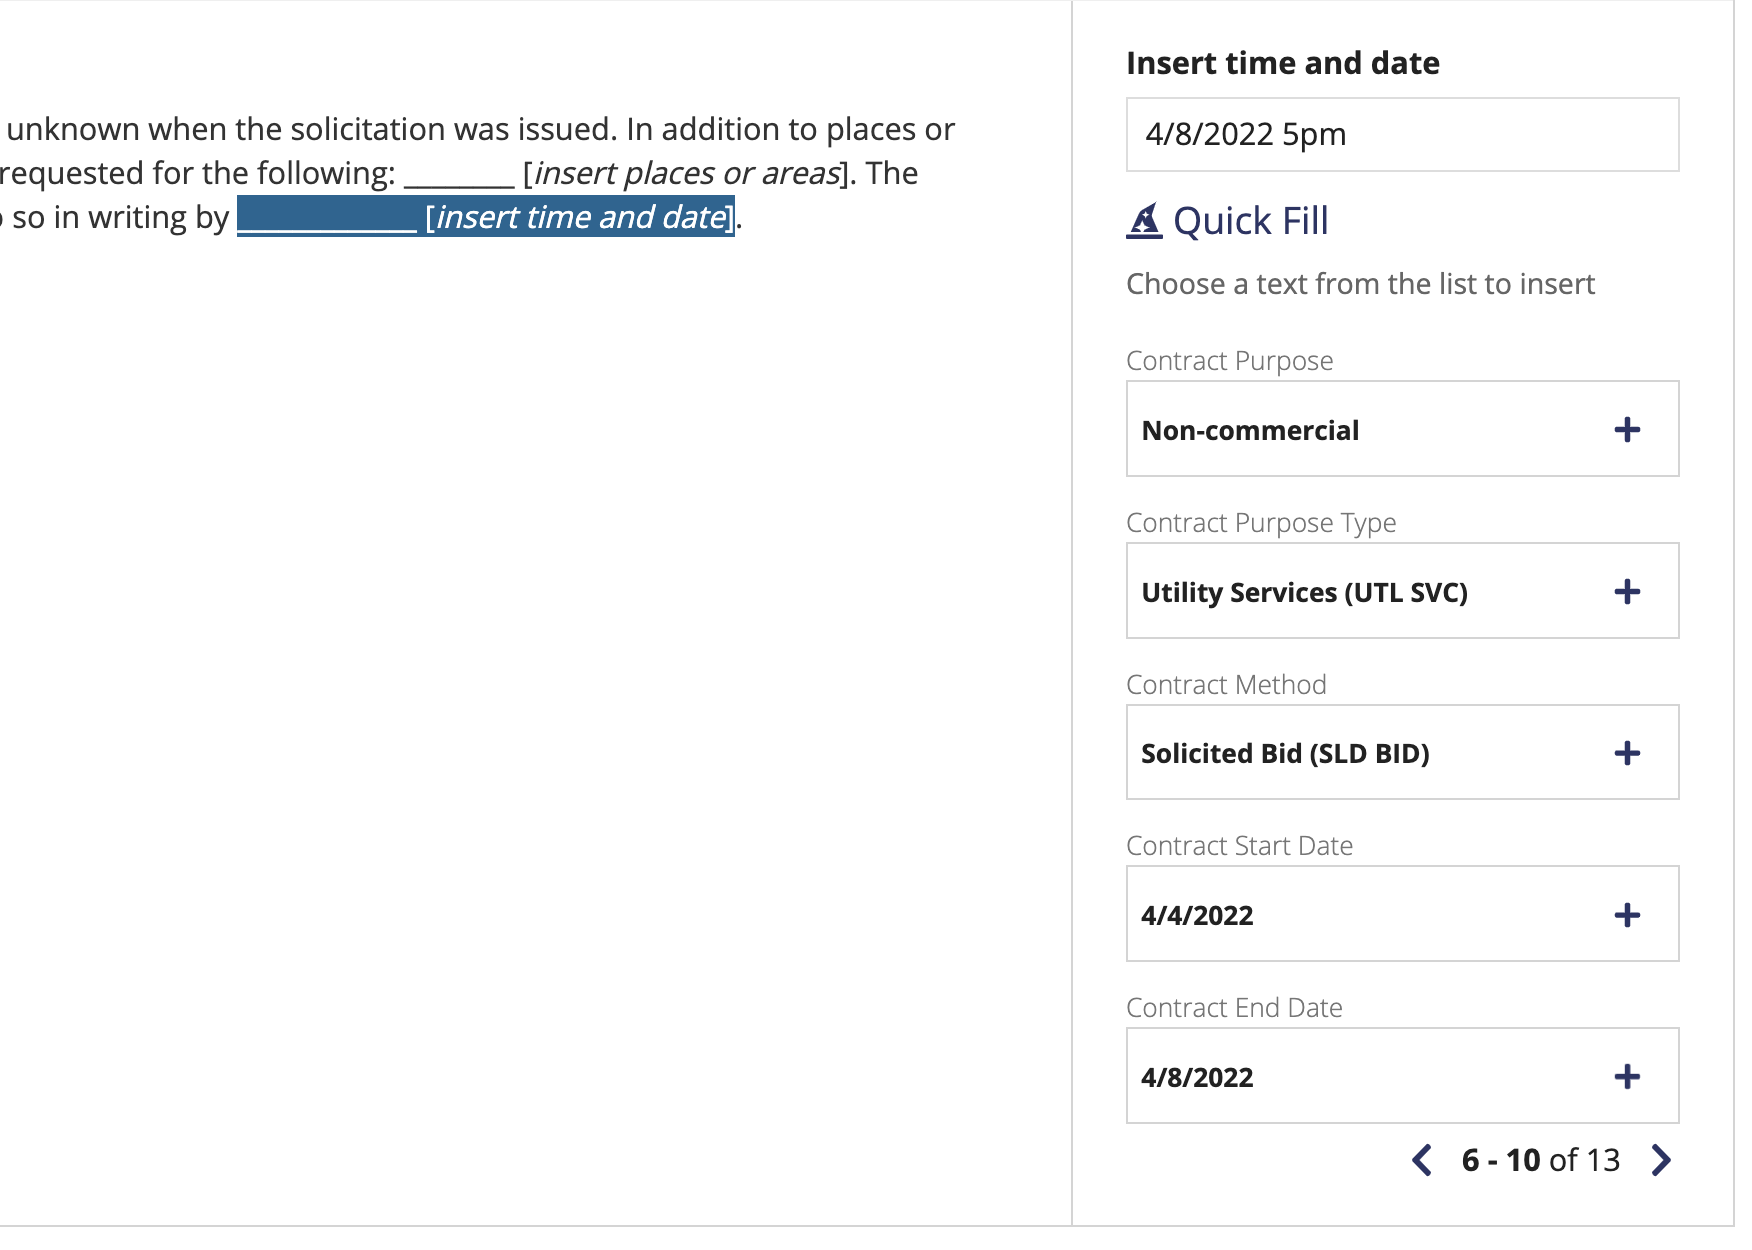
To help you quickly determine which fill-ins you need to complete, the Complete Fill-in workflow highlights the fill-ins. The workflow also displays help text that describes the current fill-in and automatically determines how much clause text to show before and after each fill-in blank to ensure that you have sufficient context to enter the correct answers.
The Quick Fill feature in the Complete Fill-in workflow allows you to complete the highlighted fill-ins with data retrieved from the contract details you previously entered, reducing the time it takes to edit your clauses.
To edit a clause using Complete Fill-ins:
- Click the ellipsis icon associated with the clause you want to edit and click Complete Fill-ins to open the Clause Fill-ins workflow.
-
- Under the Quick Fill section, review the auto-suggested text selections GCA provided and click the plus icon next to the correct text selection to complete the highlighted fill-in.
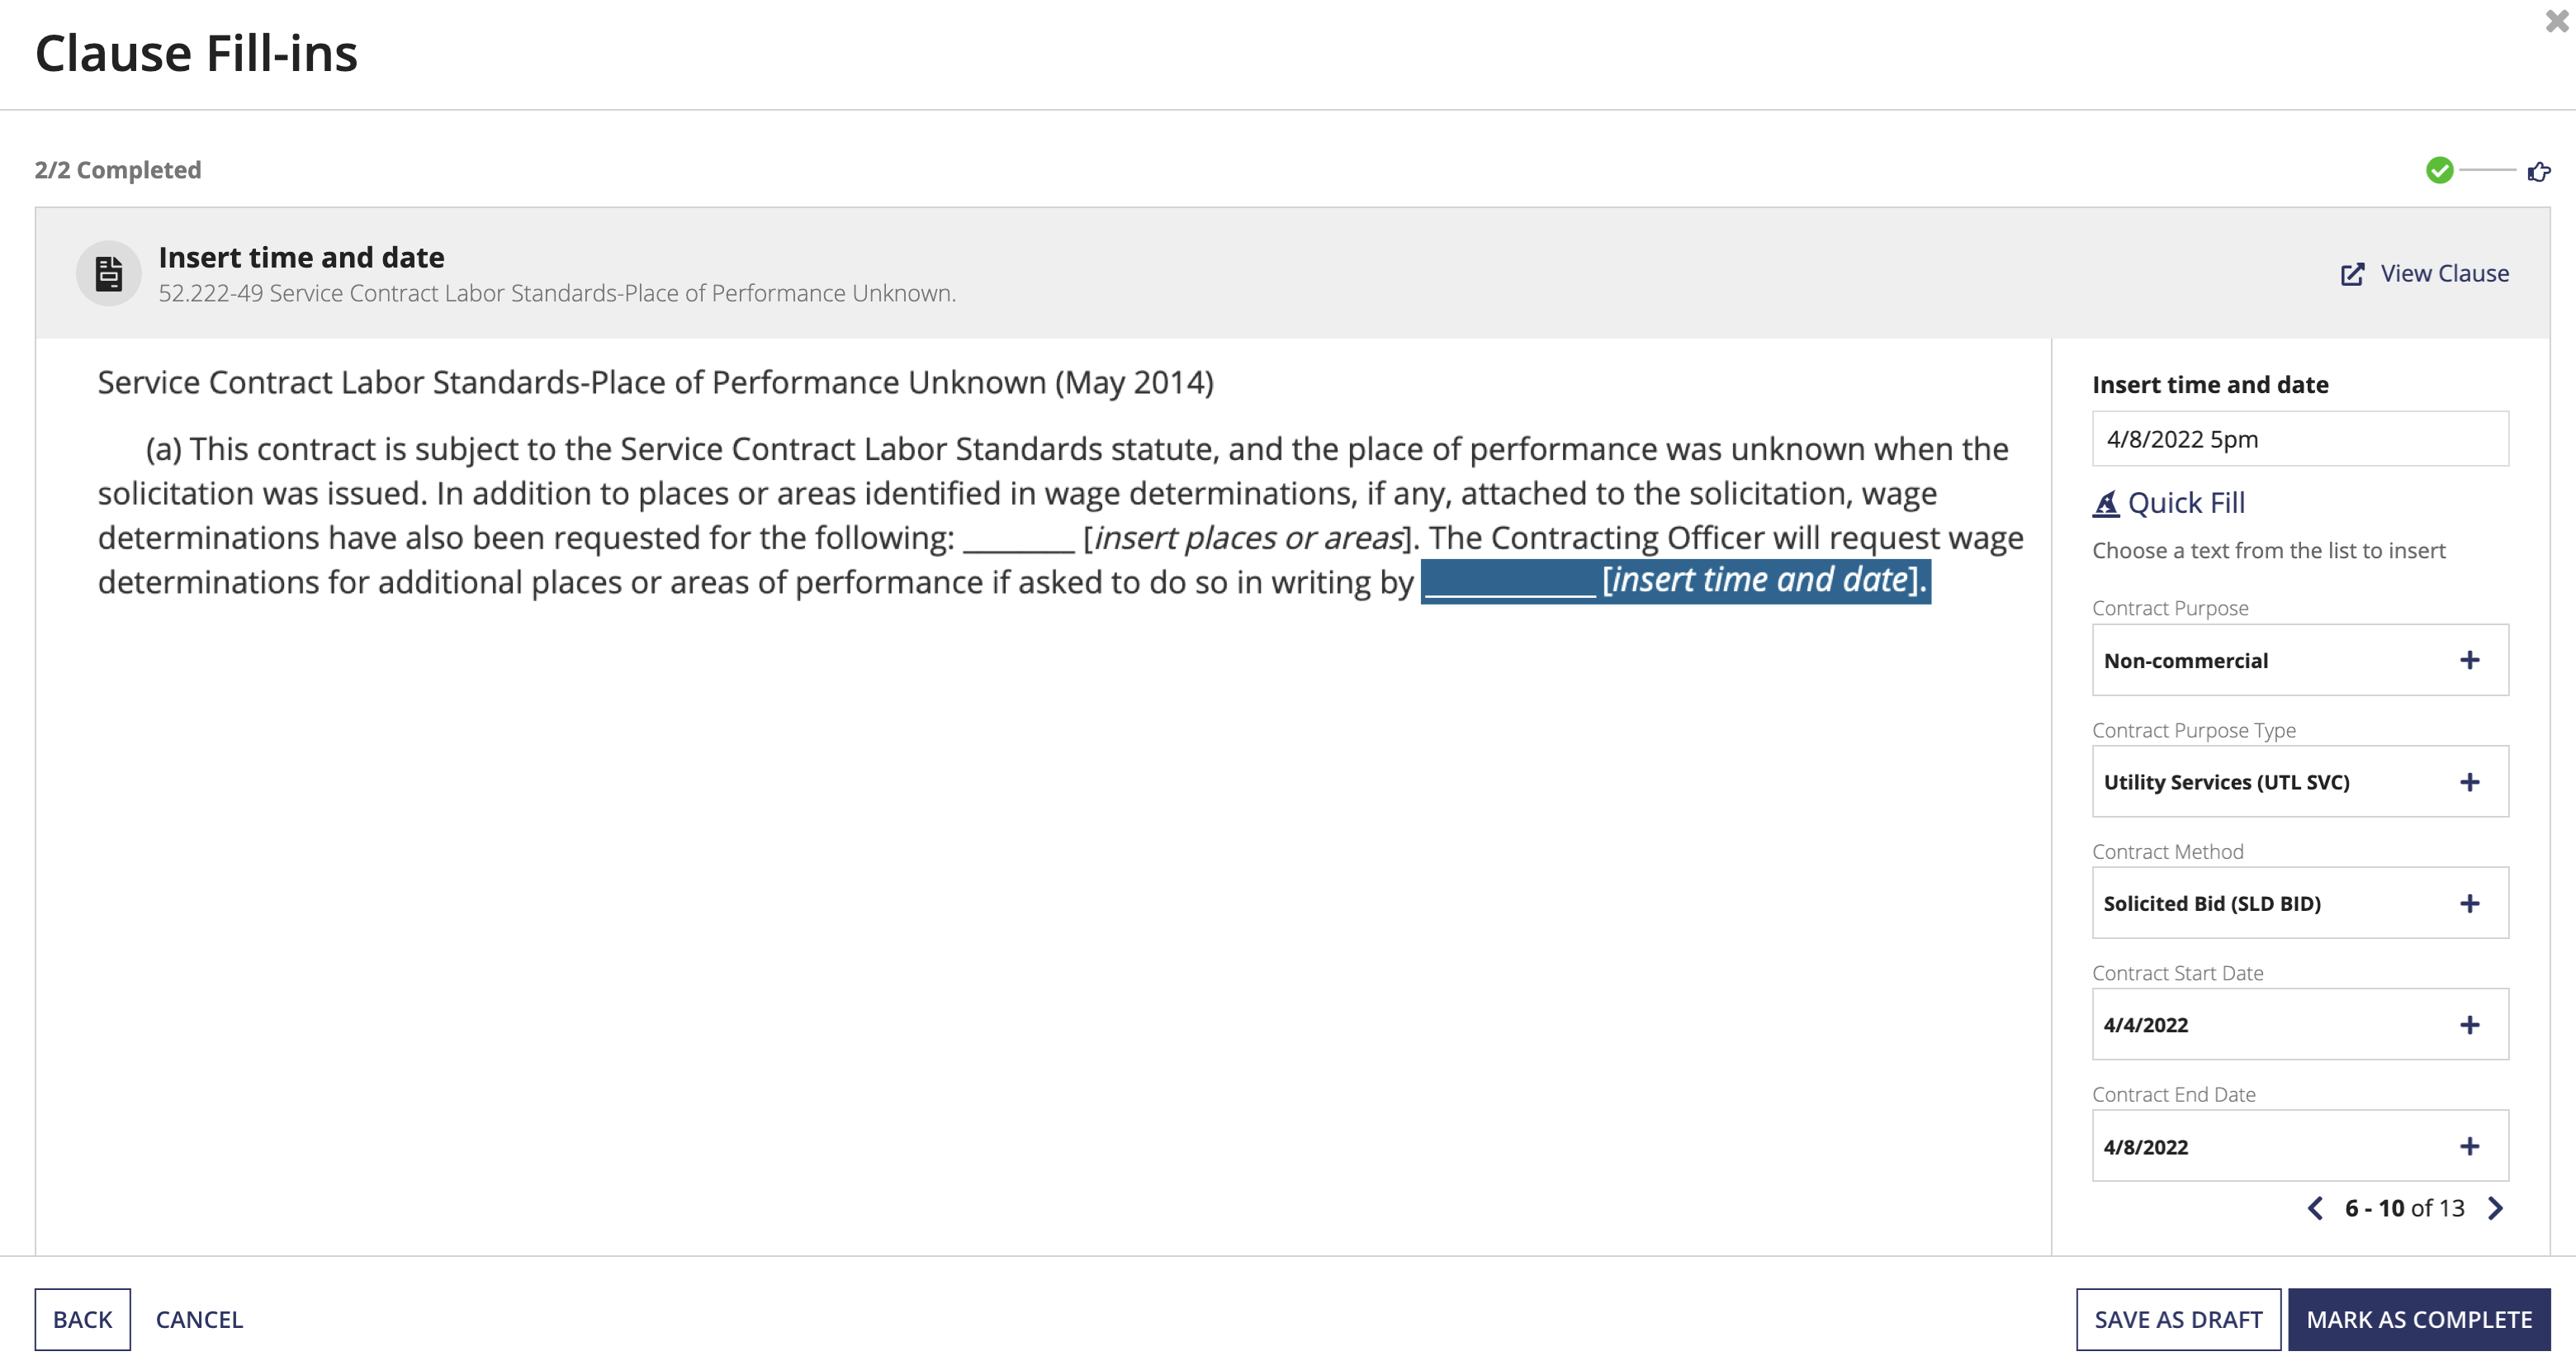
- Click MARK AS COMPLETE.
Manually editing a clauseCopy link to clipboard
Manually editing clauses in a clause set is also easy with GCA's Edit Clause editor.
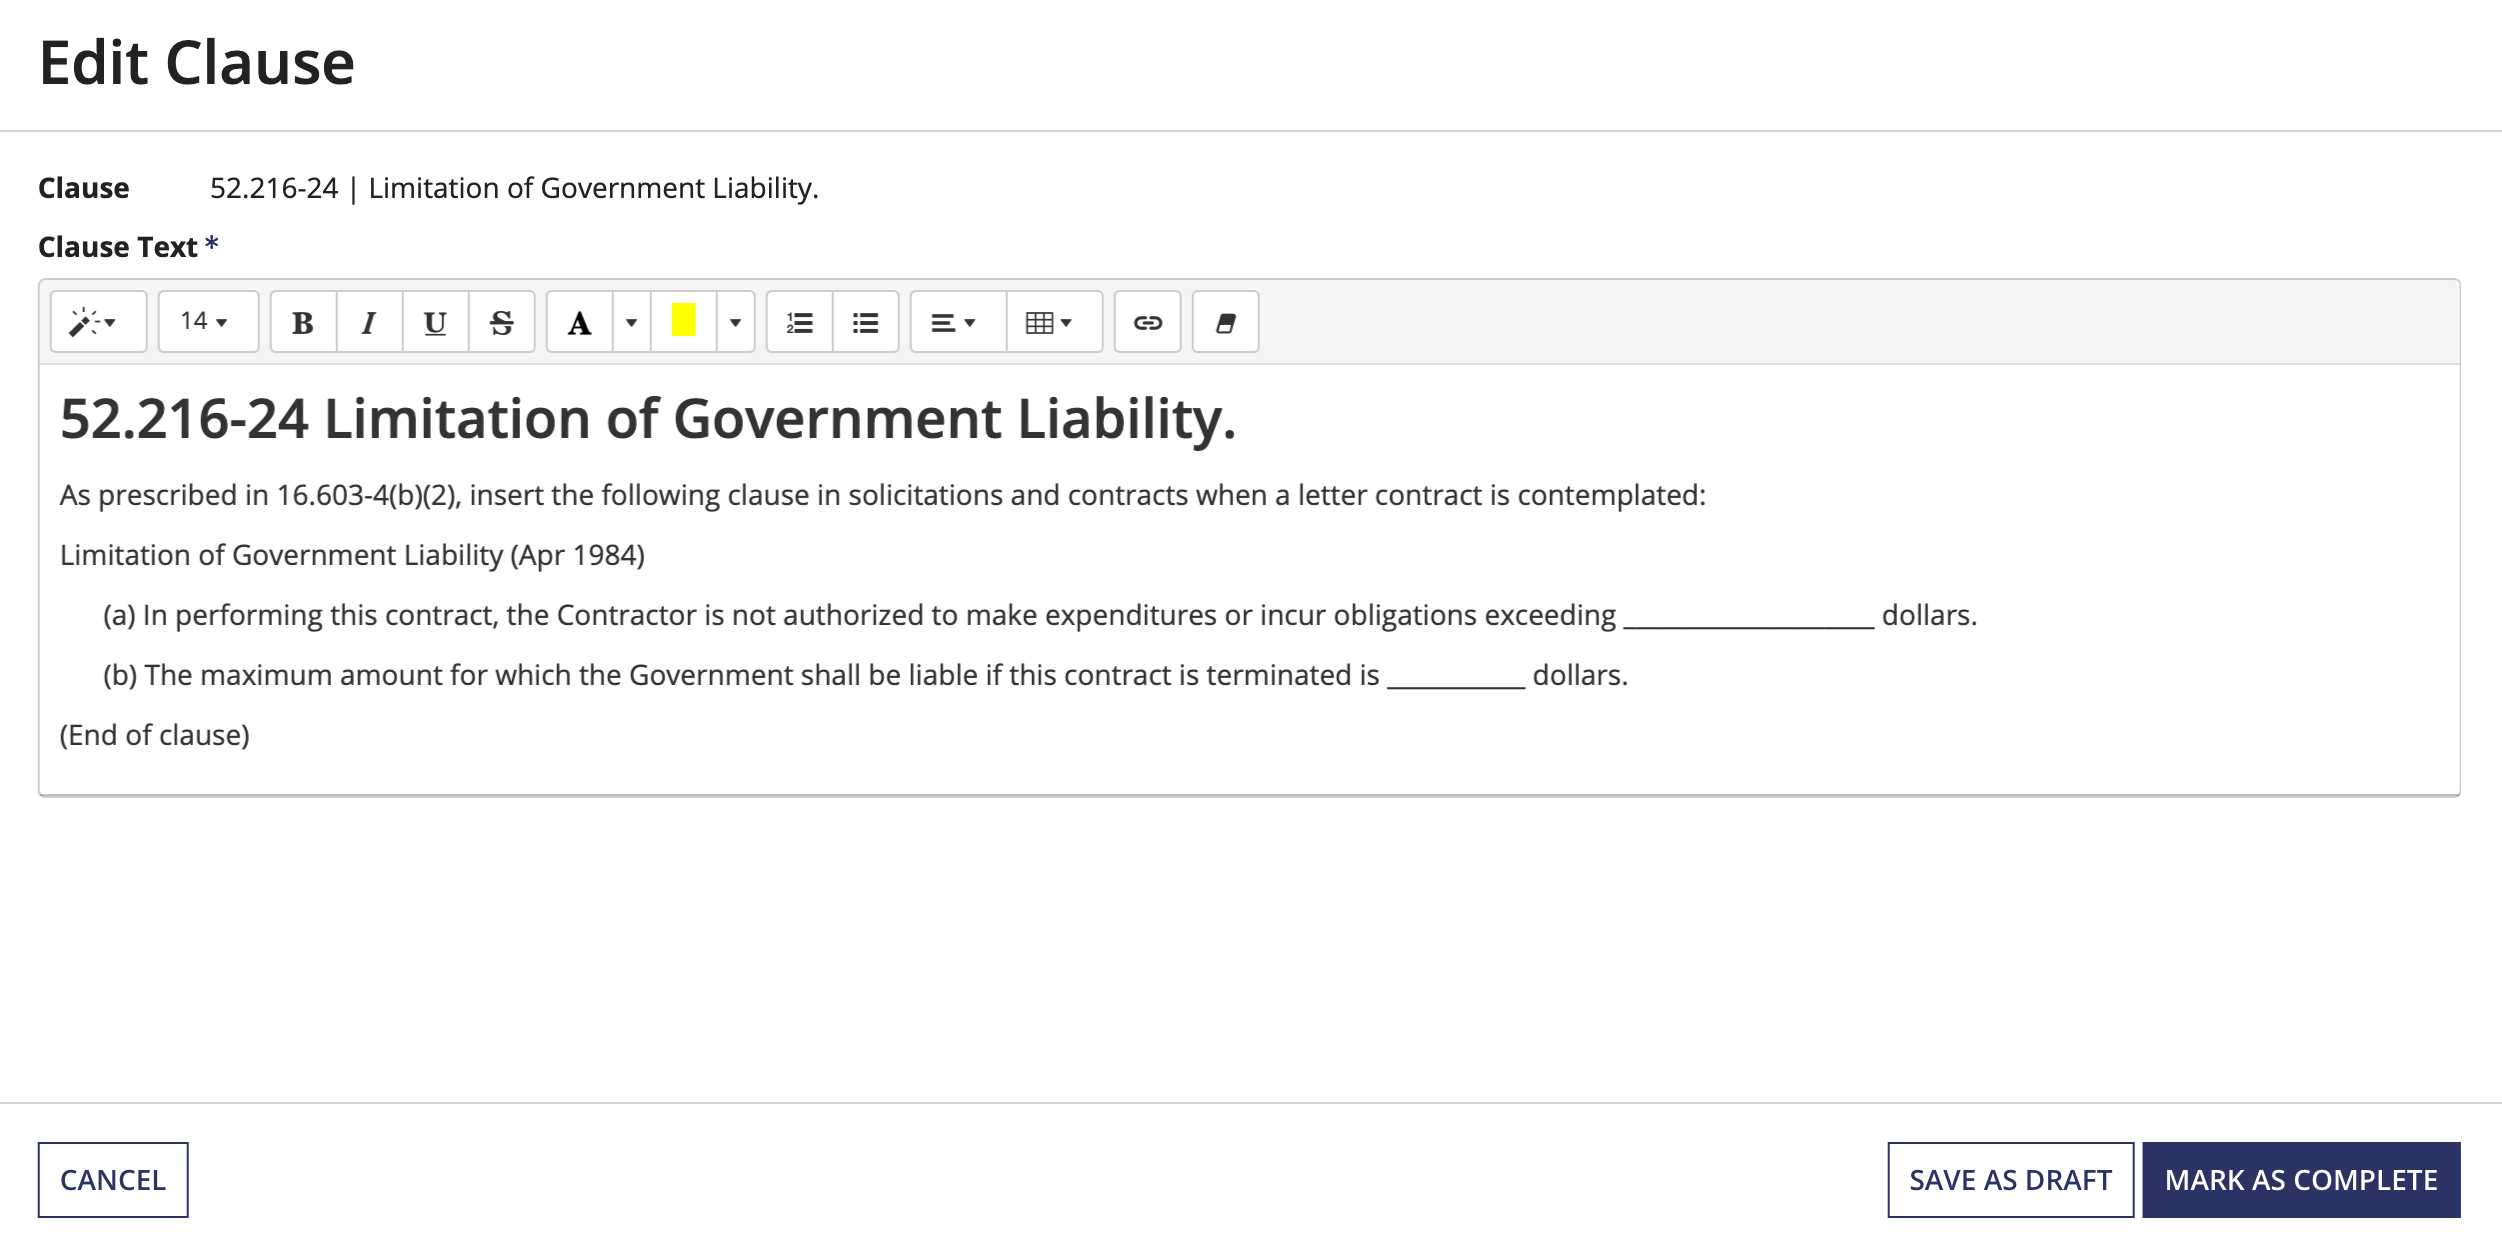
To manually edit a clause:
- Click the ellipsis icon associated with the clause you want to edit and click Edit Clause to open the Edit Clause editor.
- Update clause as needed.
- When finished, click MARK AS COMPLETE.
Clicking SAVE AS DRAFT saves your current edits but keeps the clause open so that you can continue updating it at a later date. When you click MARK AS COMPLETE, you are indicating that you have updated the clause and completed all fill-ins. Note that this action does not finalize the clause in the clause set, which can only be performed by finalizing the clause set. If needed, you can still edit a clause marked as complete until the clause set it is assigned to is finalized.
Changing a clause from IBR to Full TextCopy link to clipboard
Included by Reference (IBR) clauses that have fill-ins can be switched to Full Text to ensure the provided fill-in information is included in the generated document.
To change a clause from IBR to Full Text:
- Click the ellipsis icon associated with the clause you want to edit.
- Click Convert to Full Text.
- Click CONVERT to confirm the change.
Removing a clause from a clause setCopy link to clipboard
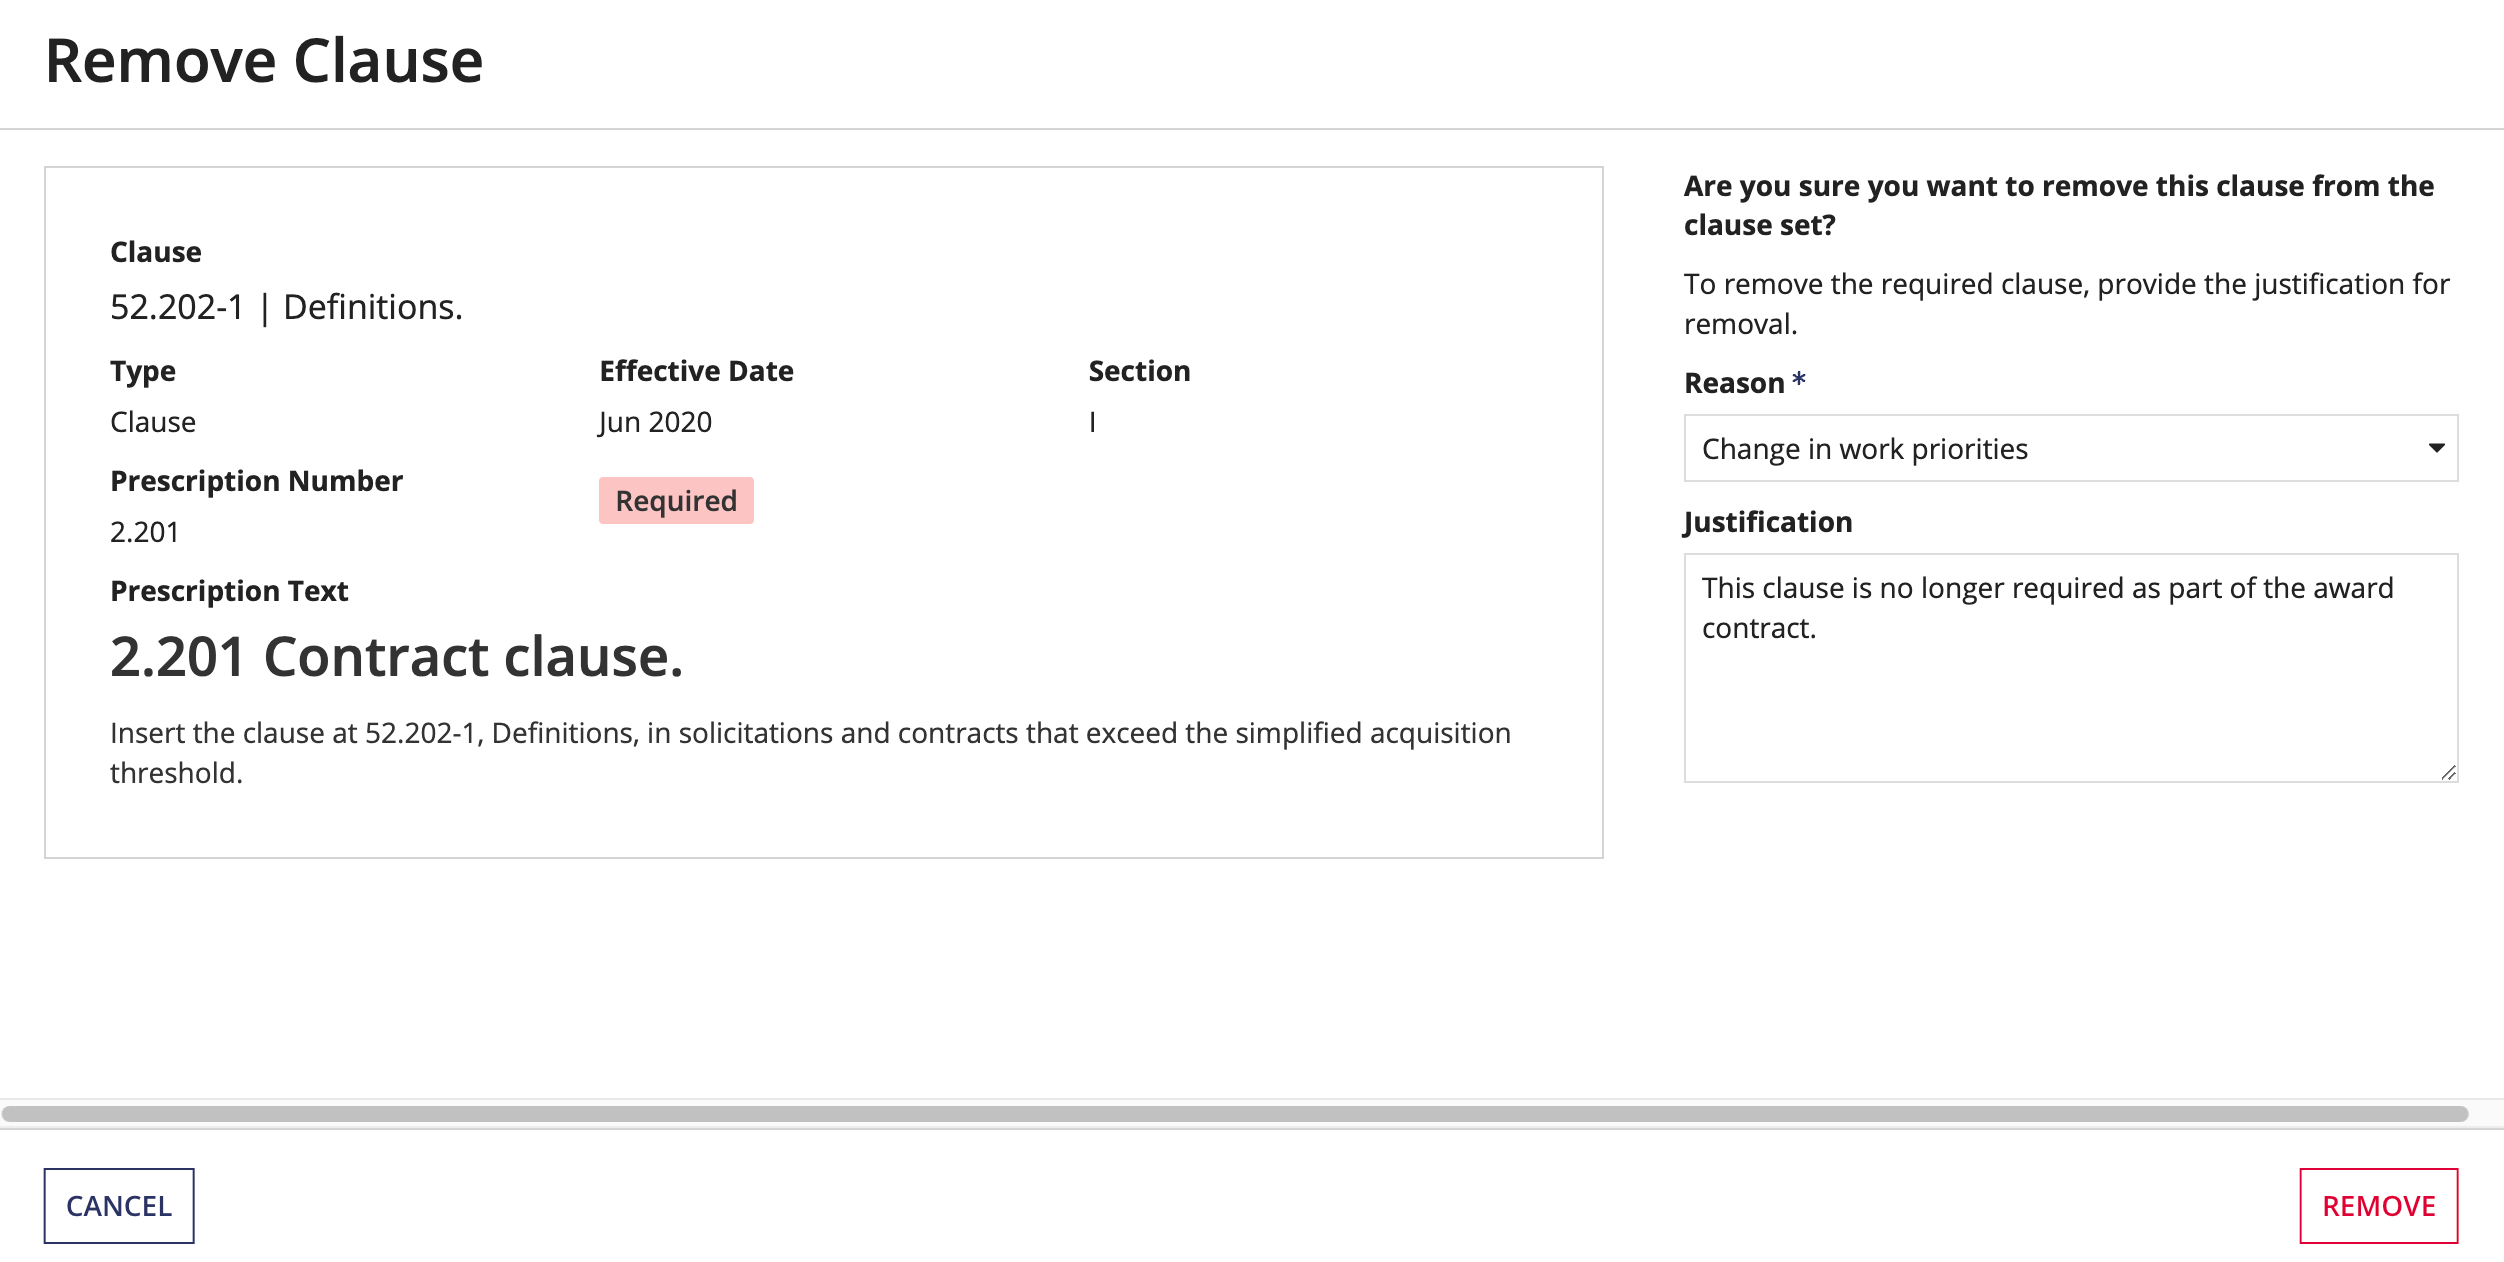
You can also remove a clause from a clause set if it is no longer needed but you must select a reason and provide a justification. Reasons include:
- Change in work priorities
- Dependent tasks did not complete on time
- Other priorities took precedence
- Part of a larger shift in schedule
- Work taking longer than originally planned
To remove a clause:
- Click the ellipsis icon associated with the clause you want to edit and click Remove Clause to open the Remove Clause form.
- In the Reason dropdown menu, select a reason for removing the clause.
- In the Justification text box, enter your justification for removing the clause.
-
Click REMOVE.
