This page provides guidance on how to configure your system, authentication, and integration settings and monitor system activity in the Appian Administration Console (the Admin Console). The Admin Console is where system administrators can update certain configuration properties through the web interface. Users must be system administrators to make changes in the Admin Console.
To access the Admin Console in your Appian environment, open the navigation menu , then select Admin Console.
Only system administrators can access the Admin Console and make changes to the configurations. The Administrator user is specifically prohibited from accessing the Admin Console in order to ensure that all changes can be traced to a specific named user rather than a shared account.
All changes made through the Admin Console are logged to an audit log. The log captures the username of the user that made the change, along with the previous and new values of the changed property.
See also: Appian Admin Console Logging
The following pages relate to system administration.
The Branding page allows you to manage the name, logos, and colors that appear throughout the Tempo interface. The branding settings only apply to the web interface. For branding of the mobile interfaces see the Custom Mobile Applications documentation.
Note: Clicking the SAVE CHANGES button will cause the updated values to become live in the system. As a best practice, experiment with various color configurations in a development environment before applying them to a production system.
All branding modifications result in an audit log message with the username of the user who made the change, the previous values, and the new values.
Note that the Branding configurations only apply to Tempo. To learn about custom styling for embedded interfaces, see Themes.
Logo.#416b88.#ffffff.#f8e85b.#222222.#1d659c.#ebf1f7.#1d659c.#1d659c.#666666.#ffffff.The Data Retention page allows you to manage the following settings:
Allow News Entry Deletion - Allow users to delete news entries and social tasks that they have authored, as long as nobody has commented. The default is that news entry deletion is allowed.
Enable Periodic Cleanup of Deployment Packages - Allow deployment packages (ZIP files) to be automatically deleted after the specified number of days. The default is 30 days. Appian recommends setting 30 days or less for package cleanup to ensure optimum disk space.
The File Upload page allows customers to manage the following settings:
Note: Appian applies these settings exclusively to files uploaded via the File Upload component. Files uploaded to Appian through other methods do not use these settings.
File type verification can be toggled on and off through the checkbox labeled "Block any file with an extension that does not match the underlying file type". To fully leverage this powerful feature, we recommend enabling it in coordination with a list of extensions to allow rather than a list of extensions to block. We recommend this for two reasons:
The Internationalization page allows you to set the primary locale and time zone displayed to users. This page also controls the calendar types and locales that are enabled for the environment.
The locale settings affect the language of Appian-generated text and the format of dates, times, and numbers. It does not affect text that is configured by developers in design objects.
The table below lists the default locales available for selection. Text is only translated in the interfaces listed below, as supported. When a new version of Appian adds support for a new locale, the translated interfaces may only include support for the Tempo and Mobile interfaces.
| Locale | Locale Code | Interface Support | ||
|---|---|---|---|---|
| Tempo/Mobile | Admin Console | Appian Designer | ||
| Arabic | [ar] | Yes/No | Yes | Yes |
| Chinese (Simplified) | [zh_CN] | Yes | Yes | Yes |
| Chinese (Traditional) | [zh_HK] | Yes | Yes | Yes |
| Dutch (Netherlands) | [nl] | Yes | Yes | Yes |
| English (United Kingdom) | [en_GB] | Yes | Yes | Yes |
| English (United States) | [en_US] | Yes | Yes | Yes |
| French (Canada) | [fr_CA] | Yes | Yes | Yes |
| French (France) | [fr_FR] | Yes | Yes | Yes |
| French (Switzerland) | [fr_CH] | Yes | Yes | Yes |
| German (Germany) | [de] | Yes | Yes | Yes |
| Greek (Greece) | [el] | Yes | Yes | Yes |
| Hebrew | [iw] | Yes/No | Yes | Yes |
| Italian (Italy) | [it] | Yes | Yes | Yes |
| Japanese (Japan) | [ja] | Yes | Yes | Yes |
| Korean (South Korea) | [ko] | Yes | Yes | Yes |
| Polish (Poland) | [pl] | Yes | Yes | Yes |
| Portuguese (Brazil) | [pt] | Yes | Yes | Yes |
| Russian (Russia) | [ru] | Yes | Yes | Yes |
| Spanish (Mexico) | [es] | Yes | Yes | Yes |
| Swedish (Sweden) | [sv] | Yes | Yes | Yes |
| Thai | [th] | Yes | Yes | Yes |
| Turkish | [tr] | Yes | Yes | Yes |
Enabling a locale makes it available for users to select as their locale setting. To enable a locale, select it from the Enabled Locales dropdown, then click SAVE CHANGES.
When enabling locale settings, consider:
Appian must have at least have one locale enabled. If no locales are selected, you must enable at least one locale before you can save your changes.
For Appian Mobile applications, start and task forms appear in the locale preference set in Appian, News feed entries appear in the locale they were entered, and the remaining aspects of the mobile application, such as button names and titles, are determined by the device's language setting. The device's language setting does not need to be enabled as a locale in Appian to translate the button names correctly.
The Process Modeler is translated to the developer's preferred locale, except for the following areas: the node and smart service palette, the font palette, and some validation messages.
When locale is set to Arabic, the interface displays from right-to-left rather than left-to-right and default alignment for interface components and grid columns is right rather than left.
Non-SAIL interfaces used in (Application Portal [Deprecated]) support all languages except Arabic and Hebrew.
To disable a locale, remove the check from the corresponding entry in the Enabled Locales dropdown list.
If a user's preferred locale is set to a locale you have disabled, the primary locale for the environment displays to the user instead. Users then can select a new preferred locale from one of the remaining locales that are enabled for your environment.
To specify a primary locale for your environment, select a locale from the Primary Locale dropdown list. The primary locale is used for users who have not selected their own preferred locale. Note that only enabled locales are listed here.
To use the primary locale for all users regardless of their preferred locale, select the Always override users' selected locale checkbox.
Note: Selecting the Always override users' selected locale checkbox ensures that user preferences are never enforced. Irrespective of user preferences, the primary setting is then always applied.
The preferred locale setting governs the format of dates and numbers that are displayed by the system. For example, if the preferred locale is set to English (US) [en_US], the date is displayed with the month preceding the day. The same date, when the preferred locale is set to Spanish [es], is displayed with the day preceding the month.
The following table lists the date and time formats used when a certain default locale is selected (or is the only enabled locale).
| Preferred Locale | Date and Time Format | Example |
|---|---|---|
| US English (en_US) | Month Day, Year Hour:Minute AM/PM | Dec 15, 2010 3:32 PM |
| UK English (en_GB) | Day Month Year Hour:Minute | 15 Dec 2010 15:32 |
| French (ca_FR) | Year-Month-Day Hour:Minute | 2010-12-15 15:32 |
| Spanish (es_MX) | Day/Month/Year Hour:Minute | 15/12/2010 15:32 |
Hours displayed in US English use a 12-hour clock with an AM or PM designation.
The separators between digits in a number change based on the preferred locale. For example, if the preferred locale is English (US) [en_US], a comma (,) is used as a separator (1,000). If however, the preferred locale is set to German [de]), a full stop (.) is used as the separator (1.000).
According to the US Naval Observatory, the Gregorian calendar is the internationally accepted civil calendar. This is the default calendar used in Appian.
To change the default Gregorian calendar to a different calendar, select a calendar from the Primary Calendar dropdown list. Options include the calendars listed below.
Islamic calendars
You can select from three Islamic calendars, which use slightly different leap year patterns and different means for calculation.
| Type | Leap Years | Description |
|---|---|---|
| 1 | 2 5 7 10 13 16 18 21 24 26 29 | Kūshyār ibn Labbān (11th cent. CE) Ulugh Beg (15th cent. CE) Similar to the "Kuwaiti algorithm" |
| 2 | 2 5 7 10 13 15 18 21 24 26 29 | Most Commonly Used |
| Um Al Qura Calendar تقويم أم القرى |
Not applicable | Based on observation or astronomical calculation. |
The leap year patterns are based on the following logic:
The difference between calendar type 1 and type 2 centers on when the leap day is added.
The difference between the Type 1 and Type 2 leap-year schemes are shown in the following table, which lists the remainder for each year in the 30-year cycle.
| Year | Type 1 remainder | Type 2 remainder | Year | Type 1 remainder | Type 2 remainder | Year | Type 1 remainder | Type 2 remainder |
|---|---|---|---|---|---|---|---|---|
| 1 | 11/30 | 11/30 | 11 | 1/30 | 1/30 | 21 | 7/10 * | 7/10 * |
| 2 | 22/30 * | 22/30 * | 12 | 2/5 | 2/5 | 22 | 1/15 | 1/15 |
| 3 | 1/10 | 1/10 | 13 | 23/30 * | 23/30 * | 23 | 13/30 | 13/30 |
| 4 | 7/15 | 7/15 | 14 | 2/15 | 2/15 | 24 | 4/5 * | 4/5 * |
| 5 | 5/6 * | 5/6 * | 15 | 1/2 * | 1/2 | 25 | 1/6 | 1/6 |
| 6 | 1/5 | 1/5 | 16 | -2/15 | 13/15 * | 26 | 8/15 * | 8/15 * |
| 7 | 17/30 * | 17/30 * | 17 | 7/30 | 7/30 | 27 | -1/10 | -1/10 |
| 8 | -1/15 | -1/15 | 18 | 3/5 * | 3/5 * | 28 | 4/15 | 4/15 |
| 9 | 3/10 | 3/10 | 19 | -1/30 | -1/30 | 29 | 19/30 * | 19/30 * |
| 10 | 2/3 * | 2/3 * | 20 | 1/3 | 1/3 | 30 | 0 | 0 |
Islamic calendar epoch
The epoch defines the starting point of the Calendar (the first day of year one). The following epochs can be selected for Islamic Type 1 and 2 calendars.
| Epoch | Day 1 / Year 1 | Description |
|---|---|---|
| A | 15/July/622 CE/Julian | Thursday or Astronomical Epoch |
| B | 16/July/622 CE/Julian | Friday or Civil Epoch |
To override all users' preferred calendar settings with the primary calendar, select the Always override users' selected calendar checkbox when selecting the primary calendar.
Note: Selecting the Always override users' selected calendar checkbox ensures that user preferences are never enforced. Irrespective of user preferences, the primary setting is then always applied.
Locale preferences and time zone preferences affect how dates and times may be displayed. For example, a process start time of Oct 12, 2011 at 5:00 pm Eastern is displayed differently for a user with Spanish locale and Central time zone preferences.
| Process start time | User's Preferred Setting | User's Preferred Time Zone | Displayed start time |
|---|---|---|---|
| Oct 12, 2011 at 5:00 PM Eastern Daylight Time | Spanish - Mexico | Ciudad de México (México) (America/Mexico_City) | 12/10/2011 at 4:00 PM GMT-05:00 |
As with locales, system administrators must also specify a primary time zone for the environment. At installation, the primary time zone is set to Greenwich Mean Time (GMT). To specify another primary time zone for the environment, select a time zone from the Primary Time Zone dropdown list. This recommended list is based on the selected locale. System adminstrators can override the default list of recommended time zones or add a list for a new locale by modifying the custom.properties file.
To override all users' preferred time zone settings with the primary time zone, select the Always override users' selected time zone checkbox.
When selecting a Continental US time zone, we recommend using the following settings.
A process model can take a specific time zone, which is used by each process spawned from the model. Alternatively, models can be configured to use the time zone preference of the user who starts the process model. This is set in the process model's properties.
Note: Selecting the Always override users' selected time zones checkbox ensures that user preferences are never enforced. Irrespective of user preferences, the primary setting is then always applied.
The Mobile page allows you to manage settings for your organization's mobile devices:
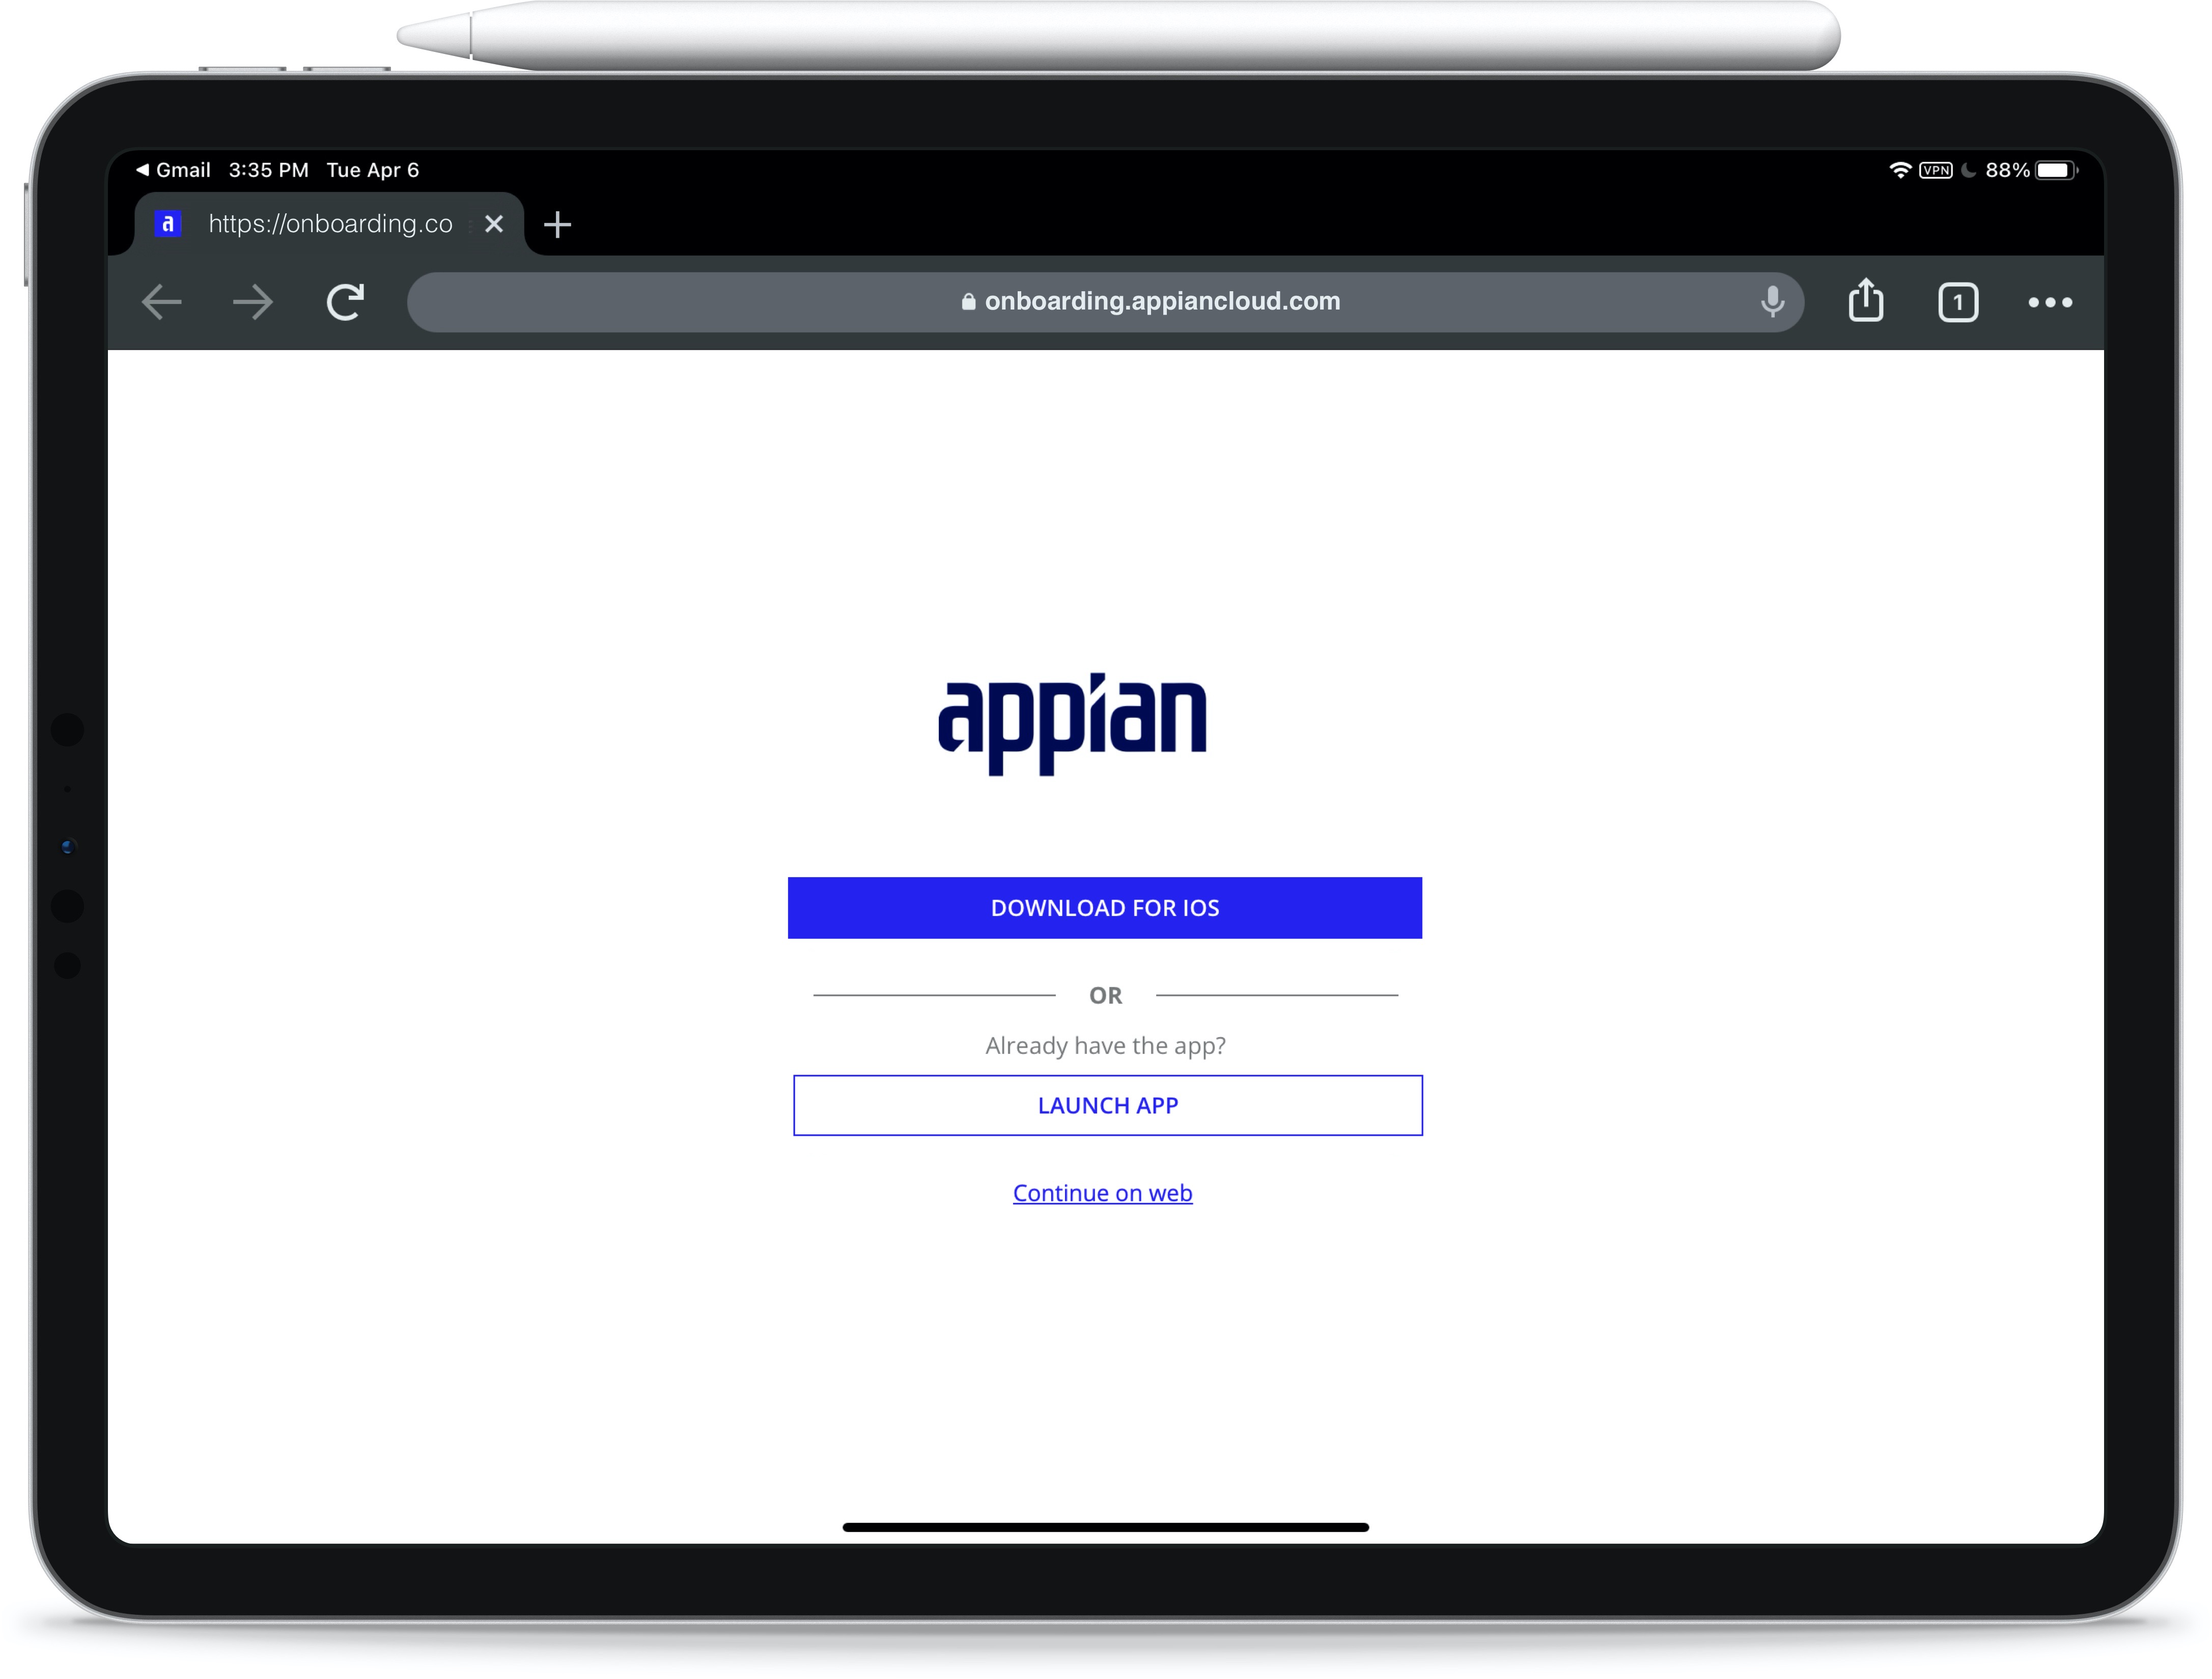
Prompt Users to Download App - Displays a redirect page to encourage users to open links in the native mobile application (if already installed), or to install the application. The logo and the button accent color can be configured by changing the Logo and Accent Color on the Branding page.
Android App Download Link - Download URL for the Android application. The default URL is the Appian Mobile Android application on the Google Play Store.
Note: The redirect page will not be displayed from the Safari browser running on iPadOS, due to a change made by Apple that makes Safari running on an iPad indistinguishable from Safari running on a desktop.
The Permissions page allows you to control user actions to various actions on Tempo.
The User Profile section allows you to specify what information users are allowed to update from their user profiles, and whether users will be able to see the profile details of other users.
The fields that are set to be not editable here are displayed but disabled to users in their user profiles. Each checkbox on the page corresponds to a set of user profile fields as follows:
If this option is selected (the default) users will be able to see the profile details of a user if that user's role map has no viewers configured and notification emails sent by Appian will include users' display names. If unselected, no users will see that user's details unless they are explicitly added in the viewers role of that user and notification emails sent by Appian will only include users' usernames, not their display names. Regardless of the value given for this property, if the viewers role is non-empty, only those users set in the viewers role will be able to see that user's profile details.
Update Quick Apps settings on the Permissions page in the Admin Console. This section contains the configurations to enable Quick App creation.
This link opens the Quick App Creators group. Adding users to this role gives them access to the Quick Apps Designer.
The data source chosen in this dropdown is the location where tables will be generated and updated for new Quick Apps. No Quick Apps can be created until a value is selected here.
Changing this value will only affect new Quick Apps. Any existing Quick Apps will remain connected to the data source selected at the time they were created, even when the Quick App is updated from the Quick Apps Designer.
Note: The Appian user must have the following permissions to the connected data source for Quick Apps to work correctly: CREATE, ALTER, DROP, INSERT, UPDATE, and DELETE.
The Error Messages setting allows you to control the level of technical detail that you want to include in error messages that your basic users may encounter when working with expressions, interfaces, views, or actions. System administrators, and basic users in the (system) Designer group, will always see detailed error messages when working with these objects and components. Setting options are enabled or disabled; the default setting is enabled.
Enabling this setting provides basic users with detailed error messages that may include system information and object-specific information, like object references and details about why the expression error occurred. For example, the detailed error message below includes information about the expression error, the error type ID, the affected expression rule and parameter, and the code line where the error occurred.

Disabling this setting prevents basic users from having access to unwanted technical information. Instead, they will see a simplified error message that includes an identifier and instructions to contact the application administrator as shown below.

The application administrator should provide the system administrator with the Error Message Identifier so they can use it to view further details about the error in the Design Error log.
Note: Detailed error messages are always logged in the design_errors.csv log.
This section contains the configurations to control Tempo access.
This link opens the Tempo Users group. By default, all users can access Tempo. Removing members or membership rules from this group will prevent those users from accessing Tempo.
Note: All plug-ins are use-at-your-own-risk, and their functionality is not guaranteed by Appian. All plug-ins should be tested thoroughly. For more details about individual plug-ins, visit the Appian AppMarket.
The Plug-ins page lists all plug-ins that are available in the environment.
For each plug-in, the page provides the following information:
This plug-in information is provided by the plug-in manifest file when you install a plug-in.
If a user changes the access to a plug-in, then there will be an audit log message that will track the username of the user making the change, the previous value, and the new value.
In the Plug-ins page, you can:
View the version status of a plug-in.
Tip: You can also view the plug-in list and compare plug-ins across environments in the Objects view in Appian Designer.
For Appian Cloud customers, system administrators can add plug-ins that are approved for Appian Cloud and supported in your environment's version of Appian.
To add a plug-in:
When you add a plug-in this way, it deploys immediately to your environment. If the plug-in fails to deploy, check the Application Server logs for more information.
For Appian Cloud customers, the system automatically verifies your installed plug-ins against the applications listed in the AppMarket. The system then displays the results of this verification as version status indicators in the Version column of the plug-ins list.
Version statuses include:
| Version Status | Description | Indicator in List |
|---|---|---|
| Not listed in AppMarket | The system could not find the plug-in listed in the AppMarket. This means that either the plug-in was removed from the AppMarket or it was custom built by your organization. If your organization did not build this plug-in, we recommended removing it from your environment. | |
| Update available | The version installed in your environment is different than the latest version of the plug-in listed in the AppMarket. We recommend updating the plug-in to take advantage of security updates and enhancements. | |
| Up-to-date | The version installed in your environment matches the latest version of the plug-in listed in the AppMarket. |
To filter the plug-ins list by version status, use the VERSION STATUS filter in the toolbar.
The Encryption Service allows the plug-in to encrypt or decrypt values of type Encrypted Text.
By default, no plug-ins are allowed to access the Encryption Service. An administrator must explicitly grant access to each plug-in.
To enable Encryption Service for a plug-in:
Once access is granted, a shield icon displays next to the plug-in name, and all modules within the plug-in may use the Encryption Service.
This option is only available if you have enabled connected environments.
To compare a plug-in across environments:
Learn more about comparing objects across environments.
You can track deleted plug-ins in the deletions log.
To delete a plug-in:
The Sign-in Page Links page allows you to add custom links to the sign-in page. The links will appear on the sign-in page in the same order in which they are arranged in the Admin Console.
The maximum number of links is five and only links that use the http, https, or mailto protocols are allowed.
The Sites Typeface page allows you to add and preview up to nine custom typefaces for your sites on both web and mobile. Typefaces can only be customized for sites and only one typeface can be used at a time. Custom typefaces can be selected, edited, or removed.
To add a custom typeface:
Once you have added these files, you can preview each weight. Additional sets of files, called language groups, can also be added from this dialog.
The User Start Pages page allows you to configure which pages users start on when they first log into Appian or if they navigate to the base Appian URL with or without the application context (for example acme.appian.com or acme.appian.com/suite). Note that if a user navigates to a specific environment (for example Tempo) or page (for example a record view), they will not be redirected to their configured start page.
You can add rows to the grid to configure different groups of users to have different start pages. Only public and restricted groups can be selected, not personal groups. If a user belongs to multiple groups that have different start pages configured, his start page will be the highest one in the grid that corresponds to a group that he belongs to.
You can also configure the Default Start Page, which is the start page for all users who don't belong to any of the groups configured in the grid.
To minimize data entry errors, copy and paste start page URLs directly instead of typing them in manually.
Clicking the SAVE CHANGES button will cause the configured start pages to take effect in the system.
An audit log captures all historical values in this page.
See also: Appian Admin Console Logging
The following pages relate to authentication administration. Unless otherwise indicated in the setting section, these settings do not apply to users who authenticate through SAML.
The Appian Authentication page allows you to control password strength requirements and password expiration policies.
Appian hashes passwords using an industry standard hashing algorithm and only stores the hashed values of passwords. When passwords are entered, they are similarly hashed using the same algorithm, and the result is compared against the stored value.
The Password Format section allows setting the following:
1.A-Z and a-z) allowed in a password. The default is 0.a-z) allowed in a password. The default is 0.A-Z) allowed in a password. The default is 0.0.0. Special characters include: ! " # $ % & ' ( ) \* + , - . / : ; < = > ? @ [ \ ] ^ _ \` { | } ~0 and 24, inclusive. The default is 1, meaning that the user's current password may not be reused but that other previous passwords may be reused.The configurations in this section apply only to passwords managed by Appian and do not apply to accounts that authenticate with LDAP or SAML.
For information and details regarding the configuration of the Remember Me Authentication, see also: Remember Me Authentication
Appian Cloud installations have different default settings than self-managed installations. The following default password policies are in place for Appian Cloud users:
7 characters long.1 numeric character.1 letter.4 passwords used.The Remember Me section allows you to enable and disable remember me and set the length of time a user may go between logins. This configuration applies only to users who authenticate with Appian's native authentication or via LDAP and does not apply to users who authenticate against a SAML identity provider.
See also: Remember Me
Note: This setting also applies to sessions of users authenticating through SAML.
The Password Expiration section allows setting the following:
10080 minutes, which is one week.0. This setting does not affect temporary passwords or the ability for an administrator to reset a user's password.When a password expires, the user must change the password before they are allowed to proceed past the Appian log-in page.
The configurations in this section apply only to passwords managed by Appian and do not apply to accounts that authenticate with LDAP or SAML.
Appian Cloud installations have different default settings than self-managed installations. The following default password policies are in place for Appian Cloud users:
90 days.7 days before it happens.Initial passwords for Appian Cloud are temporary passwords. The system prompts users to reset their password immediately after logging into Appian Cloud.
The Forgot Password section allows setting the following:
Enable Forgot Password from Sign-In Page - Should users be able to reset their passwords from the sign-in page? If enabled, users will be able to reset their passwords by clicking the "Forgot your password?" link on sign-in page and following the steps provided.
Password Reset Link Duration (Minutes) - How long should password reset links be valid? A user following an expired link will need to re-enter their username to receive a new link before they can reset their password. When this value changes, the change is applied retroactively to existing links.
When this feature is enabled, only users that meet the following requirements will be able to reset their passwords:
If either SAML or LDAP are enabled for all users, the Enable Forgot Password from Sign-In Page checkbox will disabled and unchecked because when these authentication features are enabled, Appian does not have control over users' credentials. If, however, only some users authenticate through LDAP or SAML, the feature can be enabled, and the "Forgot your password?" link will appear on the sign-in page for all users.
Use import customization files to change the value between environments with different authentication configurations.
Use of this feature can be audited through the Forgot Password Requests and Password Resets audit logs.
User accounts that have difficulty supplying the proper credentials are temporarily locked (prevented from making a login attempt) when the user (or someone attempting to log in as the user) tries too many incorrect passwords. The system does this by keeping track of the number of failed login attempts for each account. The failed login count is reset automatically after some time has passed from the last failed attempt. This prevents the user from accumulating a large number of failed login attempts over a long period of time.
The Account Locking section allows setting the following:
6.30 minutes.30 minutes.Note: This setting also applies to sessions of users authenticating through SAML.
The failed login count is reset if the account is unlocked by an administrator.
When you specify a deactivation interval, that same interval must elapse before user accounts begin to be deactivated. For example, if you specify an inactivity deactivation interval of 90 (90 days) on April 1st, a user account that does not successfully log in between April 1st and June 30th is deactivated. In this scenario, a user account that has not logged in since January 1st also remains active until June 30th, as you did not activate the policy until 90 days after the user account became inactive.
User accounts that are deactivated due to inactivity are listed at the INFO level in db_PE_yyyy-mm-dd_hhmm.log in the <APPIAN_HOME>/logs/ directory.
The system user Administrator is never automatically deactivated.
Appian Cloud installations have different default settings than self-managed installations. The following default password policies are in place for Appian Cloud users:
Activity from the Appian Mobile applications does not count towards the number of active sessions a user has and the number of requests from the mobile applications.
See also:
The Terms of Service Agreement section allows you to set a message on the sign-in page that users must click to accept before entering the system.
When you change the terms of service, all Remember Me authentication sessions will be invalidated and users will need to input their username and password the next time they sign-in to Appian.
The LDAP Authentication page allows you to configure Appian to authenticate users against an external directory server, like Microsoft Active Directory, via LDAP rather than its native authentication.
In order to prevent you from locking yourself out of Appian, if your configuration requires that the user you are currently logged in as must authenticate via LDAP then you must successfully test your configuration using the "Test" button before saving it.
It is not possible to configure Appian such that a given user may authenticate with either LDAP or native Appian authentication. Each account may only authenticate against one or the other.
LDAP authentication settings cannot be imported or exported from the Admin Console.
The Maintenance Window page allows you to set a period of time to deploy application updates to your environment and write a message to display in a banner at the top of your site. During maintenance windows, all users except for system administrators will be logged out of the site, and a banner will display at the top of your site's login page for web and mobile.
The SAML Authentication page allows you to configure Appian to authenticate users against external SAML identity providers, like Microsoft ADFS or Shibboleth, rather than against Appian's native authentication.
When configuring your SAML identity provider, it is important to ensure that the metadata file uploaded to Appian is consistent with the configurations defined with the identity provider. Specifically, the entity ID or issuer ID in the uploaded IdP metadata file must match the issuer ID found in the SAML response. Appian requires the entity ID within IdP metadata files to be unique across multiple SAML configurations. Attempting to upload IdP metadata files containing identical entity IDs will result in an error and be prevented by the system. It is not recommended to manually modify an IdP metadata file, prior to uploading to Appian in order to circumvent this restriction, as this may result in users not being able to access Appian.
For more information see, SAML Authentication.
The Users page allows you to:
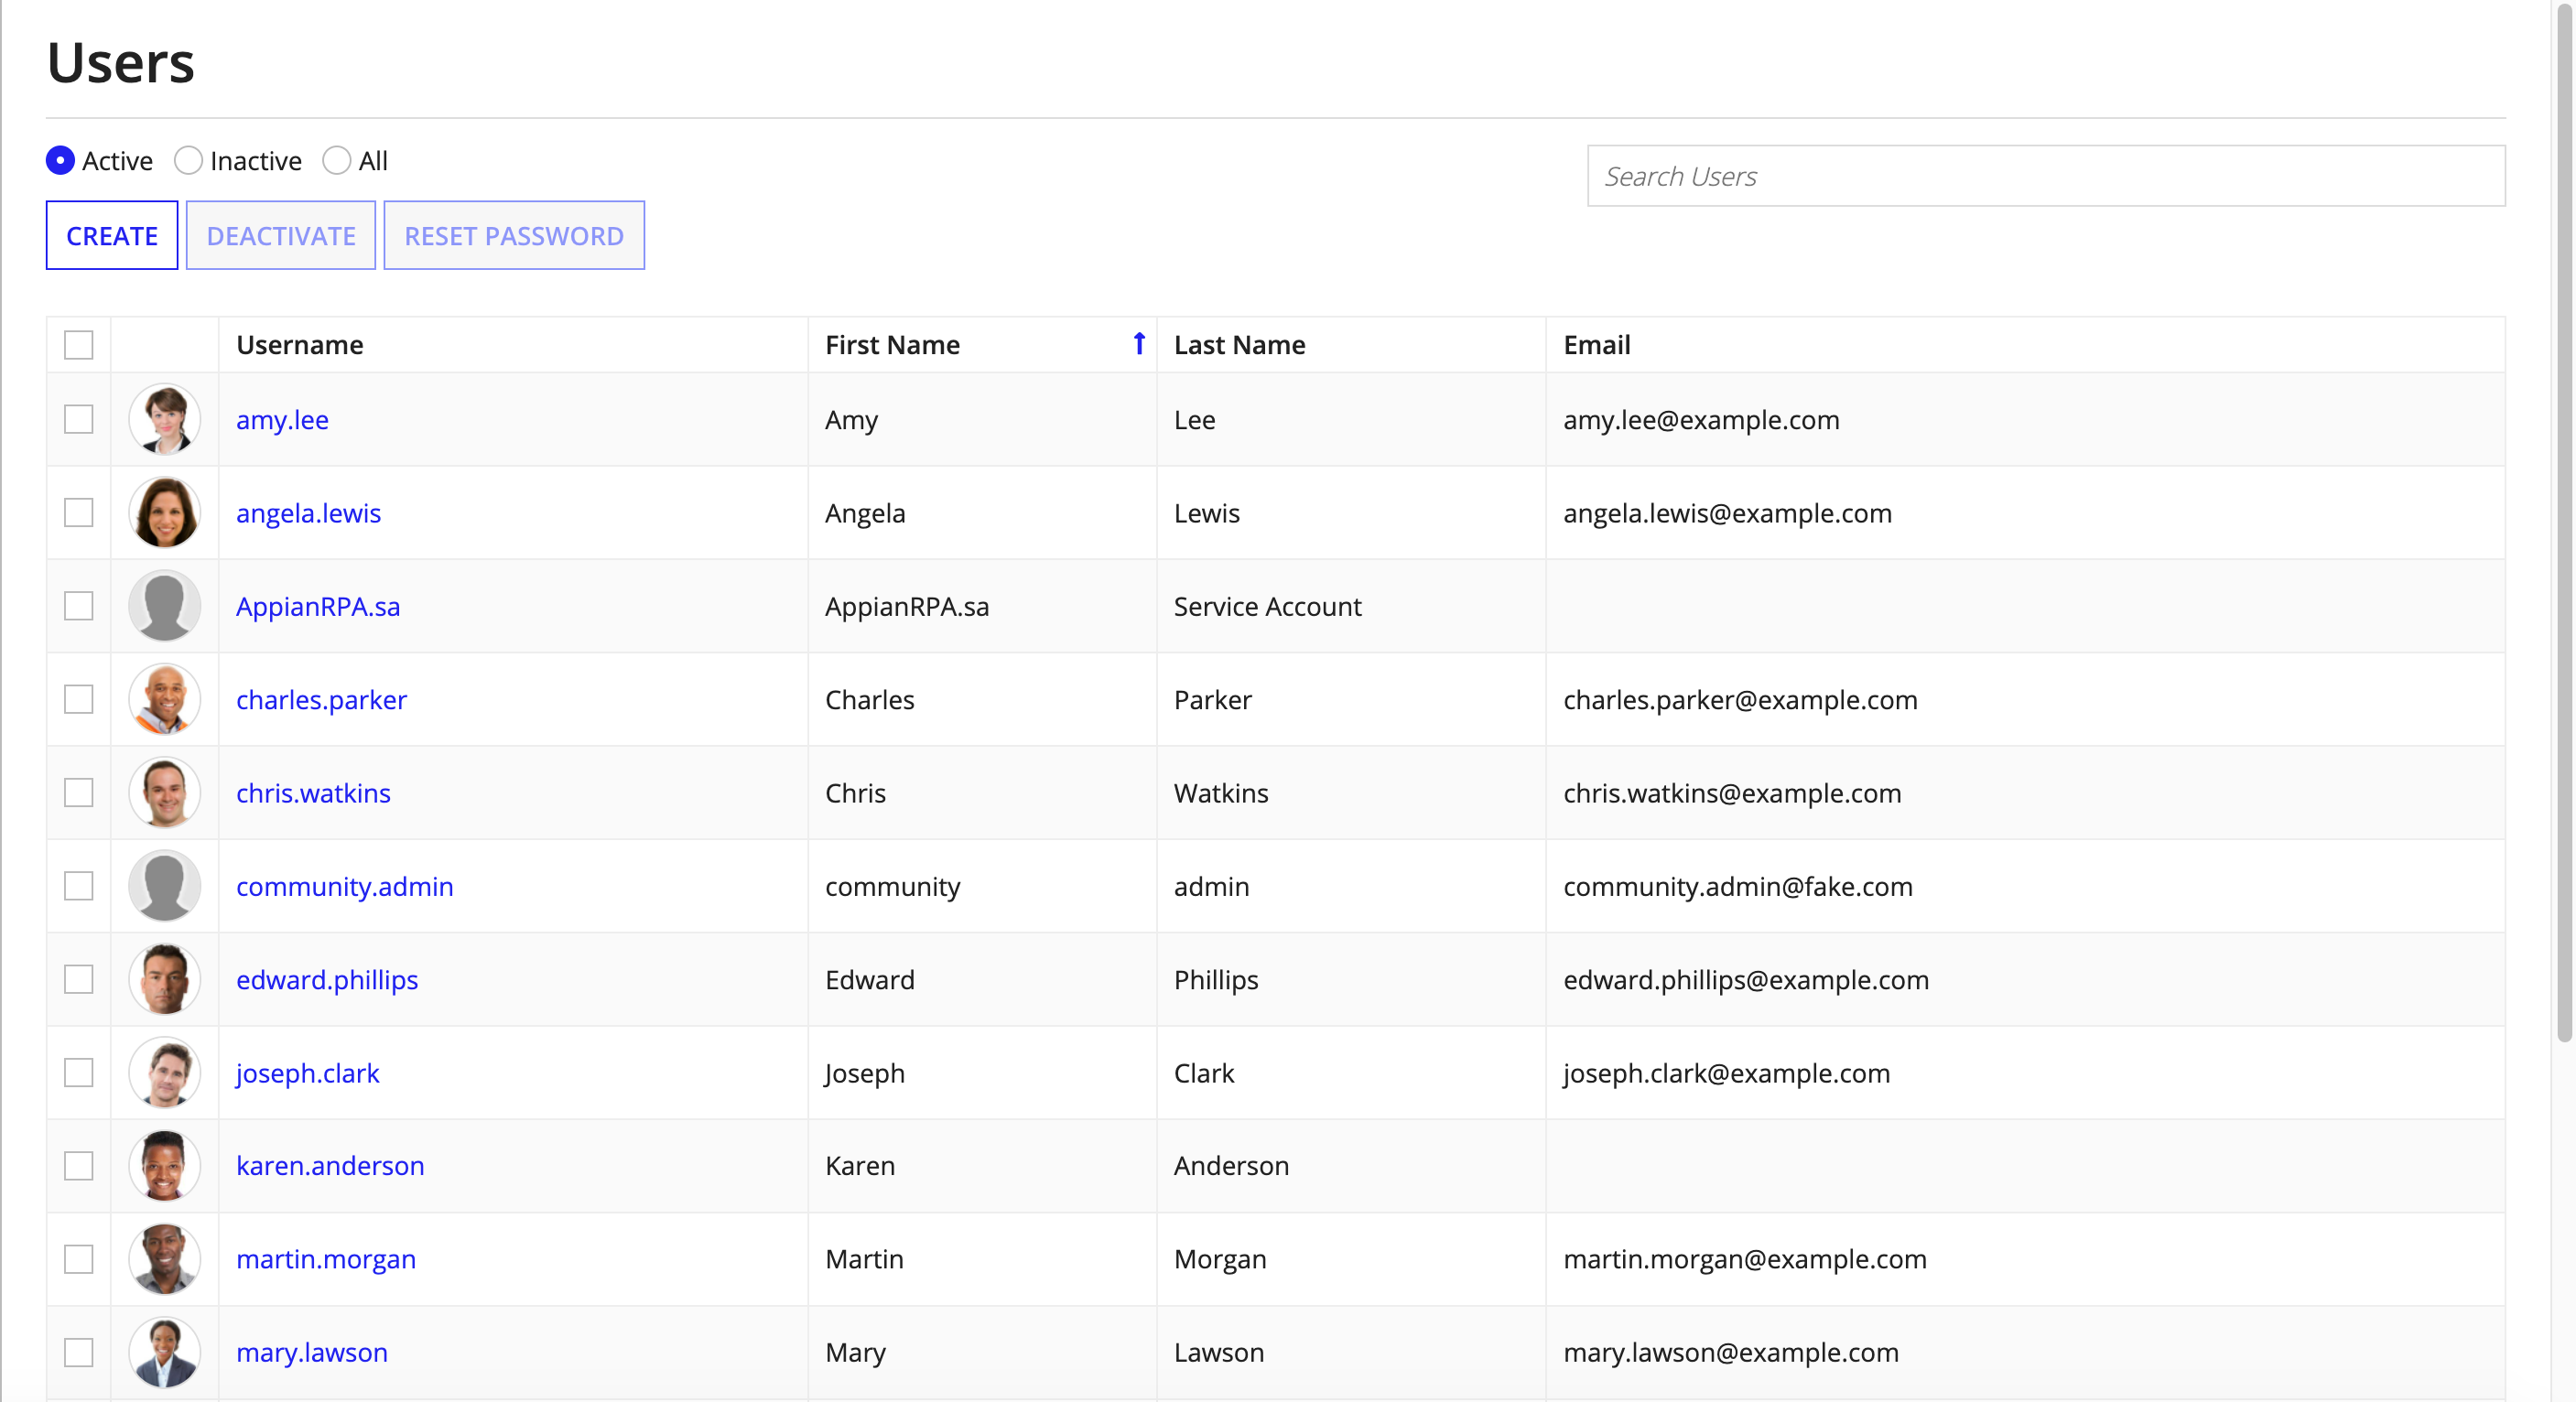
Users cannot be imported or exported from the Admin Console.
See also: User Management
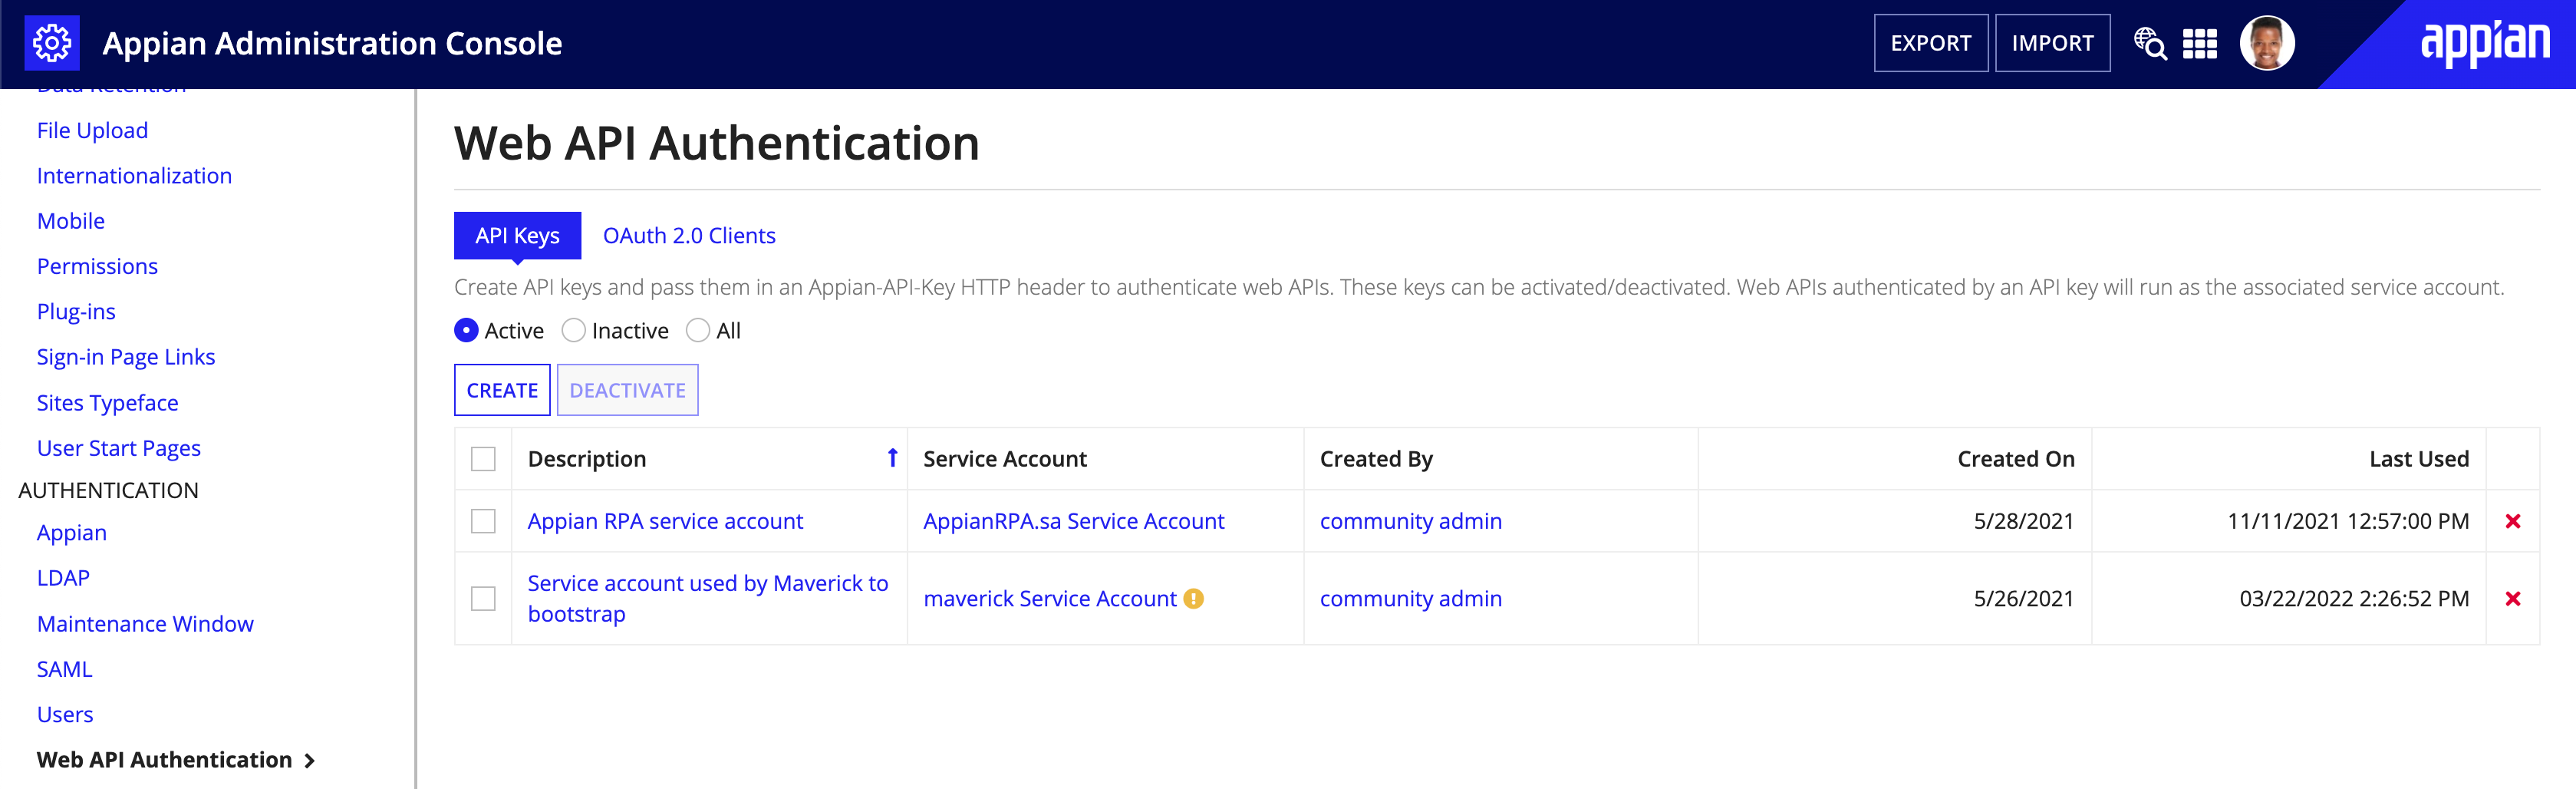
This page allows you to manage API keys and OAuth 2.0 clients, which can be used to invoke Appian Web APIs.
The API Keys tab allows you to create and manage API keys and Service Accounts, which can be used to invoke Appian Web APIs. This page allows you to:
To create a new API Key:
Note: "Service Account" will automatically be added to whatever username you enter. See Service accounts.
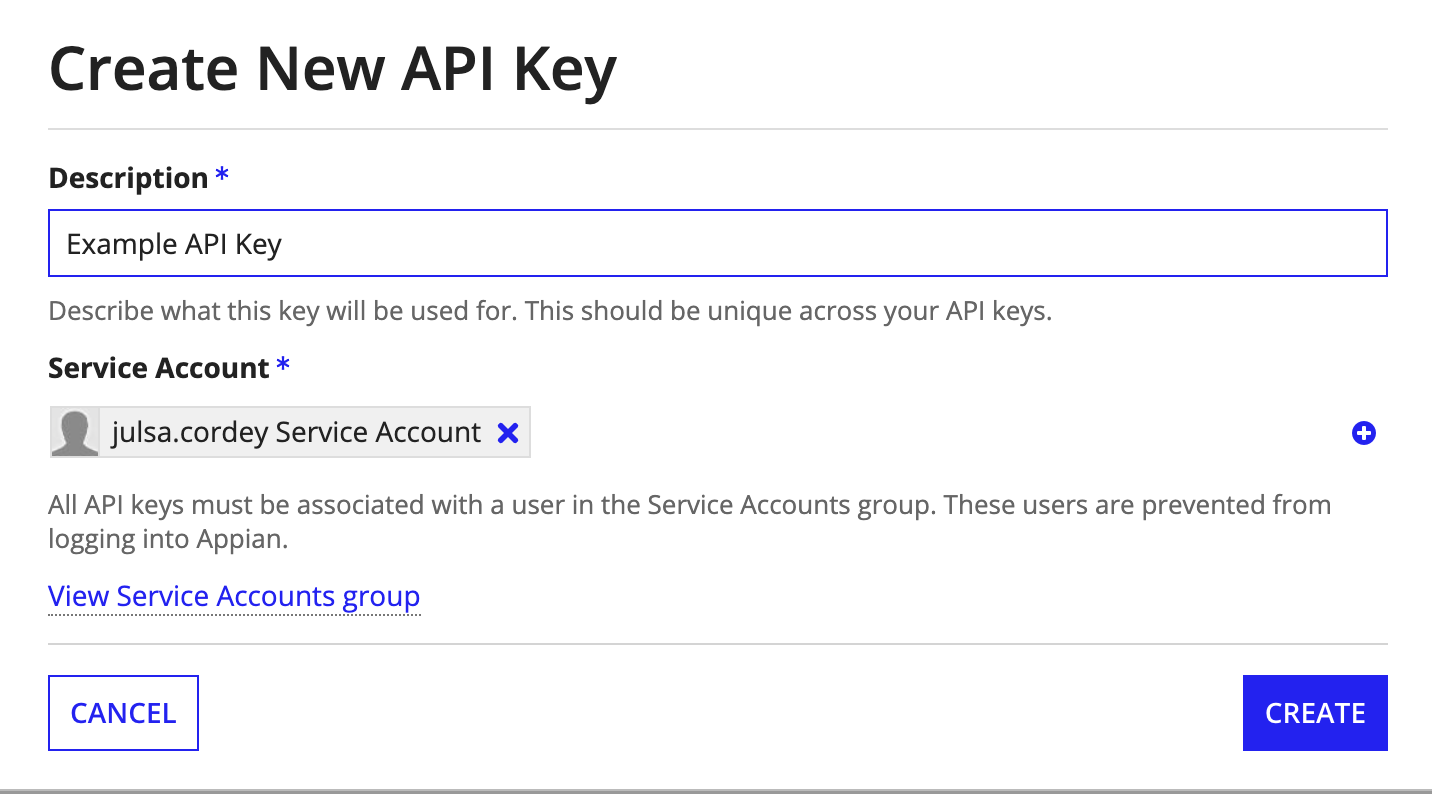
Note: When creating an API key, the API key should be tied to a service account with the same username and given the same description in each environment. API keys can only be used for the environment they're created in.
There are three ways to invalidate an API key:
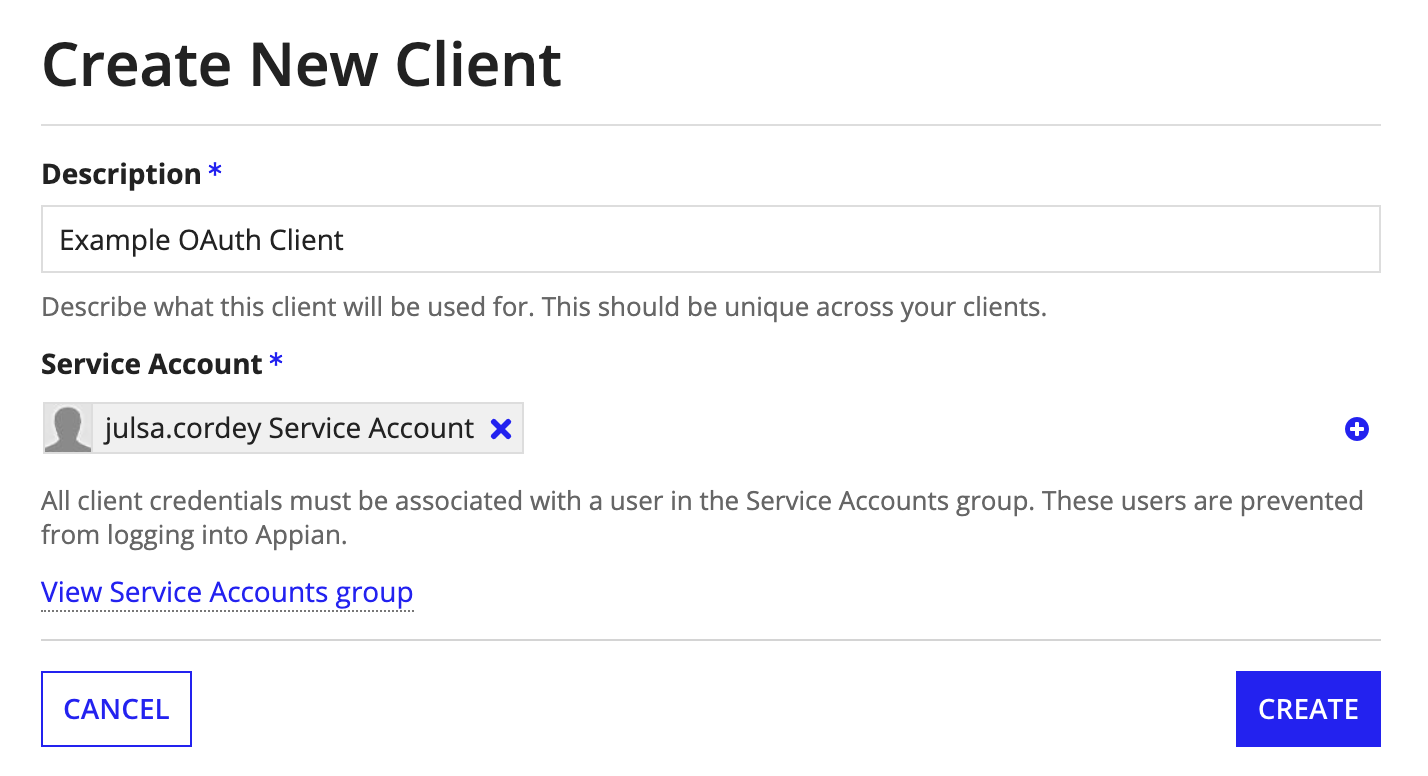
The OAuth 2.0 Clients tab allows you to create and manage OAuth 2.0 Clients and Service Accounts, which can be used to invoke Appian web APIs with the OAuth 2.0 Client Credentials grant. This page allows you to:

To create a new OAuth 2.0 client:
Note: "Service Account" will automatically be added to whatever username you enter. See Service accounts.
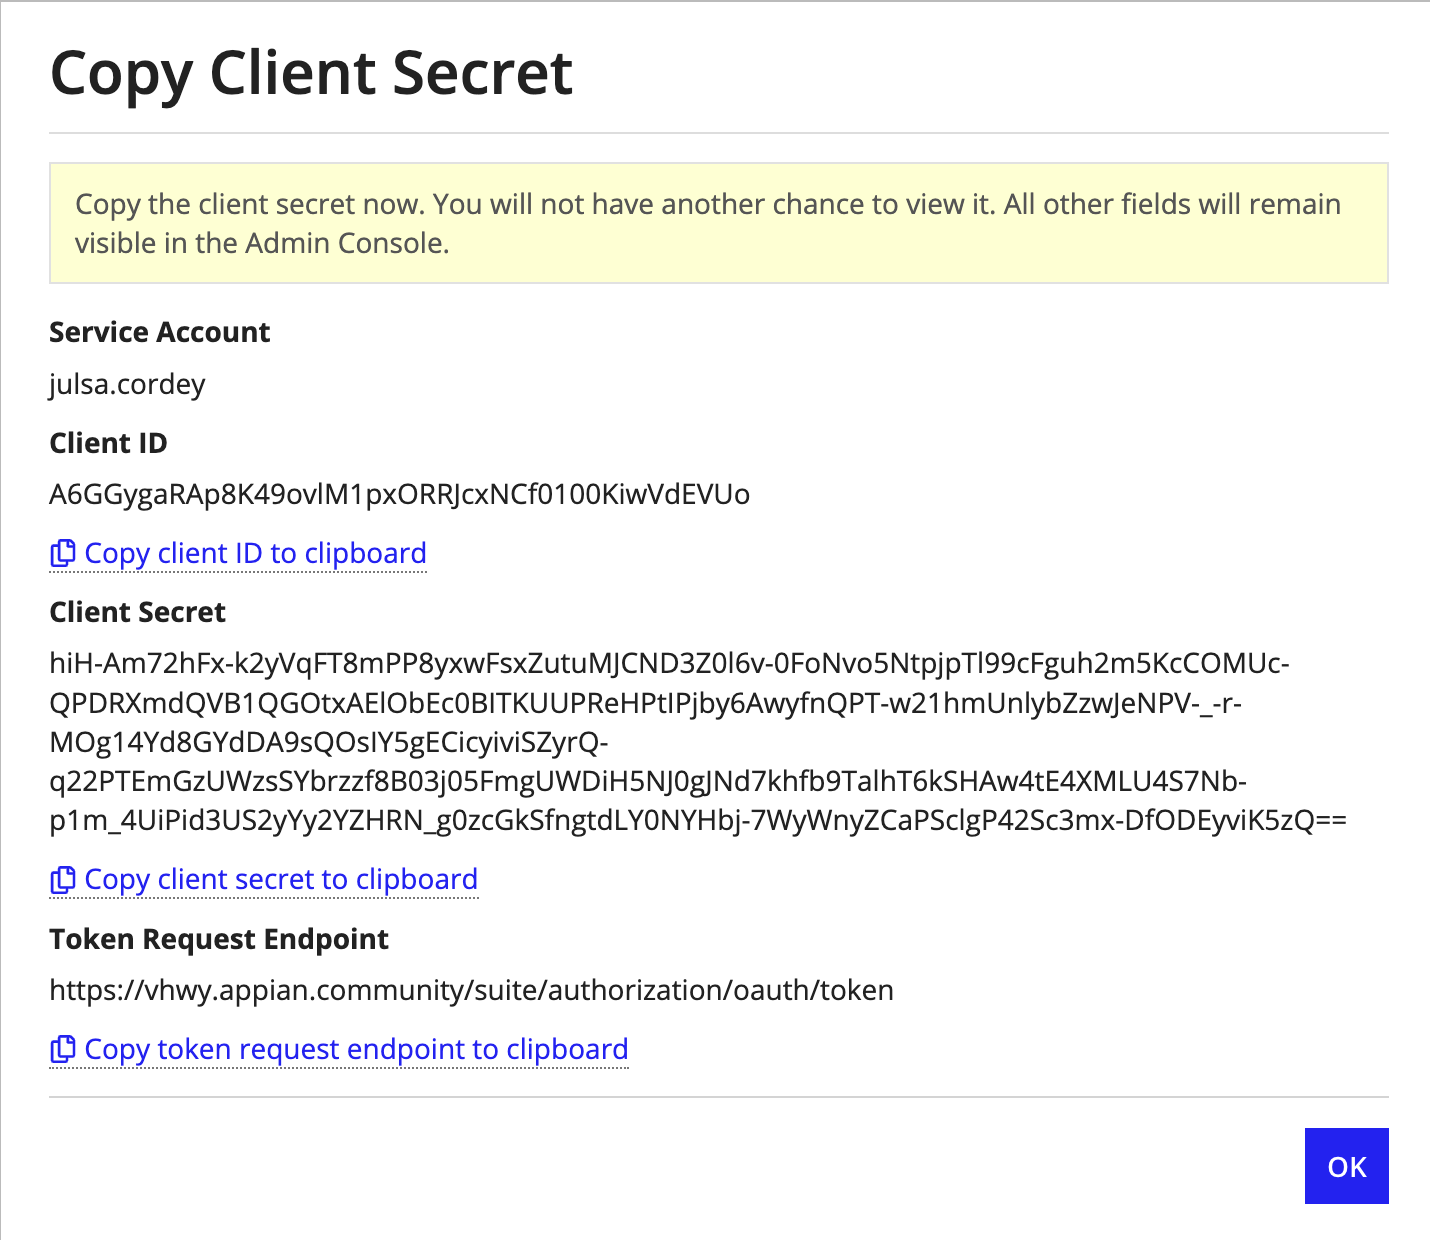
Note: When creating an OAuth 2.0 client, the client should be tied to a service account with the same username and given the same description in each environment. OAuth 2.0 clients can only be used for the environment they're created in.
There are three ways to invalidate an OAuth 2.0 client:
If you need to create a new service account, you can easily do so by clicking the plus icon to the right of the Service Account picker on the API key creation modal or the OAuth 2.0 client creation modal. This prompts you to provide a username.
Service accounts should be created in each environment with the same username and placed in the same groups so that permissions can be promoted to higher environments.
The created service account will have its first name set to the selected username and its last name set to "Service Account". It will be automatically assigned the Service Account role.
Existing users can be converted to service accounts by placing them in the Service Accounts system group. When a service account is removed from the system group or deactivated, all API keys and OAuth 2.0 clients associated with that service account cease to work. Although they won't work, these credentials will continue to exist until they are manually deleted.
Note: Your service account will need to be added to the proper groups in order to successfully call a web API with an API key or OAuth 2.0 client.
The following pages relate to features that support DevOps.
The Deployment page allows you to manage the following settings:
When enabled, test values saved in interface and expression rules are imported along with those objects. When not selected, interfaces and expression rules have their test values removed on import.
When enabled, automatic database schema updates will occur on data type update and data store import for appropriately configured data stores. When disabled, data stores' automatic database schema update configurations will be ignored, and automatic updates will never occur.
Note: Warning: Before enabling this setting, check with your database administrator to see if it is acceptable for Appian to automatically run DDL statements in this environment. If Appian does not have DDL privileges on the database level, automatic schema updates will fail, even if this feature is enabled.
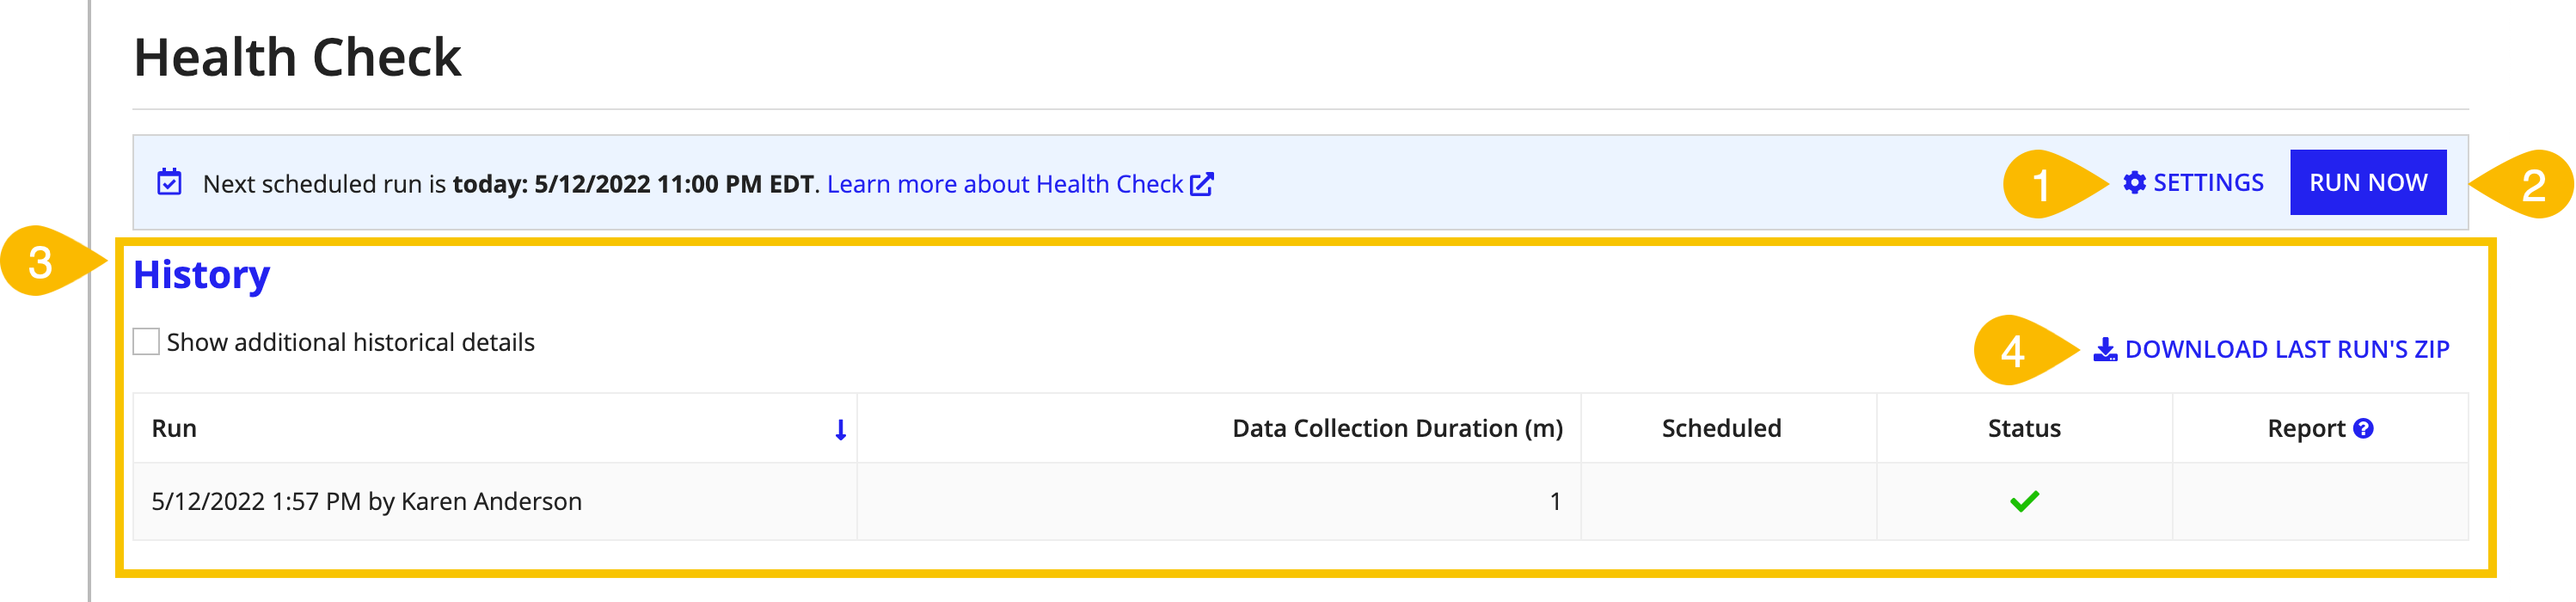
The Health Check page allows you to set up, schedule, and pull Health Check reports on your Appian environment.
Switching from the Plug-in to the Admin Console Health Check
If you are using the Appian Health Check plug-in, Appian will automatically uninstall the Health Check plug-in when you set up Health Check in the Admin Console.
If you want to pull Health Check reports using a Continuous Integration (CI) tool, such as Jenkins, you will need to create a web API that uses a!latestHealthCheck().
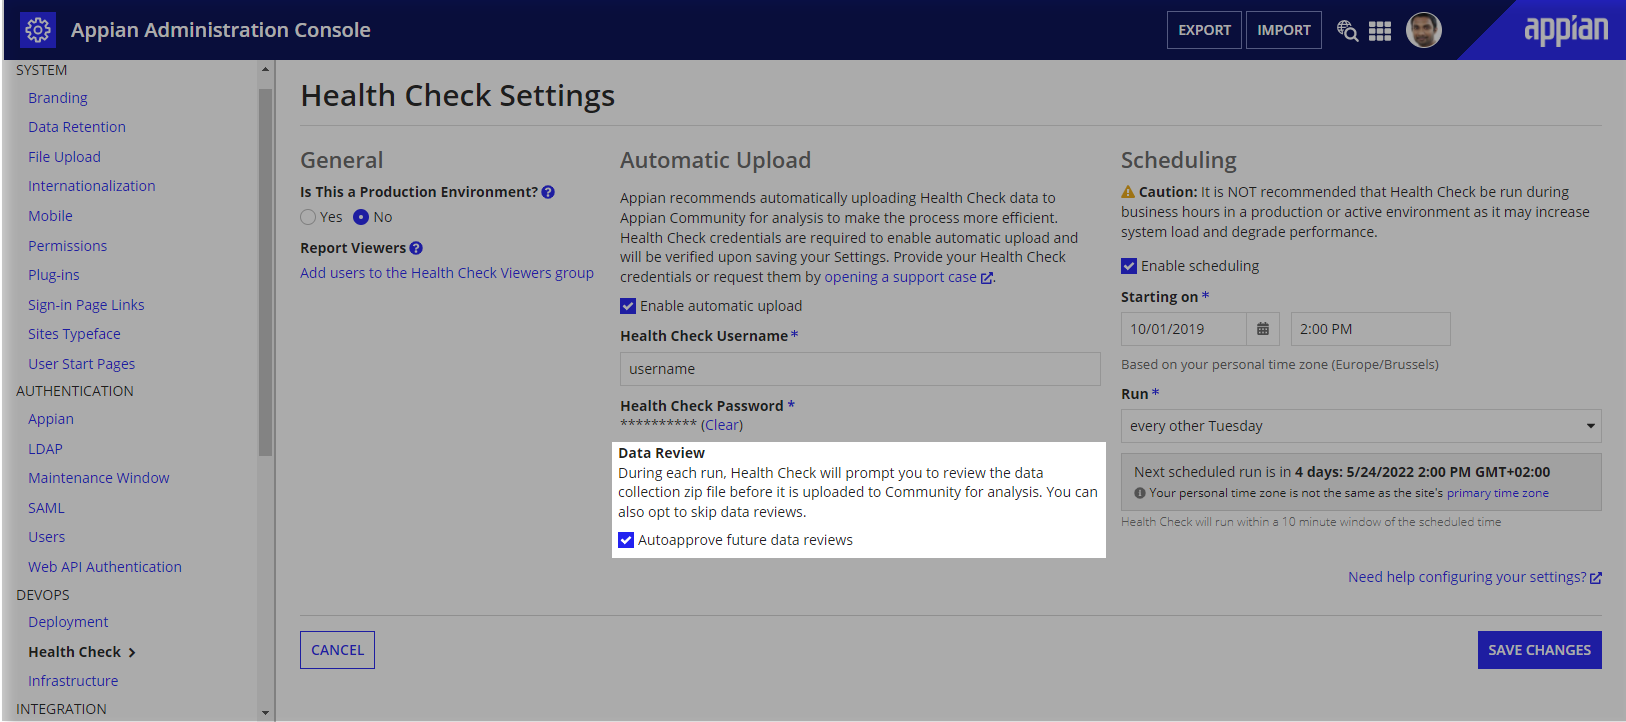
Health Check Settings are grouped into three sections:
A. General B. Automatic Upload C. Scheduling
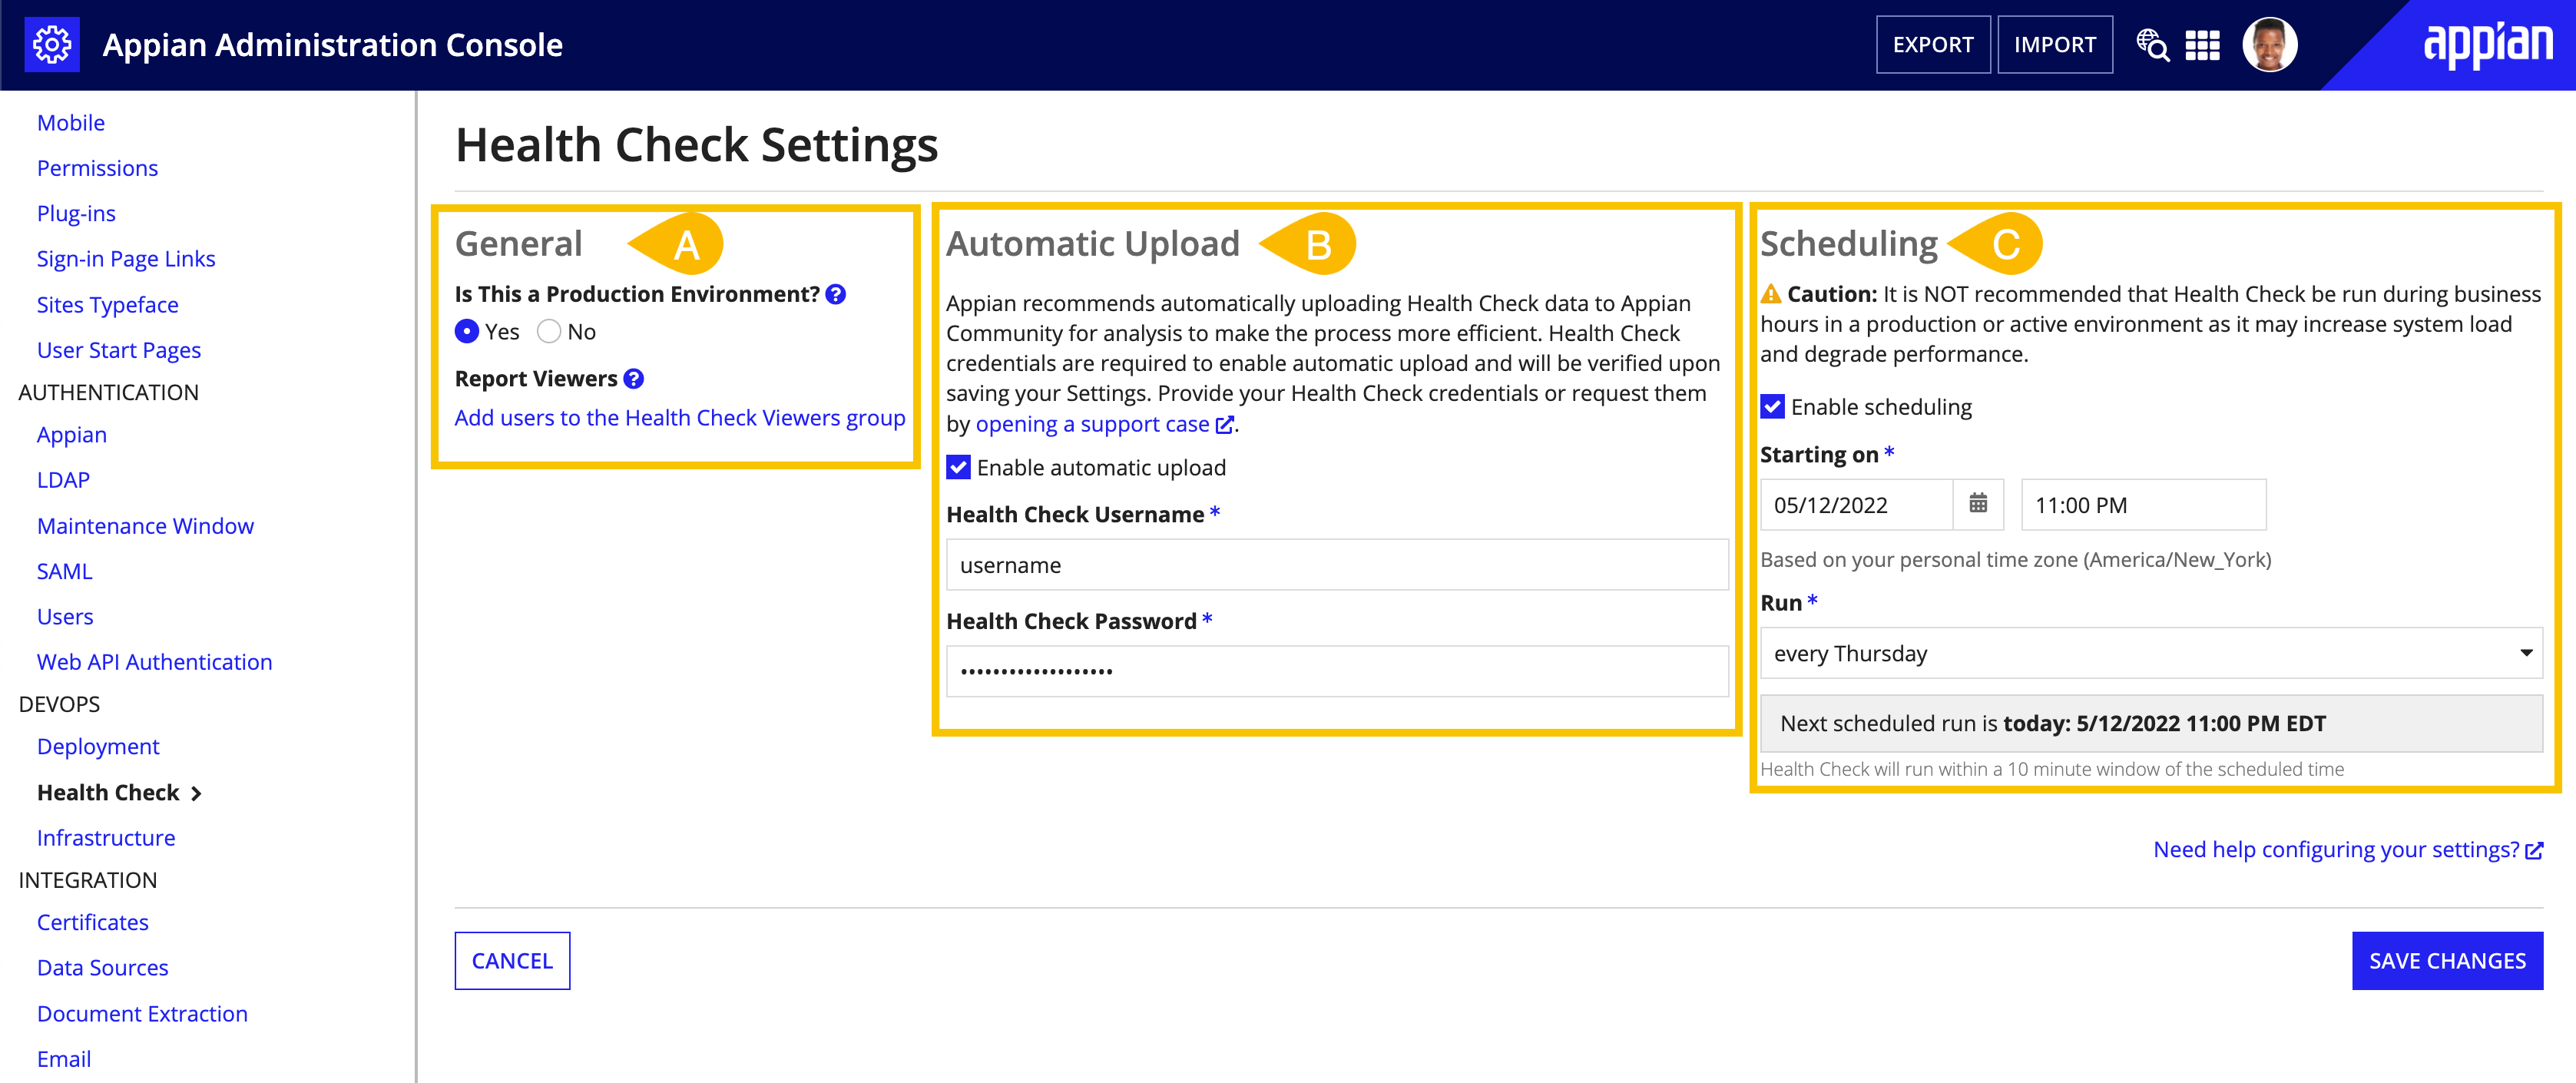

A - General
To help Health Check establish the correct risk level for various findings, specify whether your environment is a production environment.
The Health Check Viewers system group allows users to access the Health Check report from a News post and via email notifications. System administrators will always have access to the report from the Admin Console.
Note: Health Check reports generated when automatic upload is disabled will not be available from the Admin Console and News. Instead, the report will be emailed directly to the system administrator who uploaded the Health Check data to Community. For more information, see the Automatic Upload section below.
B - Automatic upload
Appian recommends enabling automatic upload to make your Health Check process more efficient. Automatic upload allows your environment to directly submit the data collection ZIP file to Appian Community when it is ready for analysis.
To enable automatic upload, Health Check credentials for Appian Community are required. The same credentials can be used across multiple environments within your organization. An authorized support contact can obtain Health Check credentials or reset the Health Check password in MyAppian.
To obtain credentials or reset the password:
Once you have your Health Check credentials, enter them in the Automatic Upload section.
If you previously configured third-party credentials for the Health Check plug-in, they are automatically detected and transferred over as Health Check credentials for the Settings page.
If you enable automatic upload, a data review will be required for the first Health Check run in each environment. During that review step, you will have the option to select Autoapprove this step for future runs and skip data reviews for future runs.
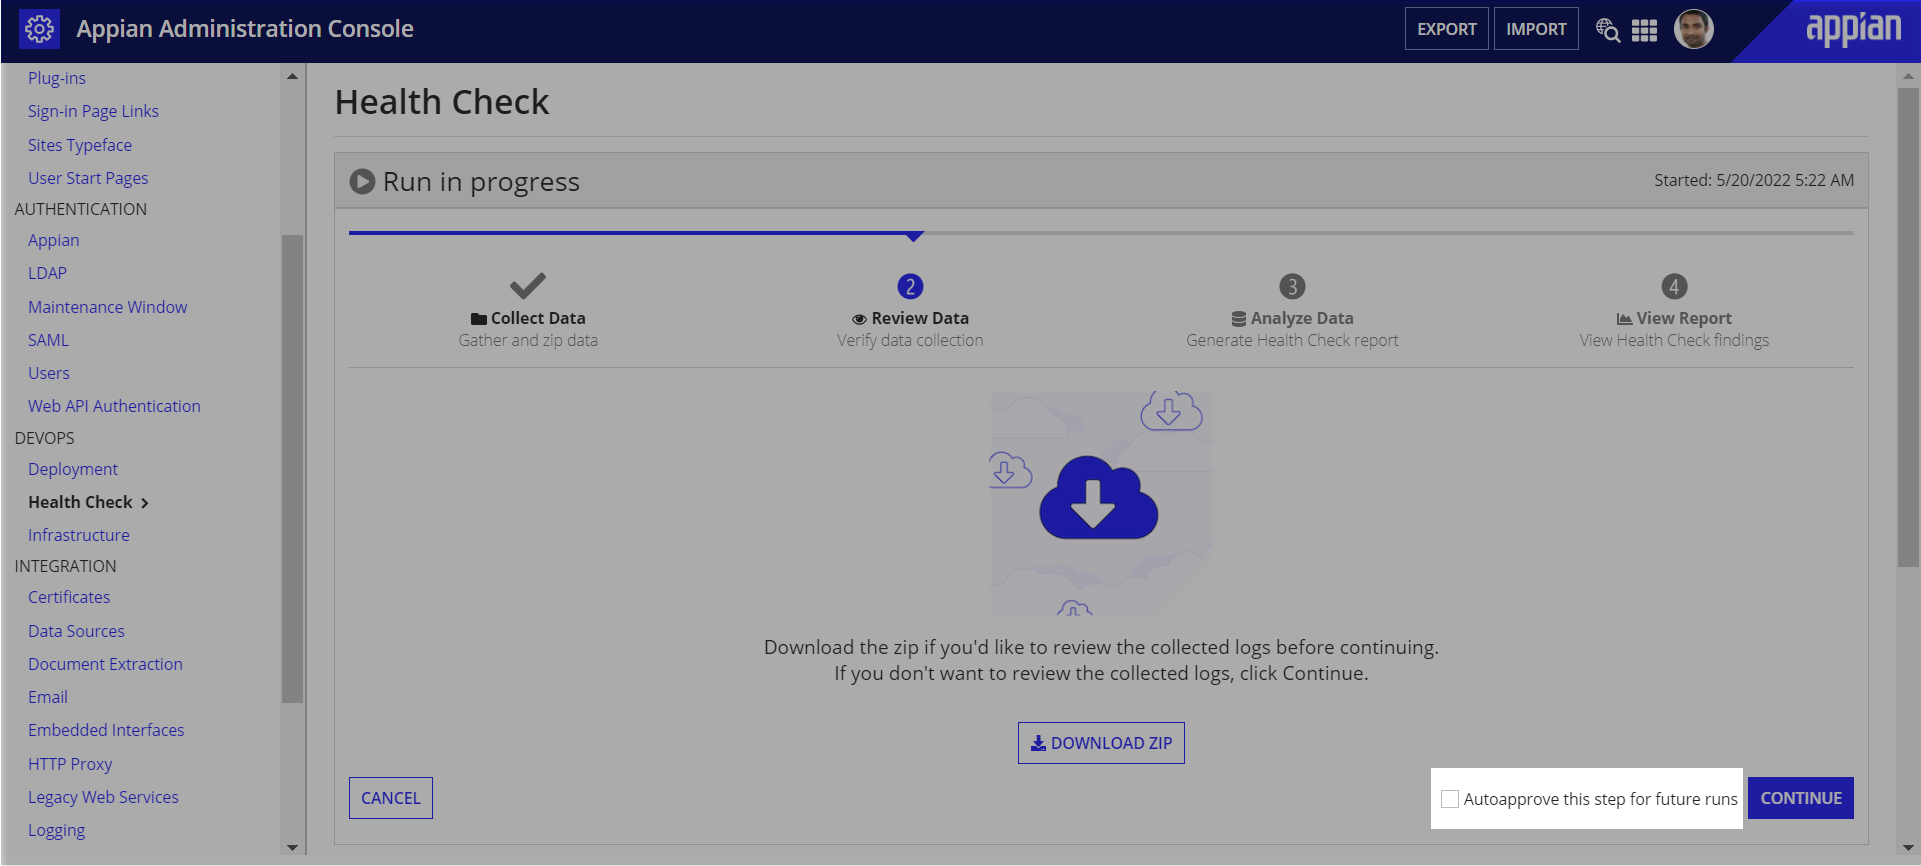
System administrators can disable autoapprove from the Automatic Upload section at any time after their first Health Check run.
If automatic upload is not enabled, a system administrator will need to manually download the data collection ZIP file, and upload it to Community for analysis during each run.
C - Scheduling
After enabling scheduling, you will be asked to provide the date and time of your first run, as well as how frequently you would like Health Check to run.
Appian recommends regularly scheduling Health Check, and running it during non-business hours in a production or active environment, as it may increase system load and degrade performance. You should also take into consideration the time zones of your primary Appian users when scheduling Health Check.
Health Check will run within a 10 minute window of the scheduled time. For example, if you schedule Health Check to run at 12:00 AM, it could start as late as 12:09 AM.
The Infrastructure page displays all the Appian environments in your organization and lets you control how those environments interact with each other. For example, you can let developers in your development environment compare and directly deploy application changes to their test environment.
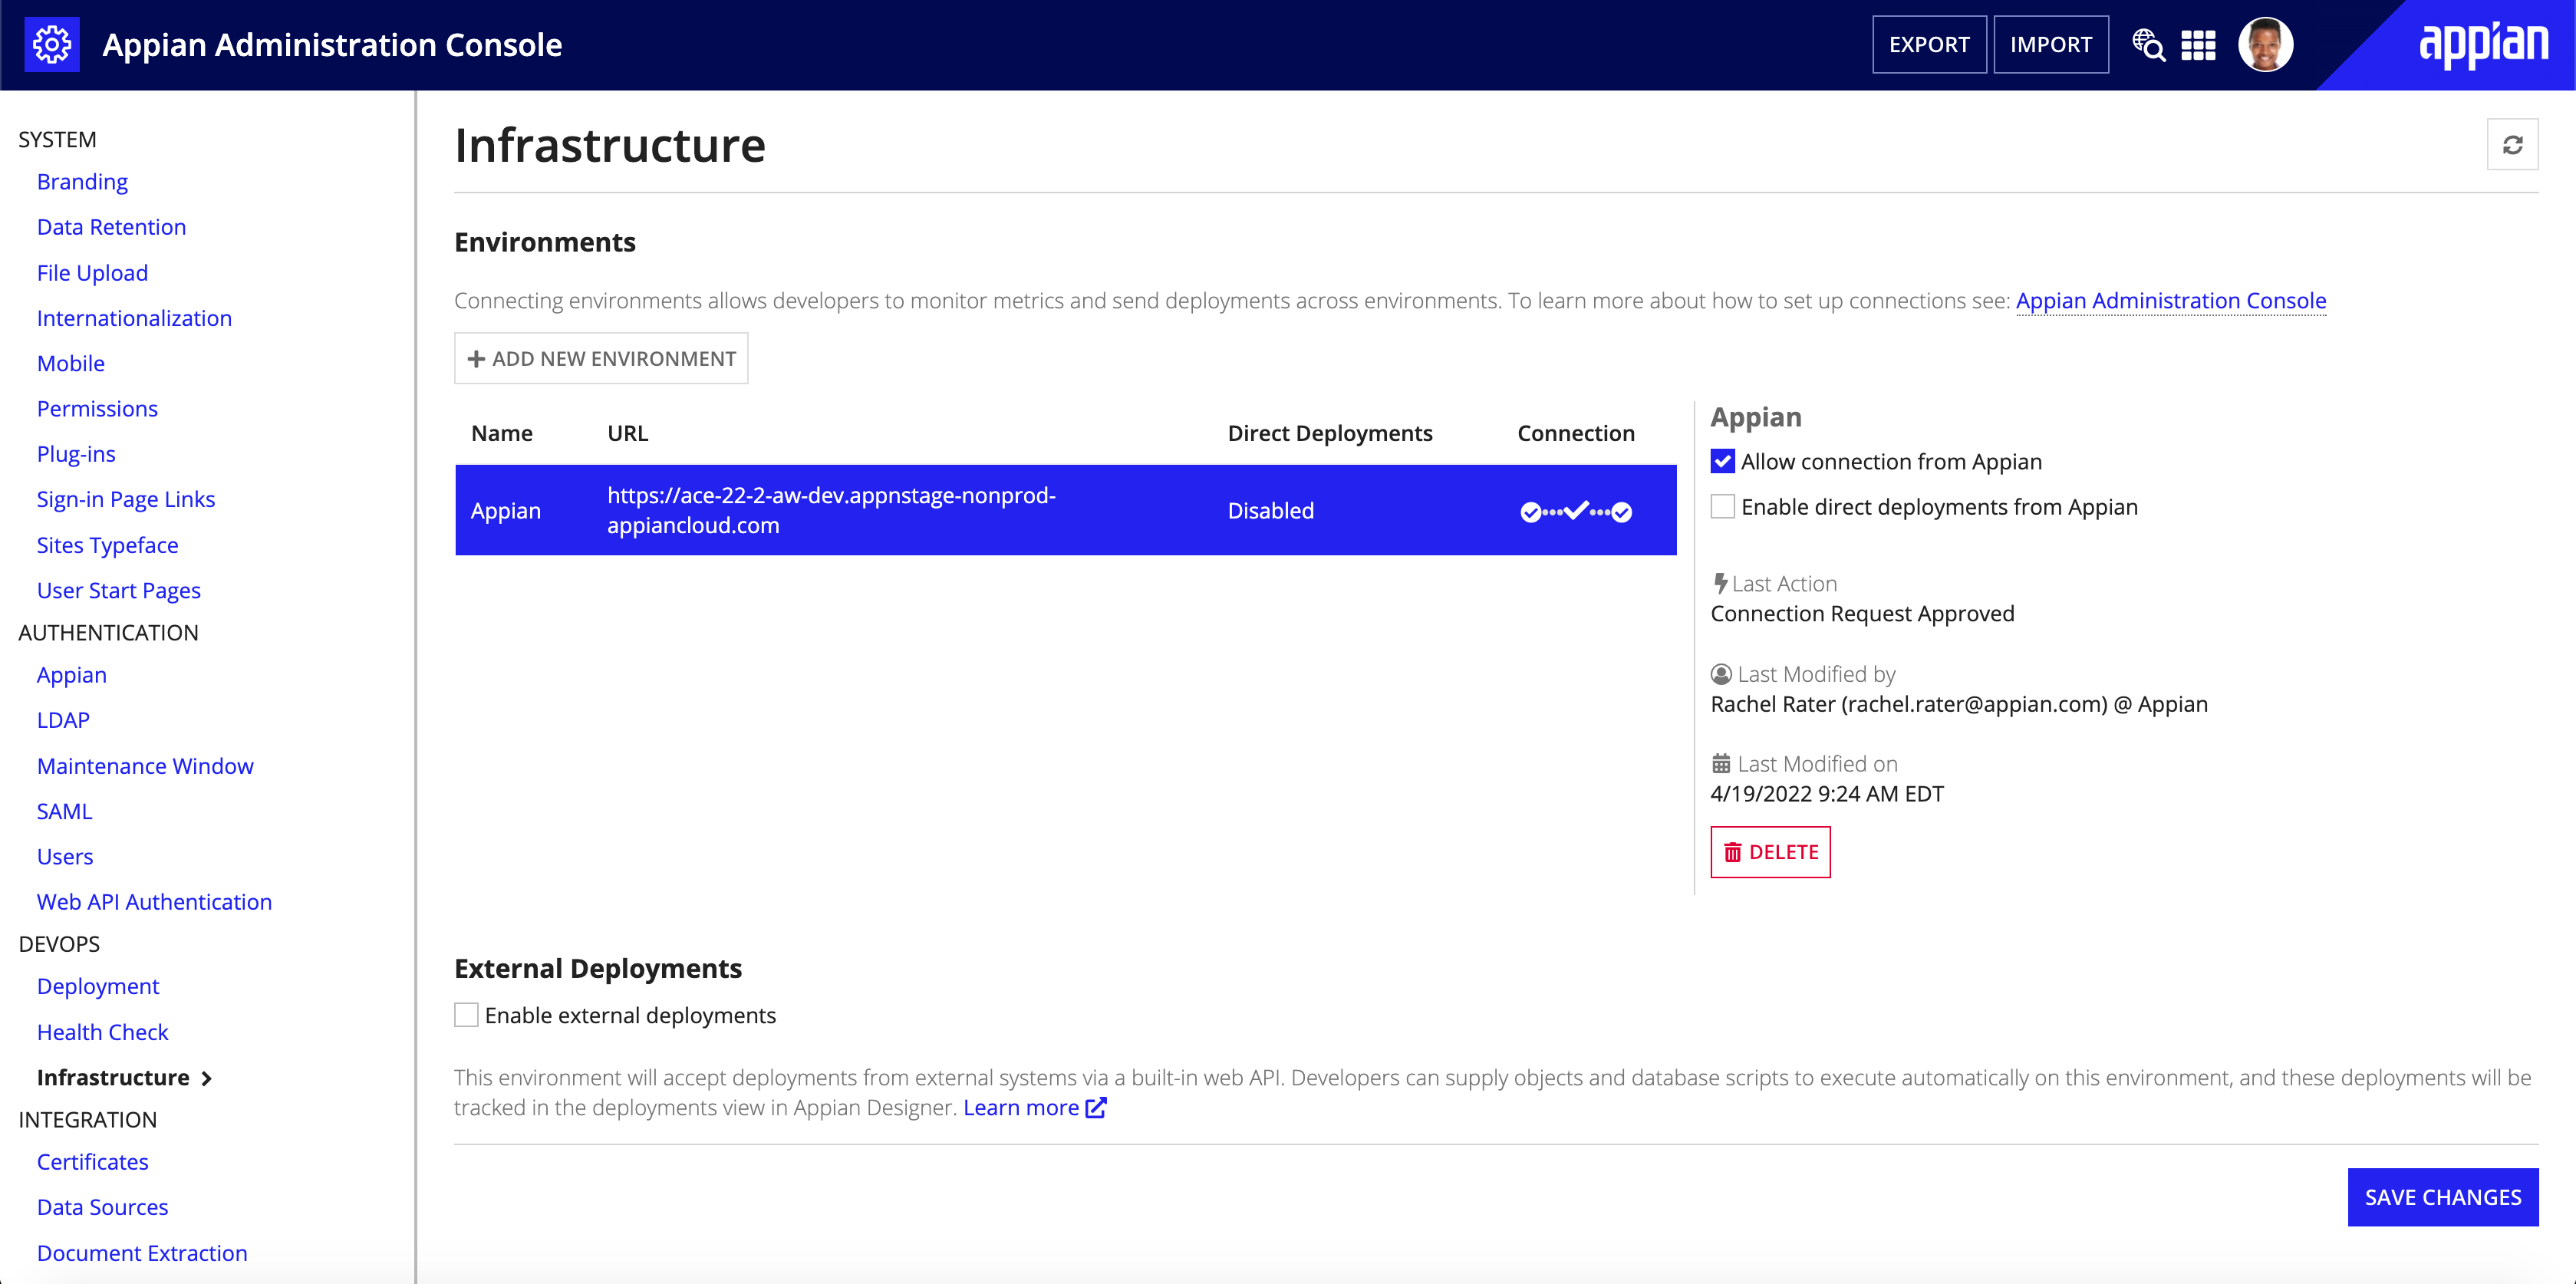
The section displays all connected environments, their name, URL, direct deployment status, and connection status. You can also select an environment to view the last action, modifier, and modified date.
System administrators can enable and disable the connection with each environment. Both environments must have their connections enabled to leverage infrastructure capabilities, such as compare and deploy. If either environment disables their connection, all infrastructure capabilities between the two environments are disabled. For example, the dev environment must be added to the infrastructure of the test environment and vice versa for the connection to be fully enabled.
| Icon | Connection Status |
|---|---|
 |
Enabled: this is the only status where infrastructure capabilities can be leveraged |
 |
Disabled by remote environment |
 |
Disabled by current environment |
 |
Disabled by both environments |
 |
Connection error with connection enabled by current environment |
 |
Connection error with connection disabled by current environment |
To add an environment:

Outgoing connection requests can be withdrawn at any time. Once the request is sent, system administrators will receive an email that links them to the Infrastructure page. They can view the incoming connection requests and take action on them. Incoming connection requests will time out after 7 days if no action is taken on them.

Tip: When Cloud customers upgrade to 19.1, their environments will be pre-configured.
To allow connection from Appian:
To enable direct deployments from Appian:
When enabled, this environment will receive deployment requests from the selected environment in this infrastructure. A deployment can include object, database, and plug-in changes, which will be tracked in the Deploy view on both environments. Appian recommends configuring which specific environments can deploy to higher environments, such as Production. For example, you should allow application administrators on the Test environment to deploy to Production. But you wouldn't necessarily allow application administrators on the Development environment to deploy to Production. Disabling direct deployments will block direct deployments without affecting the ability to monitor performance metrics or compare applications.
Removing an environment from the current infrastructure will remove the environment from the remote environment's infrastructure as well.
To remove an environment:
If your environment leverages mutual authentication, you will need to upload your current environment's SSL certificate to each of its connected environments. In addition, you'll also need to ensure that your current environment has the SSL certificate from each of its connected environments. To do this, upload the trusted server certificates in the Admin Console. For troubleshooting information, refer to the Knowledge Base.
Tip: If your environment leverages Trusted IP Addresses, please be aware that Appian Cloud outbound IP addresses will need to be allowed in order for the infrastructure to work.
When external deployments are enabled, incoming deployments to the current environment can be triggered programmatically via the deployment APIs. When disabled, any calls to these endpoints will fail with an HTTP 403 status code, indicating that the environment is not accepting deployments via these APIs.
In order to authenticate an external deployment request, you must have an API key and corresponding service account. These can be created and managed from the Web API Authentication page. The appropriate service account should be selected in the Authenticate As field, which will result in its associated API key being passed as part of the API request
This section displays settings that apply to incoming direct and external deployments from all environments that have been added to this environment's infrastructure.
After enabling direct or external deployments from other environments, you are required to select a system administrator user in the service account role to act as the deployer in the Deploy As picker. This user will appear as the Last Modifier for all objects in the deployment.
You can also allow users to directly deploy plug-in and database changes. Select Allow deployments with plug-ins to allow the current environment to receive plug-in changes through direct deployments. Select Allow deployments with database scripts to allow this environment to receive database changes through direct deployments.
Tip: The Plug-in Changes section does not apply to external deployments since you cannot deploy plug-ins via the deployment API.
To add deployment approval for your deployment process, select the Require Review option and specify a reviewer group. In addition to system and application administrators, this group can approve or reject deployments.
The following pages relate to integration administration.
There are two types of SSL certificates that can be managed in the Admin Console: Client Certificates and Trusted Server Certificates.
Some web services require transport-level client certificate authentication when setting up an SSL connection. The Client Certificates tab of the Certificates page allows you to expose certificates for use by the HTTP integration and HTTP connected system objects, the Call Web Service smart service, the webservicequery() expression function, and the webservicewrite() expression function.
Note: Pre-built connected systems do not support SSL. These client certificates currently only apply to integrations that use an HTTP connected system, an OpenAPI connected system, or no connected system at all.
The main view of the Client Certificates page is a grid view of all of the client certificates in the system. Initially the grid will be empty. Click New Client Certificate to upload a new certificate. The certificate must be formatted as a PEM file. If the certificate is protected by a password you should enter the password in the password field. This password will not be stored. The certificate will be stored in an encrypted format in the Appian data source.
There is no way to download a certificate from this page. Store a copy outside of Appian as well as uploading one here.
All modifications result in an audit log message with the username of the user who made the change, the previous values, and the new values.
Client certificates cannot be imported or exported from the Admin Console.
Some web services, such as those that utilize self-signed or internal SSL certificates, require an administrator to explicitly trust certain server certificates for authentication. The Trusted Server Certificates tab of the Certificates page allows administrators to upload a server certificates that should be trusted by HTTP integrations, connected systems, the Call Web Service smart service, the webservicequery() expression function, and the webservicewrite() expression function.
Note: Trusted server certificates that are added in the Admin Console are only applicable to integrations that use HTTP or OpenAPI connected systems. You cannot apply these uploaded trusted server certificates to data source connected systems.
The main view of the Trusted Server Certificates page is a grid view of all of the trusted certificates that have been added through Trusted Server Certificates grid. Initially the grid will be empty. Click New Trusted Server Certificate to upload a new certificate. The certificate must be formatted as a PEM file. The certificate will be stored in an encrypted format in the Appian data source.
There is no way to download a certificate from this page. Store a copy outside of Appian as well as uploading one here.
All modifications result in an audit log message with the username of the user who made the change, the previous values, and the new values.
Trusted server certificates cannot be imported or exported from the Admin Console.
Note: New way to connect data sources. If you want to deploy data sources to other environments and restrict who can access data sources during development, you can create connected systems for data sources instead. Learn more about data source connected systems.
The data sources page lets you integrate Appian with external databases using a JDBC connection by adding, updating, and removing named connection configurations called data sources. These data sources are available for designers to use in their applications through data stores and the Query Database smart service.
A data source consists of the following fields:
You cannot create a data source with the same name as the Appian data source, as specified in the conf.data.APPIAN_DATA_SOURCE property in custom.properties.
See also: Business Data Sources
Configure options in this section of the Admin Console to control which document extraction vendors are enabled on your environment. Currently, Appian offers document extraction powered both by Appian built-in services and by Google Document AI.
Availability of Appian's built-in document extraction capabilities varies based on your site's compliance requirements:
Appian is selected as the preferred vendor in a document extraction process:
You can review Appian Cloud services compliance statements to ensure that it aligns with your organization's security requirements.
Appian has a built-in service to perform optical character recognition (OCR) to extract data from documents. All customers have access to OCR. Additional capabilities are also available, such as:
Customers who are in supported regions get these enhancements automatically when Appian is selected as the vendor when using the Start Doc Extraction smart service.
Customers in unsupported regions can access these enhancements by enabling the options and choosing a supported region to process their documents. This option is disabled by default. If you don't enable the enhancements, you'll still be able to use the OCR capabilities available in your region.
Regional support for additional built-in OCR capabilities:
| Region | Additional OCR supported by default1 |
|---|---|
| Africa (Capetown) | No |
| Asia Pacific (Mumbai) | Yes |
| Asia Pacific (Seoul) | Yes |
| Asia Pacific (Singapore) | Yes |
| Asia Pacific (Sydney) | Yes |
| Asia Pacific (Tokyo) | No |
| Canada (Central) | Yes |
| Europe (Frankfurt) | Yes |
| Europe (Ireland) | Yes |
| Europe (London) | Yes |
| Europe (Milan) | No |
| Europe (Paris) | Yes |
| Europe (Stockholm) | No |
| Middle East (Bahrain) | No |
| South America (Sao Paulo) | No |
| US East (N. Virginia) | Yes |
| US East (Ohio) | Yes |
| US West (N. California) | Yes |
| US West (Oregon) | Yes |
1 Customers who wish to use additonal OCR capabilities will need to enable this option in Admin Console.
To enable additional OCR capabilities in an unsupported region:
Note: Customers who wish to use Google services in Appian will need to bring their own Google Cloud credentials to do so.
In order to use certain Document Extraction features, you need to enter your Google Service Account key information in the Admin Console > Document Extraction page.
The required information is in the Google Service Account Key file, which is generated when the service account key is created. These keys will be used for all instances of the Doc Extraction smart services.
If you are using Appian AI, contact your Appian administrator for the Google Service Account Key JSON file from the License Management section of Appian Community.
Otherwise, to create the Service Account Key file:
APIs & Services > Library - see Google Cloud docs on enabling APIs.
storage.objects.create and storage.objects.list permissions. In the Google Cloud Console, navigate to APIs & Services > Credentials page - see the Google IAM documentation for more information on creating and managing service accounts.The following Google Cloud Document AI keys are in the Google Service Account key JSON file that is generated when the service account key is created.
storage-bucket-0000000000storage-bucket-0000000001us, eu.See also:
The Email page allows you to enable or disable the ability for Appian to send email.
The Embedded Interfaces page allows you to manage origins and themes for embedding interfaces on external web sites.
The Origins section allows you to add and remove from the list of hosts that are allowed to make cross-origin resource sharing requests to your Appian site. If an Appian interface is embedded on a web site that uses a different host than Appian, that host must be added to the allowed origins list. Origins should be entered using the host as it is typed in the browser address bar with the port (if it's different than the protocol default) but without the protocol, like server.example.com or server.example.com:8080.
By default, the list is empty. The prevention of unauthorized cross-origin requests is an important part of web application security, so only trusted hosts should be added to this list.
Adding or removing a host results in an audit log message with the username of the user who made the change, the previous list of allowed hosts, and the new list.
See also: Embedded Interfaces
The Themes section allows you to configure any number of themes with custom font and color styling. A theme can be optionally applied to the interfaces that are embedded in an external web page. This allows custom styling of embedded interfaces in order to make them more consistent with the host web page.
Note that themes can only be applied to embedded interfaces. Learn more about Tempo branding and sites branding.
All modifications to themes result in an audit log message with the username of the user who made the change, the previous values, and the new values.
See also: Themes for Embedded Interfaces
The HTTP Proxy page allows you to configure a proxy server for outgoing HTTP and HTTPS connections. The proxy is used by following integration features:
Note: HTTP, OpenAPI, and pre-built connected systems shipped with Appian have been developed to respect the configured proxy. Connected system plug-ins only support using the configured proxy if the developer specifically developed them to do so. For an example, see Configuring HttpClient when a proxy is enabled.
| Property | Description |
|---|---|
| Enable HTTP Proxy | Should Appian use an HTTP Proxy? When this is not selected, all other fields on this page are disabled. |
| Host | The hostname or IP address of the proxy server. |
| Port | The port of the proxy server. |
| Do not use the proxy server for the following hosts | A list of hostnames or IP addresses. Requests that match hosts in this list will not use the proxy server. Wildcards (*) are supported, for example, *.google.com will match www.google.com and docs.google.com. |
| Use proxy authentication | Does the proxy server require authentication? When this is not selected, the Username and Password fields are disabled. |
| Username | The username used for proxy authentication. |
| Password | The password used for proxy authentication. |
The Legacy Web Services page allows you to manage processes exposed as web services. The interface for configuring legacy web services opens in a new browser tab.
Note: We recommend designers use web APIs and the Start Process smart service to expose process models to external systems.
Legacy web services cannot be imported or exported from the Admin Console.
This page allows you to configure logging for integrations to facilitate troubleshooting.
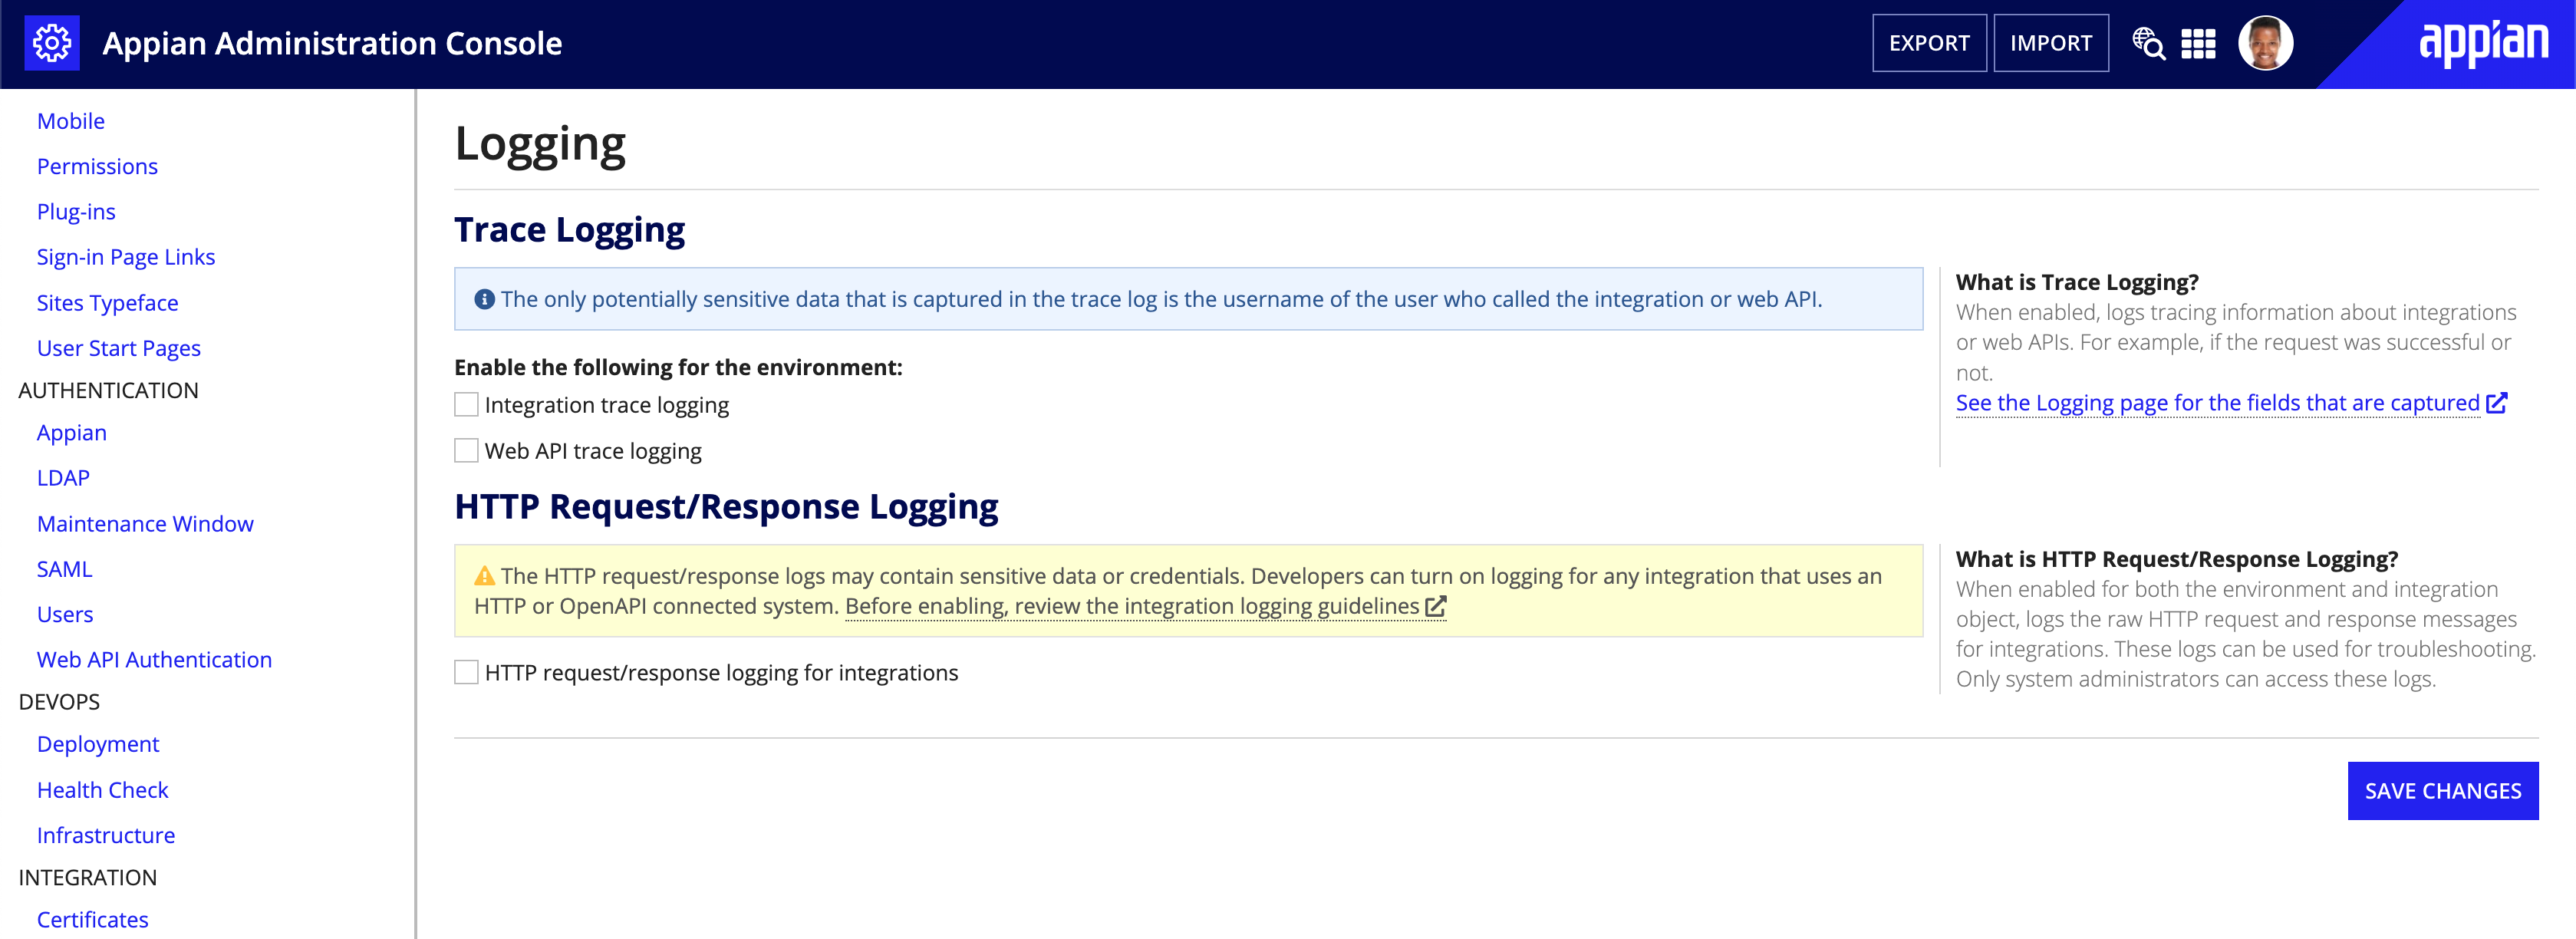
This section controls the integration_trace.csv and web_api_trace.csv logs. When enabled, Appian will log tracing information about integrations and/or web APIs. For example: if the request was successful or if it logged out.
See the integration and web API sections on the Logging page for the fields that are captured.
Tip: The only potentially sensitive data that is captured in the trace log is the username of the user who called the integration.
This section controls the integration_req_resp_activity.log log. When enabled, logs the raw HTTP request and response messages for integration objects that have logging enabled. Developers can turn on logging for any integration object that uses an HTTP or OpenAPI connected system.
See the Logging page for more information on the HTTP request/response logs.
Note: The HTTP request/response logs may contain sensitive data or credentials. Before enabling HTTP request/response logs for integrations, it's important to understand the integration logging guidelines.
This page allows you to configure Appian's Task Viewer Add-in for Microsoft Outlook.
/suite/integrations/office/outlook, that serves up the content to embed in Outlook is enabled. The endpoint can only serve up content when embedded in Outlook and does not expose sensitive data to unauthenticated users.The Third-Party Credentials page allows you to manage credentials for connecting to external systems. These credentials are stored in the Secure Credentials Store.
The following entities can use these credentials:
webservicequery expression function.The Third-Party Credentials page contains a grid view of all configured sets of credentials. Initially, the grid will be empty.
To create a set of third-party credentials:
Configure the following properties:
Property |
Description |
|---|---|
Identity |
|
Name |
The name of the third-party credentials entry. This name represents the external system to which the credentials will be used to authenticate. The name given here is displayed anywhere that this set of credentials can be selected, such as on grid on the main page of the admin page, in the Predefined Credentials dropdown list in the Call Web Service smart service, and on the Third-Party Credentials settings page available to end-users. |
Key |
The key field is auto-generated and not editable. The key is generated based on the given name. The key does not change when the credentials set is renamed. The key is used when accessing the credentials through the Secure Credentials Store public API and used as a reference to the credentials when inspecting the audit log for the Secure Credentials Store. |
Description |
A short description of the credentials set and/or the external system. |
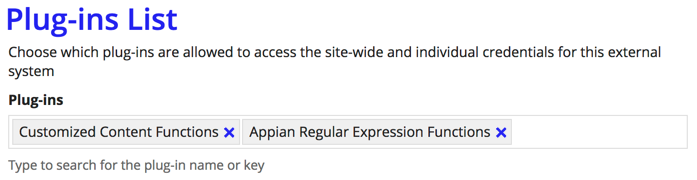
Plug-ins List |
|
Plug-ins |
The plug-ins that are authorized to use this set of credentials. When deploying a plug-in that uses the Secure Credentials Store API, that plug-in must be added to this list for each set of third-party credentials that it will be allowed to access. The input will auto-complete and allow selection of a deployed plug-in as you type the name or plug-in key of the plug-in. Any plug-ins that were previously added to the list, but have since been removed from the system, will appear in the list as the plug-in key rather than the plug-in name. These plug-ins may be safely removed if you know that they will not be re-deployed to the system. |
Credentials |
|
see description |
This section of the form allows you to define the fields of the credentials (for example, "Username" and "Password") as well as the site-wide values for these fields. Once fields are defined, a checkbox allows you make these fields available to end-users on the Third-Party Credentials settings page, so that they can store their own personal credentials that are used to connect to the external system. For each set of a credentials, the designer of an application has the ability to select whether to use the site-wide credentials (for use cases where there is a single integration user), or use the per-user credentials (for use cases where the individual's access rights to the external system are important). Using an individual's credentials is only possible when that user is logged in and acting in the system. When configuring credentials for the first time, the section will be empty except for an Add field link. Clicking the link will display a grid with the following columns:
|
Test Connection |
|
Expression |
This section of the form allows you to test the values for site-wide credentials. Provide an expression that returns When testing the connection, the expression only has access to the current credentials on the form, and you must use the unique identifier key as generated to retrieve the credentials from the Secure Credentials Store. If testing using a function that is provided in a plug-in, that plug-in must be in the authorization list. |
Deleting individual credentials fields will cause all site-wide and per-user values for that field to be deleted. Deleting a set of third-party credentials from the grid on the Third-Party Credentials page will cause all site-wide and per-user values for the entire set of credentials fields to be deleted.
All credential changes result in a audit log message with the username of the user who made the change, the previous values, and the new values.
See also:
The following pages relate to monitoring your Appian installation.
Monitoring information cannot be imported or exported from the Admin Console.
The Current User Activity page allows you to see which users are currently active on your site.
User activity is stored for 1 hour and only the most recent 1000 entries are displayed.
When a user logs out of the system, they are removed from the list of recent activity.
It is possible for the same user to appear in the list twice if they are connected from two different browsers or mobile clients.
The Document Reports page shows the following usage information about documents in the system:
Note that user avatars are stored as documents, so views of user images are counted as downloads.
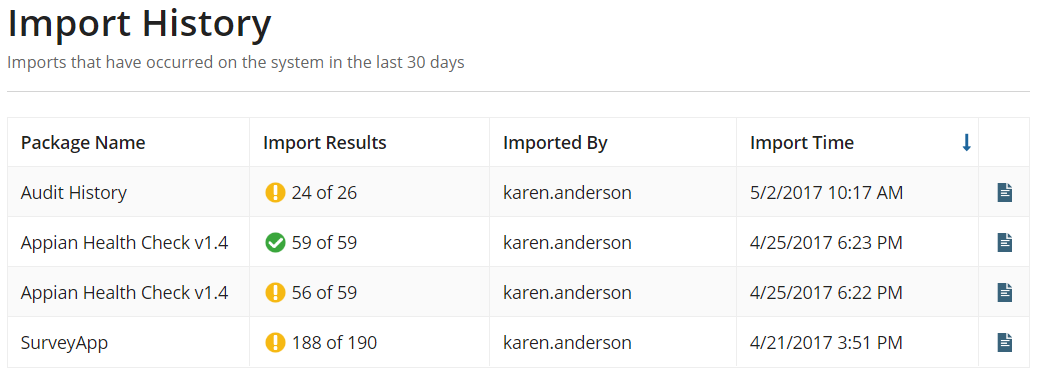
The Import History page allows you to see all the imports that have occurred on the system during the last 30 days. This includes imports from:
ImportExportServiceNote: See the Public API for more information
Clicking the document icon on the last column of the grid will download the import log for the corresponding import.
The Rule Performance page allows you to see the historical performance of all of the rules in the system. It contains a table of rule name, the number of times that rule has been executed, the average execution time, the minimum execution time, and the maximum execution time.
A moving window of thirty days of performance metrics are gathered and stored as end users execute the rules. The evaluation times recorded do not include the evaluation of the rules when they are executed in Appian Designer.
Clicking on the name of a rule will bring up more details on the performance of that rule, including graphs of the performance over time. These graphs are the same as the ones found in the historical performance trends in the performance view.
This page contains performance data for rule objects, including expression rules, interfaces, query rules, integrations, and decisions.
Most Admin Console settings can be imported and exported, except for settings on the following pages:
In addition, you can export the Encryption Service setting associated with plug-ins, but you cannot import or export plug-ins in the Admin Console. Instead, deploy plug-ins using a direct deployment.
Note: For security reasons, you cannot export credential values. Instead, you can provide these values during deployment using an import customization file</a>.
To export Admin Console settings:
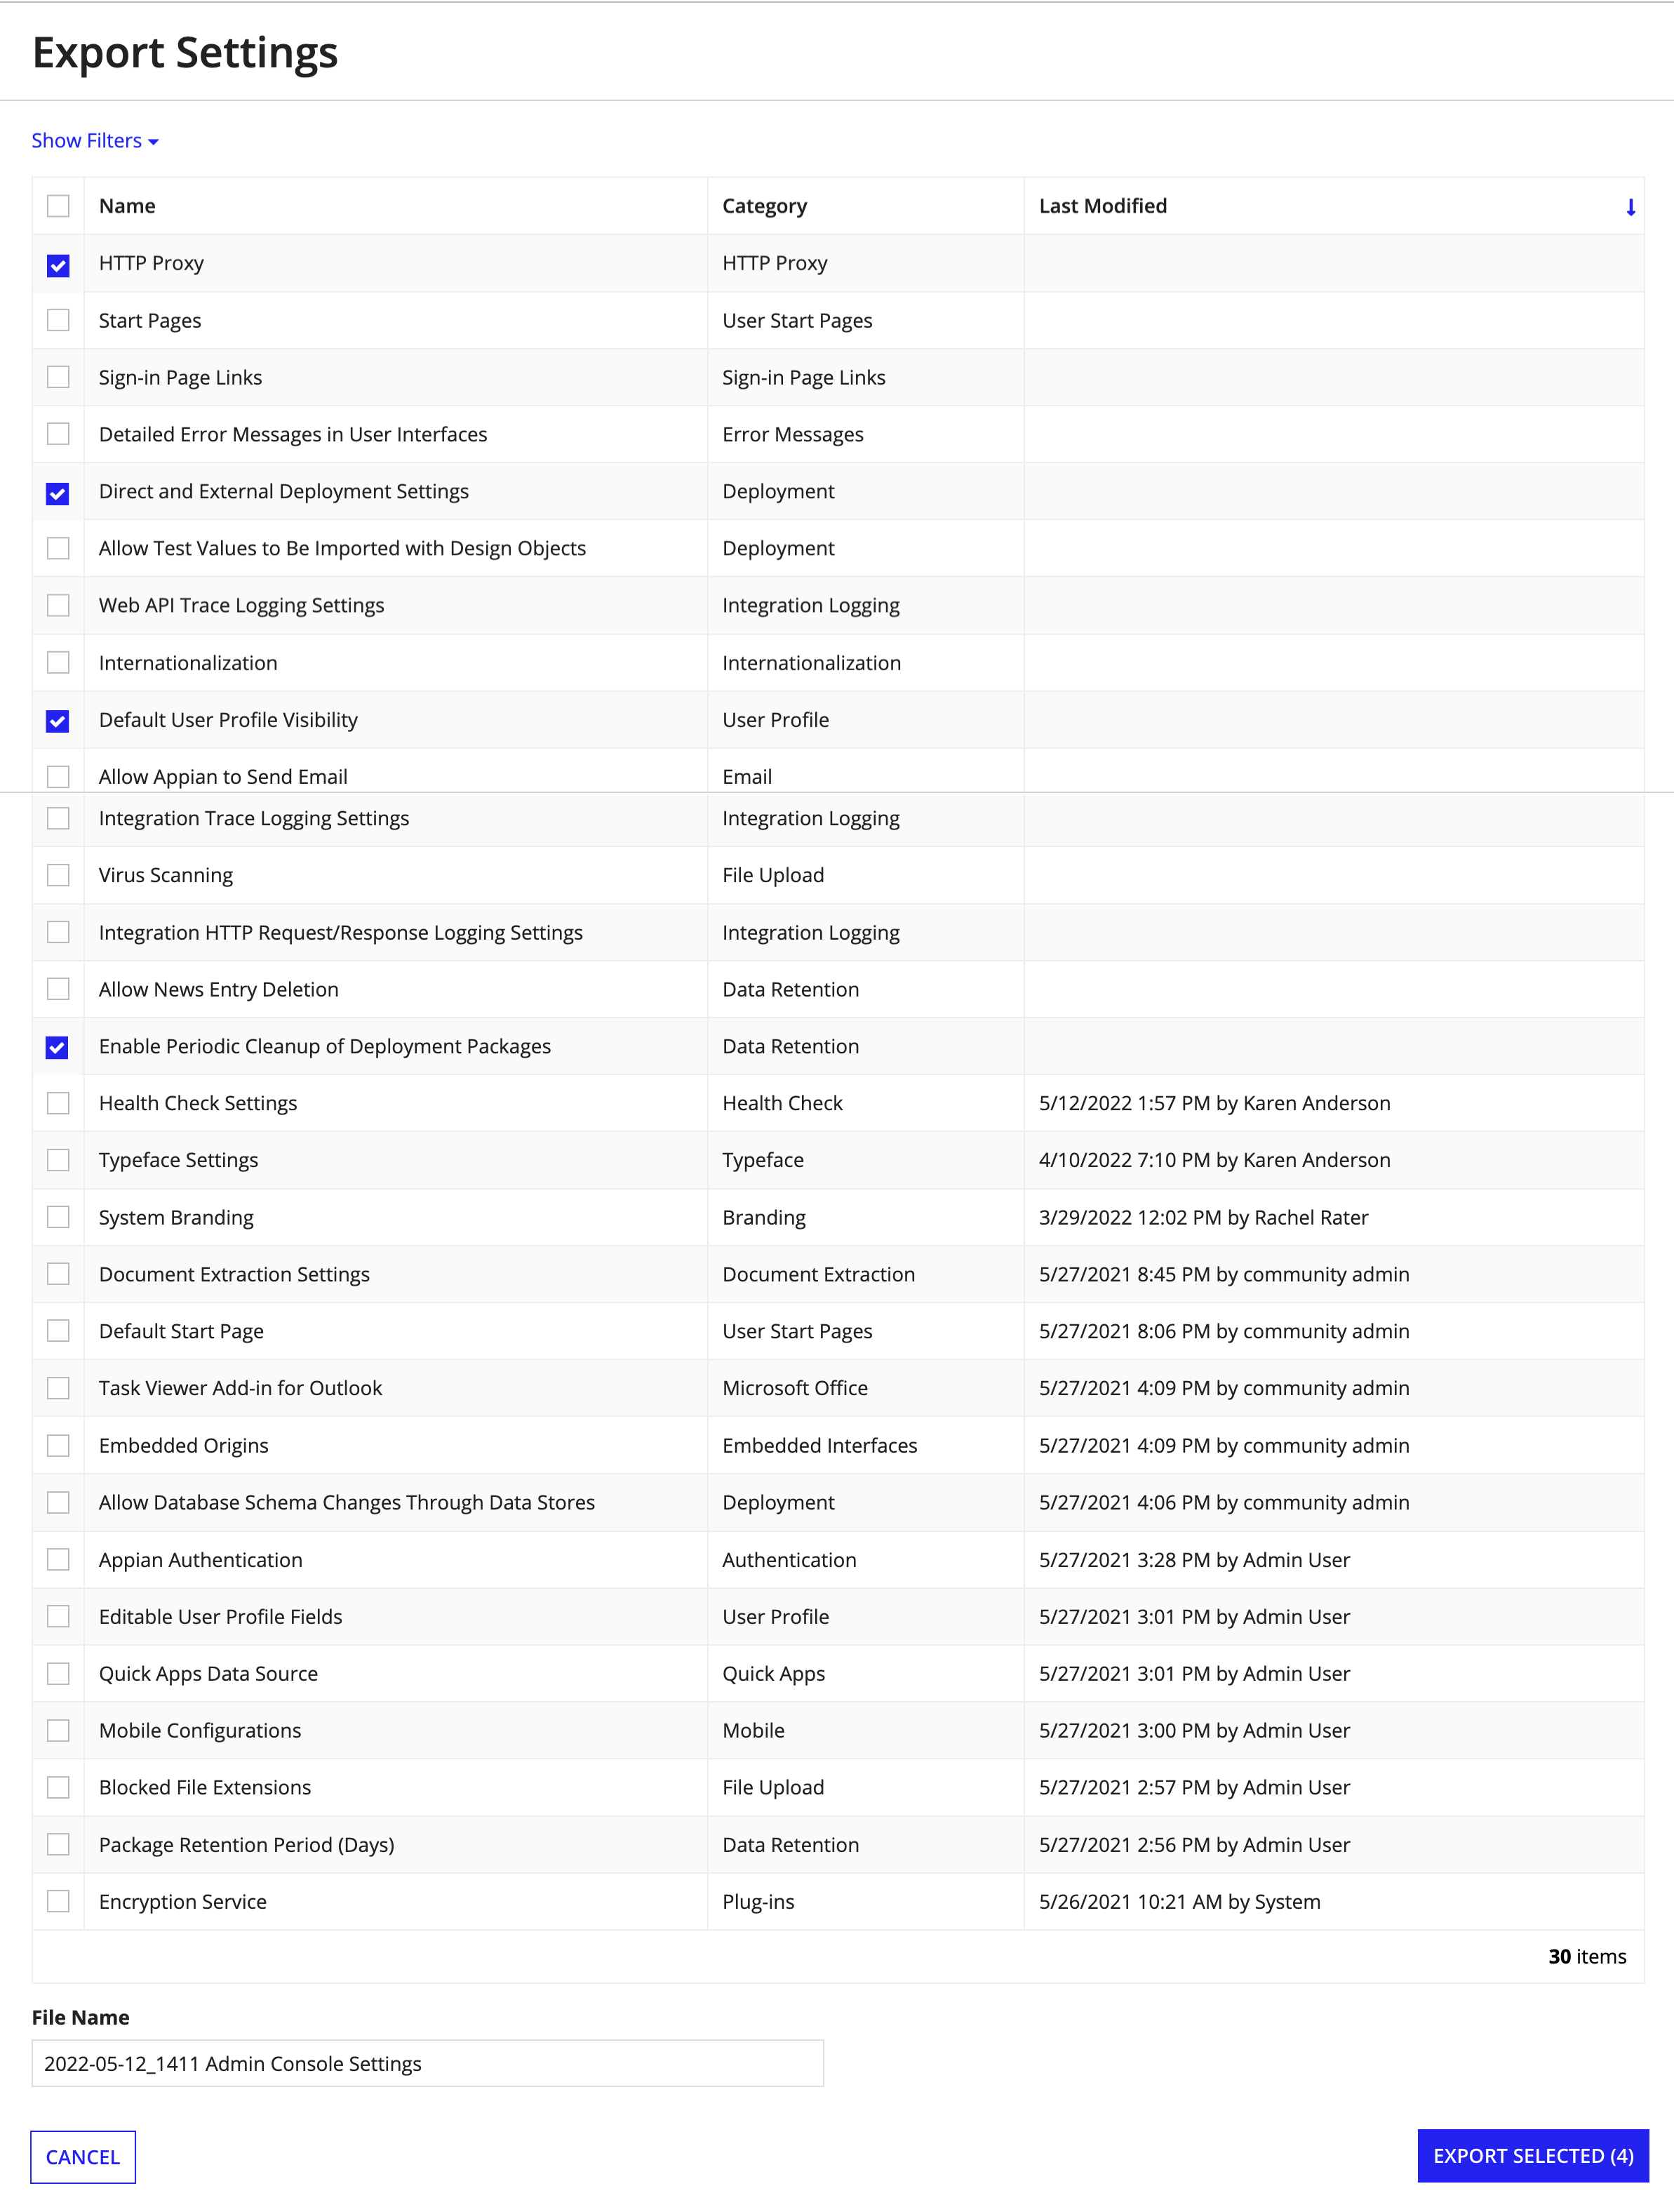
Download the appropriate files:
| File | Extension | Action |
|---|---|---|
| Admin Console settings files | .zip |
Click DOWNLOAD PACKAGE. |
| Export log | .txt |
Click Download Export Log. |
| Import customization file | .properties |
Click Download Import Customization File. |
The files download according to your browser settings.
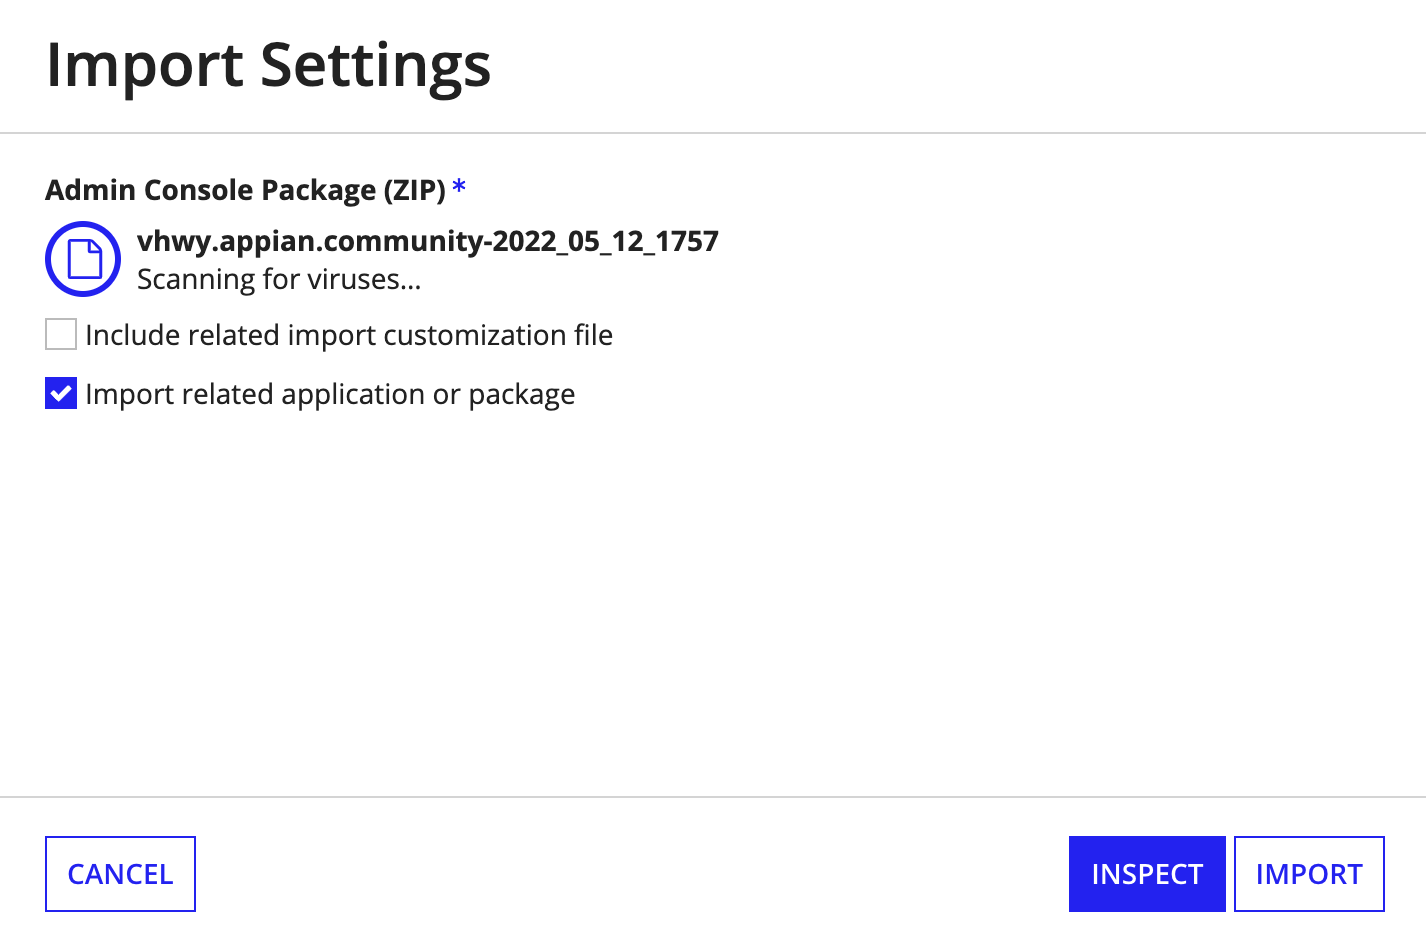
In the Admin Console, you can import the following individually or in combination:
To import in the Admin Console:
.zip file containing the Admin Console settings you want to import..properties file containing your import customizations.Continue as appropriate:
Type |
Action |
|---|---|
Application |
|
Package |
|
Admin Console settings and application objects can be tightly coupled. Because of this, Appian allows you to import an application package and an Admin Console package together.
These packages will be included in a single import, so any dependencies between them are identified and properly resolved.
Dependencies include:
During import, Appian tests the connection of the data source. If a connection cannot be established successfully, the data source will fail to import. This connection test also happens during inspection.
Health Check must be set up and enabled on an environment before any imported Health Check configurations can take effect.
You can import and export all Health Check Setting properties except the following:
When Health Check Settings are exported, the Service Account credential fields are left blank. These fields can be edited in the Health Check properties file and imported into a target environment. Note that on import:
To export and import Quick App Creator permissions, export the Quick App Creators group.
Note: Member groups are included when exporting a group, but individual user members are not. See also: Groups
The list of Encryption Service public API permissions for all plug-ins shown on the Plug-ins page can be exported as one item. For example, if you have plug-in X that has permission to use the Encryption Service and plug-in Y that doesn't, both permissions would be set during import if the setting was included in your import package. On import into the target environment, only the plug-ins that are listed in the package are updated. You may have more plug-ins in the target environment, and their Encryption Service configurations are not updated.
Appian recommends that if you are sharing an admin console package with environments where you have no knowledge of the deployed plug-ins, you should not include this setting as it might overwrite a plug-in's permissions.
When importing a set of third-party credentials onto a target environment for the first time, the credentials field values can be configured in one of two ways:
Updating the set of third-party credentials via import will not reset any per-user credentials that a user has stored. These will only be removed if that specific credential field has been deleted from the third-party credentials.
Third-party credentials may reference plug-ins. The referenced plug-ins may be deployed before or after the third-party credentials, and the reference to the plug-in name will be preserved. Appian recommends that plug-ins are deployed before importing your applications and admin console settings.
If one of your start pages points to a specific record or action, this URL will not be the same across environments. Be sure to confirm the URL is correct for these pages after import.
