| This content applies solely to CampusPass, which must be purchased separately from the Appian base platform. This content was written for Appian 21.4 and may not reflect the interfaces or functionality of other Appian versions. |
From the GENERAL SETTINGS tab, you can configure and manage the settings for questionnaires you want users in your academic institution to complete.
Questionnaire typesCopy link to clipboard
From the CONFIGURE page, there are three types of questionnaires you can configure for users in your academic institution: Pass Requests, Surveys, and Isolation Updates.

In the Questionnaire Settings section, simply click the type of questionnaire you want to configure to get started. The following table provides a description of each questionnaire type and the most common scenario for when to use each type.
| Questionnaire Type | Description | Use When |
|---|---|---|
| Pass Request | A set of questions that users can respond to each day before they come to a campus. | Use the Pass Request Questionnaire when you want to determine if a user should be able to come to campus based on their responses. |
| Survey | A set of questions that can be sent to users before they start requesting passes. You can use this to gauge interest and ability to return to campus. | Use a survey when you want to gauge interest and ability to return to campus. |
| Isolation Update | A set of questions that you want users to answer when in isolation. | Use an Isolation Update Questionnaire when you want to check if exposed individuals are developing symptoms, determine how sick individuals are doing, or anything else you think is helpful. |
Populate questionnaire answersCopy link to clipboard
Each time users fill out a questionnaire, you may want them to enter in their pass request answers manually. Another option is to have the user's previous answers populate so that they don't have to select each response again.
Whichever your institution prefers, you can control this ability with the Prepopulate Questionnaire Answers toggle.

When this setting is toggled on, the most recent answers the user submitted for a questionnaire are prepopulated. Users can still update their answer to each question but this workflow saves the user time.
When this setting is toggled off, users will have to submit each of their responses manually whenever they fill out a survey, pass request, or isolation update.
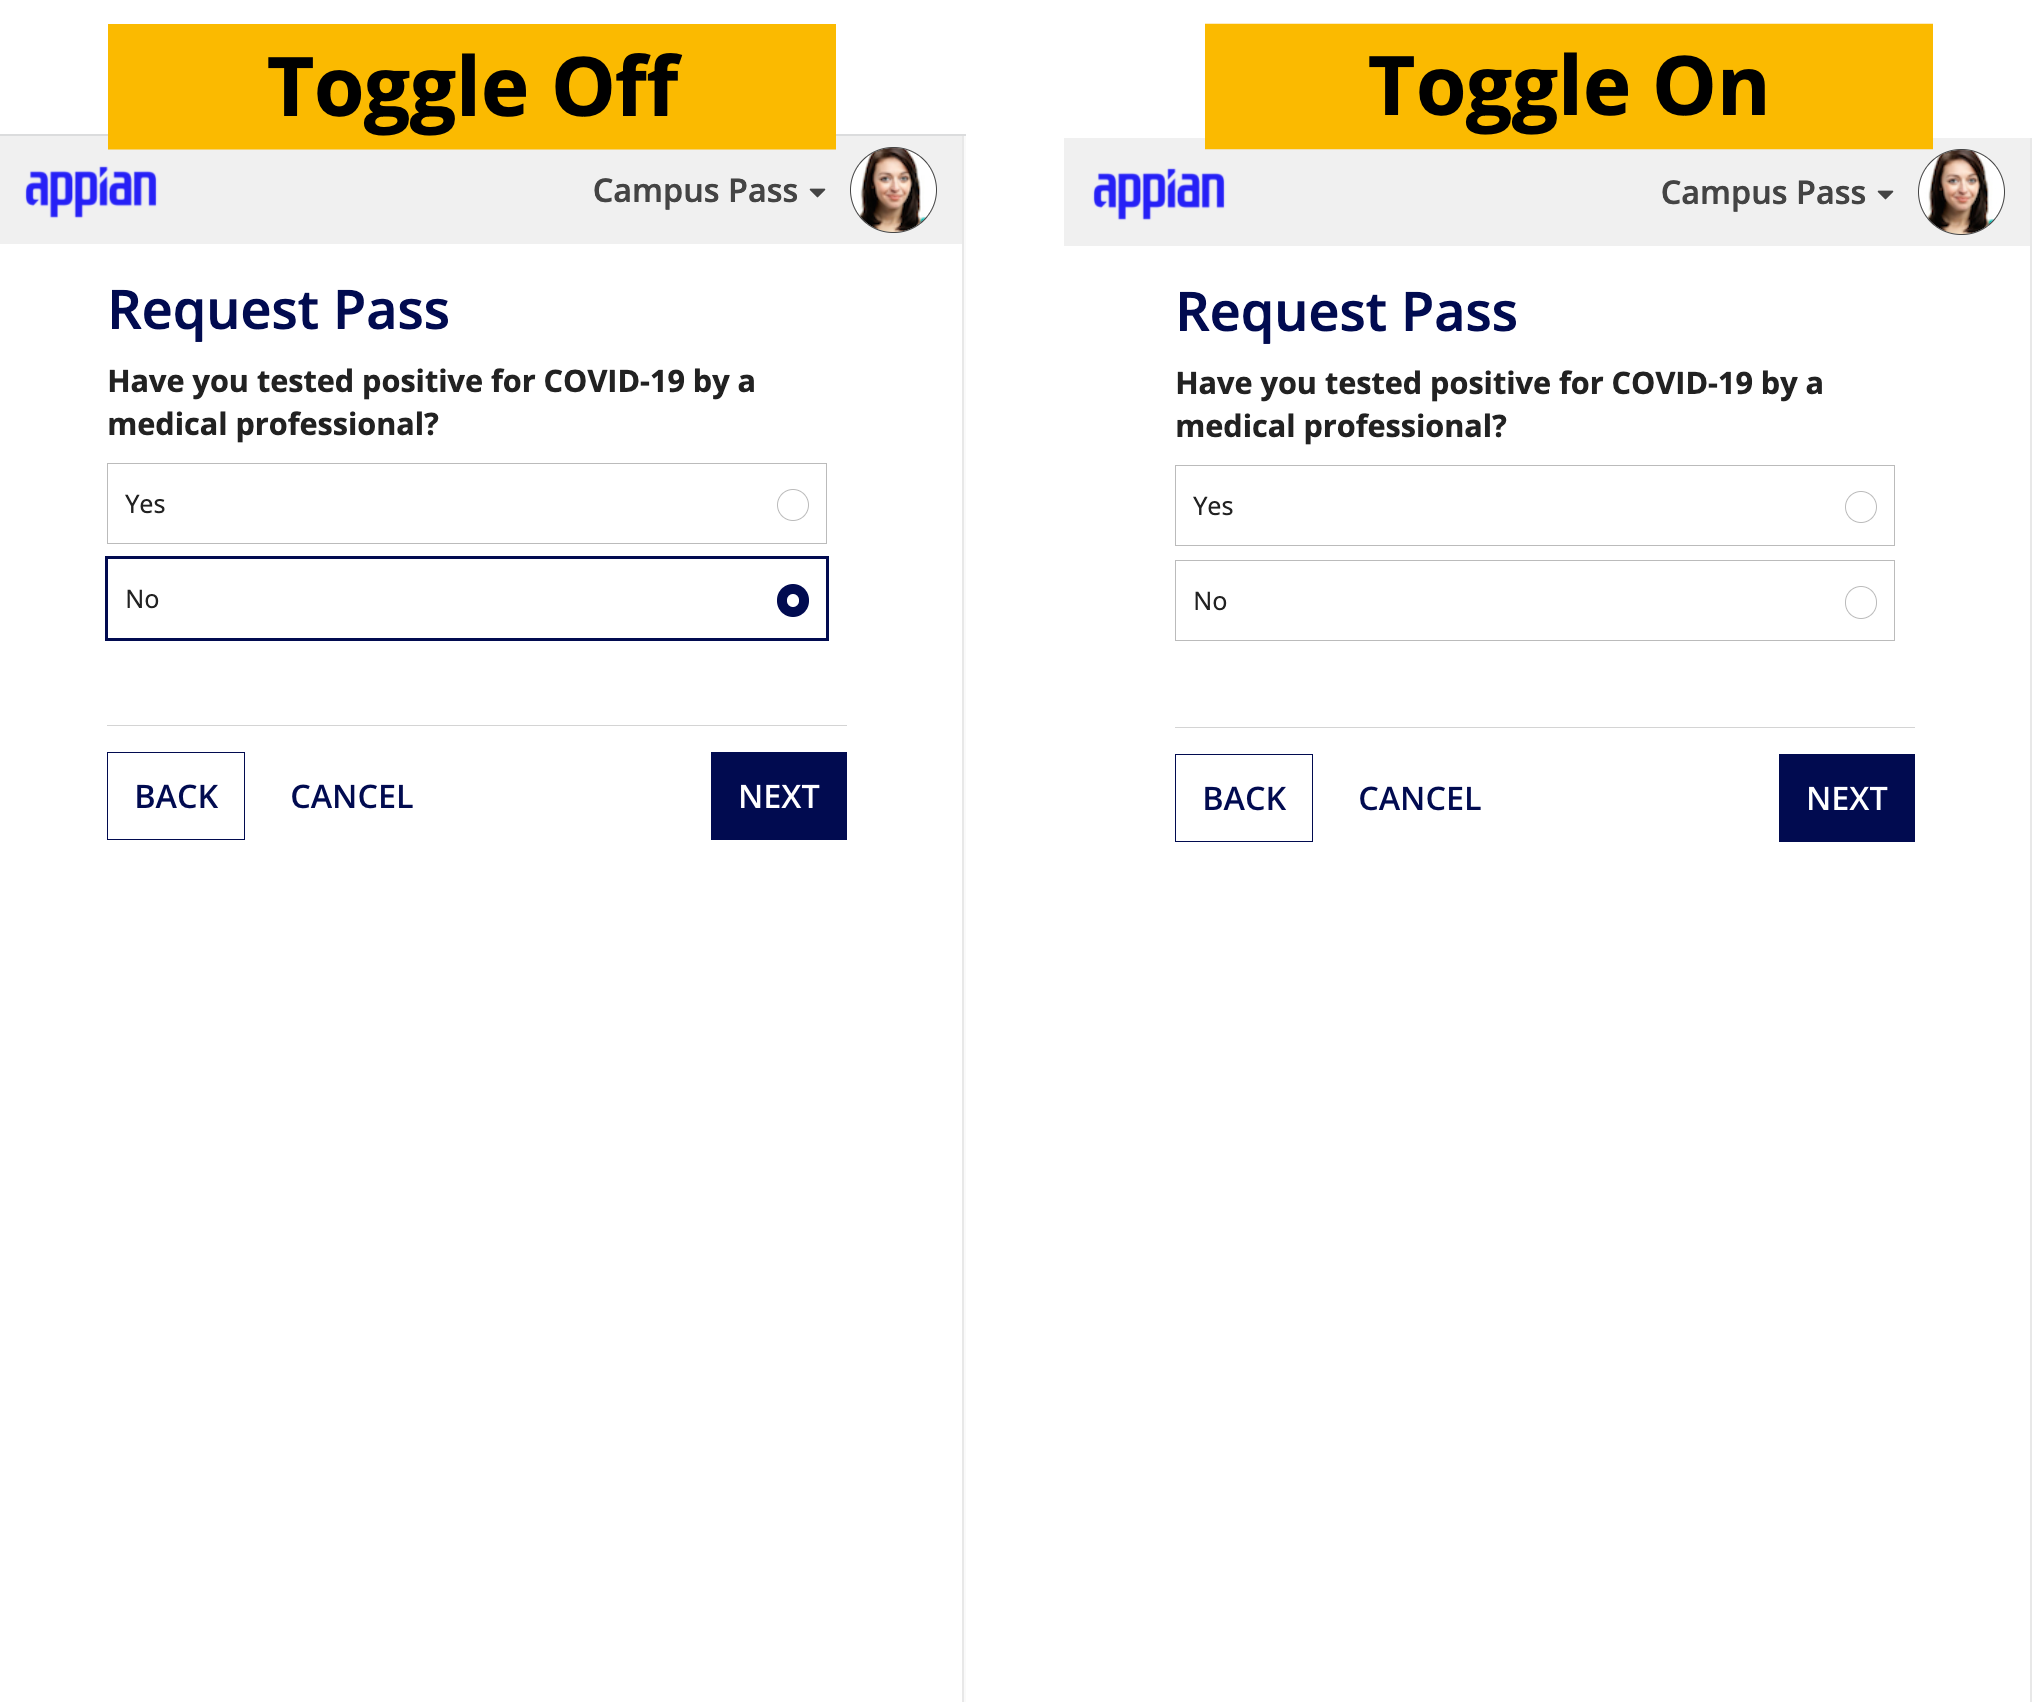
Keep in mind that this can affect the performance of CampusPass. If users are experiencing lag times, you may want to consider toggling this feature on.
Question settingsCopy link to clipboard
Each question in a configured questionnaire has specific settings that you can assign. To access settings for a specific question from the question list, simply select the questionnaire type to open the setting options.
For example, you can reorder questions using the arrows . To reorder follow-up questions, click the edit icon for the question to edit it.
You can set a question to active or inactive, which determines whether or not the question appears on the pass request questionnaire that all users receive. To deactivate a question, simply toggle the active icon to inactive .
You can also edit all questions. To modify the text for an existing question, simply click the edit icon . The Edit Question dialog also allows you to configure the following settings for each question in a pass request, survey, and isolation update:
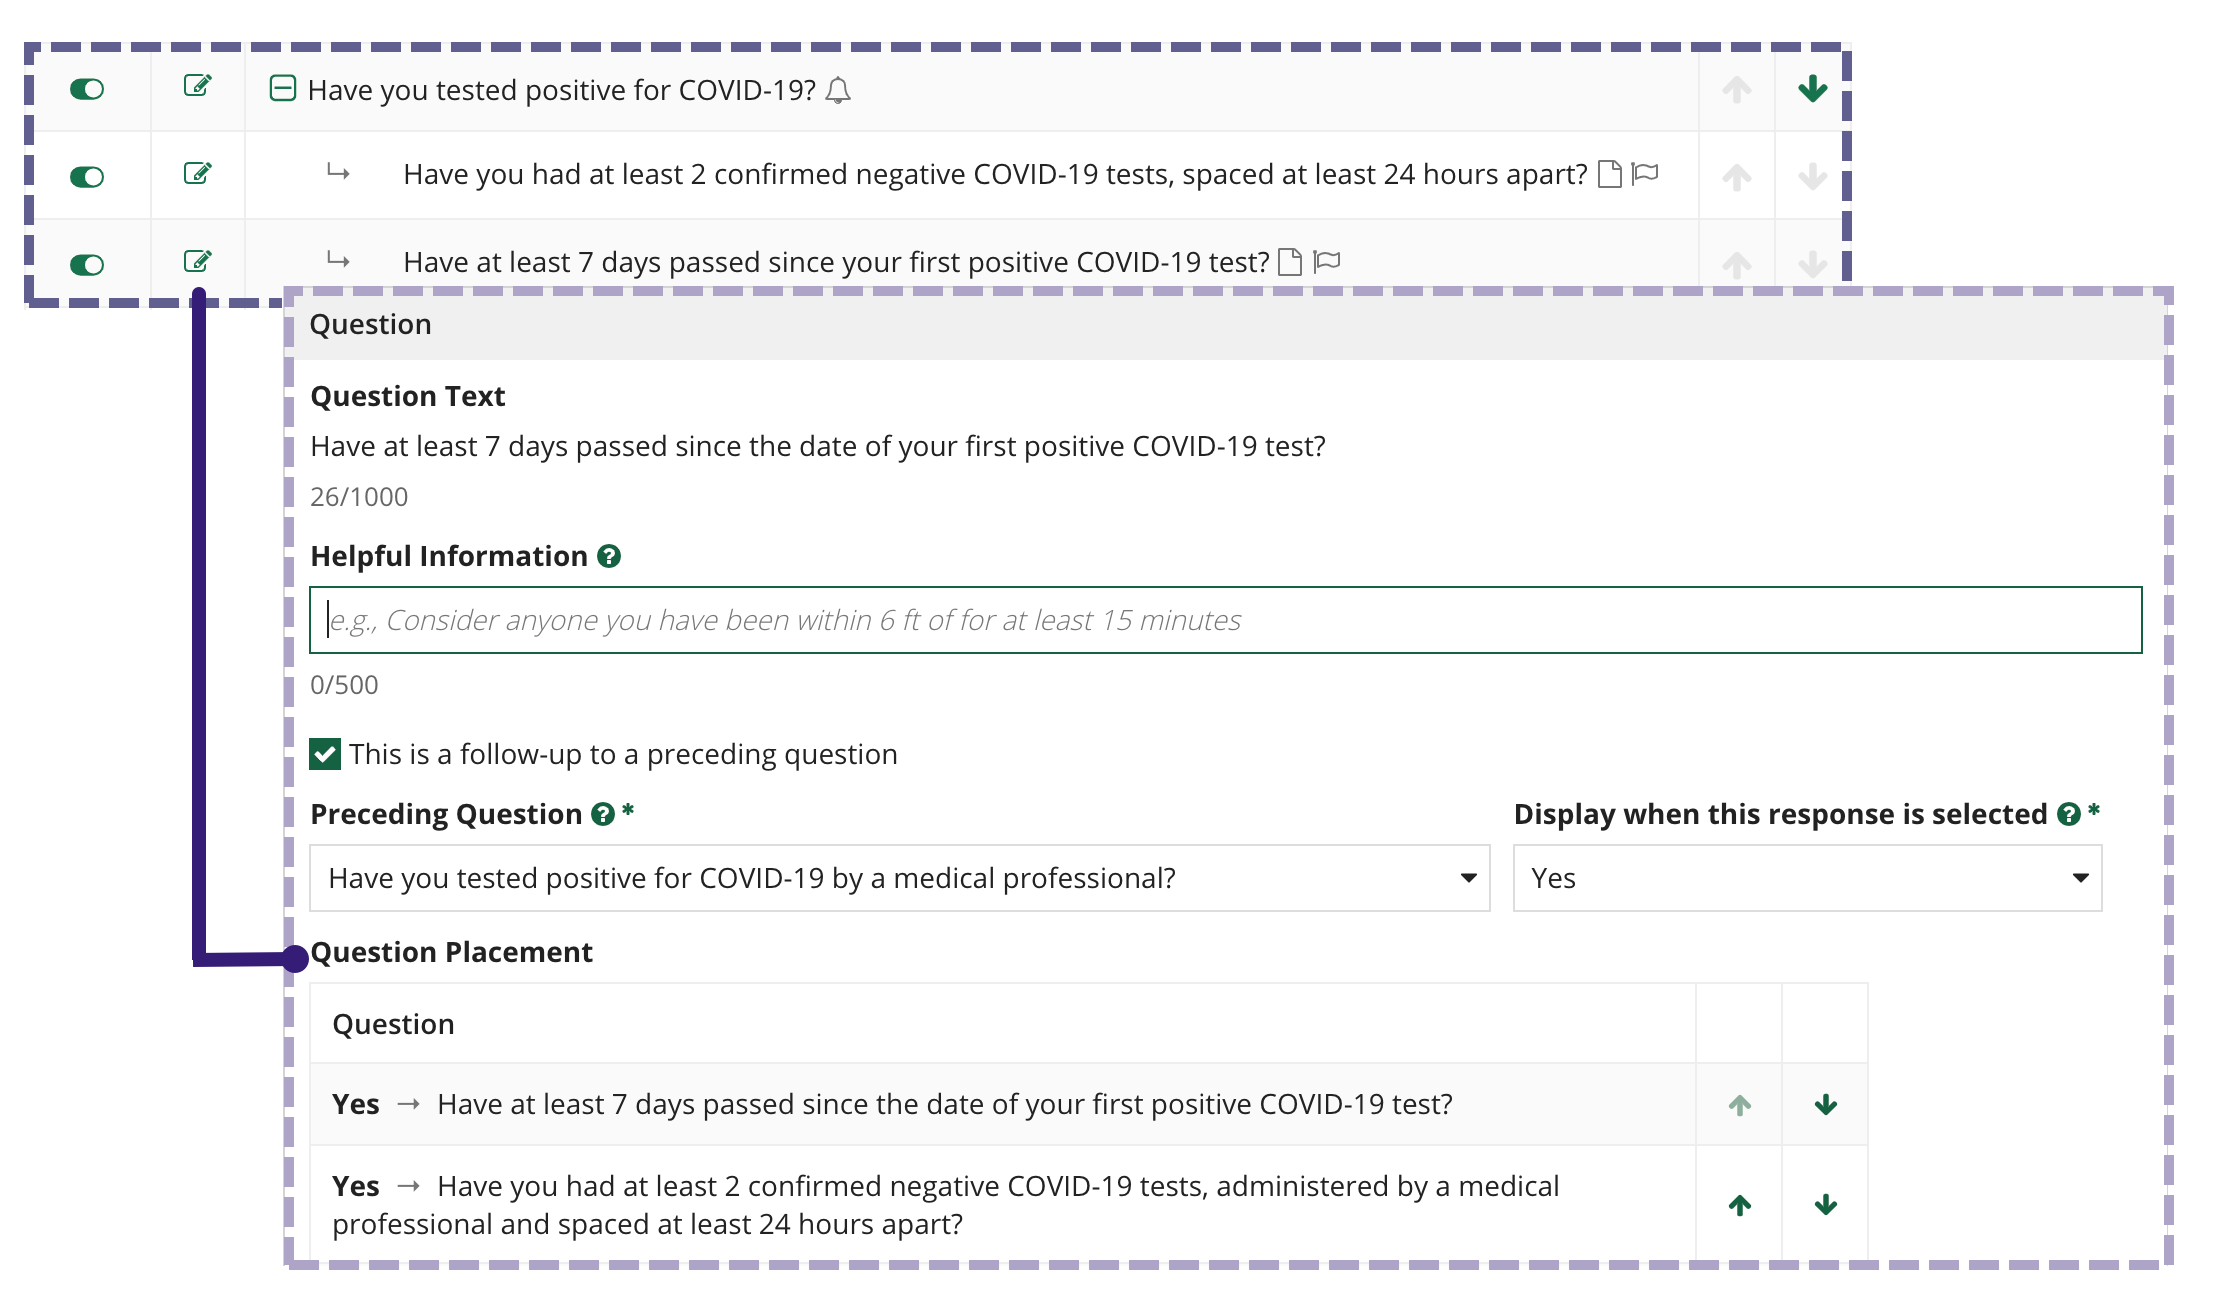
- Follow-Up Questions: Whether the question will appear based on the response to a previous question.
- Example: If a user answers yes to Have you been tested for antibodies?, you can ask the follow-up question, Did your antibodies test return positive for COVID-19?
- Helpful Information: Add a tooltip that displays next to questions to clarify a question, define terms, or provide guidance in how to answer a question.
- Response Type: Whether the response type is yes/no, single selection, multiple selection, or short answer.
- Disqualifying Answers: For pass request and survey questions, whether a certain response to the question will disqualify a user from returning to campus.
- Incident Creation: Whether a certain response to the question will automatically create an incident.
- Require a Supporting Document: Whether a certain response to the question will require the user to upload a supporting document.
- Example: A test result or note from a doctor.
- Guidelines: Which guidelines to display to the user for each response choice. See Configure guidelines for more information on adding and deactivating guidelines.
- Example: If the user answers yes to a question about a health issue, you could display a guideline that says Discuss with your healthcare provider on whether it is suitable for you to return to campus at this time.
- Visibility: Whether the question should display only for users at certain campuses, users who have certain roles, or visitors.
Tip: If an incident is created when a user fills out a pass request or survey, that incident will be updated each time a user fills out the pass request or survey again.
Previewing questionnaire questionsCopy link to clipboard
Response and configuration managers can preview their questionnaire questions by clicking CONFIGURE under the questionnaire type.
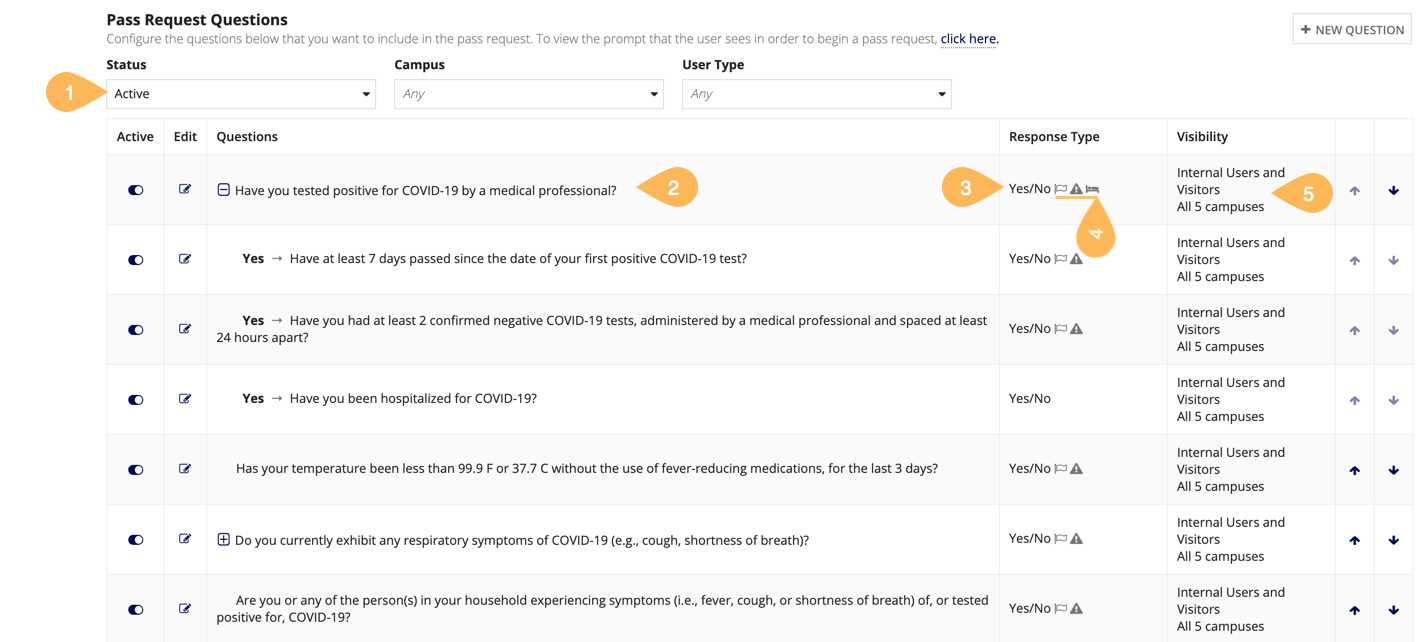
From here, you can:
- Filter questions by Status or Campus. For pass request questions, you can also filter by User Type, internal or visitor.
- View questions. Click the plus sign to view follow-up questions.
- View the response type for the question, Yes/No, Single Selection, Multiple Selection, or Short Answer.
- View whether the question:
- : May disqualify a user from returning to campus.
- : May put the user into isolation.
- : Requires a file upload.
- Show who the question is visible to by user type and campus.
Follow up question limitsCopy link to clipboard
Initial questions can have as many follow-up questions as you need. Their follow-up questions can even have their own follow-up questions.
However, a question that is already nested under another question cannot have any follow-up questions.
Response typesCopy link to clipboard
When you create a new question, you can select which response type you want the question to be: Yes/No, Single Selection, Multiple Selection, or Short answer.
Yes/no questions will display a simple yes or no option to end users.
For single and multiple selection questions, you can add and edit numerous choices that a user can choose from. If there are less than five choices, users will select from a radio button or checkbox list. If there are five or more, they will select from a dropdown list. For single selection questions, users can only choose one option. For multiple selection questions, they can choose multiple options.
For short answer questions, users can respond with free text or numbers. Their responses are limited to 255 characters.
Adding a questionCopy link to clipboard
Note: After you save the question you cannot edit the Response Type. For Single Selection and Multiple Selection questions, you cannot edit or delete the choices, but you can add choices, reorder them, and inactivate them.
To add a question to a questionnaire:
- From the CONFIGURE page, click the questionnaire type: Pass Request, Intake Survey, or Isolation Update.
- Click NEW QUESTION.
- Enter the Question Text.
- If you would like to include a tooltip for the question, enter the information you would like to display in the Helpful Information field.
- To configure the question to appear based on the response to a previous question:
- Select This is a follow-up to a preceding question.
- Choose the Preceding Question.
- Note: Questions with short answer response types cannot be selected as a preceding question.
- For Display when this response is selected, select the response that will trigger the follow-up question.
-
If there are multiple follow-up questions, you can reorder them using the arrows .

- Choose whether the response type should be Yes/No, Single selection, Multiple selection, or Short answer.
-
If you choose single or multiple selection, enter the Choices. To add more choices, click Add Choice.

- For yes/no, single selection, and multiple selection question types, configure the response choices.
- Choose whether a response choice should require a file upload.
- Choose whether a response choice should create an incident.
- For pass request and survey questions, choose whether a response choice should be Disqualifying, meaning the user is ineligible to return to their campus if they select that response.
-
Choose the Associated Guidelines for each response choice.

- Select if you want the question to only display for Internal users, Visitors, or Internal and Visitors. Default is Internal and Visitors.
- If you want the question to display only for users in certain roles, select Only show this question to certain internal roles, then select the roles.
- If you want the question to display only for users in a certain campus, select Only show this question to users in certain campuses.
-
Click ADD COUNTRY, ADD STATE/PROVINCE, ADD CITY, or ADD CAMPUS, then enter the corresponding location. Enter as many locations as you require.

-
- Click SAVE CHANGES.
Configuring pass request settingsCopy link to clipboard
The Pass Request Settings page allows you to determine if an student, faculty, and staff or visitor is eligible to return to campus. From here, you can manage pass request options, block daily pass requests, and configure pass request questions.
Enabling and disabling pass request optionsCopy link to clipboard
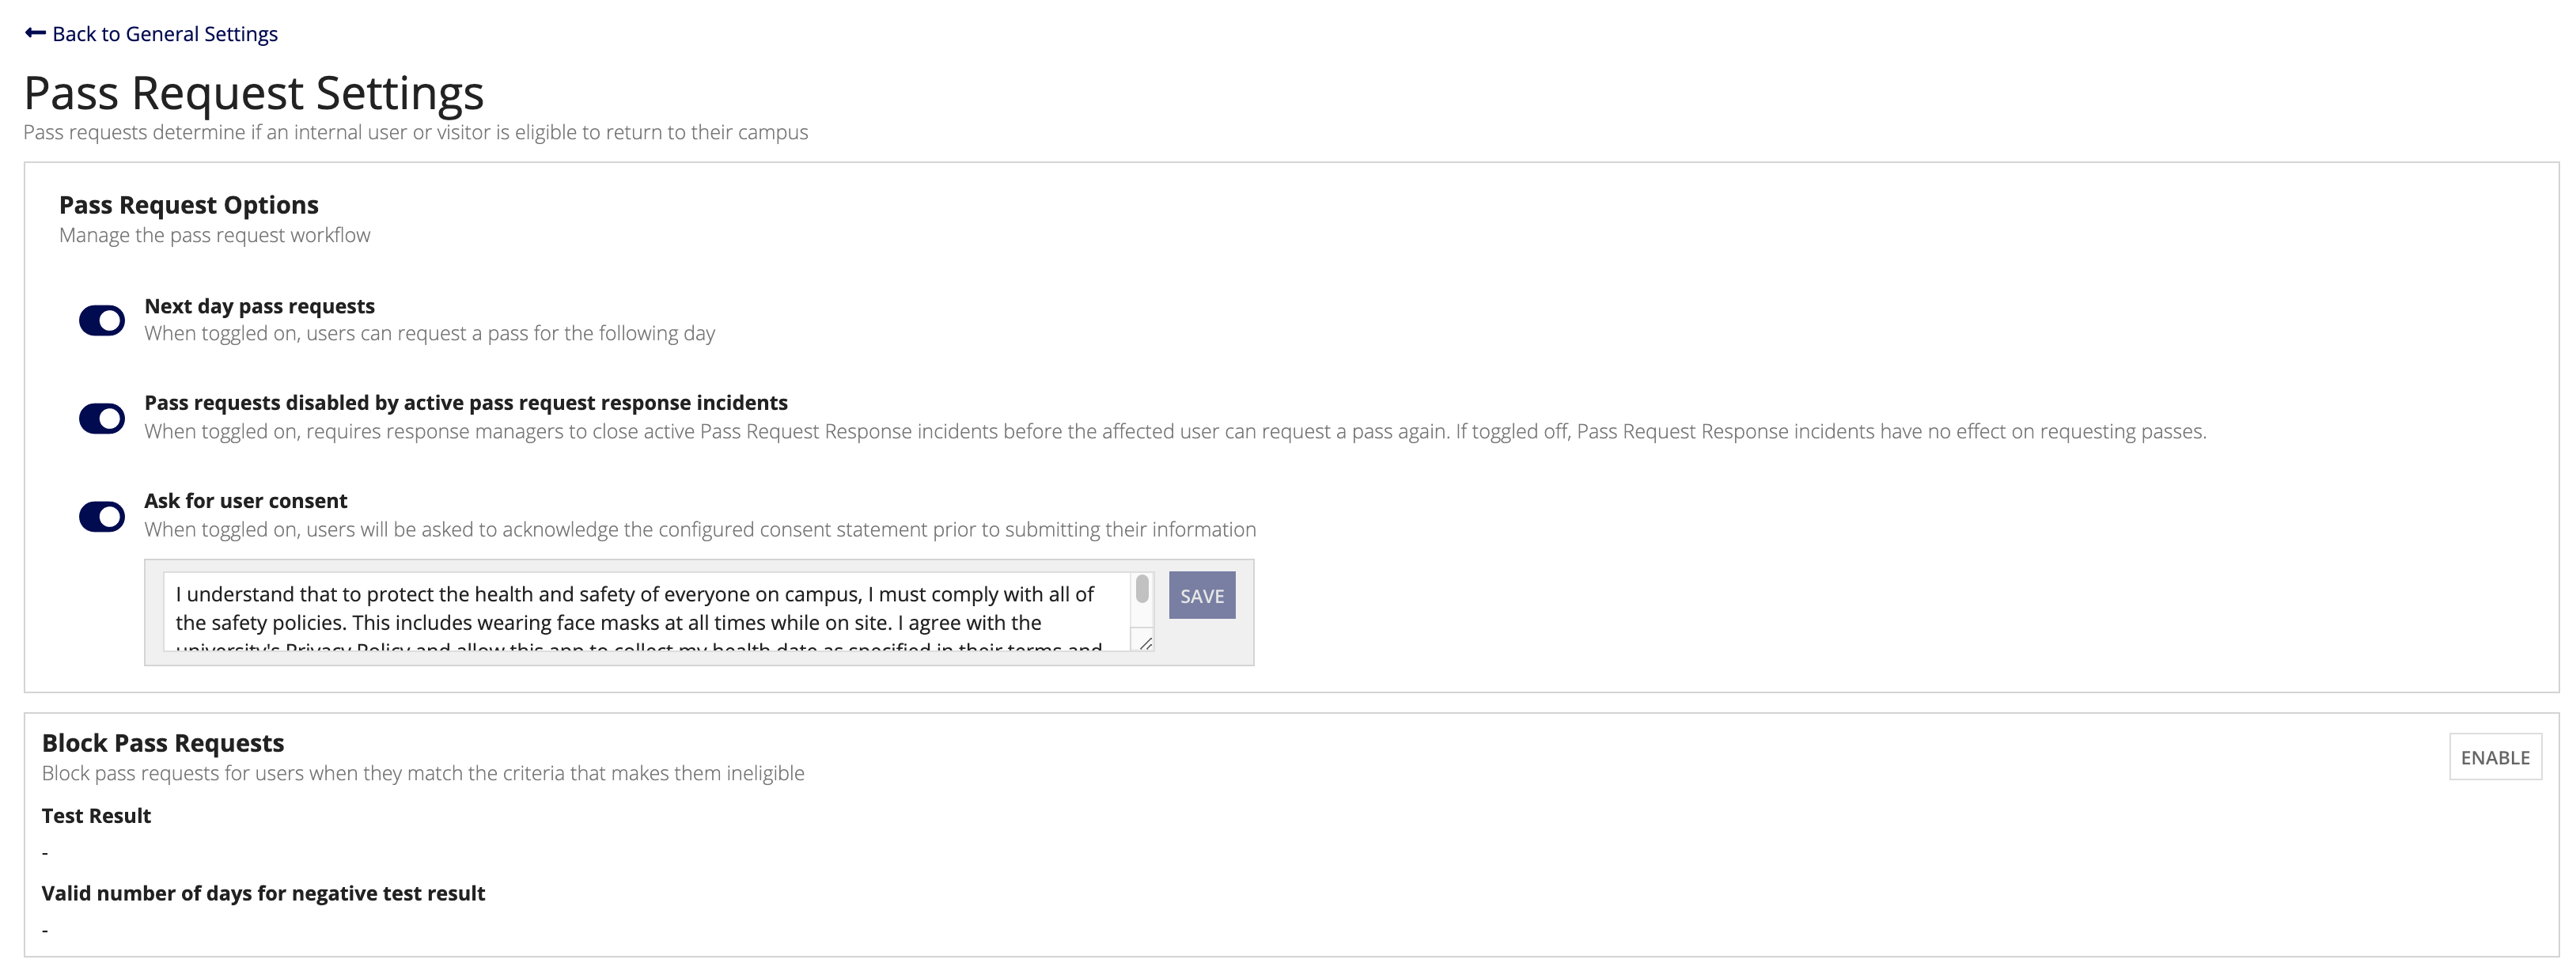
Pass request options give you complete control to manage the pass request workflow for your institution. This includes:
- Allowing users to request a next-day pass request for on-site visits.
- Disabling pass requests for any user that has an active pass request response incident.
- Requiring users to give consent before collecting their health information.
Configuring next day pass requestsCopy link to clipboard
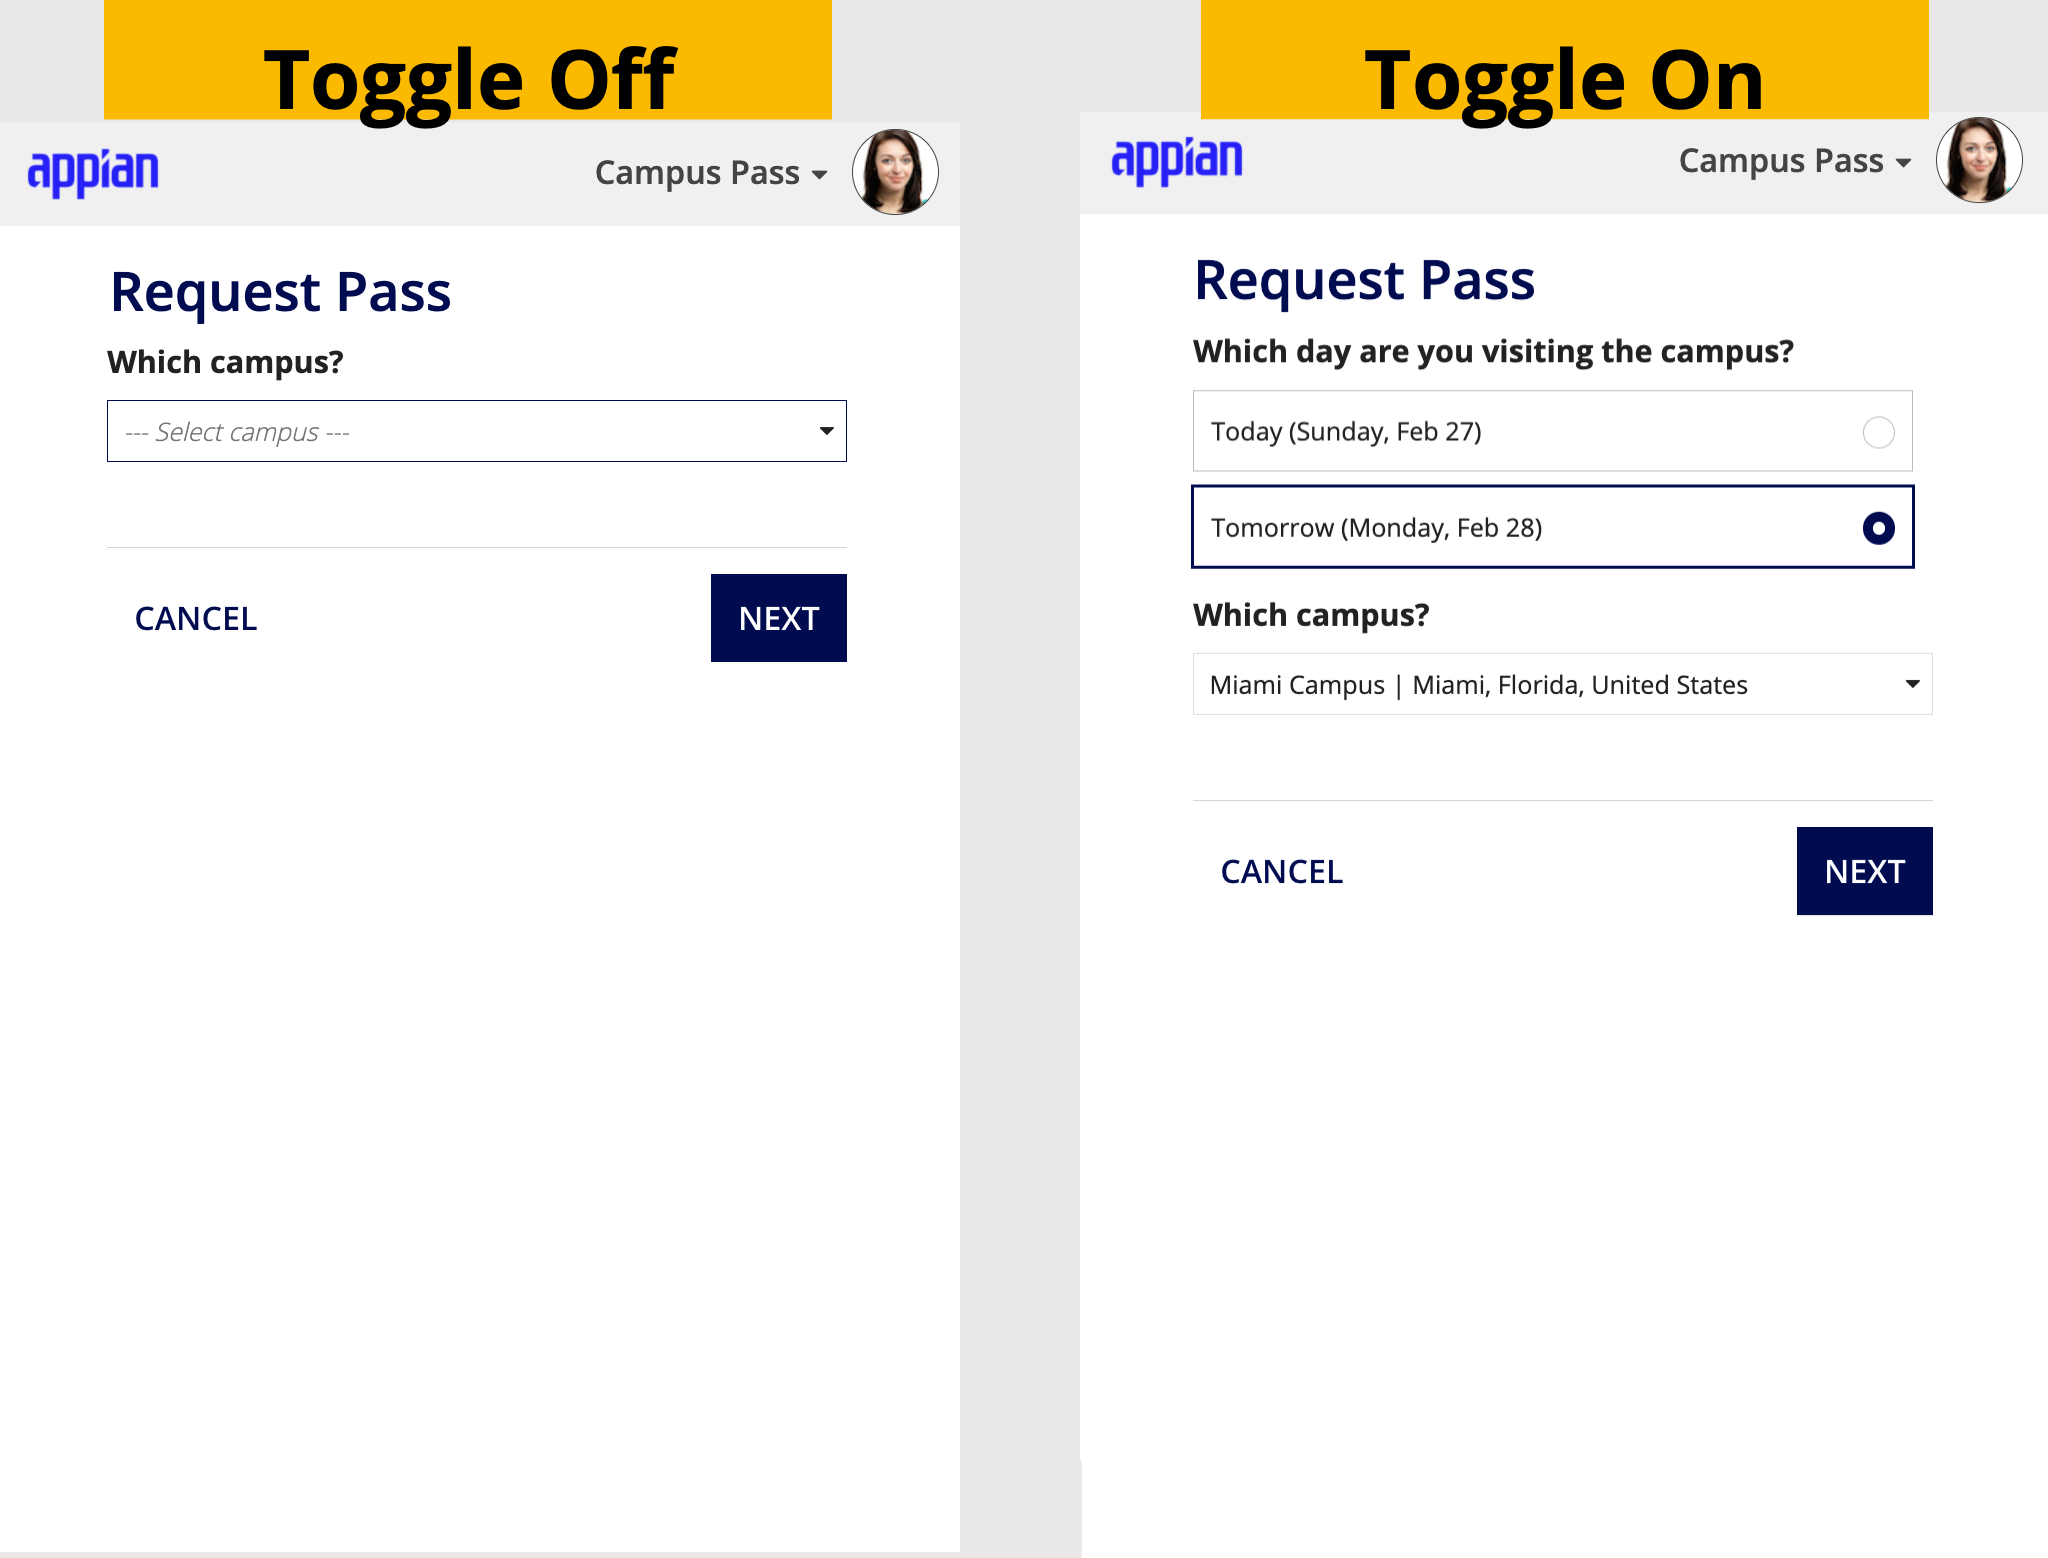
Use the Next day pass requests toggle to control whether or not users can request a pass the day before they plan to visit a campus.
When toggled on, you give users time to plan ahead by allowing them to request a pass the day before they want to visit a campus.
When toggled off, users will only be able to request a pass for the current day. In this scenario, users will only be asked what campus they are requesting a pass for and the pass will automatically be granted for the same day.
Disabling pass requests by active survey response incidentsCopy link to clipboard
When survey questions are being configured, certain responses can be configured to automatically create an incident to alert response managers.
When this setting is toggled on, response managers must close incidents that are created from a survey before the affected user can request a pass.
Tip: If the survey is not active, this feature toggle does not display.
When this setting is toggled off, incidents created from survey responses have no effect on users being able to request a pass.
Requiring user consentCopy link to clipboard
Your academic institution may have data privacy policies in place to protect your students, faculty, and staff. The CampusPass solution is California Consumer Privacy Act (CCPA) compliant. Before collecting any information from your students, faculty, and staff to determine if they are eligible to return to a campus, you can require user consent.
From Pass Request Settings, you can configure your pass request questionnaire to ask for user consent before users answer any questions. Use the Ask for user consent toggle and consent form to easily enable the user consent notice and populate the consent form with text that adheres to your institution's legal and compliance requirements.

To enable user consent:
- From the CONFIGURE page, click Pass Request in the Questionnaire Settings section.
- Toggle the Ask for user consent on.
- In the consent form, enter your institution's legal and compliance statement.
- Click SAVE.
When this setting is toggled off, user consent is not required and users do not receive a consent notice before answering pass request questions.
Blocking pass requestsCopy link to clipboard
The Block Pass Requests setting allows response managers to automatically block students, faculty, and staff from requesting a daily pass when they match certain criteria that makes them ineligible.
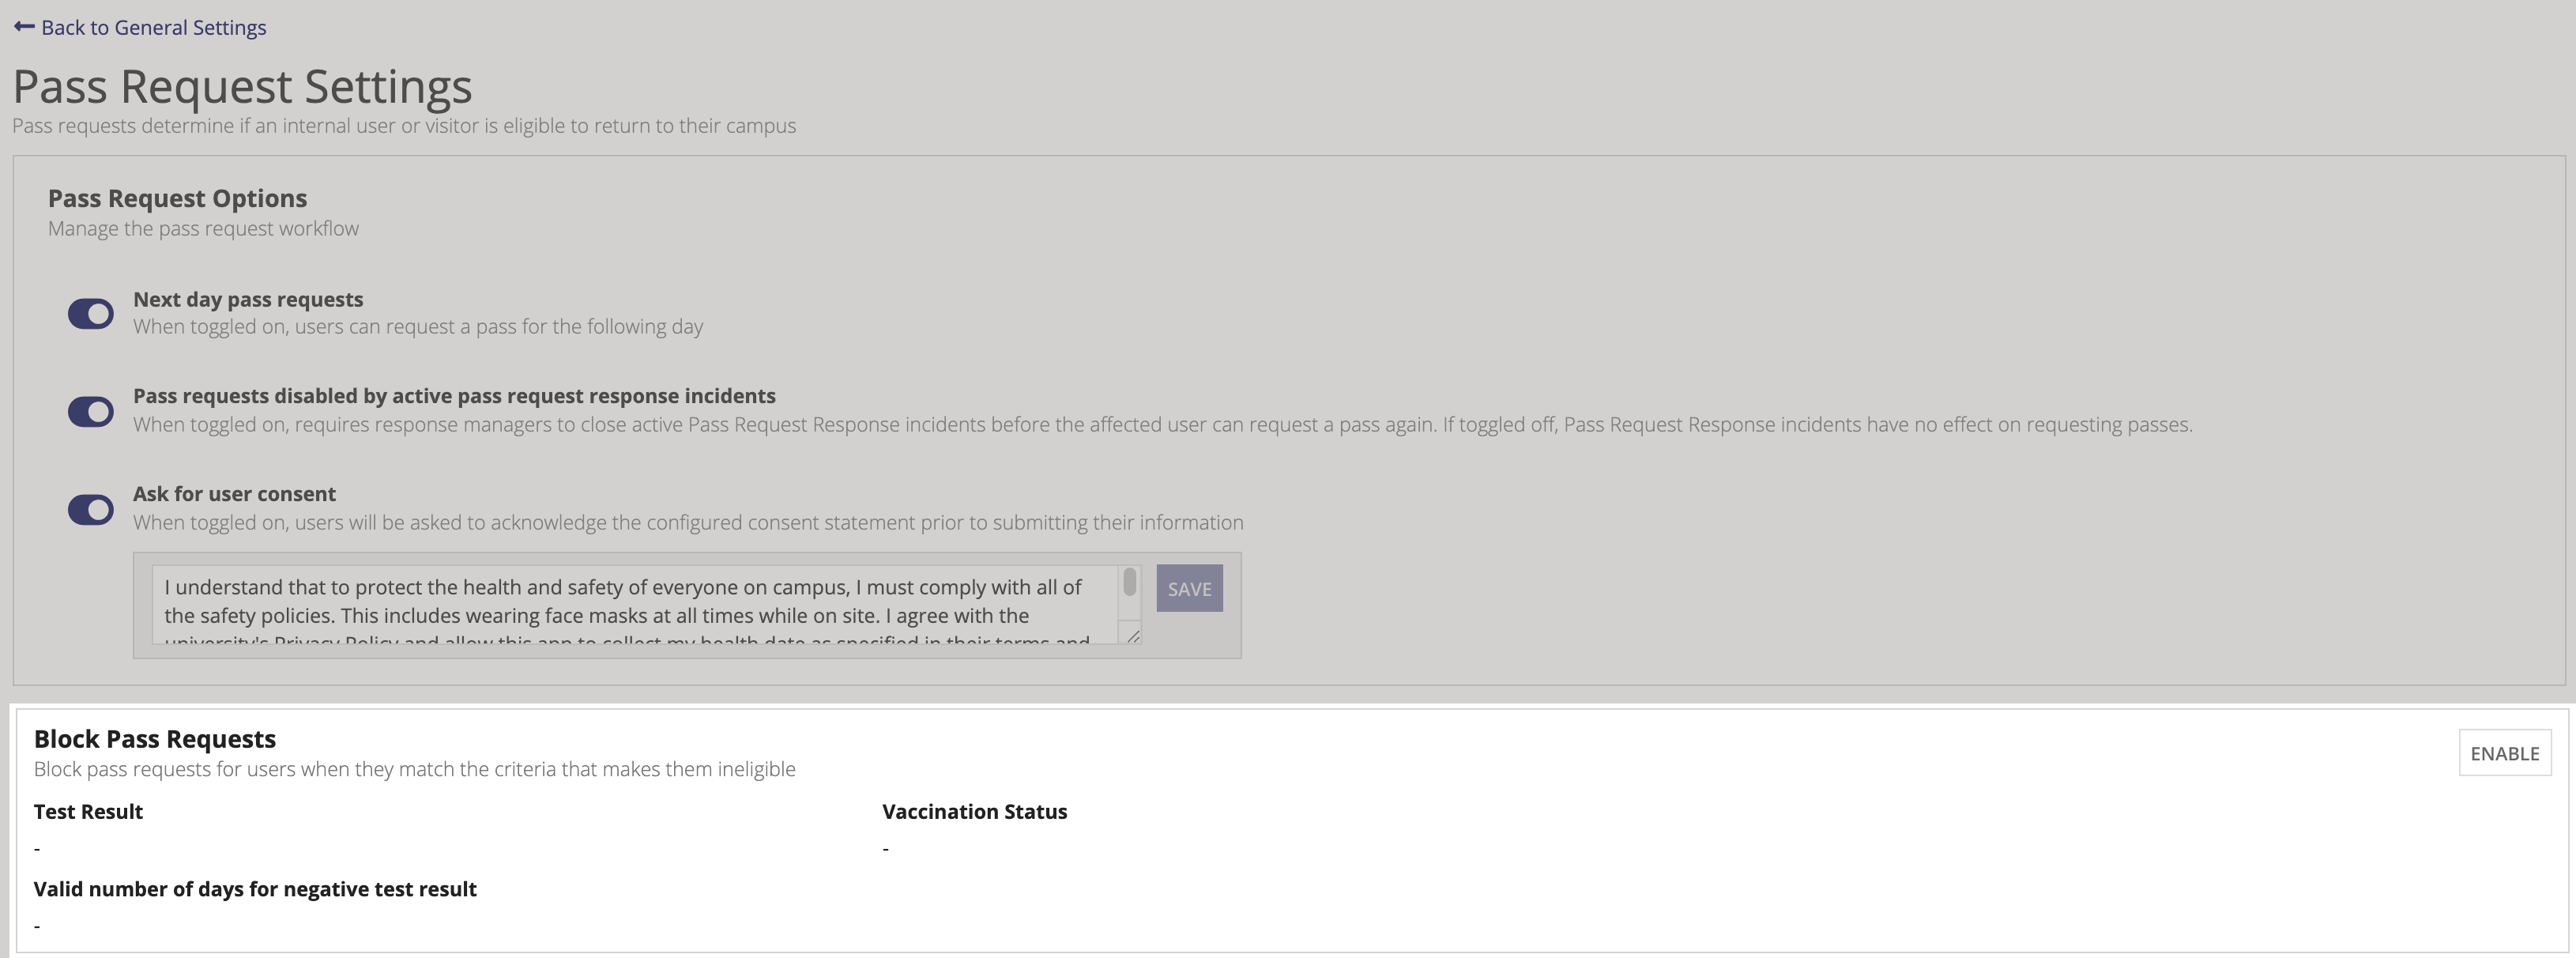
CampusPass automates the process so you don't have to manually identify and block affected users. This takes the stress out of potentially blocking the wrong person because only users that match all of the criteria you selected are blocked.
When you enable this feature, users that match your selected criteria are automatically blocked from requesting a daily pass request. You can block students, faculty, and staff based on their vaccination status, the absence of a negative test result or a pending test request, or both.
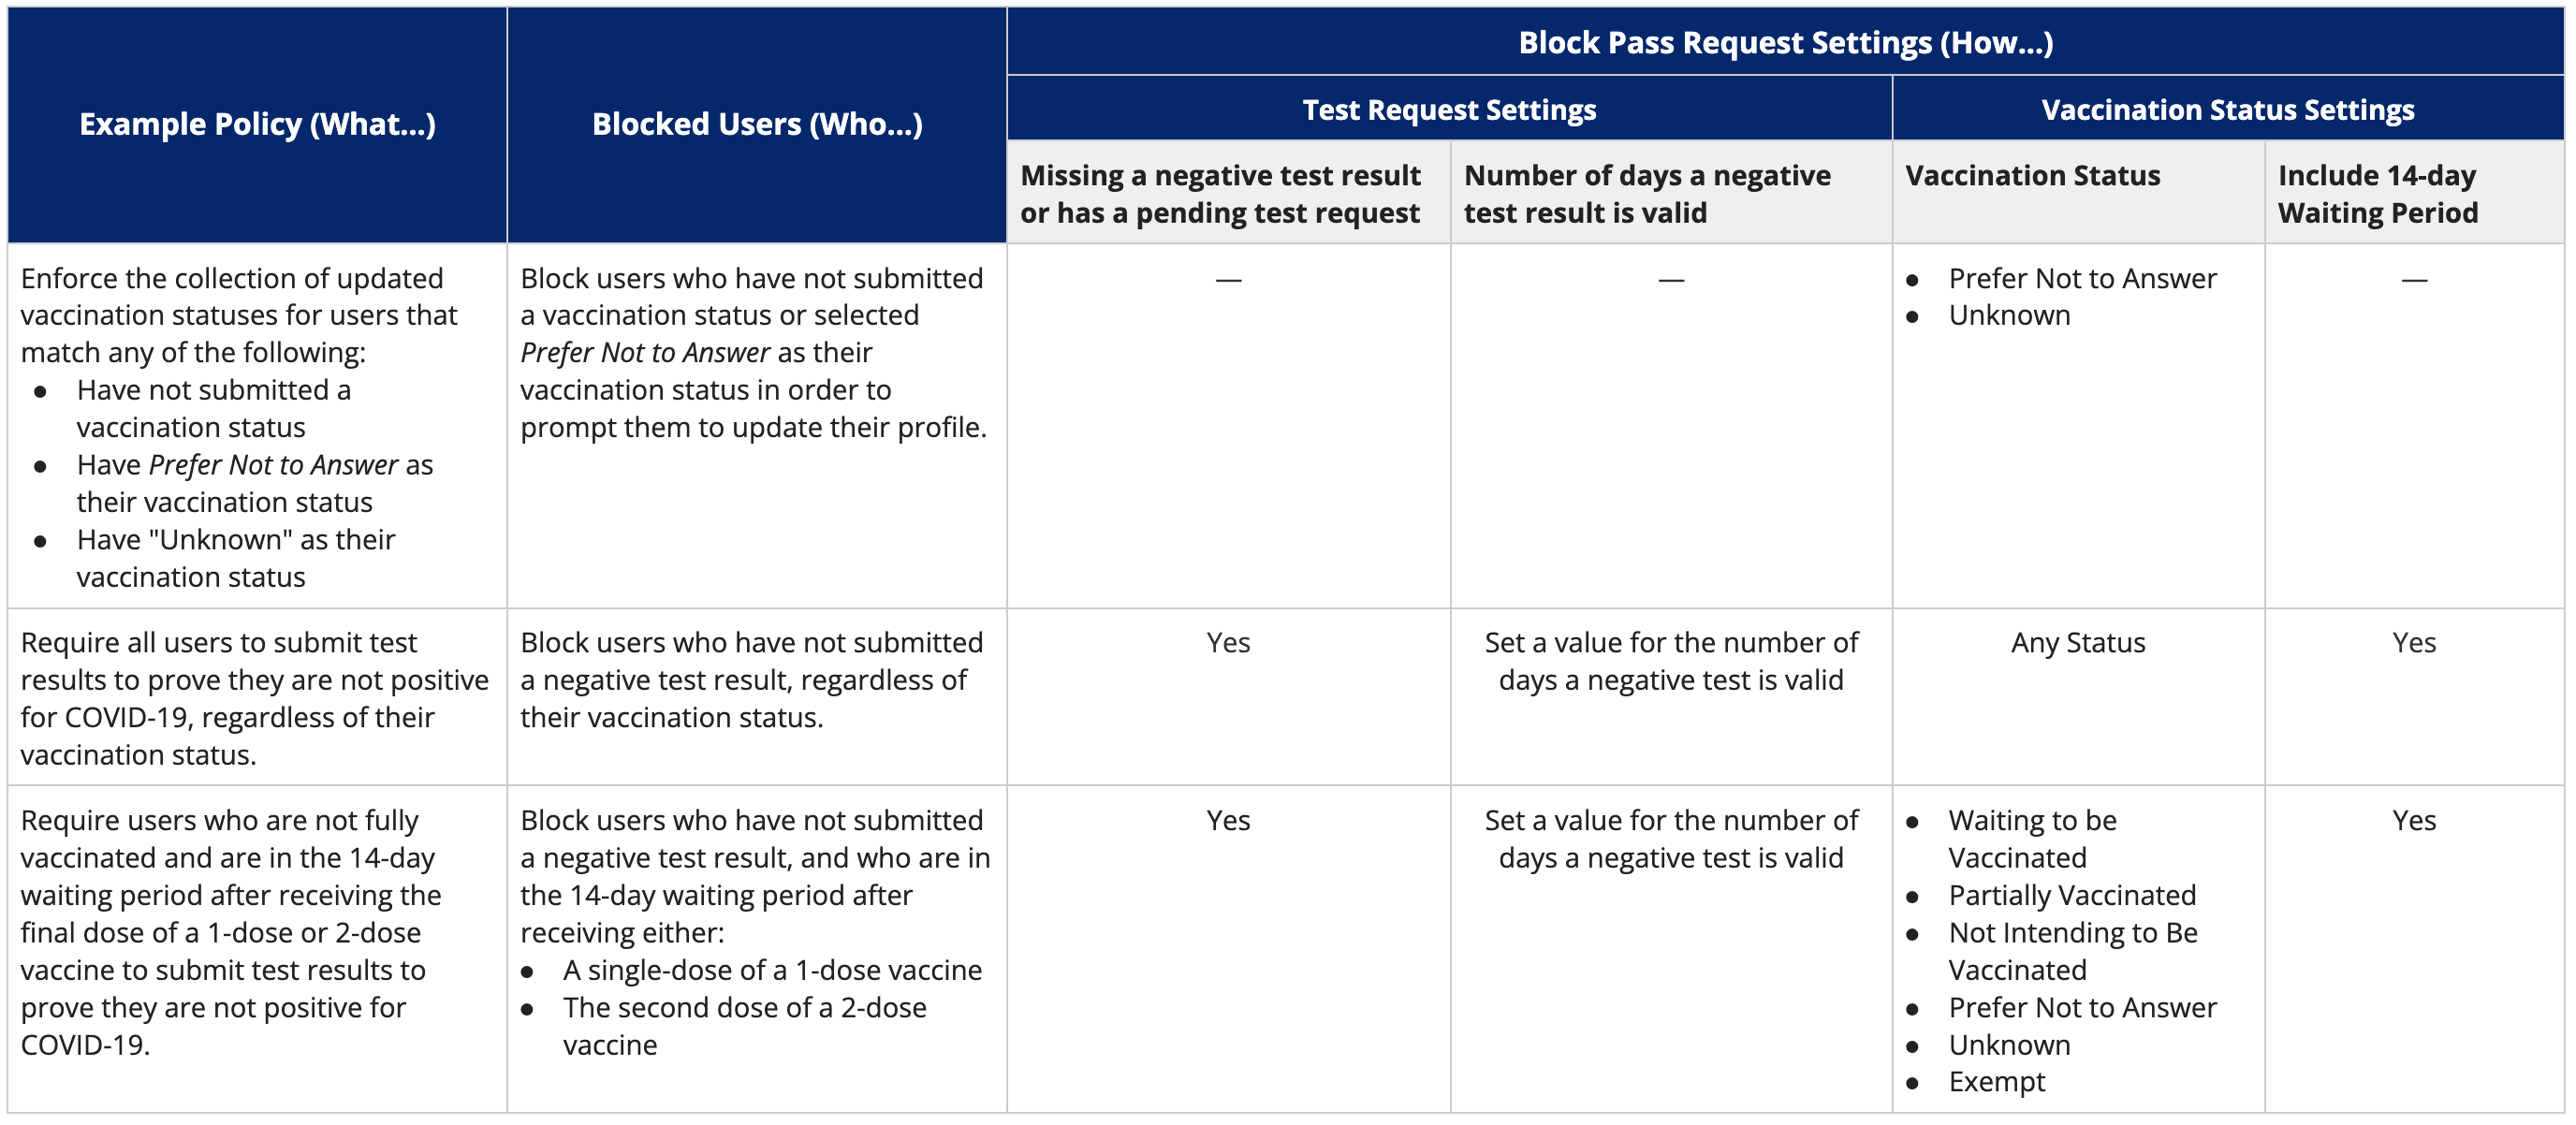
For example, users who have not submitted a vaccination status or selected Prefer Not to Answer as their vaccination status will see the following prompt on the CampusPass home page:
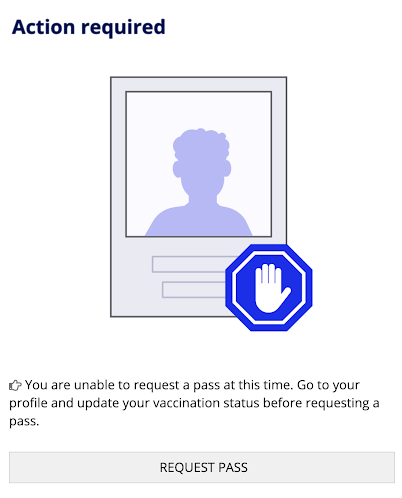
Regardless of their vaccination status, users who who have not submitted a negative COVID-19 test result will see the following prompt on the CampusPass home page:
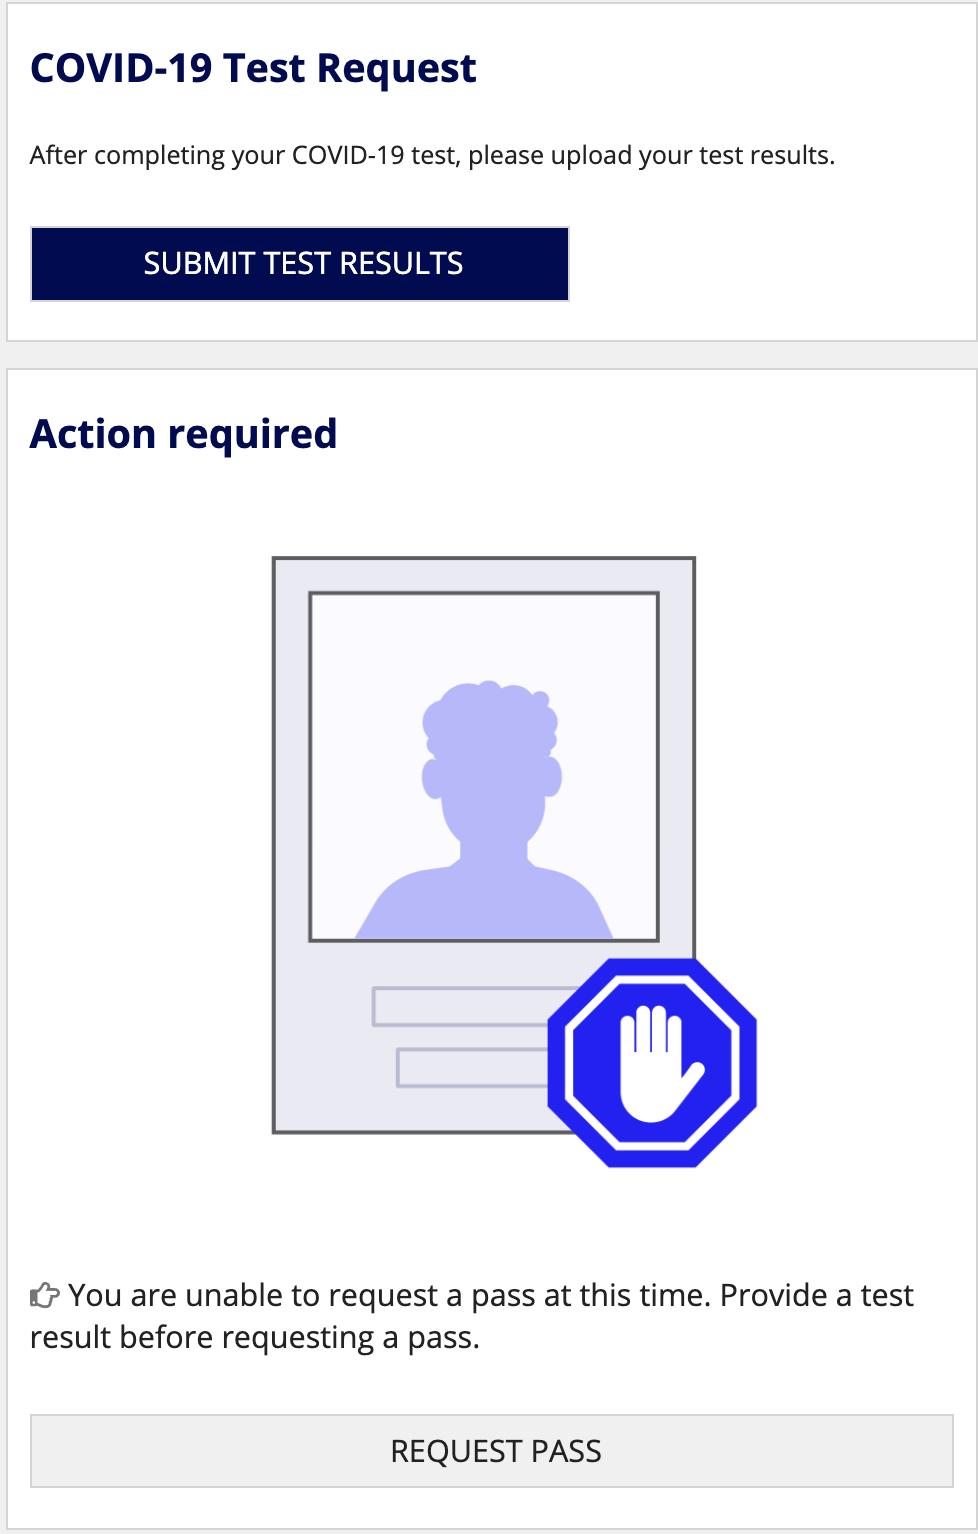
Users will see the following prompt on the CampusPass home page, if they have not submitted a negative COVID-19 test result, and who are in the 14-day waiting period after receiving either:
- A single-dose of a 1-dose vaccine
- The second dose of a 2-dose vaccine
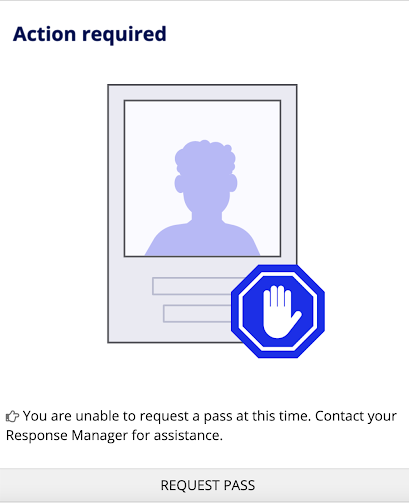
Note: Note that from the date you configure the Block Pass Requests and continuing forward, the testing and vaccination criteria you define will apply to any user that matches them, except Users who have an existing on-site reservation or a pass request that was granted before your institution configured the Blocked Pass Requests feature. These users are not retroactively blocked even if they match the criteria configured in this setting.
Recommended settings for common pass request policiesCopy link to clipboard
Setting up the Block Pass Requests configuration for your institution and deciding which users to block from requesting a pass will depend on how your institution's defines its policies around COVID-19 testing and vaccination tracking.
The following table describes 5 of the most common reasons why your institution might want to block students, faculty, and staff from requesting a pass to come on site and which feature settings to apply for each scenario.
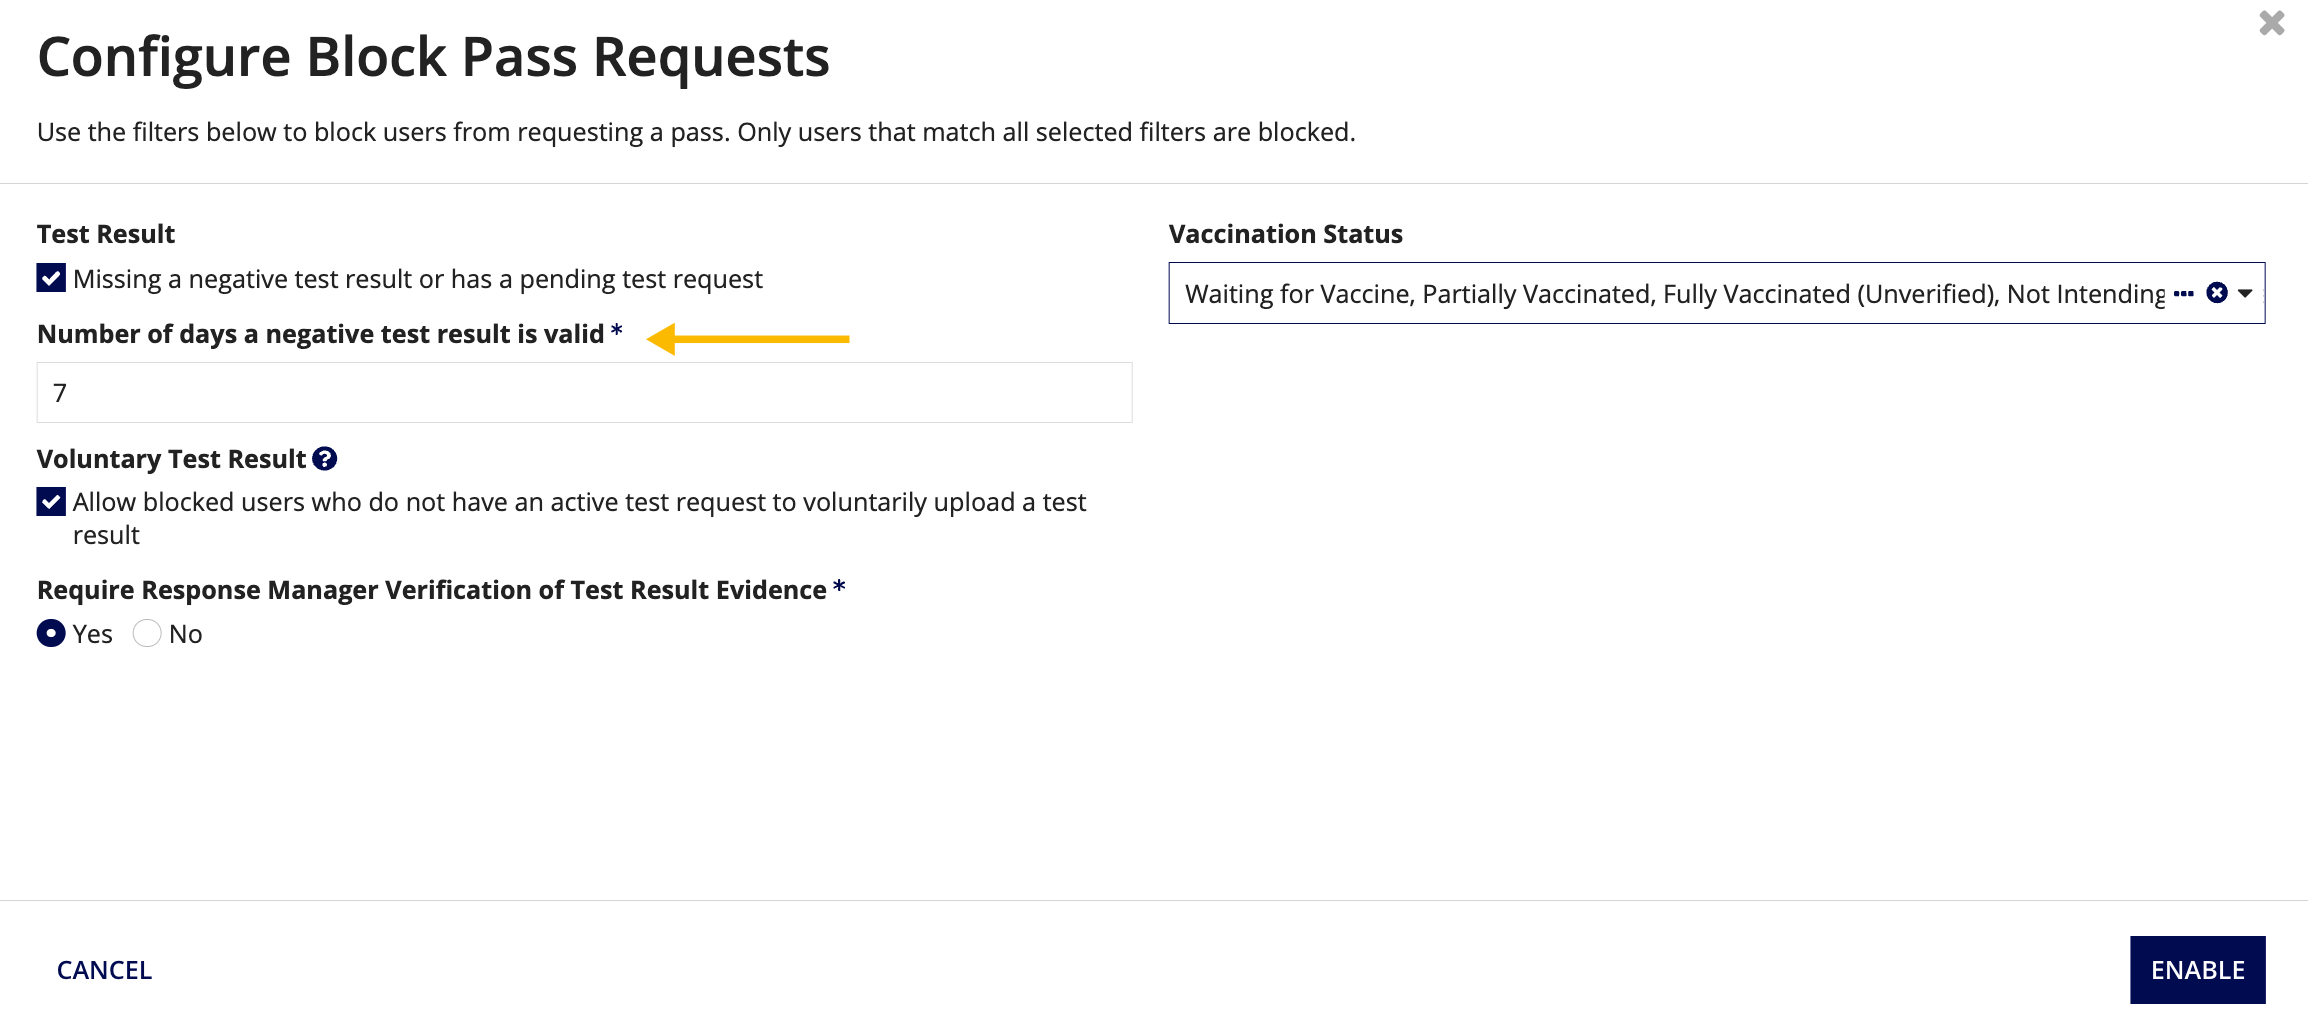
Blocking students, faculty, and staff that have not submitted a negative COVID-19 test when you have the Automated Test Requests setting enabled will automatically update the Number of days a negative test result is valid setting for Block Pass Requests to match the test frequency you set for Automated Test Requests. This setting will appear as a read-only field in Block Pass Requests, allowing you to see the matched value only.
If Automated Test Request is disabled, you must define the Number of days a negative test result is valid setting for the Block Pass Requests setting. Defining a value for this setting allows you to add another layer of safety to your institution's health and safety policy by ensuring all students, faculty, and staff regularly update their COVID-19 test status.
Allowing blocked users to submit voluntary test resultsCopy link to clipboard
You can also configure Block Pass Requests to allow blocked users to submit a voluntary test result. This setting is helpful if you do not have the Automated Test Request feature enabled and require a response manager to manually request COVID-19 test results from users.
For example, let's say a user is blocked from requesting a pass because they have not submitted a negative COVID-19 test result, and they do not have an active test request from a response manager, this user will simply remain in the blocked status until both conditions are met. To work around this, you can configure the Block Pass Request feature to allow blocked users who do not have an active test request initiated by a response manager to voluntarily upload a test result.
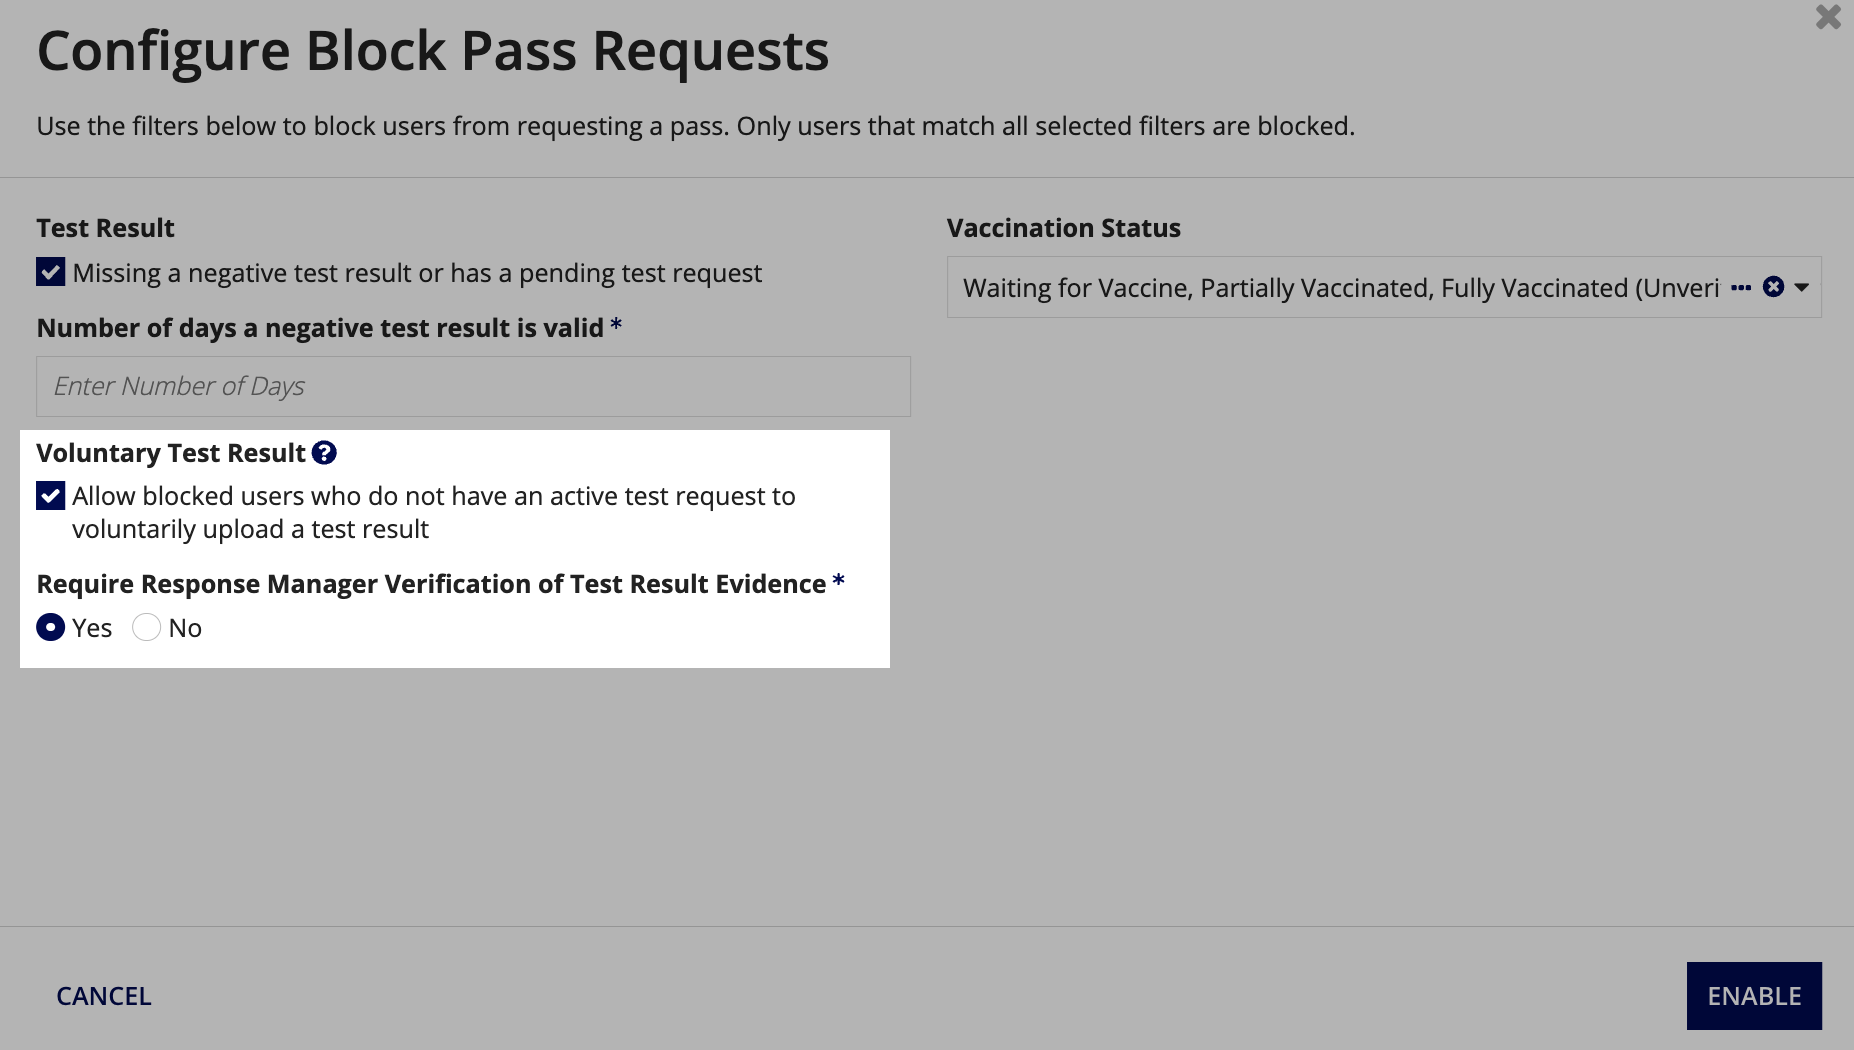
After enabling this setting, you will also have the option to decide if you want to require a response manager to verify voluntary negative test results uploaded by your users.
If you do not require a response manager to verify these negative COVID-19 test results, users in this state are automatically unblocked and can request a pass after they voluntarily submit a negative result. If the user uploads a positive test result, they are automatically put in isolation.
Enabling Block Pass RequestsCopy link to clipboard
If you decide to block students, faculty, and staff based on their vaccination status, you must first turn the Collect Vaccination Information setting on. To enable this setting, navigate to the Vaccination Insights feature and toggle Collect Vaccination Information on. This allows CampusPass to collect vaccination information from your employees.
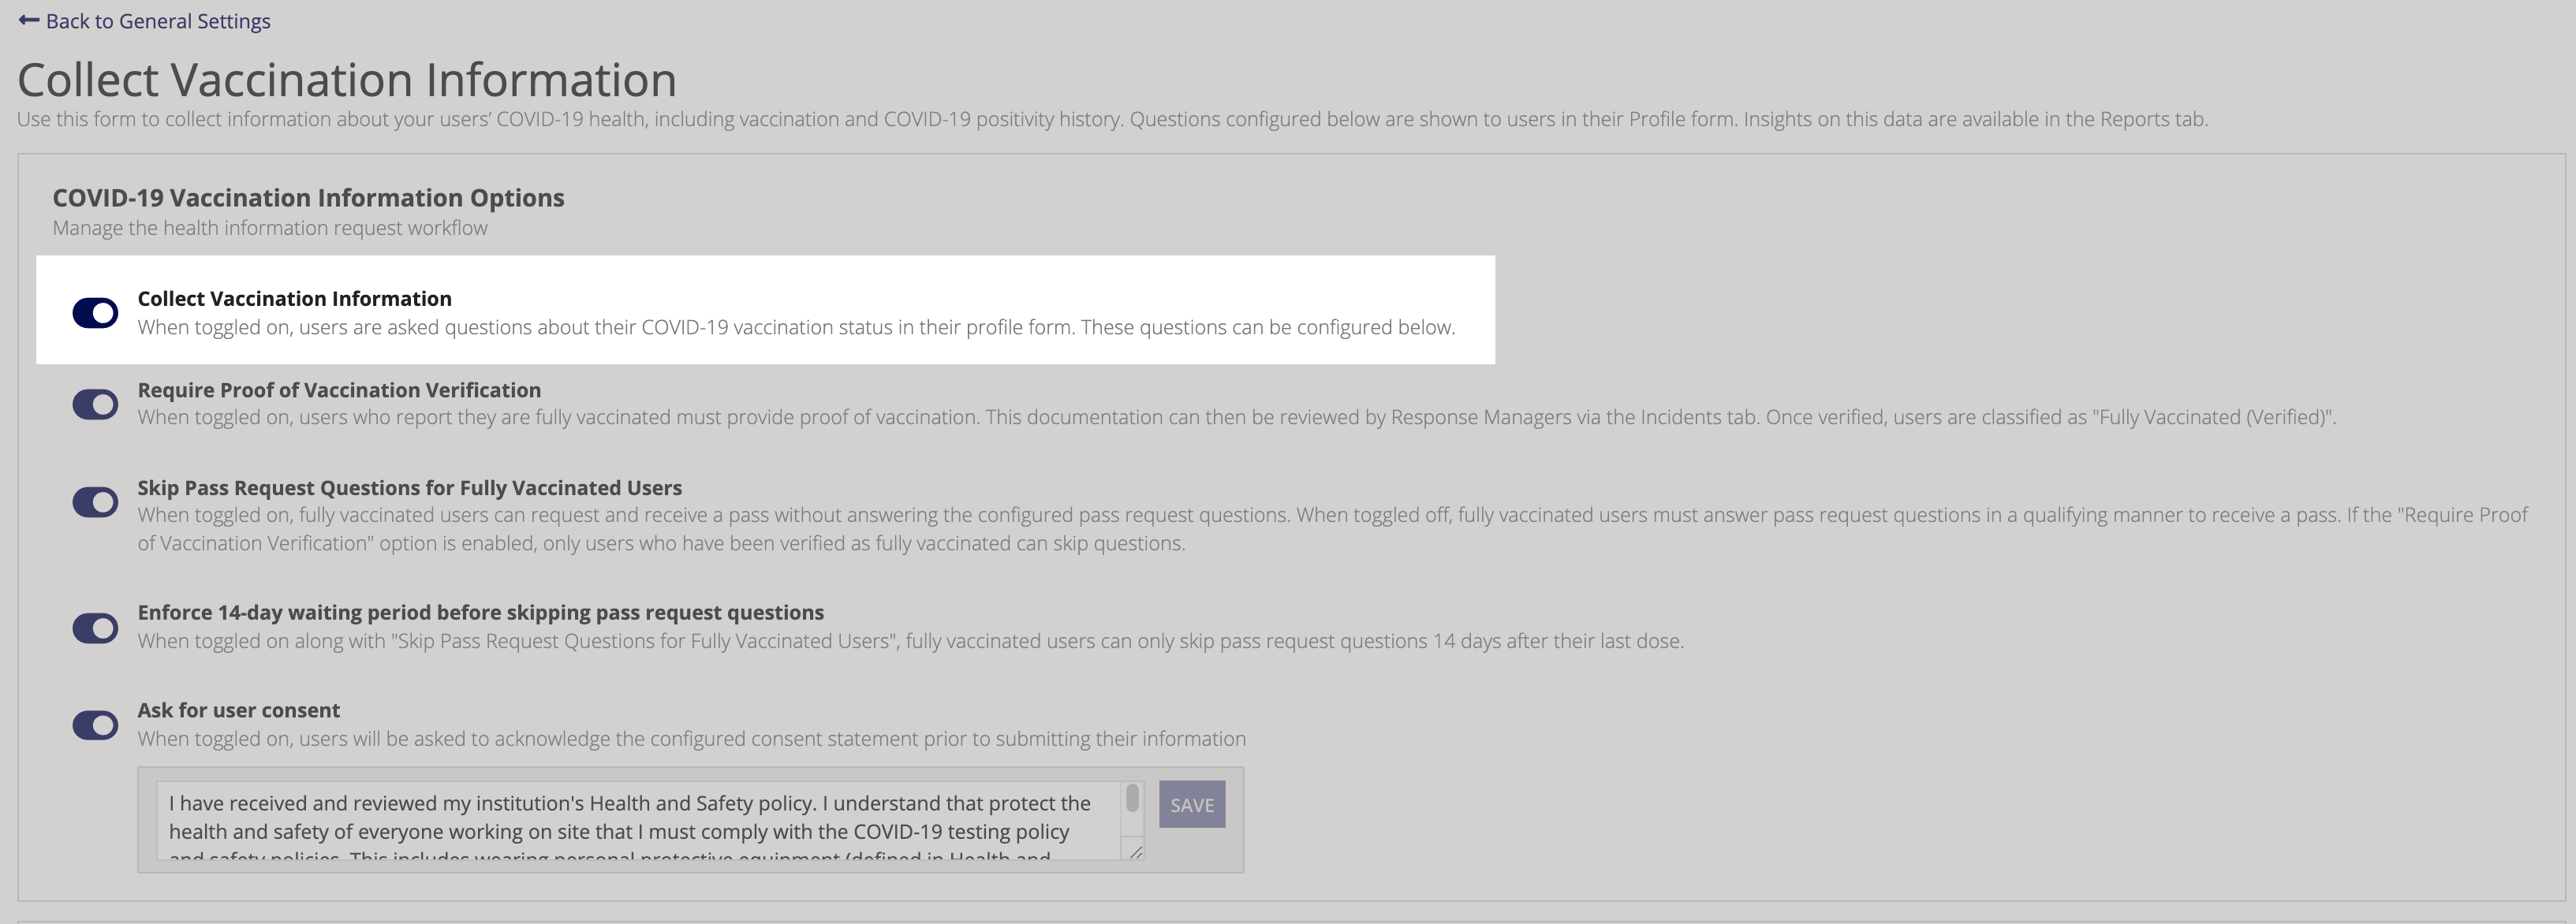
To enable and configure Block Pass Requests:
- From the CONFIGURE page, click Pass Request in the Questionnaire Settings section.
- In the Block Pass Requests section, click ENABLE to open the Configure Block Pass Requests dialog.
- Select the Missing a negative test result or has a pending test request checkbox to block students, faculty, and staff that have not submitted a negative COVID-19 test.
- Enter a numeric value for the number of days you want a negative test result to be valid.
- Click the Vaccination Status dropdown and select the vaccination statuses you want to use as the criteria for blocking students, faculty, and staff from requesting a pass.
- For example, if you want to block all students, faculty, and staff from requesting a pass who are not verified as Fully Vaccinated, select all of the following filters:
- Waiting for Vaccine
- Partially vaccinated
- Fully Vaccinated (Unverified)
- Not Intending to Be Vaccinated
- Prefer Not to Answer
- Unknown
- Exempt

- For example, if you want to block all students, faculty, and staff from requesting a pass who are not verified as Fully Vaccinated, select all of the following filters:
If you disable Block Pass Request for any reason, all of your existing settings will automatically reset and students, faculty, and staff that are not fully vaccinated, have not submitted a negative test result, or both can resume requesting a pass to return to a campuses.
Configuring intake surveysCopy link to clipboard
You can configure an intake survey, which is a set of initial questions that are sent to internal users before they are able to start requesting passes, from the Questionnaire Settings section. Simply click Intake Survey to get started.
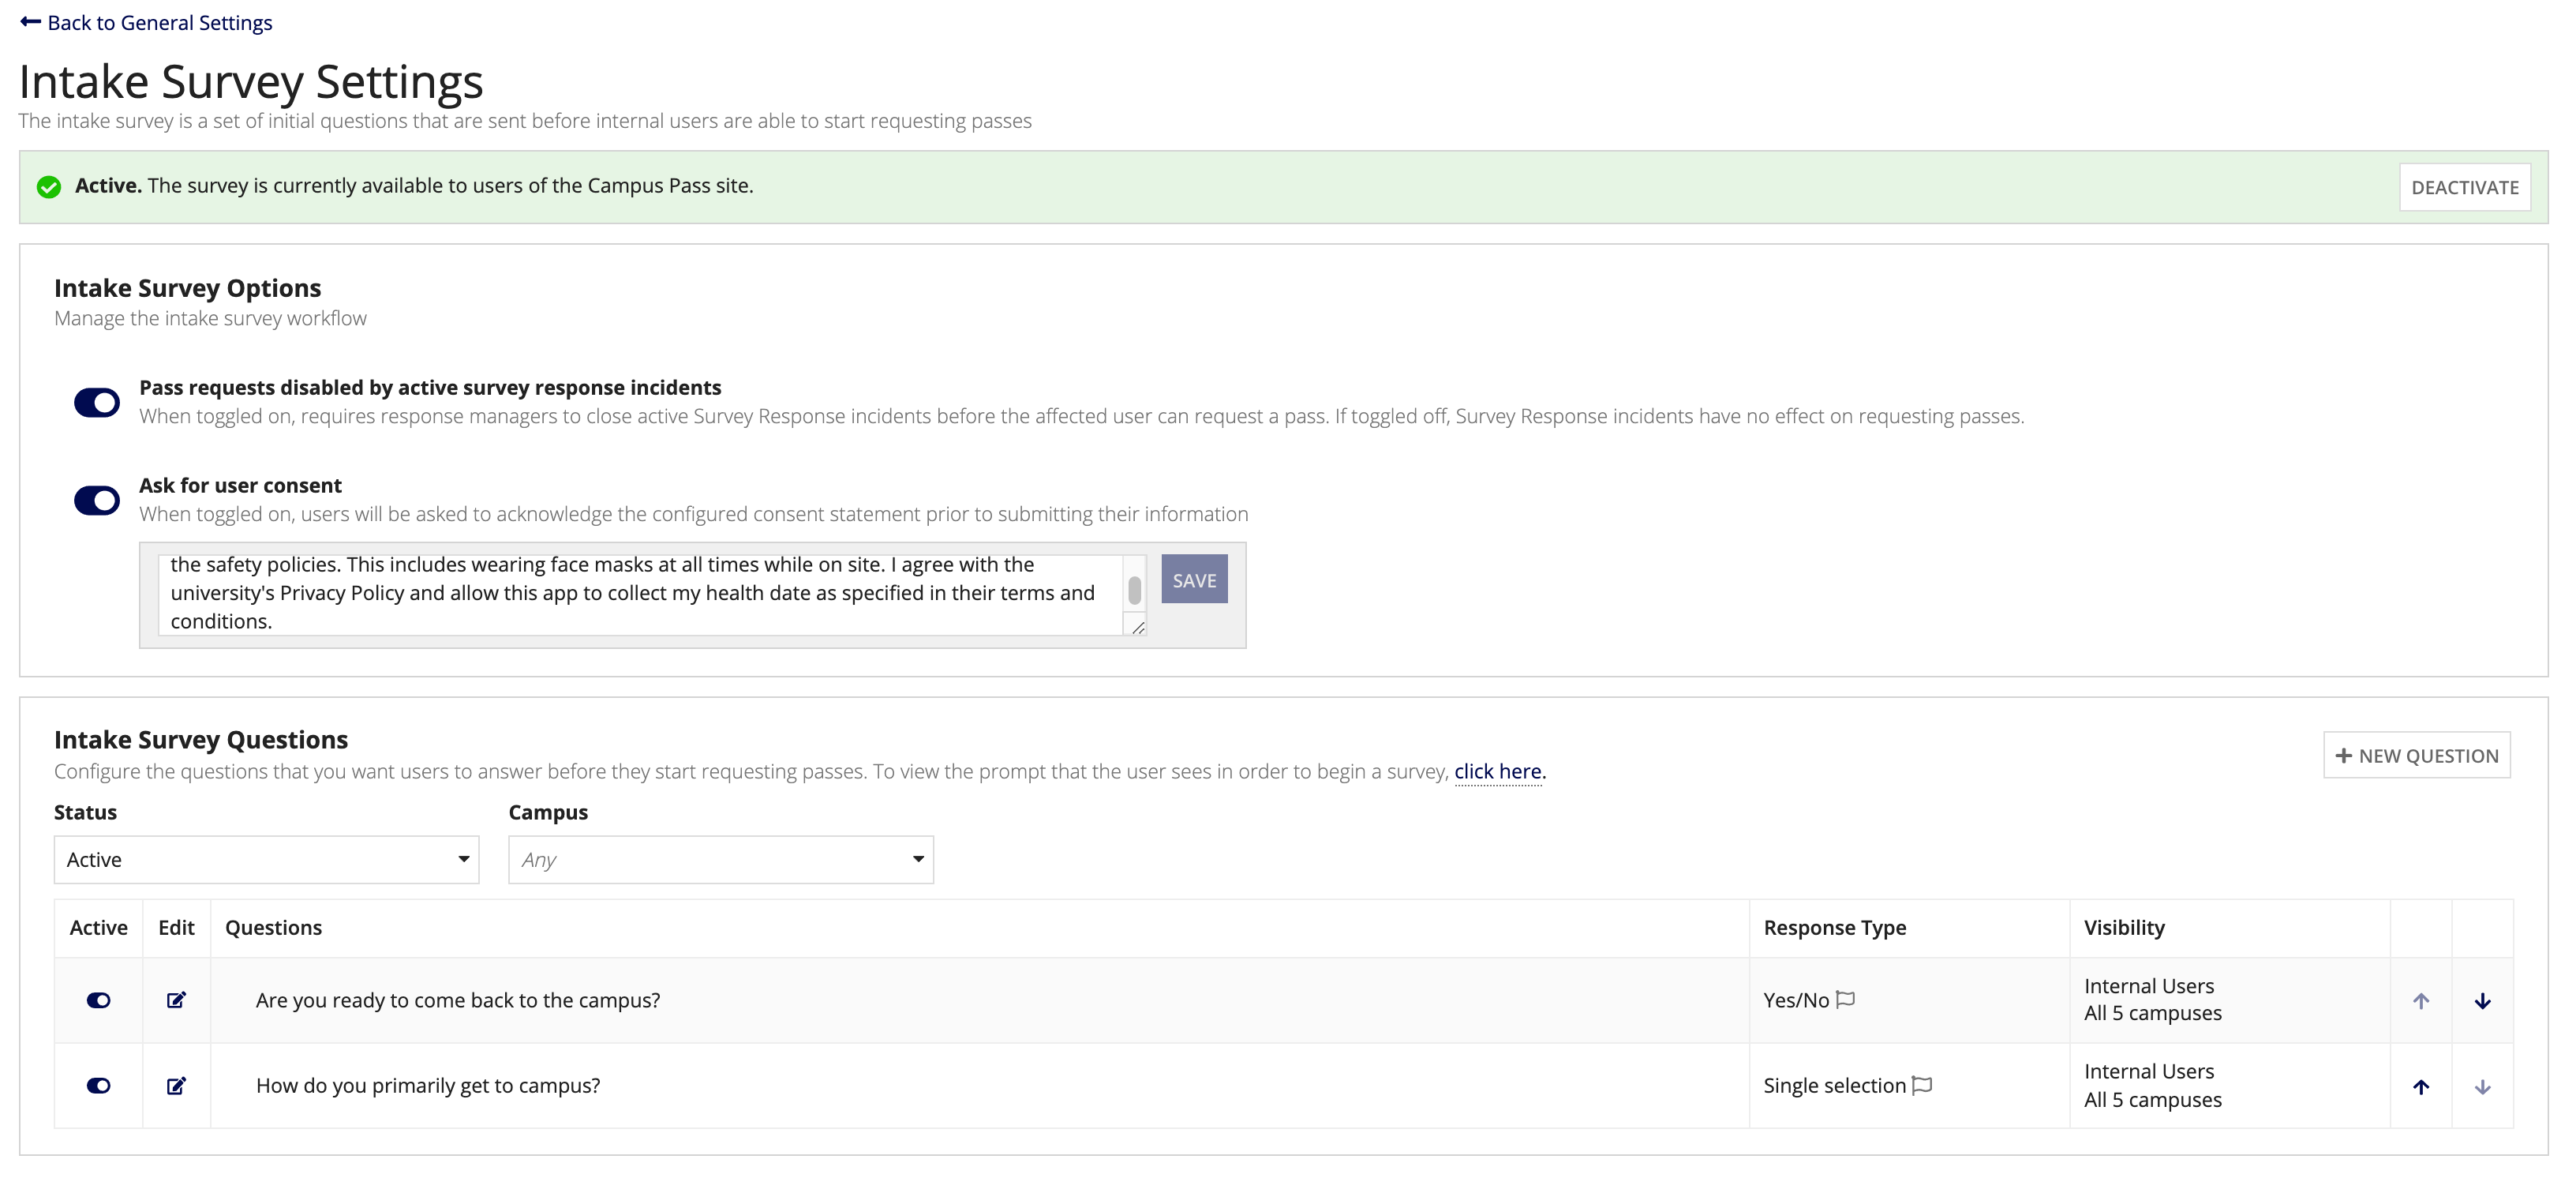
Activating and deactivating intake surveysCopy link to clipboard
When you want to gauge user interest or their ability to return to campus, you can activate the intake survey. When you have finished collecting this information, you can deactivate it.
After you activate a survey, users will be required to fill out the survey before they can request a pass.
To activate or deactivate the survey:
- From the CONFIGURE page, click Intake Survey in the Questionnaire Settings section.
- At the top of the page, click ACTIVATE or DEACTIVATE.
- Make sure you have at least one survey question added.
Configuring isolation updatesCopy link to clipboard
If you would like to ask users how they are doing during isolation, you can configure questions for them to answer when in isolation from the Questionnaire Settings section.
Activating and deactivating isolation updatesCopy link to clipboard
Control when you want to gauge how users are doing in isolation by activating and deactivating the isolation update. After the isolation update is activated, users will be asked to fill out the isolation update from their home page.
To activate or deactivate the isolation update:
- From the CONFIGURE page, click Isolation Update in the Questionnaire Settings section.
- At the top of the page, click ACTIVATE or DEACTIVATE.
- Make sure you have at least one isolation update question added.
Automatically remove users from isolationCopy link to clipboard
You can also configure isolation updates to automatically remove users from isolation when they meet specific criteria you set. Note that you must select and define at least one criterion to enable this feature.

To automate isolation removal:
- From the CONFIGURE page, click Isolation Update in the Questionnaire Settings section.
- Select the Automatically remove a user from isolation when certain criteria are met check box.
- Select and define one or both of the criteria listed below that users must meet to in order to be automatically removed from isolation:
- Student, faculty, and staff must complete a the defined recovery period
- Student, faculty, and staff must take a COVID-19 test and receive a negative result
- Click SAVE SETTINGS.

