OverviewCopy link to clipboard
OpenID Connect (OIDC) is a modern standard built on top of the OAuth 2.0 protocol. When configured, Appian users can log in using OIDC authentication. Similar to SAML, OIDC redirects users to an external identity provider (IdP) to establish single sign-on (SSO).
How OIDC works with AppianCopy link to clipboard
You can add a single OIDC identity provider for a given Appian environment.
To add an OIDC identity provider:
- In the Admin Console, under AUTHENTICATION, click OpenID Connect.
- Select Enable OpenID Connect.
- Configure the Appian Settings.
- Configure Group Membership Synchronization.
- Configure Attribute Mapping.
- If you are logged as a user that's a member of the selected Authentication Group, click Verify My Access and sign in with your current user. This ensures that you can still sign in to Appian. This is mandatory so that you do not accidentally lock yourself out.
- Click SAVE CHANGES.
Enabling OpenID Connect AuthenticationCopy link to clipboard
Once enabled, if OIDC authentication is the only identity provider configured in your environment, users will automatically be redirected to the configured Authorization Endpoint when they navigate to Appian.
Users who aren't in the selected Authentication Group will still be able to log in with Appian native authentication by navigating to suite/?signin=native.
Appian SettingsCopy link to clipboard
The Appian Settings are used to configure the connection with OpenID Connect and determine which Appian users will authenticate using it.
| Field | Description |
|---|---|
| Client ID | The client identifier for your OpenID Provider. |
| Client Secret | The client secret for your OpenID Provider. |
| Protocol | Select the protocol you wish to use to configure your endpoints. This can either be the OpenID Connect Discovery 1.0 protocol or the OpenID Connect Core 1.0 protocol. This radio button determines which of the fields you see below. |
| OpenID Connect Discovery Endpoint | The URL that points to the OpenID Connect Discovery Endpoint. This endpoint will return metadata about your OpenID Provider. Among the data returned are several important URLs: Issuer URL, Authorization Endpoint, Token Endpoint, User Info Endpoint,and JWKS Endpoint. Must start with https://. |
| Issuer URL | The URL that the OpenID Provider asserts as its Issuer Identifier. Must start with https://. |
| Authorization Endpoint | The URL that points to the OpenID Provider’s Authorization Endpoint. Must start with https://. |
| Token Endpoint | The URL that points to the OpenID Provider’s Token Endpoint. Must start with https://. |
| UserInfo Endpoint | The optional URL that points to the OpenID Provider’s UserInfo Endpoint. This will return claims about the authenticated user. To obtain the requested claims about the user, the Client makes a request to the UserInfo Endpoint using an Access Token obtained through OpenID Connect Authentication. These claims are represented by a JSON object that contains a collection of name and value pairs for the claims. If this is left blank, then attributes and group sync will be performed using the claims in the ID Token returned by the Token Endpoint. If it is populated, then attributes and group sync will leverage the claims returned by this endpoint. Must start with https://. |
| JWKS Endpoint | The URL that points to the OpenID Provider’s JWKS Endpoint. Must start with https:// |
| End Session Endpoint | The optional URL that points to the OpenID Provider’s End Session Endpoint. This can be used to trigger single sign-out, as detailed in the OpenID Connect spec. To use the end session endpoint a client application will redirect the user’s browser to the end session URL. All applications that the user has logged into via the browser during the user’s session can participate in the sign-out. Must start with https://. |
| Scope | The value of the scope parameter that should be sent to the Authorization Endpoint. |
| Username Claim | The key for the claim in the ID token that corresponds to the Appian username. |
| Authentication Group | A group containing all users that should authenticate through this IdP. We recommend you have at least one administrator account that does not authenticate through OIDC so that you can never lock yourself out of Appian. Note: this Authentication Group will come first in priority order before SAML authentication groups. This will be checked first. The only exception is environments which have PIEE authentication enabled, in which no OIDC/SAML/LDAP IdPs will work. |
| Callback URL (Read-Only) | This read-only field shows the callback URL for your environment. You don’t have control over this. You must enter it in the configurations for your OpenID Provider. |
| Enable OpenID Connect for HTTP connected systems | When selected, HTTP connected systems can be configured to use OpenID Connect as the authentication source for requests to external systems. |
Group Membership SynchronizationCopy link to clipboard
Appian has the ability to synchronize a user's group memberships based on the claims that are returned by the OpenID Provider in the ID Token or User Info Endpoint.
Only groups of a single group type will be synchronized. Users will be added to any groups of this type that have an attribute value that matches the elements in the claim returned by the OpenID Provider and removed from any groups of this type that do not have a match. If there is no Appian group that matches the claim returned, that value will be ignored and the other remaining groups that do match will synchronize. The synchronizing process will not create an Appian group if one is missing.
Synchronize Appian group membershipCopy link to clipboard
When selected, Appian will update a user's group memberships when they sign it.
Group TypeCopy link to clipboard
Select the group type that contains the groups that are eligible for membership syncing.
Group Type AttributeCopy link to clipboard
Enter the name of the group type attribute that should be matched against the response returned by the OpenID Provider. The claim should be a List of Text. In the below image, the selected claim is groups.

This Group Type Attribute can have any name so long as it matches the attribute value defined on your selected Group Type.
For example, look at this sample JSON snippet that might be returned by the User Info Endpoint:
1
2
3
4
5
6
7
8
9
10
11
12
13
14
15
16
17
18
19
20
21
{
    "sub": "00uid4BxXw6I6TV4m0g3",
    "name" :"John Doe",
    "nickname":"Jimmy",
    "given_name":"John",
    "middle_name":"James",
    "family_name":"Doe",
    "profile":"https://example.com/john.doe",
    "zoneinfo":"America/Los_Angeles",
    "locale":"en-US",
    "updated_at":1311280970,
    "email":"john.doe@example.com",
    "email_verified":true,
    "address" : { "street_address":"123 Hollywood Blvd.", "locality":"Los Angeles", "region":"CA", "postal_code":"90210", "country":"US" },
    "phone_number":"+1 (425) 555-1212",
    "groups": [
        "Faculty",
        "English Department"
        ]
}

Copy
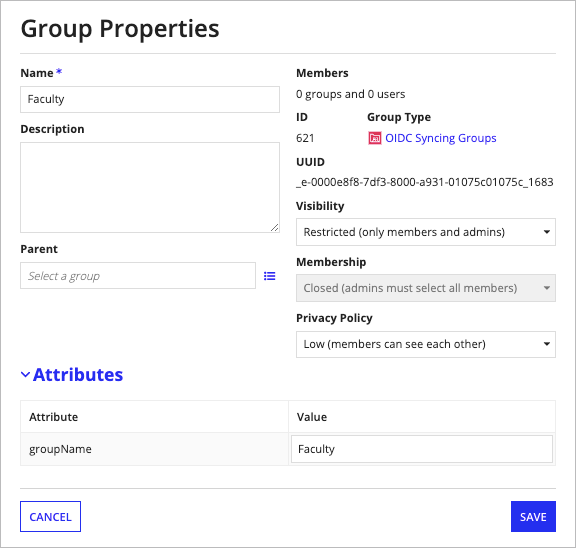
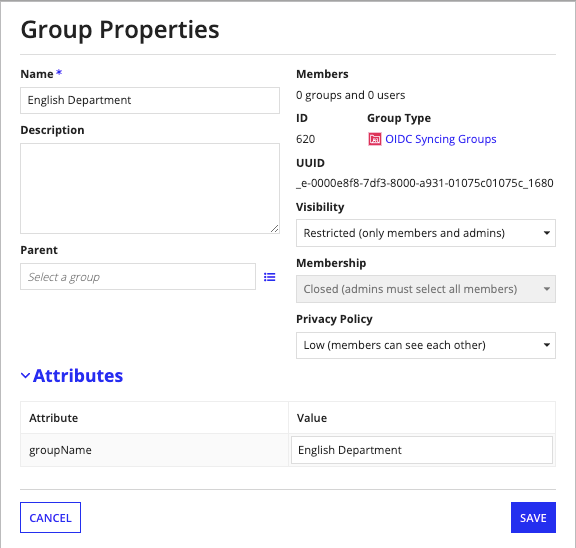
To sync the user into the corresponding groups, you would need two groups configured like this:

This first group matches the first role because the value of the selected attribute groups matches the value Faculty in the JSON response.

This second group matches the second role because the value of the selected attribute groups matches the value English Department in the JSON response.
Attribute MappingCopy link to clipboard
Appian also has the ability to synchronize user data returned by an OpenID Provider. Each user attribute can be mapped to a claim in either the ID Token or the JSON response returned by the User Info Endpoint.
Mapping of nested claims is only supported for the standard OIDC address claim.
This includes:
- address/formatted
- address/street_address
- address/locality
- address/region
- address/postal_code
- address/country
Create new users upon sign-inCopy link to clipboard
When selected, if the connecting user does not have an Appian account, one will be created for them. Account creation requires that the username, first name, last name, and email address attributes be populated. Users will be automatically added to the authentication group for the identity provider when they are created.
Update user attributes upon sign-inCopy link to clipboard
When selected, if the connecting user already has an Appian account, attributes from the JSON response will be copied into the user's Appian profile.
Unauthenticated User SettingsCopy link to clipboard
The settings for unauthenticated users are configured on the SAML page of the Admin Console.
To learn more about unauthenticated user settings, see SAML for Single Sign-On.
