After installing the Automated Case Routing module, you need to set it up before using it with the Case Management Studio Base application. This guide walks you through the setup steps, which include:
Navigate to CMGT Case Management Studio Base application.
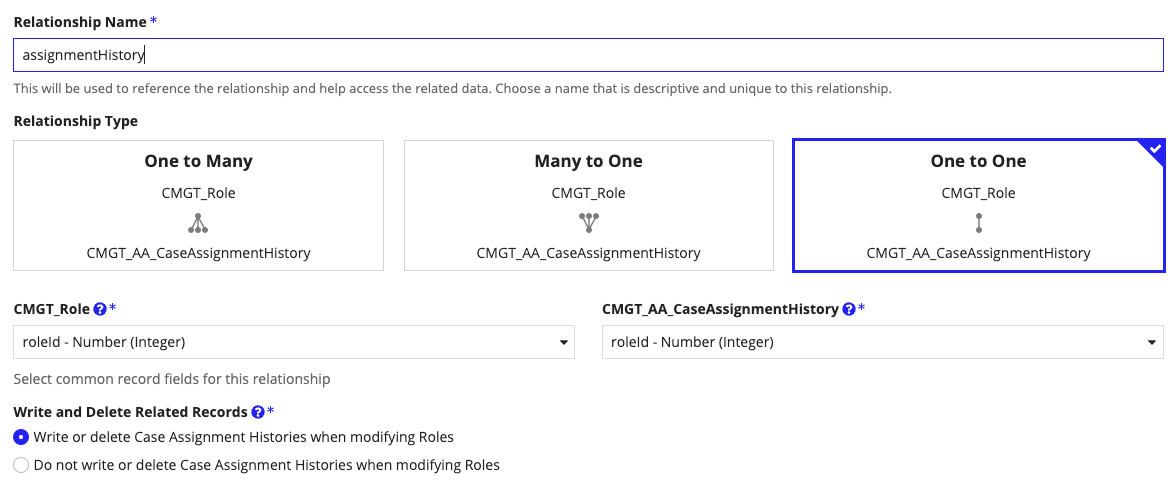
Search for and open the CMGT_Role record type.
Create a relationship to CMGT_AA_CaseAssignmentHistory using the following settings:
Relationship Name: Enter assignmentHistory.
Relationship Type: Select the One to One relationship type.
CMGT_Role: Select roleId - Number (Integer) in the drop down.
CMGT_AA_CaseAssignmentHistory: Select roleId - Number (Integer) in the drop down.
Write and Delete Related Records: Select Write or Delete Case Assignment Histories when modifying Roles.
Click ADD and save the record type.
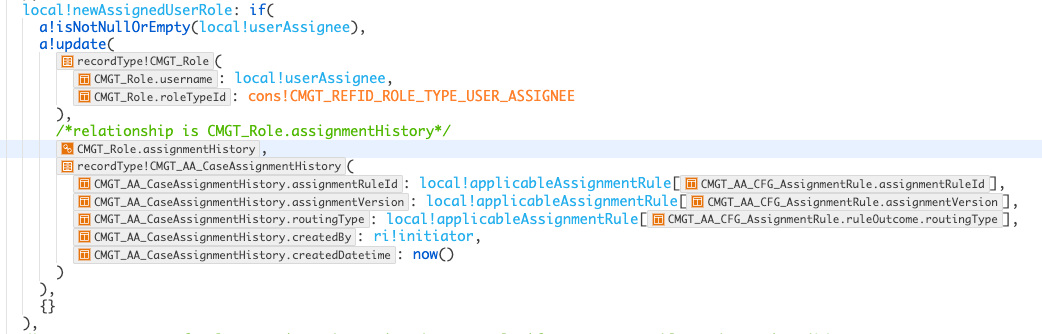
Search for and open the CMGT_AA_EVAL_returnAutoAssignedCaseRoles rule.
Uncomment the commented value in the newAssignedUserRole local variable and replace the line with the newly created relationship as shown.
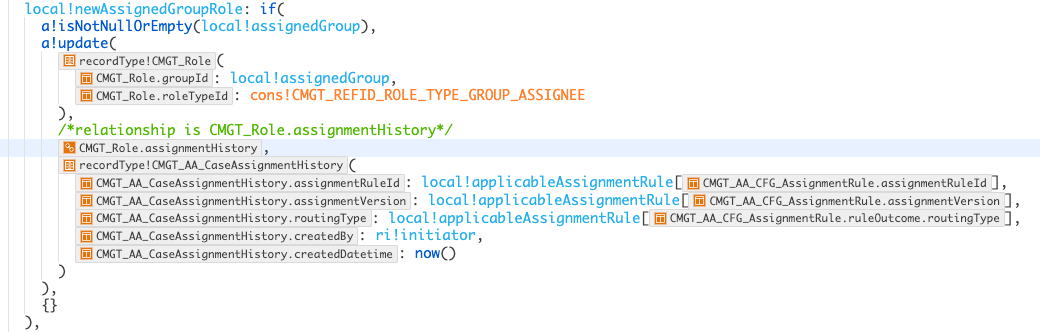
Locate the newAssignedGroupRole local variable. Uncomment the commented value in the newAssignedGroupRole local variable, and replace the line with the newly created relationship as shown.
Click SAVE CHANGES.
Step 2: Add the automated case routing assignment logic
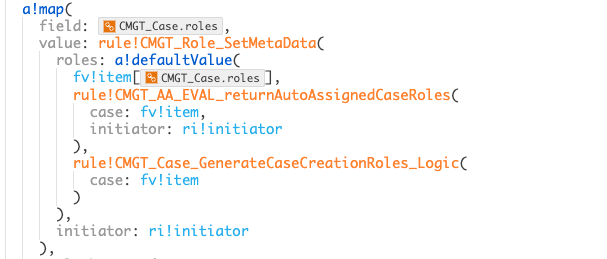
Search for and open the CCMGT_Case_Set_MetaData expression rule.
In the a!map() function for roles, add the CMGT_AA_EVAL_returnAutoAssignedCaseRoles expression into the a!defaultValue() function as shown. Add it between fv!item[CMGT_Case.roles] and CMGT_Case_GenerateCaseCreationRoles_Logic..
Click SAVE CHANGES.
Step 3: Add additional fields to the framework
This is an optional step and is only necessary if there are other fields you want to use when configuring assignment rules. Follow the instructions in this section to add additional fields.
Locate and open the CMGT_AA_CFG_assignmentFieldReference expression rule.
Note: Examine the rule framework. A map item exists for each field that can be used in the assignment rule logic. Each map item has the following parameters:
Code
Label
Reference to an evaluation rule component
Reference to a configuration interface component
Allowed operators
Create a constant with a code for the new field in the following format:
CMGT_AA_TXT_ASSIGNMENT_FIELD_CODE_<FIELD_NAME>.
Refer to CMGT_AA_TXT_ASSIGNMENT_FIELD_CODE_CASE_CATEGORY as an example.
Create a configuration rule with the following name: CMGT_AA_RuleCondition_configurationComponentFor<FieldName>.
Note: Be sure to refer to the configuration rules in CMGT_AA_CFG_assignmentFieldReference as examples.
Create an evaluation rule with the following name: CMGT_AA_RuleCondition_evaluationFor<FieldName>.
Note: Be sure to refer to the evaluation rules in CMGT_AA_CFG_assignmentFieldReference as examples.
Navigate back to CMGT_AA_CFG_assignmentFieldReference.
Construct a map item for the new field using the newly created objects. Be sure to add a label and the allowed operators as well.