
OverviewCopy link to clipboard
This page provides a follow-up to developer setup. This page details how to create a project, build it, and deploy it to your Appian site, all in about 30 minutes.
Create a unique project from the Hello World exampleCopy link to clipboard
This section guides you through the process of creating a new IntelliJ project from our examples. You can refer back to this section whenever you are creating a new project from one of these examples.
Tip: Throughout the Quick Start, we change "Hello World" to "Hello Appian" to illustrate the idea of updating the project's artifact names. In your project, feel free to use any name. Just be sure to update all the same places we do!
Download and unzip the examplesCopy link to clipboard
- Download the Hello World example here.
- Unzip the downloaded file into the directory you want the project to live in.
Update project-specific IntelliJ and Gradle settingsCopy link to clipboard
- Rename the Hello World folder to
Hello Appian. - Open IntelliJ.
- Open the folder you renamed in step 1 (
Hello Appian):- Click File > Open.
- Navigate to the Hello Appian folder.
- Click Open.
- If additional dialogs appear, select gradle, and continue through the dialogs using default values.
- Open the
settings.gradlefile and changehello-world-csptohello-appian-csp.- Check the SDK version compatibility table for more details.
Ensure your Project is using Java 8Copy link to clipboard
- Click File > Project Structure.
- Click the Project tab.
- For Project SDK, if 1.8 is an option, ensure it is selected. If it is not an option, see the Set up IntelliJ section.
Give plug-in artifacts unique namesCopy link to clipboard
In this section, you will update the packages, classes, and annotations to make your project unique.
Start by opening the Project tool window (View > Tool Windows > Project). You will see two folders here: (1) Hello Appian and (2) External Libraries.
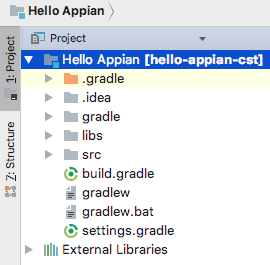
Navigate to src/main/java in the Hello Appian [hello-appian-csp] project.
Within that project you should see a directory created with the name com.mycorp.helloworld.templates. Modify the following items:
Update packagesCopy link to clipboard
-
In the Project tool window, navigate to
src/main/java. You will see there is a package calledcom.mycorp.helloworld.templates.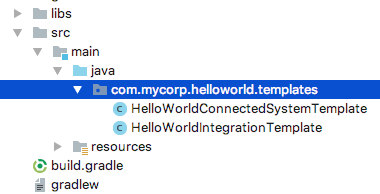
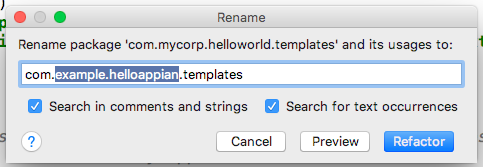
- Right-click (secondary click) on the
com.mycorp.helloworld.templates, then click refactor > rename, and changemycorp.helloworldtoexample.helloappian. -
Click Refactor.
- You will notice the old package
mycorp.helloworldbecomes empty in the project directory; delete thehelloworlddirectory.
Update template classesCopy link to clipboard
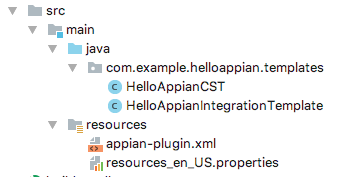
Navigate to the com.example.helloappian.templatesin the Project tool window. You will see two java classes: HelloWorldConnectedSystemTemplate and HelloWorldIntegrationTemplate.
- Update class names:
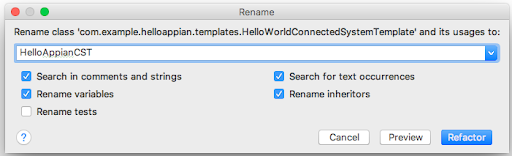
- Right-click on the class HelloWorldConnectedSystemTemplate.
- Click refactor > rename.
- Change the name to
HelloAppianCSPand click Refactor
- If the Refactoring Preview pane appears, click Do Refactor.
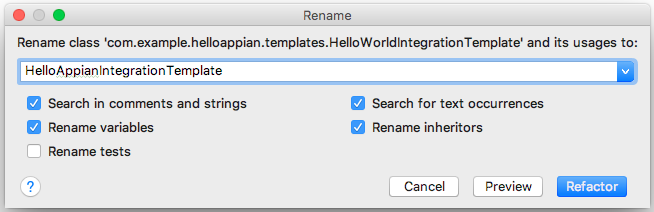
- Right-click on the HelloWorldIntegrationTemplate.
- Click refactor > rename.
- Change name to
HelloAppianIntegrationTemplate
- If the Refactoring Preview pane appears, click Do Refactor.
- Right-click on the class HelloWorldConnectedSystemTemplate.
- Update
@TemplateIdannotation:- Navigate to the java classes and change the
nameof the@TemplateIdannotation.- In
HelloAppianCSP, change@TemplateId(name="HelloWorldConnectedSystemTemplate")annotation to@TemplateId(name="HelloAppianCSP") - In
HelloAppianIntegrationTemplate, change@TemplateId(name="HelloWorldIntegrationTemplate")annotation to@TemplateId(name="HelloAppianIntegrationTemplate")
- In
Note:
TemplateIdis the identifier for your template and all its versions. To ensure your ID does not unintentionally conflict with other templates, we recommend using package-structure-style naming, for example com.mycorp.template. - Navigate to the java classes and change the
- Ensure
@IntegrationTemplateTypeannotation is correct.
Integration template type indicates the request policy of your Integration Template. There are three types: READ, WRITE, and READ_AND_WRITE. READ indicates that the template retrieves data from an external service, WRITE indicates that the template modifies data on an external service such as HTTP POST or HTTP DELETE. If the template can modify or query data depending on the designer's intent, then annotate the template with READ_AND_WRITE. If a template is READ_AND_WRITE, the designer can indicate which type of operation they intend to perform.
Since we are not modifying the request type of the HelloWorld template, we will leave the template type as is.
After modifying the configuration of your classes, the class structure should match the following code.
1
2
@TemplateId(name="HelloAppianCSP")
public class HelloAppianCSP extends SimpleConnectedSystemTemplate {...
Copy
1
2
3
@TemplateId(name="HelloAppianIntegrationTemplate")
@IntegrationTemplateType(IntegrationTemplateRequestPolicy.READ)
public class HelloAppianIntegrationTemplate extends SimpleIntegrationTemplate {...
Copy
Update the Appian Plug-in XMLCopy link to clipboard
- Open to
src.main.resources.appian-plugin.xmlin the Project tool window. - Change
appian-plugin'snamefromMy Corp Connected System - Hello WorldtoMy Corp Connected System - Hello Appian, and theappian-plugin'skeyfromhello-worldtohello-appian. - Under
plugin-info, change thedescriptionto fit your template's description. - Change
vendorto your organization's name and url. - Leave
versionas1.0.0.0. - Under
connected-system-template, change the key and name toHelloAppianConnectedSystem. - Under
integration-template, change the key and name toHelloAppianIntegrationTemplate.
This information should now look like the code below:
1
2
3
4
5
6
7
8
9
10
11
12
13
14
15
<appian-plugin name="My Corp - Hello Appian" key="hello-appian">
    <plugin-info>
        <description>My Corp Connected System - Hello Appian</description>
        <vendor name="Example Corp" url="http://www.example.com"/>
        <version>1.0.0.0</version>
        <application-version min="7.6.0.4"/>
    </plugin-info>
    <connected-system-template key="HelloAppianConnectedSystem"
            name="HelloAppianConnectedSystem"
            class="com.example.helloappian.templates.HelloAppianCSP">
        <integration-template key="HelloAppianIntegrationTemplate"
                name="HelloAppianIntegrationTemplate"
                class="com.example.helloappian.templates.HelloAppianIntegrationTemplate" />
    </connected-system-template>
</appian-plugin>
Copy
Update template name and descriptionCopy link to clipboard
- Open
src/main/resources_en_US.properties. - Change the resource keys to match the class names:
- Change
HelloWorldConnectedSystemTemplate.nametoHelloAppianCSP.name.
- Change
This resource file should look like the code below:
1
2
3
4
5
## Must have [class].name and [class].description for all connected system and integration templates
HelloAppianCSP.name=Hello Appian Connected System
HelloAppianCSP.description=Sample CS for learning how to use plug-in repo CSPs!
HelloAppianIntegrationTemplate.name=Hello Appian Integration
HelloAppianIntegrationTemplate.description=Sample CS for learning how to use plug-in repo CSPs!
Copy
Now that all of the configurations meet your template's requirements, the Connected System Template and Integration Template can be modified to contain the internal logic needed for your integration.
Build the JARCopy link to clipboard
Now that you're done updating your template code and artifacts, you're ready to build and deploy the jar.
To create the jar from the command line:
- Navigate to your project's root directory.
- Run the following command:
./gradlew jar.
To create the jar from IntelliJ:
- Open the Gradle tool window in IntelliJ by clicking View > Tool Windows > Gradle
-
Expand Tasks > Build. You should see gradle job structure like this:
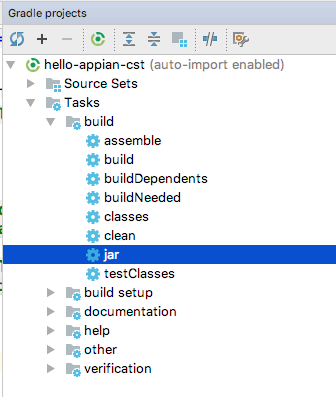
- Double-click the jar job.
If everything is set up correctly, you will see a successful message in the console like this:
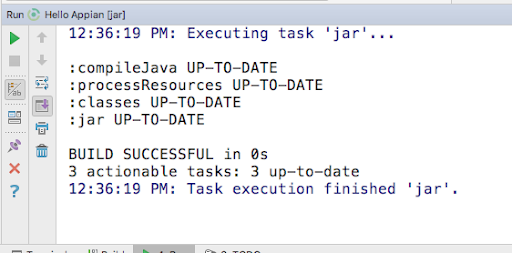
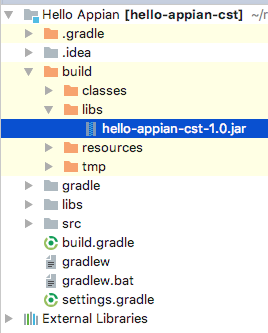
You should see your JAR file created under /build/libs.
Then, add the jar file to the <APPIAN_HOME>/_admin/plugins folder to deploy it.
How to check if the CSP deployed successfullyCopy link to clipboard
Look at the connected system in Appian DesignerCopy link to clipboard
- Open your browser and navigate to
<Appian.instance>/design. - Click New > Connected System and in the modal your new connected system type should appear.
Look at the plug-in list in the Admin ConsoleCopy link to clipboard
- Open your browser and navigate to
<Appian.instance>/admin. - From the SYSTEM menu, go to plug-ins. The plug-in will appear in the Deployed plug-ins list.
Look at the logsCopy link to clipboard
On Tomcat, go to <APPIAN_HOME>/logs. Then run:
1
tail -f tomcat-stdOut.log.<date>
Copy
You're looking for the following messages:
Connected System Template
1
[Appian Plugin Hot Deploy] INFO  com.appiancorp.connectedsystems.templateframework.osgi.ConnectedSystemTemplateModuleParser - Extracted com.appiancorp.connectedsystems.templateframework.sdk.ConnectedSystemTemplate classes for registration for the 'HelloAppianConnectedSystem' module in 0ms
Copy
Integration Template
1
[Appian Plugin Hot Deploy] INFO  com.appiancorp.connectedsystems.templateframework.osgi.ConnectedSystemTemplateModuleParser - Extracted com.appiancorp.connectedsystems.templateframework.sdk.IntegrationTemplate classes for registration for the 'HelloAppianConnectedSystem' module in 0ms
Copy
Plug-in successfully installed
1
[Appian Plugin Hot Deploy] INFO  com.appiancorp.plugins.osgi.AppianOsgiPlugin - Successfully installed Plug-in 'My Corp Connected System - Hello Appian (hello-appian) version 1.0.0.0.
Copy
Congratulations! Your plug-in should now be deployed. Follow the steps below to test it out.
- Open an application in the Appian Designer.
- Click New > Connected System.
- In the Custom (BETA) category, choose your new template.
- In the Connected System designer, enter a name.
- Enter
Helloin the Text Property field. - Click Use in New Integration.
- Enter a name.
- Click Create.
- From the Integration Designer, enter
Appianin the Text Property field. - Click Test Request.
Your two text properties should be concatenated and Hello Appian should display in the Results pane.
Next stepsCopy link to clipboard
Now you're ready develop your own Connected System Plug-in. You can start by reading through the Core Concepts section to learn important concepts about the SDK, or you can jump straight to the Examples, and go back to the over when you want to get a deeper understanding of what's going on.
At any point, if you need help doing something in particular, check the How To section.