
| This content applies solely to Connected Underwriting Life, which must be purchased separately from the Appian base platform. |
IntroductionCopy link to clipboard
Installing the Auto-Assignment Add-On module with your Connected Underwriting Life Workbench solution consists of three main steps:
- Step 1: Import the database script
- Step 2: Import the application
- Step 3: Incorporation with CU Life
Before starting the installation process, review the System Prerequisites to ensure all minimum requirements are met.
System PrerequisitesCopy link to clipboard
- Appian platform version 23.3 or greater.
- A supported web browser.
- Imported Connected Underwriting Life Workbench base application.
Step 1: Import the database scriptCopy link to clipboard
To import the database script:
- In the target environment, log in as the deployment user.
- Navigate to the Cloud Database.
- Click the Appian database.
- Note: If the base Connected Underwriting Life Workbench application uses a different database than the Appian database, select and click it.
- Click the Import tab.
- Upload the
sqlfile and click Import.
Step 2: Import the applicationCopy link to clipboard
To import the application files:
- In the target environment, log in as the deployment user.
- Navigate to the Appian Designer.
- Click IMPORT.
- Click UPLOAD and choose the application
zipfile. - Click INSPECT.
- Review the inspection results. If there are no issues, click IMPORT.
- Note: The import may time out due to file size, but the import will continue in the background.
- Review the import results.
Step 3: Incorporation with CU LifeCopy link to clipboard
The following incorporation steps are required to utilize the full functionality of the Auto-Assignment Add-On Module.
Configuration of Assignment Rules on the Settings siteCopy link to clipboard
- In the target environment, log in.
- Navigate to the Appian Designer.
- Open the Insurance Life Underwriting application package.
- Search for and open the following interface object: ISL_SitePage_AdminSettings.
-
In expression mode, add an additional map item to
local!navBarSections, as seen below: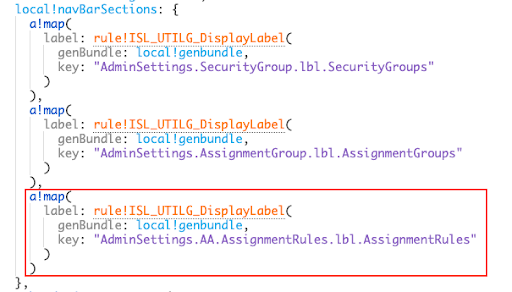
-
In the
match()statement in the second column layout (the column that displays the left sidebar navigation), add a condition for displaying the assignment rules page, as seen below: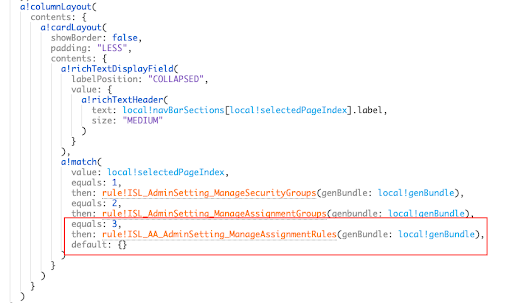
- Save the interface.
Disable default selection and manual selection of assigned group and underwriterCopy link to clipboard
- Search for and open the following expression rule: ISL_API_CreateCase_ConstructCaseFromRequestBody
- Delete or comment out the initialization of the role-related record.
- Save the rule.
- Search for and open the following interface object: ISL_Case_Sub_UpdateMiscellaneous
- In expression mode, where ISL_Role_Sub_Manage is called, pass in false for the showAssignees rule input instead of true.
- Save the interface.
Incorporate the auto-assignment logic in the case creation processCopy link to clipboard
- Search for and open the following process model: ISL_Case_Create.
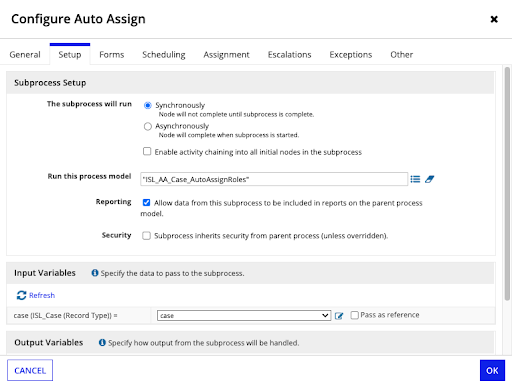
- Just before the end event, add a synchronous subprocess node labeled Auto Assign. Set up the node as seen below:
- Save and publish the process model.
Optional IncorporationCopy link to clipboard
The following steps are optional to utilize the full functionality of the Auto-Assignment Add-On Module.
Adding New Fields to Drive Auto Assignment RulesCopy link to clipboard
The following steps are optional and allow you to add additional fields in the auto-assignment logic.
- Identify which additional fields on the case record type, or on its nested record types, you want to include in auto-assignment logic.
- Example: Coverage Purpose.
- Navigate to the Appian Designer and open the ISL Auto-Assignment of Cases application package.
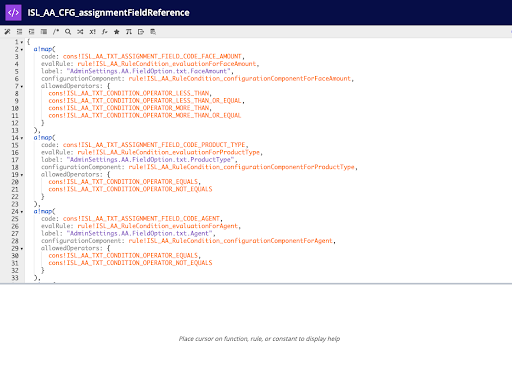
- Search for and open the following expression rule: ISL_AA_CFG_assignmentFieldReference.
- Note: This rule stores the configurations for each field that is able to be used in the auto-assignment logic. Take some time to review the design paradigm. Each field has its own map item that contains a reference to its evaluation rule, a reference to its configuration interface, allowed operators, etc.
- Create an evaluation rule for your new field by duplicating an existing evaluation rule and following the same design approach.
- Note: Choose an existing evaluation rule to duplicate that is most similar to your new field evaluation. For example, since a coverage purpose rule condition will have similar evaluation logic to a product type rule condition, duplicate ISL_AA_RuleCondition_evaluationForProductType.
- Example: ISL_AA_RuleCondition_evaluationForCoveragePurpose
- Required rule inputs:
- ruleCondition:
ISL_AA_CFG_RuleCondition - case:
ISL_Case - Note: The rule should contain a
match()statement where each possible operator for the field has its own expression to evaluate.
- ruleCondition:
- Note: Choose an existing evaluation rule to duplicate that is most similar to your new field evaluation. For example, since a coverage purpose rule condition will have similar evaluation logic to a product type rule condition, duplicate ISL_AA_RuleCondition_evaluationForProductType.
- Ensure that the new rule is added to the ISL Auto-Assignment of Cases application package.
- Create a configuration interface for your new field by duplicating an existing configuration interface and following the same design approach.
- Note: Choose an existing configuration interface to duplicate that is most similar to your new field configuration. For example, since coverage purpose will be configured in a similar way to product type (selecting a value from a dropdown of options from a reference table), duplicate
ISL_AA_RuleCondition_configurationComponentForProductType.- Example:
ISL_AA_RuleCondition_configurationComponentForCoveragePurpose- Required rule inputs:
- currentRuleCondition:
ISL_AA_CFG_RuleCondition - genBundle: Any Type
- conditionMap: Map
- isLabelCollapsed: Boolean
- accessibilityText: Text
- currentRuleCondition:
- Required rule inputs:
- Example:
- Note: Choose an existing configuration interface to duplicate that is most similar to your new field configuration. For example, since coverage purpose will be configured in a similar way to product type (selecting a value from a dropdown of options from a reference table), duplicate
- Ensure that the new interface is added to the ISL Auto-Assignment of Cases application package.
- Add a map item to
ISL_AA_CFG_assignmentFieldReference.- code: Create a constant for the code that you want to use to represent this field, and call the constant here.
- evalRule: Rule reference to the evaluation rule you just created.
- label: Create a key-value pair in the ISL_AA bundles for the label that will display when configuring this type of rule condition (i.e., “Coverage Purpose”), and call the key here.
- configurationComponent: Interface reference to the configuration interface you just created.
- allowedOperators: List of allowed operators using the available constants (same as the operators used in the
match()statement of the evaluation rule).{cons!ISL_AA_TXT_CONDITION_OPERATOR_EQUALS, cons!ISL_AA_TXT_CONDITION_OPERATOR_NOT_EQUALS}
- Search for the existing operator constants by searching for ISL_AA_TXT_CONDITION_OPERATOR_.
- Repeat steps 8-9 for each desired additional field.
- Save ISL_AA_CFG_assignmentFieldReference.
- Test the new rule condition types by creating and applying assignment rules using them.