
Estimated time to complete this tutorial: 1 hour
User experience level: Beginner
In this tutorial, you'll build two AI skills:
- a document classification AI skill to automatically classify documents your business receives, and
- a document extraction AI skill that extracts data from documents classified as invoices.
By delegating these tasks to AI, the process proceeds much faster and with a higher degree of accuracy than if this classification were done manually by a person.
Tip: Looking to start with just document extraction? Check out the Document Extraction Tutorial to build a process that extracts data from documents and writes that data to records.
ScenarioCopy link to clipboard
Acme Logistics is a shipping and receiving company that manages inventory for its customers. In addition to physical items, Acme has to manage and act on documents such as invoices and purchase orders. Different teams act on different document types: the Fulfillment department reviews purchase orders, while an Appian process extracts data from invoices. Customers and vendors submit these documents through Acme's website, so all documents have one submission channel.
This large bucket of documents presents a challenge for Acme because different departments use each of these documents. It takes time to analyze each incoming document and know which department should be notified, so Acme is eager to see how Appian can help.
Acme's current intake process entails more than just classifying documents. First, a vendor submits a form with documents attached. Then, the analyst receives a notification that a new document has been submitted and they should begin evaluating the attached documents. Acme analysts manually review the documentation and send it to the proper department. This takes at least 2-3 minutes per document, meaning the average analyst can review about 20-30 documents an hour. The analyst then forwards the document to the appropriate department, repeating the process for each document that's come in. However, analysts have other important tasks to work on, so Acme is eager to find a way to speed up the review and notification process.
In this tutorial, you're building a process to replace most of the manual work that the analyst has to do. To automate this process in Appian, you'll need to:
- Create and train AI skills.
- Set up an interface for customers and vendors to upload their documents.
- Save the documents in Appian.
- Classify the documents.
- Route the document to the proper department based on the document type.
- Notify the analyst if Appian isn't able to determine the document type.
System requirementsCopy link to clipboard
This tutorial is designed to be used with Appian 23.2 and later.
Quick definitionsCopy link to clipboard
- AI skill: Design object that enables you to build, configure, and train a machine learning (ML) model using Appian low-code capabilities.
- Model: The product of combining a dataset with a machine learning algorithm. A model is unique to a purpose which requires recognition, understanding, reasoning, and decision-making. For example, the model used to classify purchase orders isn't necessarily the same one that can recognize stop signs in a set of pictures.
- An AI skill can contain multiple models. When the AI skill is integrated in a process model, only the published model within that AI skill is used.
- Document type: The categories of documents you want the AI skill to classify. In this tutorial, the document types are invoice and purchase order.
- Confidence: Measures how sure the model is of its prediction. Confidence is calculated per document. Most decisions (made by humans or computers) can vary in confidence.
SetupCopy link to clipboard
This tutorial assumes you have an Appian application created already. We'll walk you through creating each of the design objects you need to automate document classification.
Tip: Objects in this tutorial use the AL prefix. If you're creating objects in an application that uses a different prefix, use your application's prefix in new object names.
Acme analysts spend too much time reviewing incoming documents to determine which department it should go to. To support a large business, we want to save time by automating part of their manual process – classifying documents attached to a form submission.
Gather example documentsCopy link to clipboard
Before the AI skill can serve its purpose, it needs to learn a lot about the documents your business encounters. One of your first steps should be to build a complete and representative dataset to train the model. The model can only learn from the documents you provide to it, so it's important to have a large number and variety of realistic examples.
Acme most commonly receives these two types of documents:
- Invoice
- Purchase Order
We've provided sample Invoices and Purchase Orders for you. Download these files to your computer, since you'll use them to train the AI skill in a later step. Unzip the compressed folders, as you'll need to upload the documents individually and not as a ZIP file.
Part 1: Create AI skillsCopy link to clipboard
Acme has clearly defined the use case and collected example documents, so you're ready to build a custom machine learning model in Appian using the AI skill design object. Yes, it's really that straightforward!
Create a Document Classification AI skill objectCopy link to clipboard
- In your application, go to the Build view.
- In the application toolbar, click NEW > AI Skill.
- On the Create AI Skill page, choose Document Classification.
-
Configure the following properties:
Property Value Name AL_IncomingDocumentDescription (Optional) AI skill to classify documents Acme receives. - Click CREATE. The Review AI Skill Security window displays.
- Select Viewer permissions for the Default (All Other Users) group and Administrator permissions for the AL Administrators group.
- Click SAVE.
Create document typesCopy link to clipboard
In this step, you'll begin telling the skill about each type of document that is typically attached to a form submission.
Earlier, you identified that most claims have two types of documents attached:
- Invoice
- Purchase Order
You'll need to train the model to recognize each of these documents. To do that, you'll first create a document type and add examples of those documents.
To create a document type:
- On the Create Model page, click NEW DOCUMENT TYPE.
- In the Document Type Name, enter
Invoice. - Click UPLOAD to add training documents.
- Browse for and select the Invoice documents you downloaded earlier.
- After the documents finish uploading, click CREATE AND ADD ANOTHER to create this document type and add another document type.
- In the Document Type Name, enter
Purchase Order. - Click UPLOAD to add training documents.
- Browse for and select the Purchase Order documents you downloaded earlier.
- After the documents finish uploading, click CREATE.
- Click SAVE CHANGES to save the document types you've created before you begin training.
- Click TRAIN MODEL. If this option is unavailable, check that you've met all of the requirements for the example documents and that you've saved your changes. The AI skill checks your documents as you upload them.


Training takes a few minutes to complete. While you wait, create the document extraction AI skill.
Create a Document Extraction AI skill objectCopy link to clipboard
- Go to your application.
- In the application toolbar, click NEW > AI Skill.
-
Configure the following properties:
Property Value Name AL_ExtractInvoiceDescription (Optional) AI skill to extract data from invoices Acme receives. - Click CREATE. The Review AI Skill Security window displays.
- Select Viewer permissions for the Default (All Other Users) group and Administrator permissions for the AL Administrators group.
- Click SAVE.
- On the What do you want to do with this skill? page, choose Document Extraction.
Define the invoice structureCopy link to clipboard
- On the Define Document Structure page, enter the names of the fields that appear on most invoices. Start with
companyName. - Click Add Field six more times, so you have a total of seven fields. Use the default data type of
Textfor all seven fields. - Enter the following field names:
companyEmailcompanyPhonecompanyAddressinvoiceNumberdatetotal
- Click SAVE CHANGES.
Tip: You're only going to define the document structure for invoices, because Appian will extract data from invoices. You're not using Appian to extract data from purchase orders, so you don't need to create a document extraction AI skill for purchase orders.
Part 2: View training results for the document classification modelCopy link to clipboard
After you've given the document classification model a few minutes to learn how to recognize the document types, you're ready to review training metrics.
- Open the AL_IncomingDocument AI skill you created.
- In the list of Unpublished Models, click CONTINUE EDITING.
- Click VIEW TRAINING SUMMARY. The model takes a few minutes to learn about your documents and then test its ability to recognize each document type. When results are available, they appear in the training summary.

Interpret the resultsCopy link to clipboard
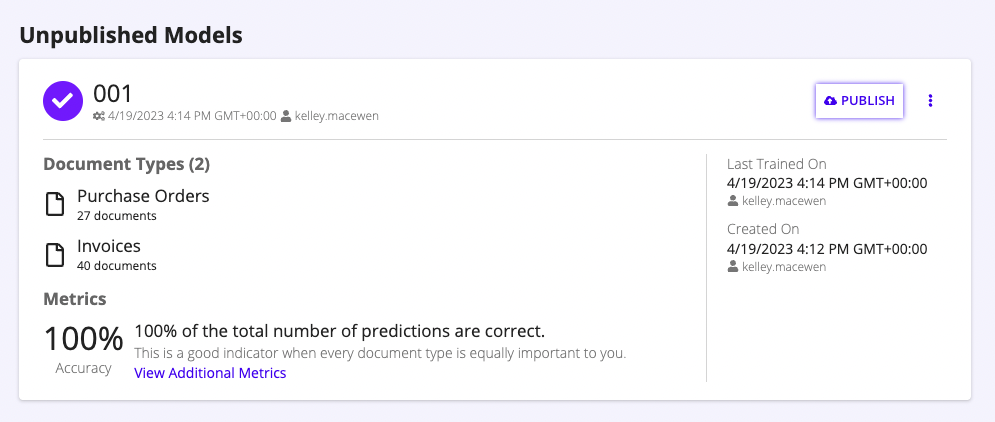
When the model is finished training, it returns multiple metrics on how well it is able to classify your documents. Click View Additional Metrics to see this data.
There is no single metric that can tell you that your model is ready to use in production. Instead, you'll want to evaluate this data based on your use case and consideration of how your process might be impacted.
For this tutorial, you're building a model to classify two types of documents (listed above). Acme receives invoices and purchase orders in equal numbers. However, the documents are reviewed by human beings at different stages in their respective processes. Data is extracted from invoices and saved to an interface, then a person reviews it. Purchase orders are reviewed immediately.
It's not very disruptive if an invoice is misclassified as a purchase order because a person will notice and correct it early. However, if a purchase order is misclassified as an invoice, it can cause some issues in that process. Therefore, you're paying special attention to how well the model predicts invoices. In this case, you want to pay attention to the precision for purchase orders. Likewise, you also want to pay attention to the recall for invoices.
The training metrics reveal that the model is able to accurately classify each document type most of the time. Acme is concerned about purchase orders being misclassified as invoices. So, you want to dive deeper into how that document type is performing.
See Evaluate Model Performance to learn more about each metric and when you might be interested in them.
Publish the modelCopy link to clipboard
Once the model training returns metrics that meet your requirements, you'll publish that version of the model to make it available to use in the Classify Documents smart service in a process model.
- On the Training Summary page, you'll see a list of Unpublished Models.
- Find the model you trained most recently – this is the one with the results that meet your requirements.
- Click PUBLISH.
- Click SAVE CHANGES.
That's it! Now the model can be called from a smart service. So let's build the process that will use the published model in this AI Skill.
Part 3: Build the classification processCopy link to clipboard
This section walks through each part of building the classification process.
Create a record type for your documentsCopy link to clipboard
Before you begin to accept documents, you'll need a place to store them. Acme wants to store document data in a record type. So let's make one!
- In your application, go to the Build view.
- Click NEW > Record Type.
-
In Create Record Type, configure the following properties:
Property Value Name AL DocumentDisplay Name (Plural) DocumentsDescription A record type to store data on documents uploaded to Acme Logistics. - Click CREATE. The Review Record Type Security window displays.
- Select Viewer permissions for the Default (All Other Users) group and Administrator permissions for the AL Administrators group.
- Click SAVE. The record type opens in a new tab.
- Click TELL US ABOUT YOUR DATA.
- On the Configure Data Source page, click I want to start from scratch.
- Click NEXT.
- Choose your Data Source where you'd like to create the data.
- Click NEXT.
-
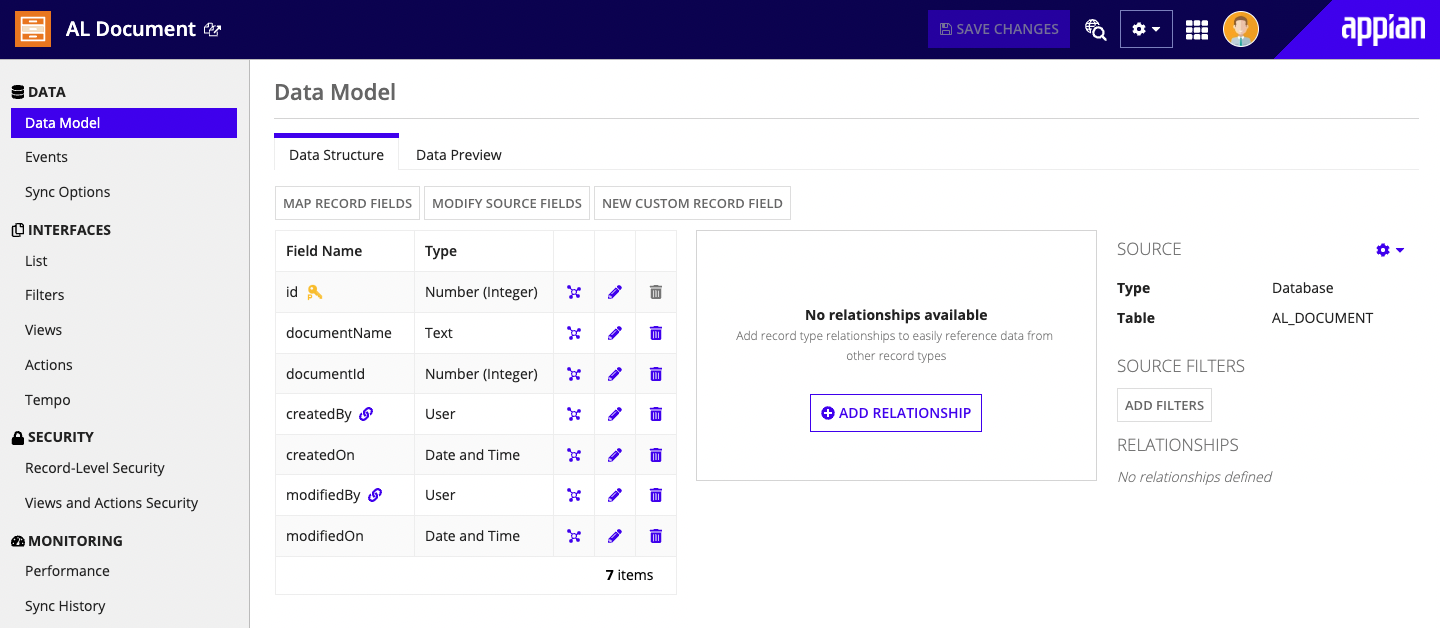
On the Create Data Model page, keep the default settings for the following fields:
Field name Data type id Number (Integer) createdBy User createdOn Date and Time modifiedBy User modifiedOn Date and Time -
Click NEW FIELD to create two new fields in the model:
Field name Data type documentId Number (Integer) documentName Text - Click NEXT.
- Keep the Create Table checkbox checked and click SAVE CHANGES.
- Click FINISH. The Data Model page displays.
If you plan to use this record type outside of this tutorial, we recommend downloading the database script.
Create a document folderCopy link to clipboard
To keep things organized, create a folder in your application to store the document files.
- In your application, go to the Build view.
- Click NEW > Folder.
-
Configure the following properties:
Property Value Type Document Folder Name AL Uploaded DocumentsDescription Folder containing documents submitted via Acme's website.Parent Folder AL Knowledge Center - Click CREATE.
Create a constant for the document folderCopy link to clipboard
To reference the folder in your interface, you'll need to create a constant.
- In your application, go to the Build view.
- Click NEW > Constant.
-
Configure the following properties:
Property Value Name AL_UPLOADED_DOCUMENTSDescription (optional) Constant referencing the AL Uploaded Documents folder.Type Document or FolderValue AL Uploaded Documents - Click CREATE.
Add a Start FormCopy link to clipboard
Acme's customers submit a form to begin the claims process. You can create an interface to collect and save all of the necessary information, including documents.
Create the interface objectCopy link to clipboard
- In your application, go to the Build view.
- Click NEW > Interface.
-
Configure the following fields:
Property Value Name AL_IntakeFormDescription (Optional) Interface to allow vendors to upload documents.Save In Select the Rules & Interfaces folder in your application. - Click CREATE.
- In the templates panel, find the FORMS section.
- Click One Column Form.
Add rule inputs and variables:Copy link to clipboard
-
Click New Rule Input and configure the following fields:
Property Value Name recordDescription (Optional) Leave blank. Type AL Document (record type) - Click CREATE.
-
Click New Local Variable and configure the following fields:
Property Value Name documentValue Leave blank. This variable will temporarily store your document as you work through the form.
-
Click CREATE AND ADD ANOTHER.
This variable will format your data so it saves properly into the record rule input when you click Submit.
Property Value Name toSaveValue See below. Tip: This local variable maps data to record type fields, so you'll use the
recordType!domain in the definition. You'll need to manually type the field references in order to reference the UUID for the record type you created earlier. We've included the excerpt here for your reference.1 2 3 4 5 6 7 8 9 10
a!forEach( items: local!document, expression: {recordType!AL Document( recordType!AL Document.fields.createdBy: loggedInUser(), recordType!AL Document.fields.documentId: fv!item, recordType!AL Document.fields.documentName: "User uploaded document", recordType!AL Document.fields.createdOn: now(), recordType!AL Document.fields.modifiedBy: null, recordType!AL Document.fields.modifiedOn: null )}[1])
Copy - Click CREATE.
Customize the interface appearance:Copy link to clipboard
- To replace the default interface title, double-click the title.
- Enter
Submit to Acme Logistics. - In the top Section Layout component in the editor, drag and drop a TEXT field from the component palette.
- Click the Text component.
-
In the COMPONENT CONFIGURATION, configure the following properties:
Property Value Label Position Hidden Display Value Click Edit as Expression and enter: "Thank you for contacting Acme! Upload your document and we'll be in touch"Read-only Checked - Click the bottom Section layout.
- In the COMPONENT CONFIGURATION, delete the default text in the Label field.
- In the bottom Section Layout component in the editor, drag and drop a FILE UPLOAD field from the component palette.
- Click the File Upload.
-
In the COMPONENT CONFIGURATION:
Property Value Target Folder AL_UPLOADED_DOCUMENTS Selected Files local!documentSave Files To local!document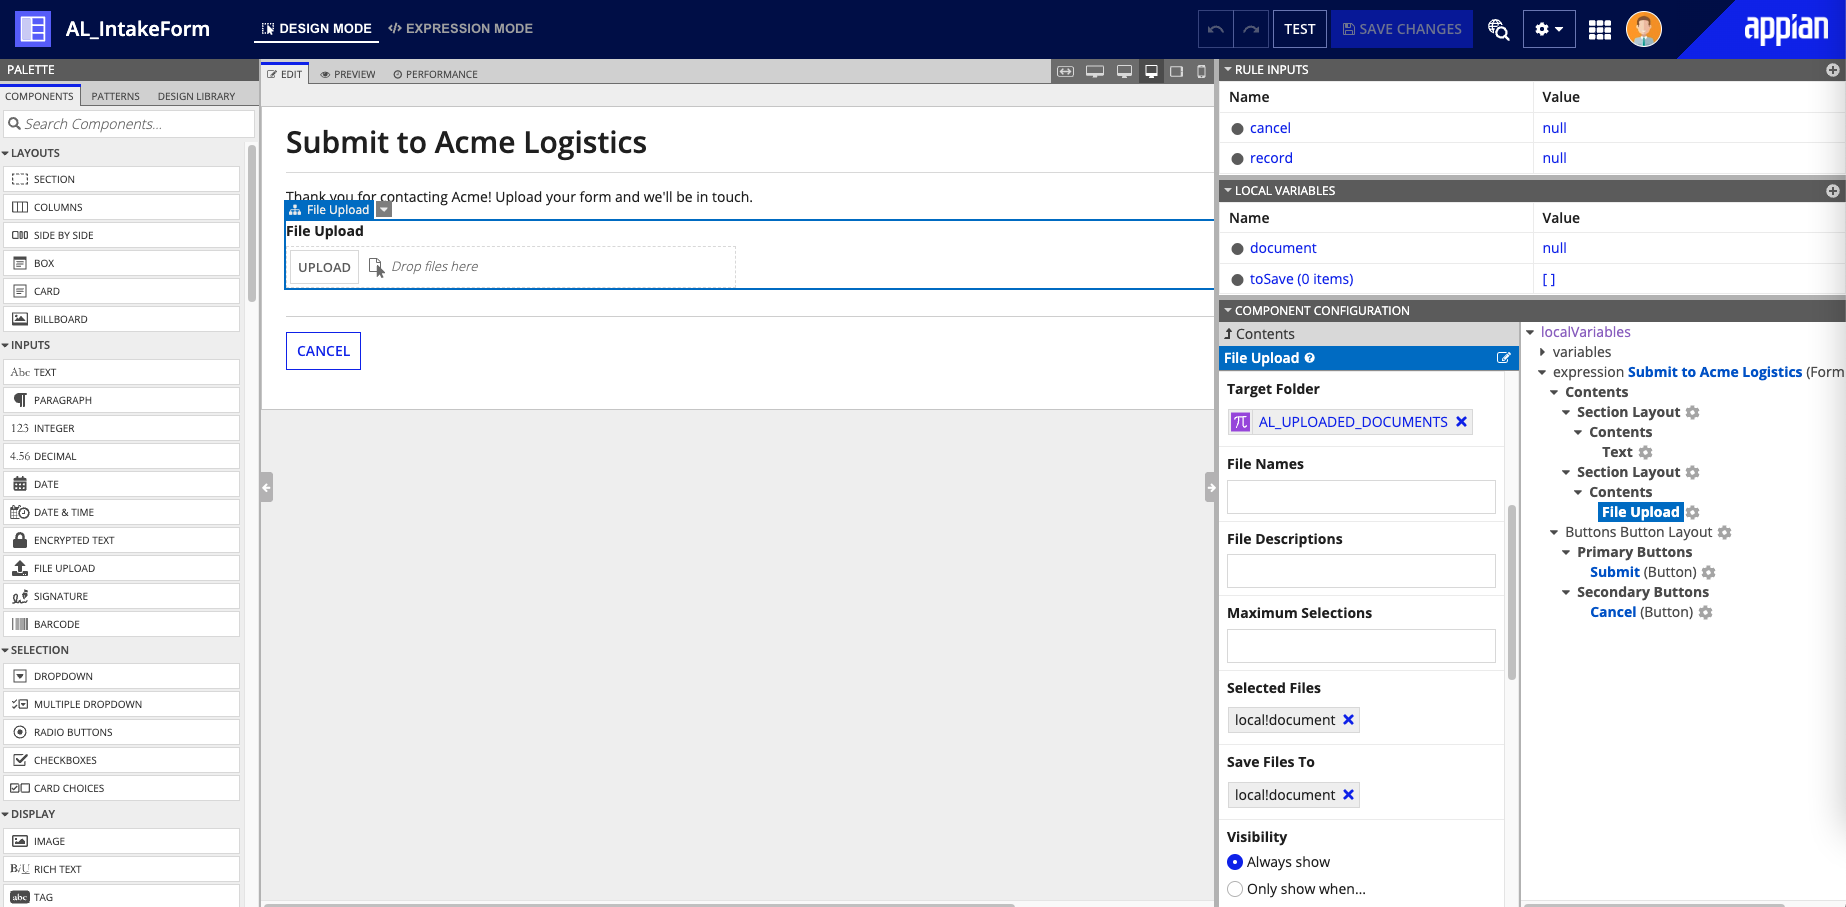
-
Click the Submit button component to configure it:
Property Value Save Value To Click Edit as Expression and enter: a!save(target: ri!record, value: local!toSave) - Click OK.
- Click SAVE CHANGES.
Add a task formCopy link to clipboard
If the incoming documents are meant for the fulfillment department, you want to present them with the data they need. In this step, you'll create a form to display as part of the user input task when a purchase order comes into the Acme website.
- In your application, go to the Build view.
- Click NEW > Interface.
-
Configure the following fields:
Property Value Name AL_FulfillmentTaskDescription (Optional) Interface to show purchase order data for Fulfillment Dept.Save In Select the interfaces folder in your application. - Click CREATE.
- Click One Column Form.
-
Click New Rule Input and configure the following fields:
Property Value Name recordDescription (Optional) Leave blank. Type AL Document (record type) - Click CREATE.
- Replace the default interface title:
- Double-click the title.
- Enter New Purchase Order.
- In the top Section Layout component in the editor, drag and drop a TEXT field from the component palette.
- Click the Text component.
-
In the COMPONENT CONFIGURATION, configure the following properties:
Property Value Label Position Hidden Display Value Click Edit as Expression and enter: "Someone submitted a purchase order via Acme's website. Review the document to confirm its validity."Read-only Checked - Click the bottom Section layout.
- In the COMPONENT CONFIGURATION, delete the default text in the Label field.
- In the bottom Section Layout component in the editor, drag and drop a DOCUMENT VIEWER field from the component palette.
- Click the Document Viewer component.
-
In the COMPONENT CONFIGURATION, configure the following properties:
Property Value Label Position Hidden Document Click Edit as Expression and enter: ri!record > fields > documentId. Appian automatically formats this selection so the expression appears as:ri!record[AL Document.documentId].- Click OK.
- Click SAVE CHANGES.
Create the process modelCopy link to clipboard
A process model is the primary tool in Appian for building a process. For this tutorial, our process model will incorporate the AI Skill we created earlier, but first we need to create the design object.
To create this process model:
- In the application toolbar, click NEW > Process Model. The Create Process Model window displays.
-
Configure the following properties:
Property Value Name AL Claim IntakeDescription (Optional) Process to collect and verify incoming claims from Acme customers. - Click CREATE.
- Select Viewer permissions for the Default (All Other Users) group and Administrator permissions for the AL Administrators group.
- Click SAVE.
Configure the Start FormCopy link to clipboard
The process kicks off when a user submits the start form. Configure the Start node to use the form you created:
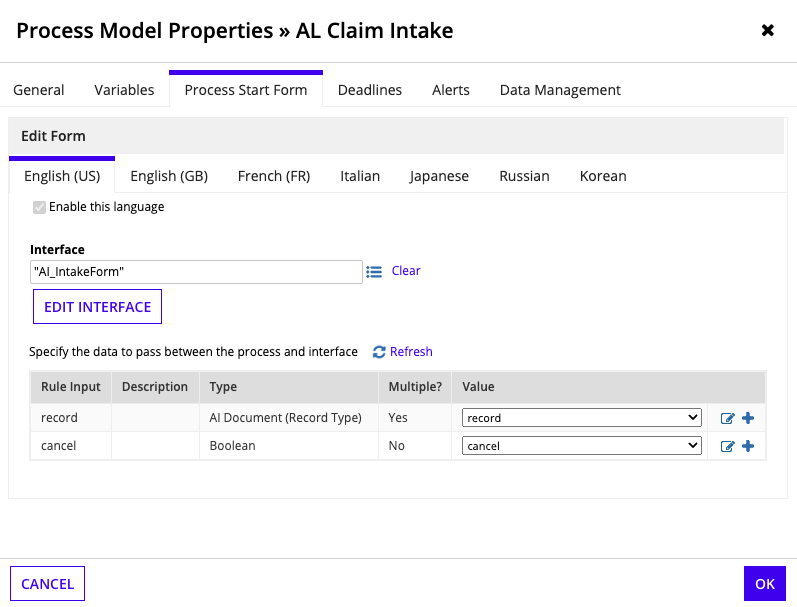
- In the Appian Process Modeler page, click File > Properties in the menu bar. The process model properties window displays. By default, the General tab is active.
- Go to the Process Start Form tab.
- In the Interface text box, enter
AL. - Select
AL_IntakeFormwhen it displays in the dropdown list. - Click Yes to create process variables based on rule inputs from the submission form.
- Click OK to return to the process model.
- In the menu bar, click File > Save & Publish.
Add and configure a Write Records smart serviceCopy link to clipboard
To save the data that your customers input into the start form, you'll want to write records next. This will save all data, including the documents they attached to the claim.
This takes the data stored in the record rule input in the interface, passes it to the record process variable, and saves it to the AP Documents record.
- In the Smart Service Search bar, search for Write Records. You can also find this in Automation Smart Services > Data Services.
- Click and drag from the search results to the flow connector between the Start and End nodes.
- Double-click the Write Records node.
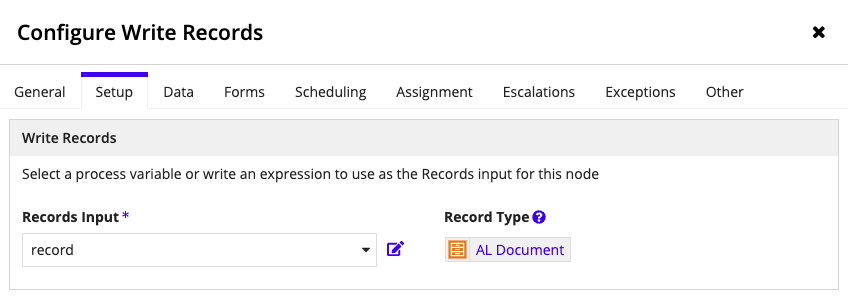
- In the Setup tab, configure the options:
- Record Input: select the record process variable.
- Record Type: AL Document (automatically selected)
- Go to the Data tab.
- Click the Outputs tab.
- Click the Records Updated output.
- In the Result Properties pane, select record for the Target.
- Click OK.
Add and configure the Classify Documents smart serviceCopy link to clipboard
Now that we have document data saved, we can pass it to the AI skill through the Classify Documents smart service. The smart service will return predictions for each document type, grouped by the model's confidence in those predictions.
To add the Classify Documents smart service:
- In the Smart Service Search bar, search for Classify Documents. You can also find this in Automation Smart Services > AI Skills.
- Click and drag from the search results to the flow connector between the Write Records and End nodes.
- Double-click the Classify Documents node.
- In the Setup tab, search for the AI skill you created earlier:
AL_IncomingDocument. - Go to the Data tab.
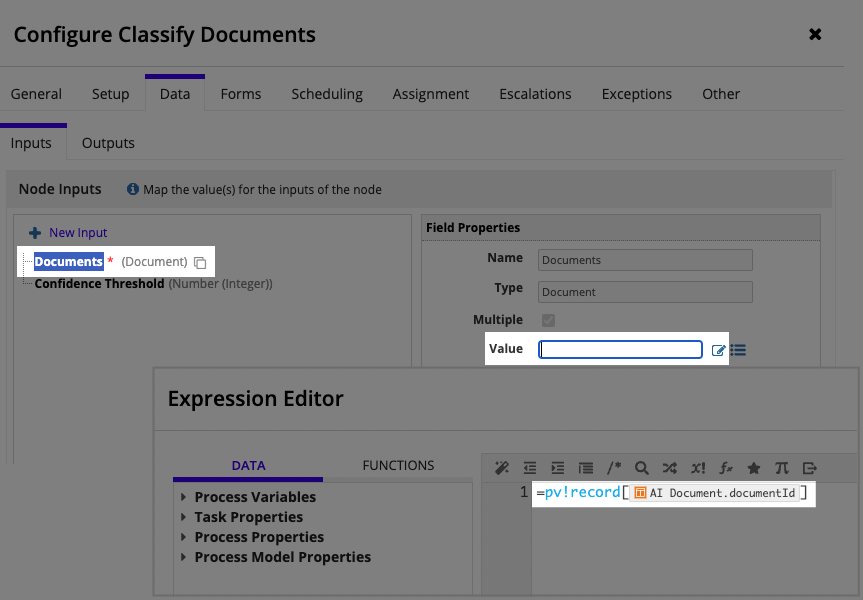
- In the Node Inputs pane, configure the node inputs:
- Click Documents.
- In the Field Properties, open the Expression Editor next to the Value field.
- In the list of Process Variables, expand record.
- Select documentId.
- Click SAVE AND CLOSE.
- Click Confidence Threshold.
- For value, enter
90, to indicate your threshold for the model's confidence in its prediction.
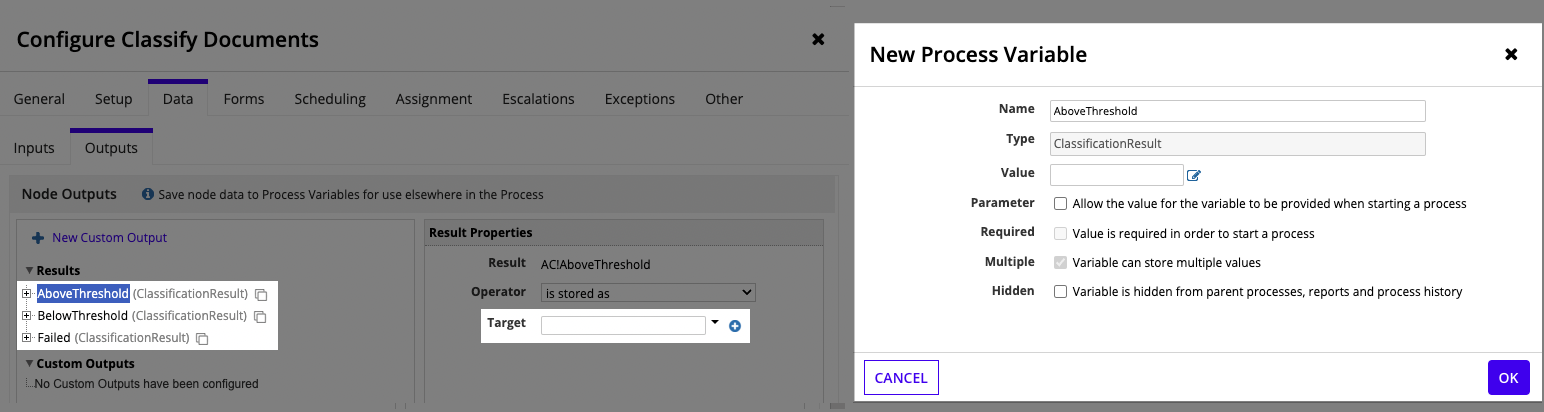
- Configure the Node Outputs:
- Go to the Outputs tab.
- Click the AboveThreshold result.
- In the Result Properties pane, click New process variable, next to the Target field.
-
Verify the following parameters for the new process variable:
Property Value Name AboveThresholdType ClassificationResultValue Leave empty - Click OK.
- Click the BelowThreshold result.
- In the Result Properties pane, click New process variable, next to the Target field.
-
Verify the following parameters for the new process variable:
Property Value Name BelowThresholdType ClassificationResultValue Leave empty - Click OK.
- Click the Failed result.
- In the Result Properties pane, click New process variable, next to the Target field.
-
Verify the following parameters for the new process variable:
Property Value Name FailedType ClassificationResultValue Leave empty - Click OK.
- Click OK to return to the process model.
- In the menu bar, click File > Save & Publish.
This way, the results of document classification are saved into process variables and can be referenced later in the process. If we don't save the outputs of this node, the values can't be referenced in the following gateways.
Build additional pathsCopy link to clipboard
If the model's prediction isn't up to our standards (that is, the model isn't very confident in its predictions), we want to notify a human being so they can double-check the classification. But if the model is confident, we're glad to let the process finish by notifying the proper team.
We'll build logic into the process using gateways. Depending on the result of an expression, we can instruct the process to follow any number of gateways.
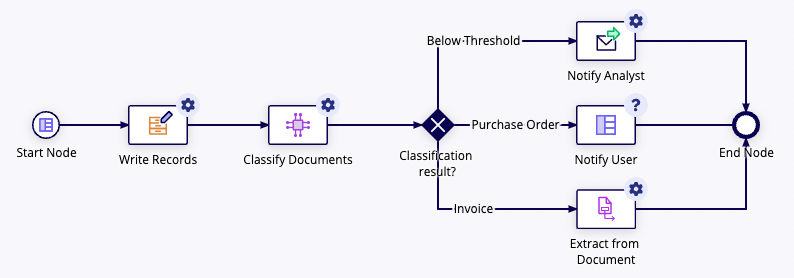
From here to the end of the tutorial, you'll be building three paths:
- Classifications below the threshold: a path to notify the analyst and ask for manual verification.
- Invoices: A path to extract document data via a subprocess.
- Purchase orders: A path to send a user input task to the Fulfillment department.
Let's get started on adding the gateway and the three paths. Then, we can configure the XOR gateway to route to each one when appropriate.
Add a gatewayCopy link to clipboard
- In the smart service search bar, enter
XOR. - Click and drag the XOR from the search results to the flow connector between the Classify Documents and End nodes.
You'll configure the XOR node's pathways after you add the remaining nodes.
Notify the analystCopy link to clipboard
We want the analyst to receive an email if any predictions fall below the threshold, so they can review the document manually.
- In the smart service search bar, enter
Send Email. - Click and drag the Send Email node from the search results to the flow connector between the XOR and End nodes.
- Double click the Send Email node.
- In the General tab, configure the following options:
- Name:
Notify Analyst
- Name:
- In the Setup tab, configure the following options:
-
Email Configuration:
Property Value From Select Process Model To Type or search for the name of the analyst to receive the task. For demonstration purposes, you can use your own email address. Subject "For Review: Document type prediction below threshold." -
Message Body:
- Click Insert An Expression.
-
Enter the following:
1
2
3
4
5
6
7
8
9
10
11
12
13
14
15
      = "Dear Analyst, the following document type was predicted with a confidence level before your threshold. Review the prediction to confirm it's correct." & char(10),
      char(10),
      "Predicted type: " & pv!BelowThreshold.type,
      char(10),
      char(10),
      a!linkField(
          label: "Download document",
          labelPosition: "ABOVE",
          links: {
              a!documentDownloadLink(
                  label: "Download",
                  document: pv!BelowThreshold.classifiedItem
              )
          }
          )
Copy
-
- Click SAVE AND CLOSE.
- Click OK.
Add and configure the Extract from Document smart serviceCopy link to clipboard
- Add a second flow connector between the XOR and End nodes.
- In the Smart Service Search bar, search for Extract from Document. You can also find this in Automation Smart Services > AI Skills.
- Click and drag from the search results to the flow connector between the XOR and End nodes.
- Double-click the Extract from Document node.
- In the Setup tab, search for the AI skill you created earlier:
AL_ExtractInvoice. - Go to the Data tab. By default, the Inputs tab is active.
- In the Node Inputs pane, configure the node inputs:
- Click Document.
- In the Field Properties, open the Expression Editor next to the Value field.
- In the list of Process Variables, expand record.
- Select documentId.
- Click SAVE AND CLOSE.
- Configure the Node Outputs:
- Go to the Outputs tab.
- Click the Extracted Data result.
- In the Result Properties pane, click New process variable, next to the Target field.
-
Configure the following parameters for the new process variable:
Property Value Name ExtractedDataType TextValue Leave empty - Click OK.
- Click OK.
Note: For the purpose of this tutorial, we aren't going to write the extracted data to a record type or other data source. But in a real-world business process, you'd add another node in the process to save this data for future use.
Notify the fulfillment departmentCopy link to clipboard
- Add a third flow connector between the XOR and End nodes.
- In the smart service search bar, enter
User Input Task. - Click and drag the User Input Task from the search results to the flow connector between the XOR and End nodes.
- Double-click the User Input Task node.
-
In the General tab, configure the following parameters:
Property Value Name Notify UserDescription Notifies the fulfillment department that there is a new purchase order to review.Task Display Name New purchase order receivedDefault Task Priority Normal. - Go to the Forms tab.
- In the Interface field, search for
AL_FulfillmentTask. - Click Yes to create process variables based on rule inputs from the task form.
- Go to the Assignment tab.
- Open the expression editor next to the Assign to the following: field.
- On the Data tab, expand the Process Properties group.
- Select initiator.
- Click SAVE AND CLOSE.
- Click OK.
Configure the XOR nodeCopy link to clipboard
Now that we have built the three possible paths, we can direct the process model to any of them based on the results of the Classify Documents smart service.
- Double-click the XOR node.
-
In the General tab, configure the following parameters:
Property Value Name Classification Result?Description Checks the result of document classification - In the Decision tab, we're going to add three conditions:
-
Click NEW CONDITION and configure the following parameters:
Property Value Condition Open the Expression editor and enter a!isNotNullOrEmpty(pv!BelowThreshold)Result Select the Notify Analyst node. Path Label Low confidence -
Click NEW CONDITION and configure the following parameters:
Property Value Condition Open the Expression editor and enter pv!AboveThreshold.type = "Invoice"Result Select the Extract from Document node. Path Label Invoice -
Click NEW CONDITION and configure the following parameters:
Property Value Condition Open the Expression editor and enter pv!AboveThreshold.type = "Purchase Order"Result Select the Notify User node. Path Label Purchase Order
-
- In the Else if no rules are TRUE row, select the Notify User node.
- Leave any other parameters unchanged.
- Click OK to return to the process model.
- In the menu bar, click File > Save & Publish.
Test the processCopy link to clipboard
- In the menu bar, click File > Start Process for Debugging.
- In the start form, click UPLOAD.
- Find and upload the Dunder Mifflin Purchase Order.pdf file on your computer.
- Click SUBMIT. The monitoring tab for the process displays.
- Click Refresh in the toolbar to watch the process advance through each node. The Classify Documents smart service may take a few minutes.
- Observe the path the process took, and click Process Details in the toolbar.
- In the Process History tab, verify that the Classify Documents node ran successfully.
Tip: Encounter an error? Check that you published the model in the IncomingDocument AI skill.
Part 4: Rejoice!Copy link to clipboard
You just built, trained, and used a custom machine learning model in Appian.