
| The capabilities described on this page are included in Appian's advanced and premium capability tiers. Usage limits may apply. AI Skill is only available for Cloud customers at this time. Self-managed and Appian GovCloud customers don't have access to this feature. Appian Cloud HIPAA or PCI-DSS customers: Before enabling this feature, please review its compliance to ensure it aligns with your organization's security requirements. |
This topic covers how to create an AI skill to classify emails using machine learning (ML) models.
What is an AI skill?Copy link to clipboard
An AI skill is a design object that enables you to build, configure, and train an ML model using low-code. A skill takes emails as inputs via the Classify Emails smart service, analyzes the emails, and returns predictions about an email's type.
Here's a high-level breakdown of how to create and use an email classification AI skill:
- Create an AI skill
- Create email types
- Add training emails
- Start training
- Assess the results
- Test the model
- Train a new model
- Publish the model
- Use the skill!
Create an AI skillCopy link to clipboard
-
In the Build view, click NEW > AI Skill.

-
Select the skill type you want to create.

-
Configure the following properties:
Property Description Name Enter a name that follows the recommended naming standard. Description (Optional) Enter a brief description of the AI skill. - Click CREATE.
- On the Review AI Skill Security window, configure security.
- Click SAVE. The AI skill opens in a new dialog or window.
Click CREATE FIRST MODEL to tell the model about your email types.
Create email typesCopy link to clipboard
Email types are the categories of emails you want this skill to classify. For example, email types might be account inquiries or customer feedback. You'll define an email type for each category of email, and then provide training data that represent the emails you expect to classify in production.
To create an email type:
-
On the Configure Training page, click NEW EMAIL TYPE.
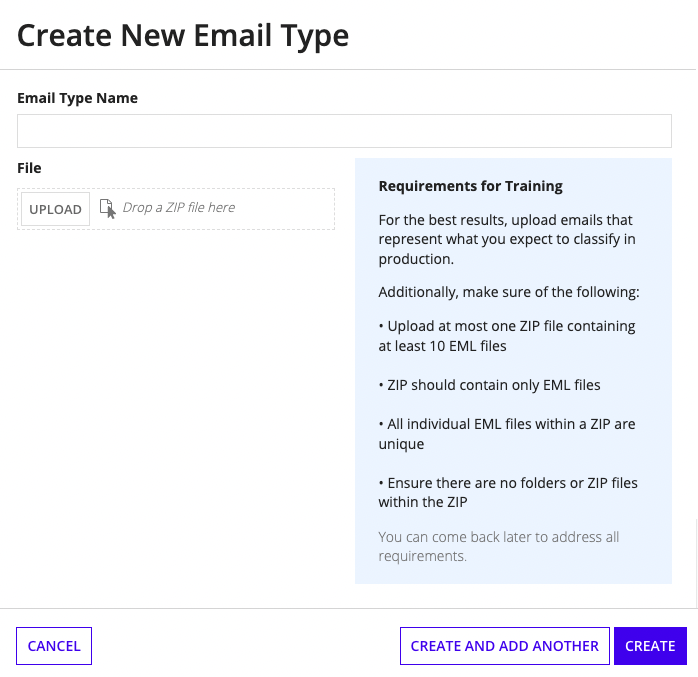
- Enter the Email Type Name.
- Click UPLOAD to add training data. Add training data as a ZIP package that contains only EML files, with no additional folders within it. Training will fail if the ZIP contains anything other than EML files.
- Browse for and select the ZIP package you want to add.
- Click CREATE to finish creating the email type, or CREATE AND ADD ANOTHER to create this email type and add another email type.
Add training emailsCopy link to clipboard
The model needs training data to learn about the patterns or traits the emails have in common. The model also uses some of these training emails to test its knowledge after training.
The model can only learn from the emails you provide, so be sure to build a comprehensive and diverse set of emails that represent what you expect to classify in your process.
Training emails must meet the following requirements:
- Upload a single ZIP package containing all training emails. The ZIP must contain only EML files, with no additional folders within it.
- Include at least 10 emails, though you may need many more based on your use case. We recommend you start with at least 50 emails.
- All emails must be in EML format.
- Each email must be unique.
- Each email must include a Subject and Body for training.
You can add training data to a new or existing email type.
To add training emails to an existing email type:
- Click CONTINUE EDITING on the unpublished model where you want to add more emails.
- Click EDIT in the row of the relevant email type.
- Click UPLOAD.
- Browse for and select the emails you want to add.
After you've added training emails, you're ready to start training the model.
Performance guidelinesCopy link to clipboard
Keep in mind the following requirements when training this AI skill type:
- Maximum number of email types for a model: 20
- Maximum size of a single ZIP file for training: 300 MB
- Maximum number of EML files across all ZIPs for a model: 10,000 EMLs
If any of these guardrails are limiting, please reach out to your Appian contact.
Start trainingCopy link to clipboard
You'll manually prompt the model to start training based on the training emails you provided. When you've created the relevant email types and provided training emails for each one, click TRAIN MODEL on the Configure Training page.
During training, the model analyzes a portion of your training emails to learn about the traits or patterns that could identify them as the email type. Model training is only based on subject and body of each email. All other email data and metadata is stripped or ignored, including HTML in the subject and body (if present).
After learning about your emails, the model uses the remaining portion of the training emails to test itself. The model training will display metrics to show how it performed.
Tip: Training can take a few minutes. You can close the Training Summary page and return later to view the results.
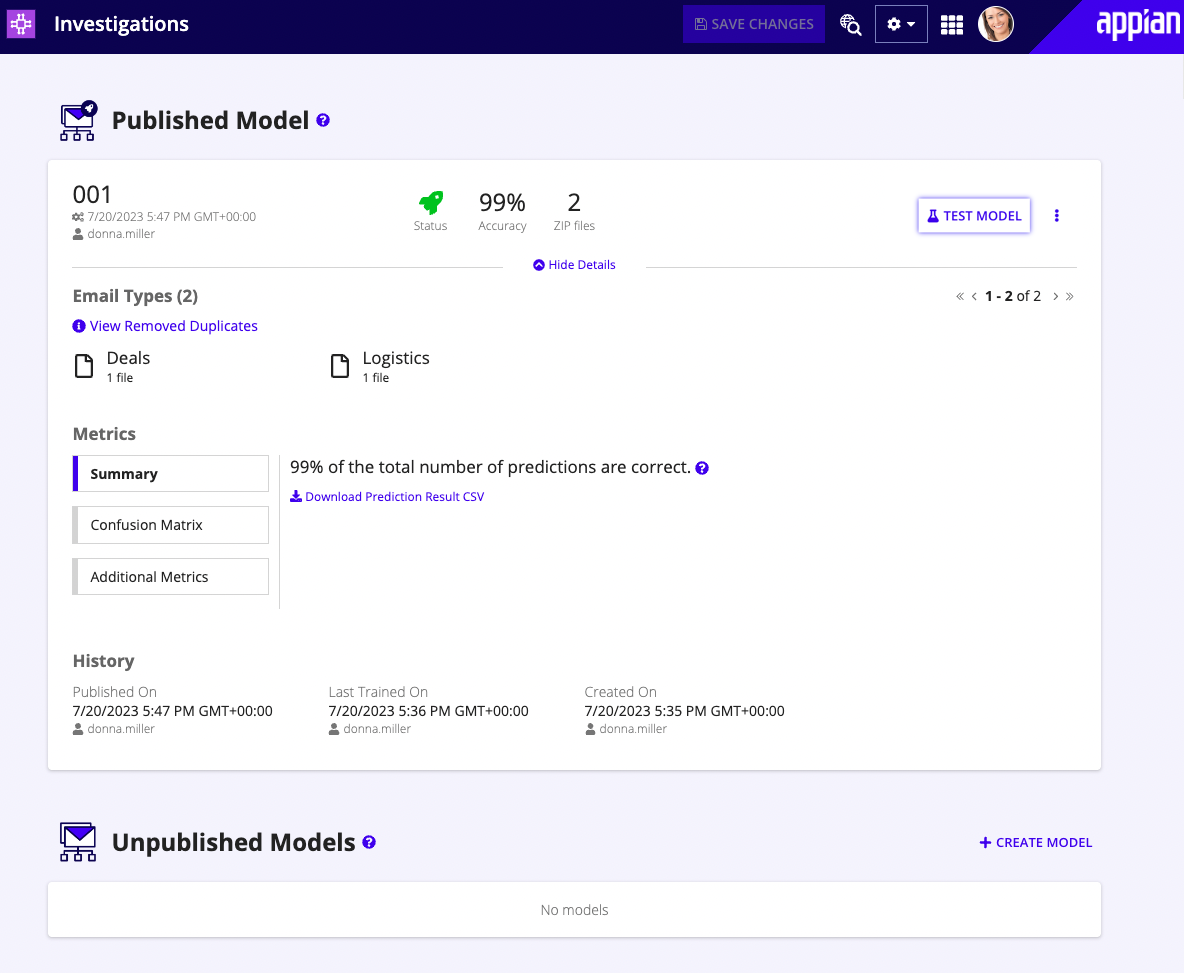
Assess the resultsCopy link to clipboard
After the model is finished training and testing, you're shown a number of metrics measuring its performance. You'll use this information to determine if this model is ready to publish, or if you'd like to provide more emails for the model to continue training.
Some of these metrics might be more or less relevant based on your use case and the type of emails you expect to classify.
Learn more about evaluating model performance.
Test the modelCopy link to clipboard
Before you integrate the skill into a process, you want to be confident the published model performs as you expect. You can test the model using a few sample files to verify it works as you expected directly within the AI skill object.
To test the model:
- Navigate to the published model.
-
Click TEST MODEL.
- Click UPLOAD.
-
Browse for and select the documents you want to add. You can add up to five files.
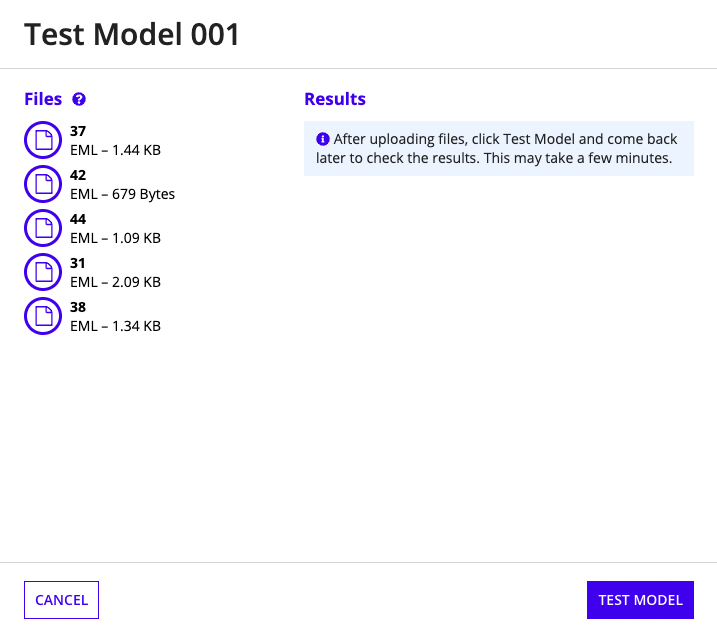
- After the files finish uploading, click TEST MODEL. The list of models displays.
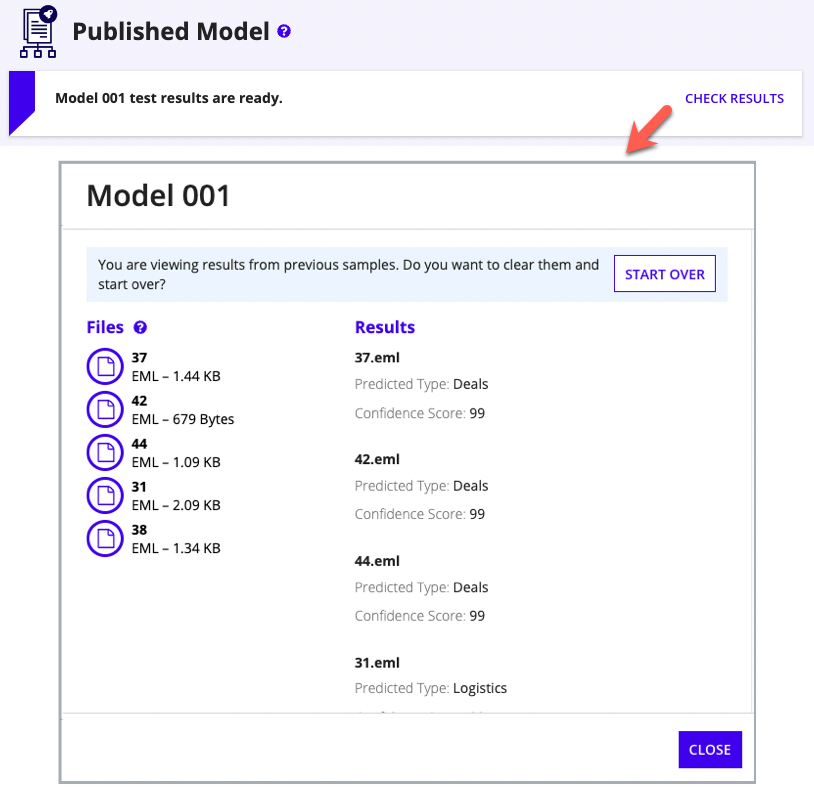
-
In the banner showing you the test status, click REFRESH to see when results are available.

- When results are ready, click CHECK RESULT.
- In the Results window, you can see the predicted type for each file, as well as the model's confidence score for each prediction.
-
Click START OVER to run another test with different files, or CLOSE to exit the results window.
Train a new modelCopy link to clipboard
If the model's training metrics don't yet meet your requirements, you can continue training to try to boost the model's performance. Each time you retrain, you're creating a new model. Provide the new model with additional training emails to help it learn more about the email type. Be sure your training emails represent the emails you expect to see in production.
To continue training by creating a new model:
- In the AI skill, click CREATE MODEL.
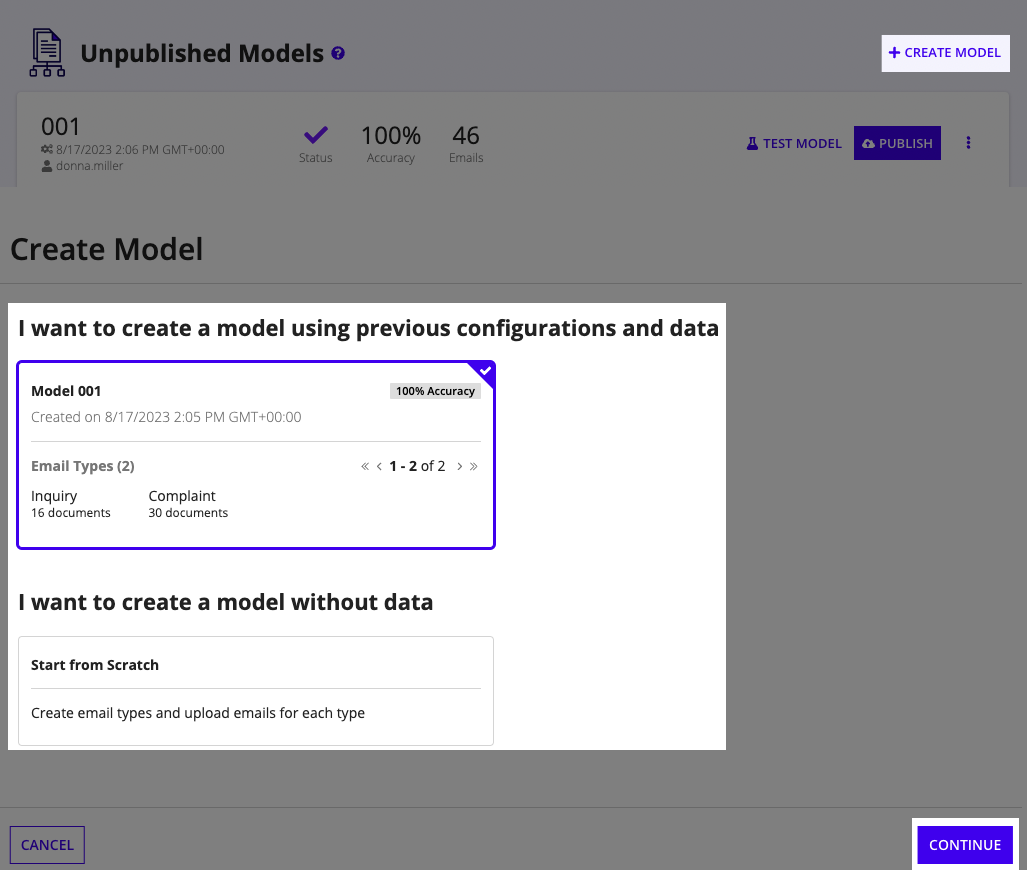
- Choose how you want to start:
- I want to create a model using previous configurations and data: Start building a new model using previously configured email types and samples. When you create a new model from an existing model, you can add new email types, remove existing email types, and add or remove samples for those email types. In this way, you have multiple options to configure the model so it can learn more about your data. This option doesn't change anything within the model you're using as the basis for the new model.
- I want to create a model without data: Start with an entirely new model. With this option, you'll create email types and upload samples to start training from scratch.
- Click CONTINUE. A Create Model page appears, where you can continue refining and training the model.

Retraining vs. creating a new skillCopy link to clipboard
As you expand how you use machine learning models throughout your applications, you might wonder: when should I train a new model vs. creating an entirely new skill?
Keep in mind you can only publish one model for a skill. In practice, this means that a Classify Emails smart service will only be able to access one model for the skill the smart service is configured to use.
Also keep in mind that ML models are designed for a specific purpose. To help the model specialize and hone in on key traits in your email types, consider creating one at the lowest level possible for your process. That is, if a single step in a process requires you to classify inquiries or complaints, don't bother including a third email type for other notifications. Adding this extraneous information will only serve to distract the model, so it's best to exclude. Instead, create email types specific to the emails you expect to classify in your specific use case.
To help demonstrate these ideas, let's use the example of studying for a test. Imagine you're taking a driving exam to get your license. You'll study laws and general rules of the road, as well as practice identifying street signs. You may even test your knowledge by navigating a practice test that contains word problems and multiple choice questions. Your family is moving to a neighboring state around the same time you're planning to take the test.
With these two things in mind, you can begin to consider when to create a new AI skill instead of using an existing one. In short:
- If you're classifying the same email types in multiple processes and you trained the model based on what the model expects to see in production for each process, you can call the same skill each time. Retrain the model as needed to improve performance or recalibrate its baseline understanding of your emails.
- Using the example above, this would be a situation where you can use your same knowledge no matter where you take the test. In all states, a red octagonal sign with STOP written across it means the same thing.
- If you're classifying new and different email types in a different process, use a separate AI skill. The more models are used in production, the greater chance that they experience data drift. Data drift is when your production data moves away from training data, which can result in a degraded model performance over time. One way to help treat data drift is to retrain the model using updated training emails, so the model can adjust its understanding of your email types over time.
- Using the example above, this would be a situation where you want to focus on learning about the state-specific laws that might appear on the test you're taking.
Publish the modelCopy link to clipboard
When the model's training metrics meet your requirements, you're ready to put it to use. Publish the model to make it available for use in your process, through the Classify Emails smart service.
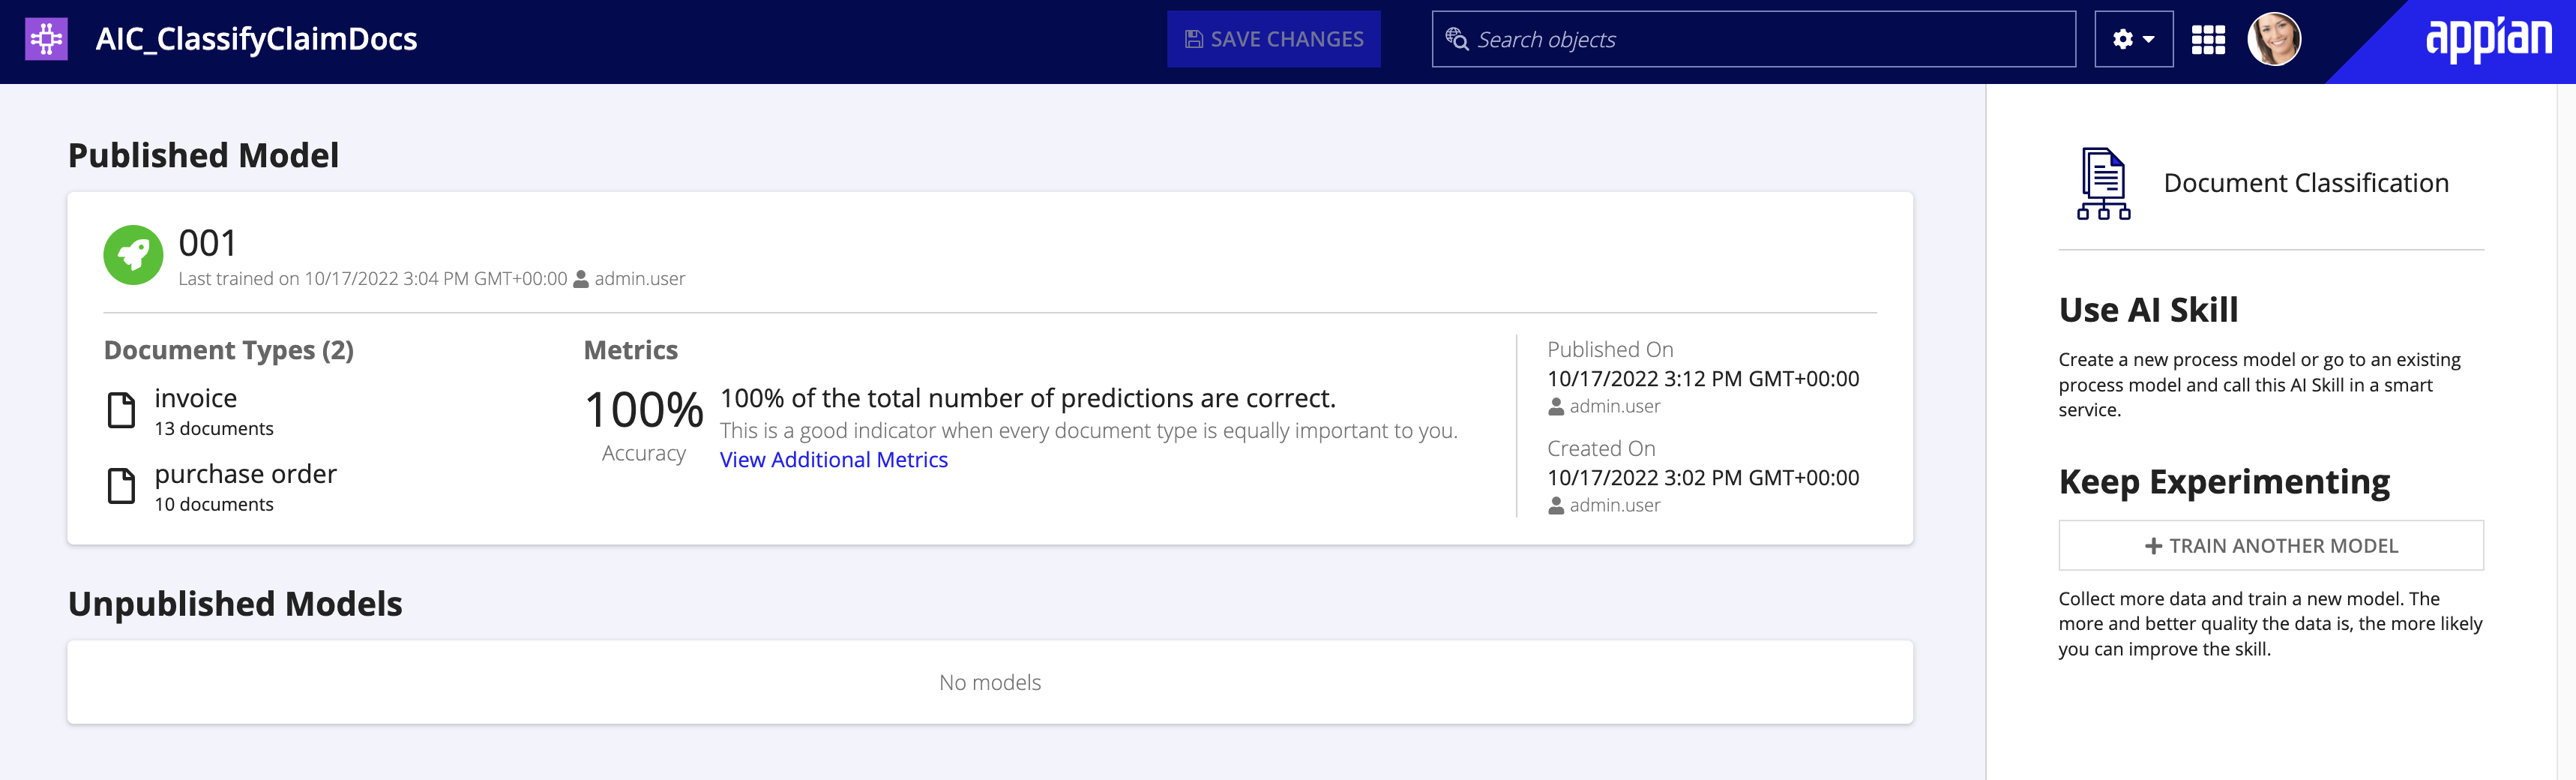
You'll configure the Classify Emails smart service to use your AI skill. When the process reaches the smart service node, it uses the published model within the skill to analyze and classify emails.
Use the skillCopy link to clipboard
Now you're ready to use your email elassification skill in a process.
Add the Classify Emails smart service and configure it to call your new skill.