
OverviewCopy link to clipboard
The translation set object is an out-of-the-box way for developers to easily create and translate multi-lingual applications. A translation set is made up translation strings, which are individual collections of values translated into multiple languages, along with the necessary contextual information for developers or translators. Translation strings can be used in interfaces and expression rules throughout an application, allowing you to provide your users with the best possible experience of your apps in their preferred language.
Translation sets allow you to:
- Quickly build a new application that supports multiple languages.
- Easily add languages to an existing app.
- Efficiently manage translated content by editing a translation string once and it updating everywhere.
Terms to knowCopy link to clipboard
To get a better understanding of translation sets and how they work, use the following terms and definitions as a reference.
| Term | Definition |
|---|---|
| Translation set | A collection of translation strings that you can use to translate user facing text in applications. |
| Translation strings | A collection of values for each translation locale that will be translated and used throughout your application. Translation strings display in the user locale of the logged in user, as long as there is a value for that locale. Otherwise, they display in the primary translation locale. |
| Enabled system locales | Environment wide settings in the Admin Console that determine which languages are supported in the environment. |
| Primary system locale | The default locale for users who have not selected their own preferred user locale. This locale controls the language of text and the format of dates, times, and numbers. |
| Translation locales | The locales enabled in the translation set object. Each translation string in the set can contain one value for each translation locale. You can use any locale supported by Appian as a translation locale, but all translation locales should be enabled system locales in your environment. |
| Primary translation locale | The default locale for the translation set. It determines which locale value is required when creating translation strings. If a translation string doesn't have a value in the user's locale, it uses the value for the primary translation locale. |
| User locale | The locale setting of the logged in user. This value will either be the primary system locale or whichever enabled system locale the user has chosen as their preferred locale in the user settings. |
| User display text | Any interface text that displays to end users, like labels, instructions, or tooltips. This doesn't include text entered by users. |
| Translation variable | Variables in a translation string that represent dynamic values, such as the value of a function, rule input, or variable. They can also use rich text styling. |
How does it work?Copy link to clipboard
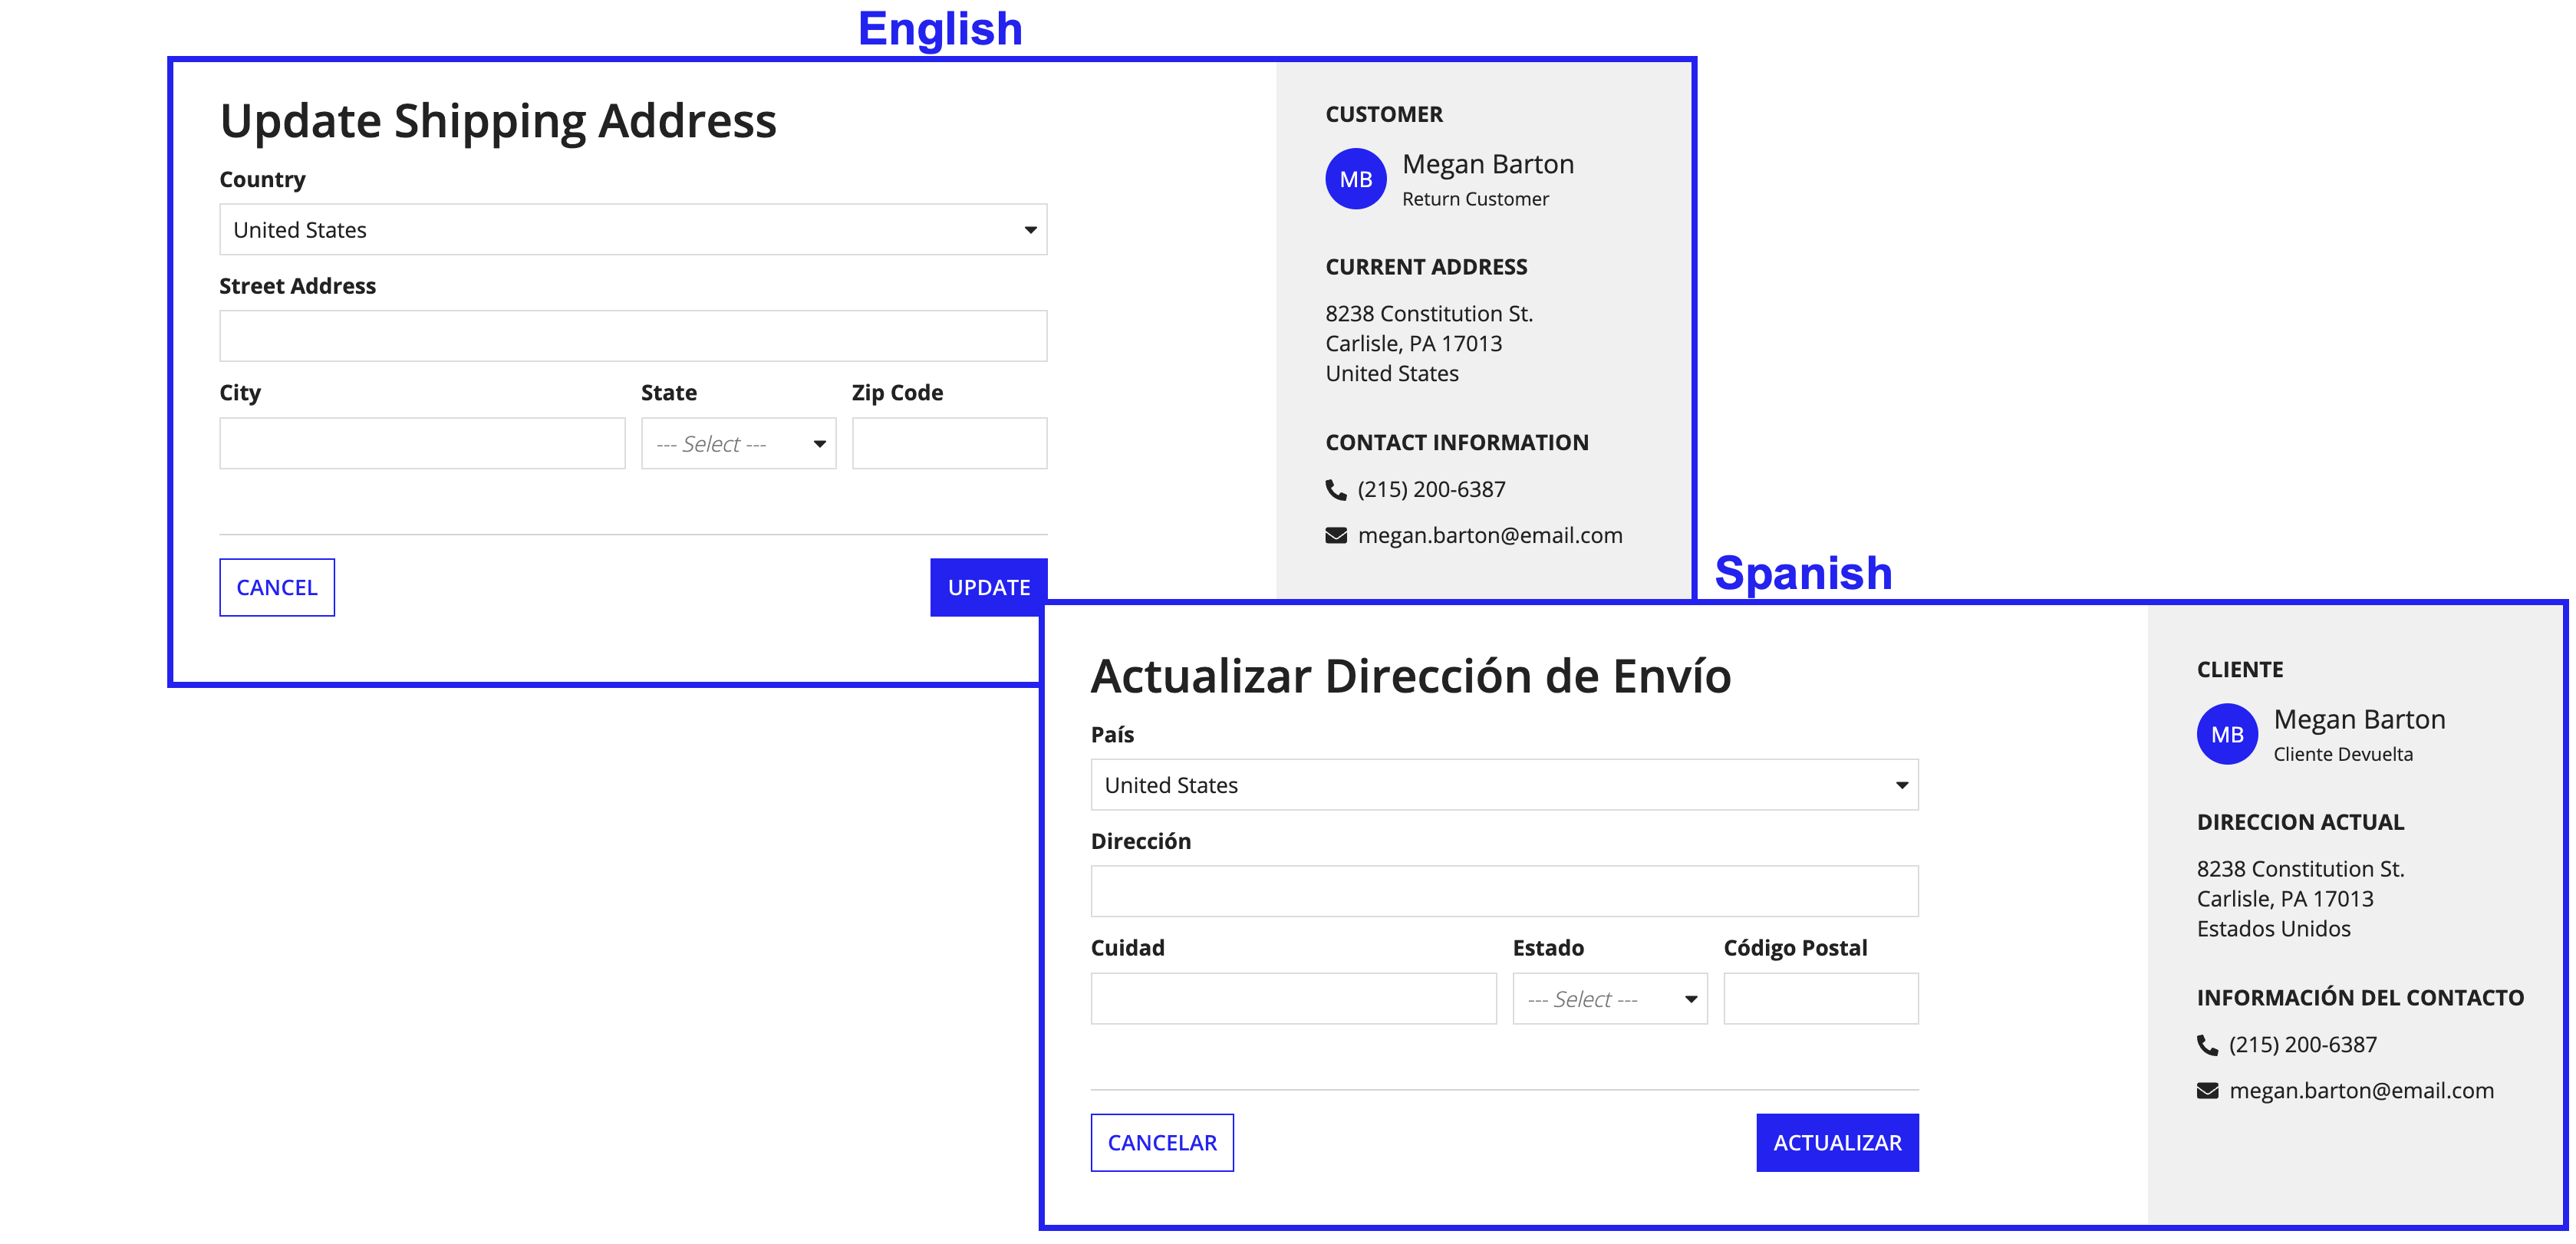
After you've created a translation set and translation strings, you can use the translation strings anywhere for user display text. User display text is any text that an end user would see, like instructions, labels, and tooltips. This can include dynamic values, called translation variables, but does not include record data.
When a user views an interface that uses translation strings, the translation strings will display in the logged in user's selected locale, as long as the translation strings have a value for that locale. Otherwise, the strings will display in the primary translation locale.
PropertiesCopy link to clipboard
Both the translation set object and the translation strings have properties.
Translation set propertiesCopy link to clipboard
| Property | Description |
|---|---|
| Name | The name of the translation set that follows the recommended naming standard. |
| Translation locales | The locales enabled in the translation set object. Each translation string in the set can contain one value for each translation locale. You can use any locale supported by Appian as a translation locale, but make sure that all translation locales are enabled system locales in your environment. |
| Primary Translation Locale | The default locale for the translation set. It determines which locale value is required when creating translation strings. If a translation string doesn't have a value in the user's locale, it uses the value for the primary translation locale. |
| Description | The description of the translation set object that only displays to developers. |
| UUID | The unique identifier for the translation set object. You can only see this property after you have created the translation set. |
| Created | The date, time, and creator of the translation set. You can only see this property after you have created the translation set. |
Translation string propertiesCopy link to clipboard
| Property | Description |
|---|---|
| Value | The text values for each locale in the translation string. This includes the value of the primary translation locale, which is required for each translation string. |
| Description | Additional details to help developers understand how the string is used in the app. The description helps developers choose the correct string to display in an interface. |
| Notes for Translator | Additional context about the translation string for translators so that they can fully understand what they are translating. |
| Translation Variable | Dynamic values added as variables to translation strings to either use rich text formatting or represent the value of a function, rule input, or variable. |
Create and edit a translation set objectCopy link to clipboard
Creating and editing translation sets is simple and can be done from multiple places, so that you can make and manage a translation set without breaking your development flow.
Create a translation setCopy link to clipboard
You can create a translation set object in three places: the Build view, within an interface, or anywhere with an expression editor.
In the Build view:
- Click New, then Translation Set.
- Configure the translation set properties:
Property Value Name The name of the translation set. Translation locales Select supported system locale to translate your translation strings into.
Primary Translation Locale Select a supported system locale to use as the default translation locale for the translation set and translation strings. Description (Optional) A description of the translation set. - Click CREATE.
- Set security and click SAVE.
You can also create a new translation set object from within an interface in either expression or design mode while creating new translation strings.
Edit a translation setCopy link to clipboard
You can edit translation set properties in the Build view of your app and in the object. When editing the properties, you can add or remove translation locales, as well as change the primary translation locale.
To edit the translation set properties from the Build view, select the translation set and click PROPERTIES in the More menu.
To edit the translation set properties in the object, click PROPERTIES in the gear menu.
Inside the translation set object, you can create and manage not only your translation set, but your translation strings.
The following image highlights the actions that you can take from the translation set object:
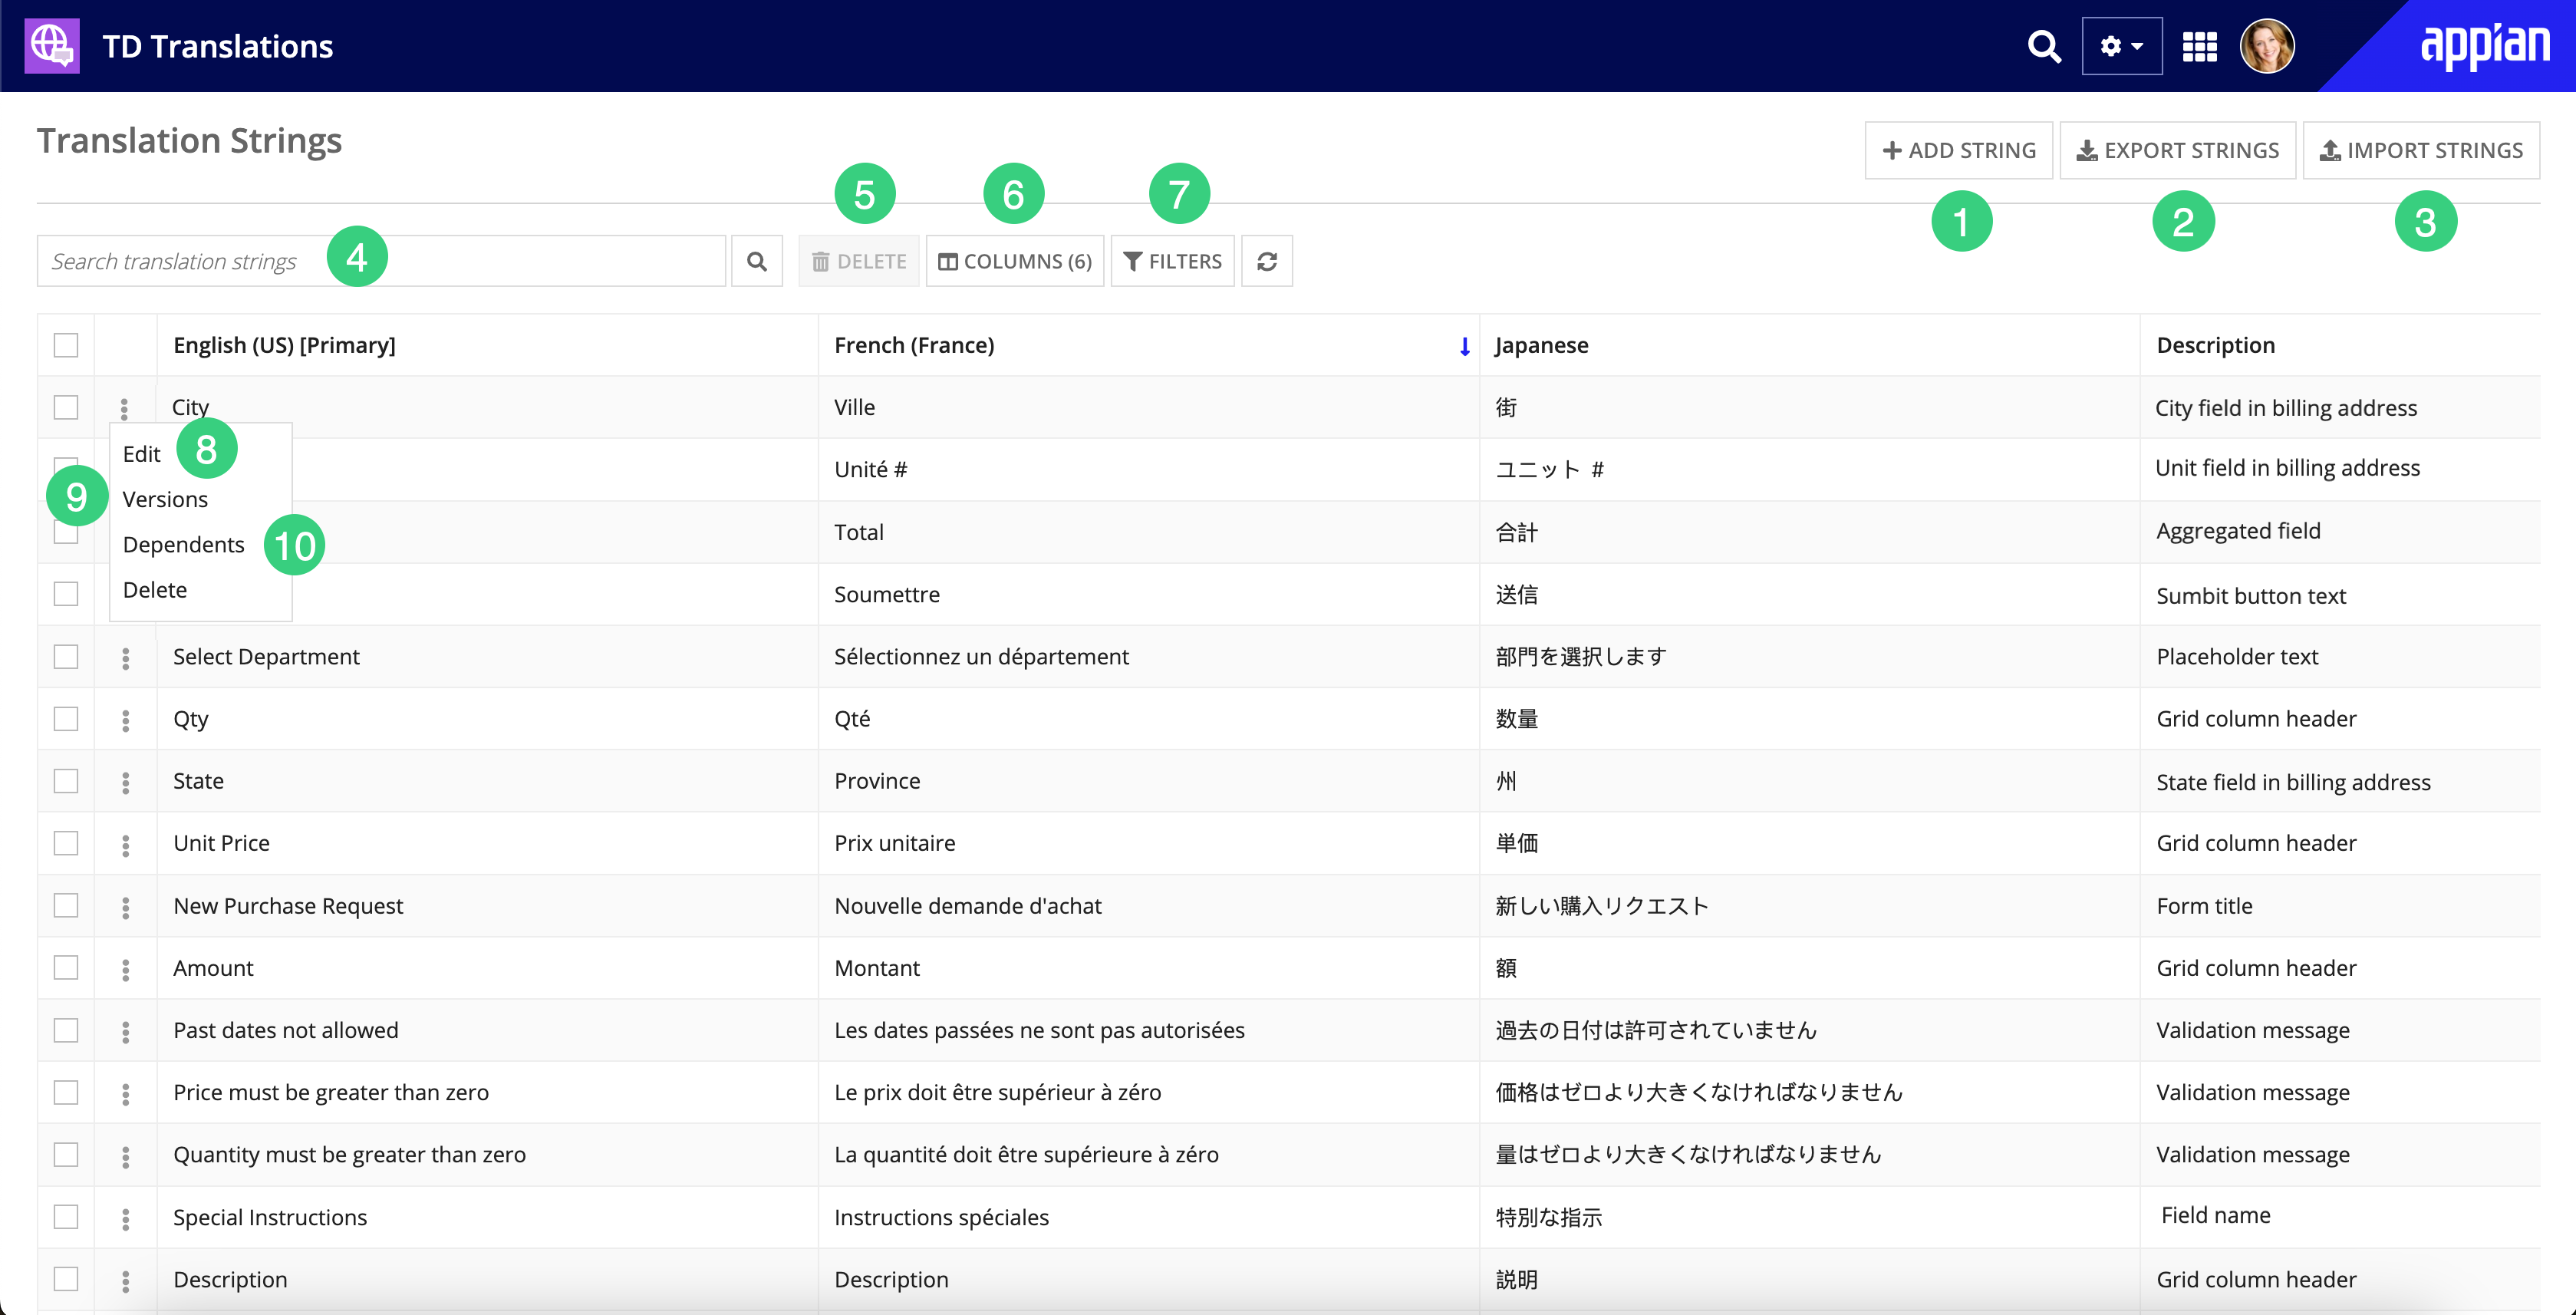
| # | Action |
|---|---|
| 1 | Add translation strings |
| 2 | Export translation strings |
| 3 | Import translation strings |
| 4 | Search translation strings |
| 5 | Delete translation strings |
| 6 | Select columns to show in the grid |
| 7 | Filter translation strings |
| 8 | Edit translation strings |
| 9 | See translation string versions |
| 10 | See translation string dependents |
Each translation set can contain up to 5,000 translation strings. If you need more than 5,000 translation strings in your application, create a new translation set.
Create translation stringsCopy link to clipboard
Translation strings are a collection of values for each translation locale that will be translated and used throughout your application. You can create translation strings in three places: the translation set object, within an interface, or within any expression editor.
Create translation strings in the translation set objectCopy link to clipboard
To create translation strings directly from the translation set object:
- Click Add String.
- Configure the translation string properties:
Property Value Value Enter a value for the primary translation locale. Description (Optional) Add a description of the translation string for developers to know which translation string to use while developing an application. Notes for Translator (Optional) Add context about the translation string for translators so that they can fully understand what they are translating. Translation Variables (Optional) Add translation variables to represent dynamic values in your static translation strings. - To add values for other translation locales, click Add value in another locale.
- Click ADD.
Create translation strings in an interface or expressionCopy link to clipboard
You can create translation strings individually or in bulk from within an interface in either expression or design mode. You can create translation strings as you develop your interface or create translation strings from text in an existing interface. While creating a new string, you must include a value for the primary translation locale, but you can optionally add values in the other translation locales enabled in your translation set.
Create individual translation stringsCopy link to clipboard
Creating translation strings individually makes it easy to update an existing interface or make updates to expressions throughout your app.
To create individual translation strings directly in an interface in EXPRESSION mode or in any expression editor:
- Find the user display text that you want to add as a new translation string and highlight the parameter value.
-
In the toolbar of the expression editor, click
 Add Translation String.
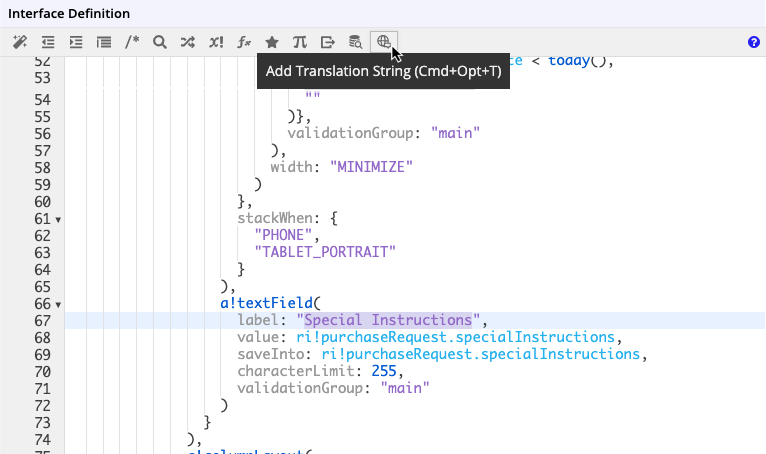
- In the Translation Set field, enter a translation set or create a new translation set. If you already have a translation set created in your application, it will be auto-populated in this field.
-
Configure the translation string properties:
Property Value Value The text that you highlighted is auto-populated as the value of your primary translation locale. You can also add translation variables in curly braces `{}` to your primary locale value. Description (Optional) Add a description of the translation string for developers to know which translation string to use while developing an application. Notes for Translator (Optional) Add context about the translation string for translators so that they can fully understand what they are translating. - To add values in other translation locales, click Add value in another locale.
- Click ADD.
Follow these same steps to create an individual translation string from an expression rule or any object with an expression editor.
Tip: When creating a new translation from the expression editor, you can include translation variables in {} in the user display text before you highlight the text and click Add Translation String. This will automatically include the translation variable in the primary locale value for the new translation string.
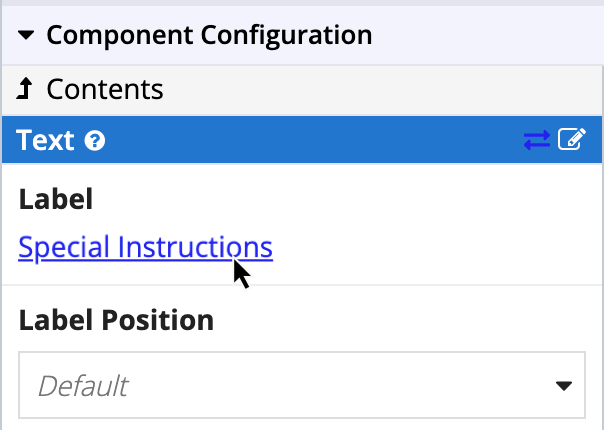
To create individual translation strings from an interface in DESIGN mode:
- Click on the component with the user display text that you want to add as a new translation string.
- In the COMPONENT CONFIGURATION pane, hover over the property you want to translate, then click Add Translation String.
- In the Translation Set field, enter a translation set or create a new translation set. If you already have a translation set created in your application, it will be auto-populated in this field.
- Configure the translation string properties:
Property Value Value The text that you highlighted is auto-populated as the value of your primary translation locale. You can also add translation variables in curly braces `{}` to your primary locale value. Description (Optional) Add a description of the translation string for developers to know which translation string to use while developing an application. Notes for Translator (Optional) Add context about the translation string for translators so that they can fully understand what they are translating. - To add values in other translation locales, click Add value in another locale.
- Click ADD.
Create a new translation set while creating translation stringsCopy link to clipboard
You can create a new translation set while creating new translation strings the same way from both expression and design modes of an interface, as well as in any expression editor.
To create a new translation set while creating new translation strings:
- From the Add Translation String dialog, click + Create Translation Set in the Translation Set field.
- Configure the translation set properties and click CREATE.
- Set security and click SAVE.
Create translation strings in bulkCopy link to clipboard
Creating multiple translation strings at once allows you to quickly take the user display text in an interface and turn it into translation strings in just a few clicks. This is great for developing new apps and interfaces.
When you generate translation strings from interface text, we collect all of the user display text, like instructions, labels, and tooltips, and create a list of values for you to review and add as translation strings. This can be done from both design and expression modes in an interface and is a great way to generate translation strings from all of the interface's user display text. You can generate up to 50 translation strings at one time and generate translation strings as many times as needed.
To generate translation strings from interface text:
- In the toolbar of your interface, click Generate translation strings from interface.
- In the Translation Set field, enter a translation set or create a new translation set. If you already have a translation set created in your application, it will be auto-populated in this field.
- (Optional) Add a Description or Notes for Translator.
- Click GENERATE, then click SAVE CHANGES.
To learn about creating translation variables with bulk generate, see Adding translation variables while generating translation strings in bulk.
Tip: Any preceding or trailing spaces in your user display text will be removed before the text is saved as translation strings.
Creating duplicate translation stringsCopy link to clipboard
Since translation strings with the same primary locale value can have multiple valid translations in other locales, Appian doesn't stop you from making seemingly duplicate translation strings with the same primary locale value.
To check if there are any existing duplicate translation strings in your translation set, you can use the duplicate primary locale values filter in the translation set object.
Editing translation strings in an interfaceCopy link to clipboard
Editing a translation string can be done in the same three places that they can be created; the translation set object, an interface, and an expression rule.
To edit a translation string in the translation set object:
- Simply click the three dots beside the string and click Edit.
To edit a translation string from EXPRESSION mode in an interface or from any expression editor:
- Use cmd+click on the translation string to open the Translation String dialog.
- Edit the translation string and add or edit translation variables.
- Click SAVE.
To edit a translation string from DESIGN mode:
- Click on the component that contains the translation string that you want to edit.
-
In the COMPONENT CONFIGURATION pane, click the translation string. This opens an expression editor dialog.
- Use cmd+click on the translation string to open the Translation String dialog.
- Edit the translation string and add or edit translation variables.
- Click SAVE.
- Click OK to exit the expression editor dialog.
Adding and editing translation variablesCopy link to clipboard
Translation variables are variables in a translation string that represent dynamic values. Translation variables can be the value of a function, rule input, or variable, and can use rich text styling. Embedding dynamic values or rich text styling in translation strings lets the variable part of the translation string change, while the rest of the string remains static. This allows you to include key information like usernames, dates, and times in your translation strings, or even format part of the translation string using rich text.
Translation variables cannot be translated. We recommend using simple values for translation variables, like usernames, dates, times, or numbers.
Translation variables must be inside translation strings and contained in curly braces {}. Translation variables cannot contain special characters and cannot have nested translation variables. Similarly to functions, parameters, and rules, translation variables use keyword syntax and you can pass in arguments using parentheses.
Note that translation variables cannot contain direct object references to record fields. For examples of how to use record data in your translation variable, see Using translation variables.
Adding a translation variable while creating translation stringsCopy link to clipboard
You can add new translation variables when you create translation strings in a translation set, interface, or expression rule.
Adding a translation variable when creating a translation string in the translation setCopy link to clipboard
To add a translation variable while creating a new translation string from the translation set, simply include the translation variable in curly braces within the primary locale value.
Adding a translation variable when creating a translation string from an interface or expression ruleCopy link to clipboard
To add a translation variable while creating a new translation string from EXPRESSION mode in an interface or from any expression editor, you can do either:
- Include the dynamic value in the expression before you create a new translation string.
- Create a new translation string and add a translation variable to it.
To include a dynamic value in the expression before you create a translation string:
- In the expression, include the translation variable in curly braces within the user display text that you want to turn into a translation string.
- Highlight the entire string. For example, you would add the translation variables
{username}and{date}to the user display text and then highlight the text all together:"Assigned to {username} on {date}". - Click Add Translation String. The dynamic value will already be included in the primary locale value as a translation variable.
- Configure the translation string properties.
- Click ADD.
To add a translation variable to a translation string from an interface:
- Find and highlight the user display text that you want to add as a new translation string.
- In the toolbar of the expression editor, click Add Translation String.
- Configure the translation string properties and add the translation variable in curly braces to the primary locale value.
- Click ADD.
You can also use this option if you are creating a new translation string from DESIGN mode.
Adding a translation variable while generating translation strings in bulkCopy link to clipboard
To add a translation variable while generating new translation strings in bulk from user display text in an interface:
- In EXPRESSION mode, include the translation variable in curly braces within the user display text that will be generated into translation strings.
- Click Generate translation strings from interface. The translation variables are automatically included in curly braces within the user display text that will be turned into translations strings.
- Click GENERATE, then click SAVE CHANGES in your interface.
When generating translation strings in bulk, we will automatically gather any nearby dynamic values like functions, local variables, and rule inputs and create corresponding translation variables.
You can't make changes to the translation variables while in the Generate Translation Strings dialog. You can either cancel generating the translation strings and edit the expression, or you can change the variables after the translation strings are generated by editing the individual translation strings.
If you need to edit the translation variables before generating the translation strings:
- Click CANCEL.
- Edit the translation variables in the expression editor.
- Click Generate translation strings from interface again and generate the translation strings.
Adding and editing a translation variable in an existing translation stringCopy link to clipboard
To add or edit translation variables in an existing translation string from within a translation set:
- Click Edit in the more menu beside a translation string.
- In the Edit Translation String dialog, click Update beside Translation Variable.
- If the translation string doesn't have any existing variables, enter the variable name under Variables in the Edit Translation Variable dialog. Do not include curly braces, they are included automatically after you add the variable.
- If you are editing an existing translation variable, edit the variable name under Variables in the Edit Translation Variable dialog.
- (Optional) Click Add Variable to add another variable.
- Click SAVE.
To add or edit a translation variable in an existing translation string from EXPRESSION mode in an interface or expression:
- Use cmd+click on the translation string to open the Edit Translation String dialog.
- Follow steps 2 through 6 above.
Exporting and importing translation strings as Excel fileCopy link to clipboard
Once you've added translation strings to your translation set, you can export the entire translation set or a subset of translation strings as a Microsoft Excel file. This allows your translators to quickly and easily provide translations using a familiar workflow. Once you've downloaded the Excel file, you can edit the file to add translated values to your translation locales, add new translation strings, or even add a new translation locales. Then, you can upload the Excel file and import the updated translation strings directly to your translation set.
Exporting translation strings for translationCopy link to clipboard
To export a translation set or a selection of translation strings as an Excel file:
- Open the translation set object.
- (Optional) Select specific columns or translation strings to export.
- To export only some columns or locales, click COLUMNS and select the translation locales and details to export with your translation strings. Click DONE.
- To export only the translation strings that match your filter criteria, click FILTERS and select the desired filters. Click DONE.
- To export the entire translation set, make sure all columns and are selected and no filters are applied.
- Click EXPORT STRINGS. Only the columns and rows shown in the grid are Exported.
You can then open and edit the file in any spreadsheet program.
Editing the translation fileCopy link to clipboard
When editing the translation file you can add translated values for existing translation strings, add new translation strings, and add new translation locales to your translation set. Then, your edits are reflected in the translation strings and translation set after you import the translation file.
If you've added new translation strings or a translation locale to your Excel file, you will see an informational message when you import the file letting you know that new translation strings or translation locales will be added to your translation set. No further action is required.
Note: Blank values in the Excel file aren't imported, so you don't have to worry about overwriting existing values in your translation set.
Updating translation locale values in an Excel fileCopy link to clipboard
You can easily add translations for many translation strings at once by adding translation locales values in the translation file.
To add new translations to your translation strings,
- In the Excel file, add the translated values for each translation string to the appropriate translation locale columns.
- Save the file.
Note that you can't add or edit translation variables for existing translation strings directly from translation files. You can only add curly braces {} to existing translation strings if they are used as literal characters and are escaped using backslashes \.
To learn how to add these to your translation set via import, see importing the file to the translation set.
Adding new translation strings in an Excel fileCopy link to clipboard
To add new translation strings through an Excel file:
- In your Excel file, add a new row.
- Leave the UUID blank. When you import the new translation string, Appian will assign the translation string a UUID.
- Enter a value for the primary translation locale and include any necessary translation variables.
- (Optional) Enter a value for any of the additional columns.
- Save the file.
To learn how to add these to your translation set via import, see importing the file to the translation set.
Adding translation locales in an Excel fileCopy link to clipboard
To add a translation locale to your translation set through an Excel file:
- In your Excel file, add a new column. This must be after the UUID column.
- Enter a translation locale that is enabled in your environment.
- Enter at least one value in the new locale column.
- When you import the Excel file, confirm the locale of the new column using the locale selection.
- Save the file.
To learn how to add these to your translation set via import, see importing the file to the translation set.
Importing updated translation stringsCopy link to clipboard
To import an Excel file of updated translation strings to your translation set:
- In the translation set object, click IMPORT STRINGS.
- Upload a translation set file in .xls or .xlsx format.
- Review the preview of the file and, if needed, make any changes to match the columns from the file with the columns in the translation set.
- Click IMPORT.
Testing translation strings in an interfaceCopy link to clipboard
You can test and preview your translation strings in any supported locale directly from your interface. You can see a localized preview for the translation strings that have locale values for the selected locale. Translation strings that do not have values for the selected locales will show the primary locale value.
To test your translation strings in different locales in your interface:
- In your interface, click the locale dropdown next to the form factor preview options.
- Select a locale to test your interface in.
You can also use this dropdown to test any function that provides a localized value, such as a!currency() or date and time functions.
Switching between left-to-right and right-to-left locales for testingCopy link to clipboard
To test or preview your interface in a locale with a different directionality than your user locale, you need to change your user locale to a locale with the directionality of the locale you want to preview.
For example, if your user locale is a left-to-right (LTR) locale like English (US), you can preview any other supported LTR locales directly from the interface. But to preview a right-to-left (RTL) locale like Arabic in the interface, you must change your user locale to a RTL locale, such as Arabic or Hebrew.
To change your user locale and preview translation strings in that locale in an interface:
- Click your user profile photo in the header bar of Appian Designer.
- Click Settings.
- Under Locale, change your user locale to one of the locales in your translation set that has values for the translation strings in your interface.
- Click SAVE CHANGES.
- Refresh your browser.
- View and test your interfaces in the new translation locale or select a locale of the same directionality from the locale dropdown.
Remember to change the user setting back once you're done testing.
Design best practicesCopy link to clipboard
While creating multi-lingual applications is largely the same as developing any other application in Appian, there are a few best practices to keep in mind while designing your interfaces, expressions, and applications so that they work optimally with the translation set object.
General best practicesCopy link to clipboard
- For more streamlined organization, we recommend that you only use one translation set per application.
- Use the Notes for Translator field to provide necessary context for your translators, including context to alert them to the difference in seemingly duplicate translation strings.
- Translation strings can't contain leading and trailing spaces. These may be included in the text that is collected when generating translation strings from interface text, but they will not be included in the translation string once it is saved to the translation set.
Working with translation localesCopy link to clipboard
- Ensure that the locales in your translation set are enabled as system locales in your environment and on any environment that the translation set will be used. If not, you won't be able to view the translation strings for those locales in your interfaces or application.
- Don't use the Always override users’ selected locale option in the Admin console. If this option is selected, all users will see all interface text displayed to end users in the primary system locale, regardless of their preferred locale.
- To switch to a new primary translation locale after you have created translation strings, make sure that each translation string has a value for the new primary translation locale. You won't be able to use this locale as the primary translation locale until all translation strings have a value for that locale.
Using translation variablesCopy link to clipboard
Translation variables are variables in translation strings that represent dynamic values or use rich text styling. To learn about referencing translation strings that contain translation variables, see Reference translation strings.
Note that you can have a maximum of 30 translation variables per translation string.
Example: using translation variables with dynamic valuesCopy link to clipboard
The following is an example of how to use translation variables to represent dynamic values in your translation strings.
1
2
3
4
5
6
7
8
9
10
{
  a!textField(
    labelPosition: "COLLAPSED",
    readOnly: true,
    value: translation!Requested By {name} on {date}(
      name: loggedInUser(),
      date: today()
    ),
  )
}
Copy
Translation string references are specific to each environment. This example is for reference only and will not work if you copy and paste it into your environment.
Example: using translation variables with dynamic values and rich text formattingCopy link to clipboard
The following is an example of how to use translation variables to represent dynamic values and format those values with rich text styling in your translation strings.
1
2
3
4
5
6
7
8
9
10
11
{
  a!richTextDisplayField(
    value: translation!Case submitted on {date} and last modified by {name}(
      date: today(),
      name: a!richTextItem(
        text: loggedInUser(),
        style: "STRONG"
      )
    )
  )
}
Copy
Translation string references are specific to each environment. This example is for reference only and will not work if you copy and paste it into your environment.
Example: using record data with translation stringsCopy link to clipboard
Translation variables cannot contain direct object references to record types, but you can use rule inputs and translation variables to reference record data. If you want to reference record data directly, simply separate the record type field reference from the translation string.
To reference record data using translation variables and rule inputs:
- Create a rule input for your record type and make the Type your record type.
- In your expression, reference your translation strings with translation variables that represent the record data that you want to use.
- In the value of the translation variable, enter the rule input for your record type and index into the necessary record field. For example, to reference a username field in the
Caserecord type, you would enter something like:ri!caseRecord[recordType!Case.fields.username], wherecaseRecordis a rule input with type set to theCaserecord type. - (Optional) To test your interface with the record data, click TEST and enter a record type query for the Value. The query should look something like this:
1
2
3
4
5
a!queryRecordType(
  recordType: recordType!Case,
  fields: {recordType!Case.fields.reviewerFirstAndLastName, recordType!Case.fields.reviewDeadline},
  pagingInfo: a!pagingInfo(startIndex: 1, batchsize: 100)
).data
Copy
Check out the example below to see how referencing record data using translation variables and rule inputs might look in an interface.
1
2
3
4
5
6
7
8
9
10
11
12
13
14
15
16
17
18
19
20
21
22
23
24
25
26
27
28
29
30
31
32
33
34
35
36
37
38
39
40
{
  a!cardLayout(
    contents: {
      a!richTextDisplayField(
        value: {
          a!richTextIcon(
            icon: "check-circle-o",
            color: "ACCENT",
            size: "MEDIUM"
          ),
          a!richTextItem(text: " "),
          a!richTextItem(
            text: translation!The case has been sent to {reviewer} for review..(
              reviewer: a!richTextItem(
                text: ri!caseRecord[recordType!Case.fields.reviewerFirstAndLastName],
                style: "STRONG"
              )
            ),
            color: "ACCENT",
            size: "MEDIUM"
          ),
          a!richTextItem(text: " "),
          a!richTextItem(
            text: translation!The review is due by {reviewDeadline}..(
              reviewDeadline: a!richTextItem(
                text: ri!caseRecord[recordType!Case.fields.reviewDeadline],
                style: "STRONG"
              )
            ),
            color: "ACCENT",
            size: "MEDIUM"
          )
        }
      )
    },
    height: "AUTO",
    style: "INFO",
    marginBelow: "STANDARD"
  )
}
Copy
Record type field references and translation string references are specific to each environment. This example is for reference only and will not work if you copy and paste it into your environment.

SecurityCopy link to clipboard
The security role map of a translation set controls which developers can see or modify it and its properties.
Translation set object security role mapCopy link to clipboard
The following table outlines the actions that can be completed for each permission level in a translation set's security role map:
| Actions | Administrator | Editor | Viewer | Deny |
|---|---|---|---|---|
| Update the Translation set | Yes | Yes | No | No |
| Add, edit, and delete content inside the translation set | Yes | Yes | No | No |
| View the security | Yes | Yes | No | No |
| Rename the translation set | Yes | Yes | No | No |
| Delete the translation set | Yes | No | No | No |
| Update the security | Yes | No | No | No |
How translation set permissions work with other object securityCopy link to clipboard
The following table shows how different levels of object permissions can effect how you interact with translation string references in interfaces and other objects that reference a translation string.
| Access to object that references the translation string | Access to translation set | What can you see and do? |
|---|---|---|
| No access | No access | You can't view or use the referencing object or translation set. |
| View only access | No access | You can see that a translation string is being used in the object, but can't see which string is being used. The reference will show a No Permission message. |
| No access | View access | You can't view the referencing object or find it in the application objects list. |
| View access | View access | You can view the translation strings as a reference in the object and can view information about the translation string and translation set. You can't make changes to either the translation string or translation set. |
| Edit access | No access | You can see that a translation string is being used in an object, but can't see which string is being used. The reference will show a No Permission message. |
| Edit access | View access | You can see the translation string as a reference in the object and can view information about the translation string and translation set. You can't make changes to either the translation string or translation set. |
| No access | Edit access | You can edit the translation strings and translation set, but can't view the objects dependent on them. However, when a translation set is deleted or modified, you can see the referencing object in the list of dependents for the translation set. |
| View access | Edit access | You can view the translation string as a reference in an object but can't make changes to it. |
| Edit access | Edit access | You can view, add, and edit translation strings and translation sets in the referencing object. |
DeploymentCopy link to clipboard
Like other Appian objects, translation sets and translation strings can be deployed to new environments in apps and packages.
When deploying to a target environment, keep in mind that deleting strings in the source environment does not impact those strings in the target environment. For example, if some translation strings that you are importing have been deleted from the source environment, but still exist in the target environment, these strings will not be deleted in the target environment.
When using Compare and Deploy to deploy to a connected environment, you can easily compare the versions of the translation strings in the source environment to the versions of those same translation strings in the target environment.
Translation string versioningCopy link to clipboard
Each time you make changes to a translation string, a new version of the translation string is created. All objects that use the translation string will automatically use the new version. This kind of versioning allows you to easily recover earlier versions of the translation string or compare changes between versions.