Tip: Interface patterns give you an opportunity to explore different interface designs. Be sure to check out How to Adapt a Pattern for Your Application.
GoalCopy link to clipboard
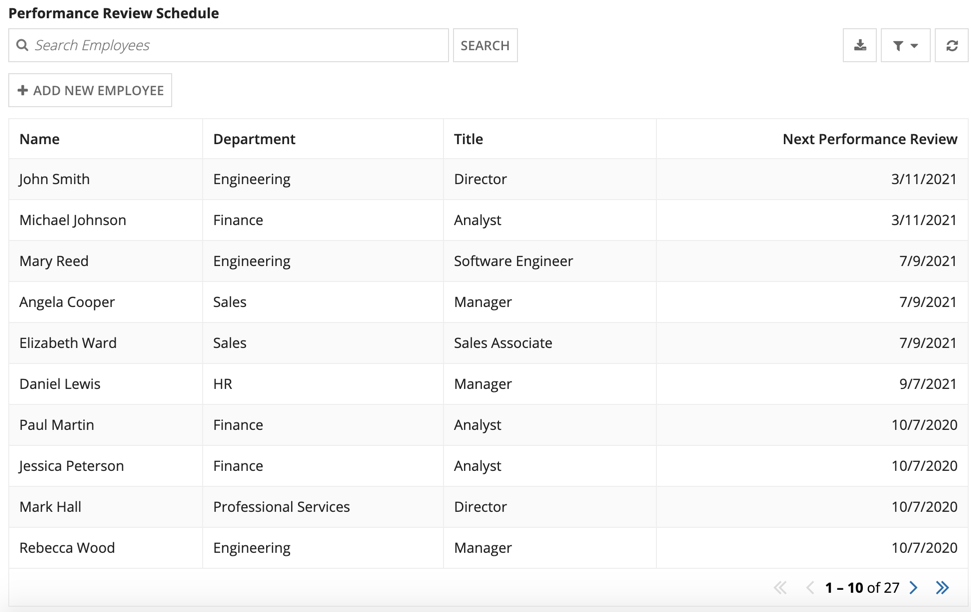
Display calculated values in columns in a grid.
Note: This expression uses direct references to the Employee record type, created in the Records Tutorial. If you've completed that tutorial in your environment, you can change the existing record-type references in this pattern to point to your Employee record type instead.
Use CaseCopy link to clipboard
You can configure a read-only grid to display calculated columns. These columns differ from the columns returned from your data source. Calculated columns allow you to combine data from two or more columns into a single value or display the result of a data calculation.
In this use case, we'll use a record type as the data source for the read-only grid and provide calculated values in two columns: Name and Next Performance Review. First, we will concatenate firstName and lastName to display as a single name. Next, we'll look at an employee's start date, calculate the employee's next performance review date, and display that calculated value in the Next Performance Review column.

Use the pattern in this example as a template when you want to:
- Concatenate values in two or more columns in your grid and display the result in a single column.
- Use two or more data points from your data source to compute and display a calculated result.
Tip: In your own applications, you may create record types (like Employee) that also represent Appian users. We recommend configuring a relationship between those record types and the User record type so you can easily reference user information.
For example, you can use the firstAndLastName record field from the User record type instead of combining the separate firstName and lastName fields as shown in this pattern.
ExpressionCopy link to clipboard
The expression pattern below shows you how to:
- Concatenate two separate data points to create a single value.
- Use the Retrieve Next Anniversary Date function recipe to format a date and improve its readability.
1
2
3
4
5
6
7
8
9
10
11
12
13
14
15
16
17
18
19
20
21
22
23
24
25
26
27
28
29
30
31
32
33
34
35
36
37
38
39
40
41
42
43
44
45
46
47
48
49
50
51
52
53
54
55
56
57
58
59
60
61
62
63
64
a!gridField(
  label: "Performance Review Schedule",
  labelPosition: "ABOVE",
  data: recordType!Employee,
  columns: {
    a!gridColumn(
      label: "Name",
      sortField: recordType!Employee.fields.firstName,

      /* In the value parameter, we used fv!row with a record type field
       * reference to pull in the first name and last name fields. Then
       * used ampersand (&) to concatenate both fields together into a
       * single value. */
      value: fv!row[recordType!Employee.fields.firstName] &" "& fv!row[recordType!Employee.fields.lastName]
    ),
    a!gridColumn(
      label: "Department",
      sortField: recordType!Employee.fields.department,
      value: fv!row[recordType!Employee.fields.department]
    ),
    a!gridColumn(
      label: "Title",
      sortField: recordType!Employee.fields.title,
      value: fv!row[recordType!Employee.fields.title]
    ),
    a!gridColumn(
      label: "Next Performance Review",
      sortField: recordType!Employee.fields.startDate,

      /* We used local variables to store the value of the employee's
       * start month and start day. Then used the date() function to
       * calculate the next review time based on the start date
       * returned when using fv!row with a record type field to
       * reference each employee's start date. */
      value:
        a!localVariables(
        local!startMonth: month(fv!row[recordType!Employee.fields.startDate]),
        local!startDay: day(fv!row[recordType!Employee.fields.startDate]),
        if(
          and(
            local!startMonth <= month(today()),
            local!startDay <= day(today())
          ),
          date(1 + year(today()), local!startMonth, local!startDay),
          date(year(today()), local!startMonth, local!startDay)
        )
      ),
      align: "END"
    )
  },
  pagesize: 10,
  showRefreshButton: true,
  showExportButton: true,
  refreshAfter: "RECORD_ACTION",

   /* We added the "Add New Employee" record action to the grid for testing
    * only. This record action was configured in the record type and brought
    * into the grid. */
  recordActions: {
    a!recordActionItem(
      action: recordType!Employee.actions.addNewEmployee
    )
  }
)
Copy
Test the gridCopy link to clipboard
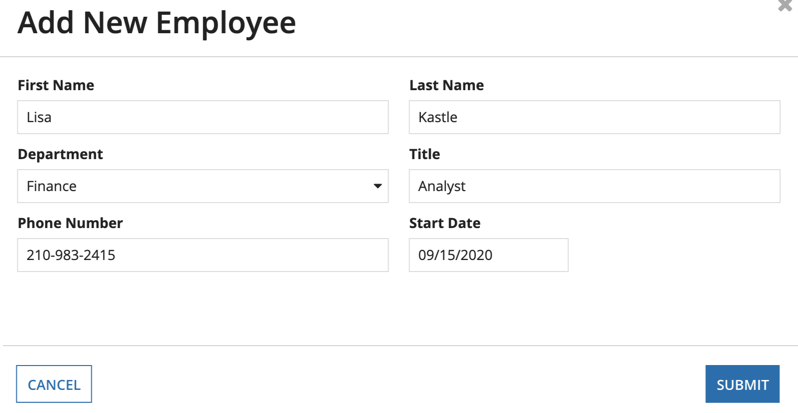
- Click ADD NEW EMPLOYEE to add a new employee record to the data source and display in the grid.
-
Complete the Add New Employee form.
Tip: In Start Date, enter a start date of 9/15/2020 to ensure this grid test evaluates correctly. Use dummy data to populate the other fields in the Add New Employee form.
-
Click SUBMIT.

-
In the Search box, enter the first and last name of the new employee you added in step 2. This will return the employee record only, will show a review date of 9/15/2021 in the Next Performance Review column.

