| This content applies solely to Connected Claims, which must be purchased separately from the Appian base platform. |
Getting startedCopy link to clipboard
If you are new to the Connected Claims solution and want to start quickly using it to initiate, process, track, and manage your insurance claims, then the Connected Claims Quick Start Guide is for you!
This guide walks you through the simplest use case for using the Connected Claims solution to process a property and casualty (P&C) claim. You will learn to use some basic features in the FNOL module to report and process a car insurance claim.
Note that your specific implementation of the Connected Claims solution may have more automation and customization to meet your business and process needs.
Use case: accidents happenCopy link to clipboard
It's Friday evening, and Maria Garcia, a long-time customer, uses her cell phone to contact her insurance company's call center to report that she has been in a major car accident. Fortunately, Maria is not hurt but pretty shaken up, and her car bumper is damaged. Though she has been with her insurance company for years, she's never filed a claim. She's unsure of the process and hopes the agent that answers her call can quickly walk her through it so she can get back on the road and home safely.
Maria is greeted by Lisa, a new Customer Service Representative in training. By the sound of her voice, Lisa could tell that the experience shook up Maria. Lisa knows that it is her job to make Maria feel at ease as they go through the intake process, but she also needs to ensure that she captures all of the information she needs to submit Maria's auto claim. Typically, new hires would not take on these calls, but Maria's insurance provider has the Connected Claims solution to streamline their entire claims process. Recently trained on the solution, Lisa is confident she has all the tools she needs to provide exceptional customer service and complete Maria's intake process. She logs in to the solution, lands on the HOME page, and is ready to start the claim.
Reporting a claimCopy link to clipboard
Lisa quickly looked at the Connected Claims Home page's card navigation and selected FNOL. This module will enable her to log Maria's claim promptly and capture her contact information, details about her vehicle, any other vehicles involved in the accident, and the communication channel Maria used to report the claim.
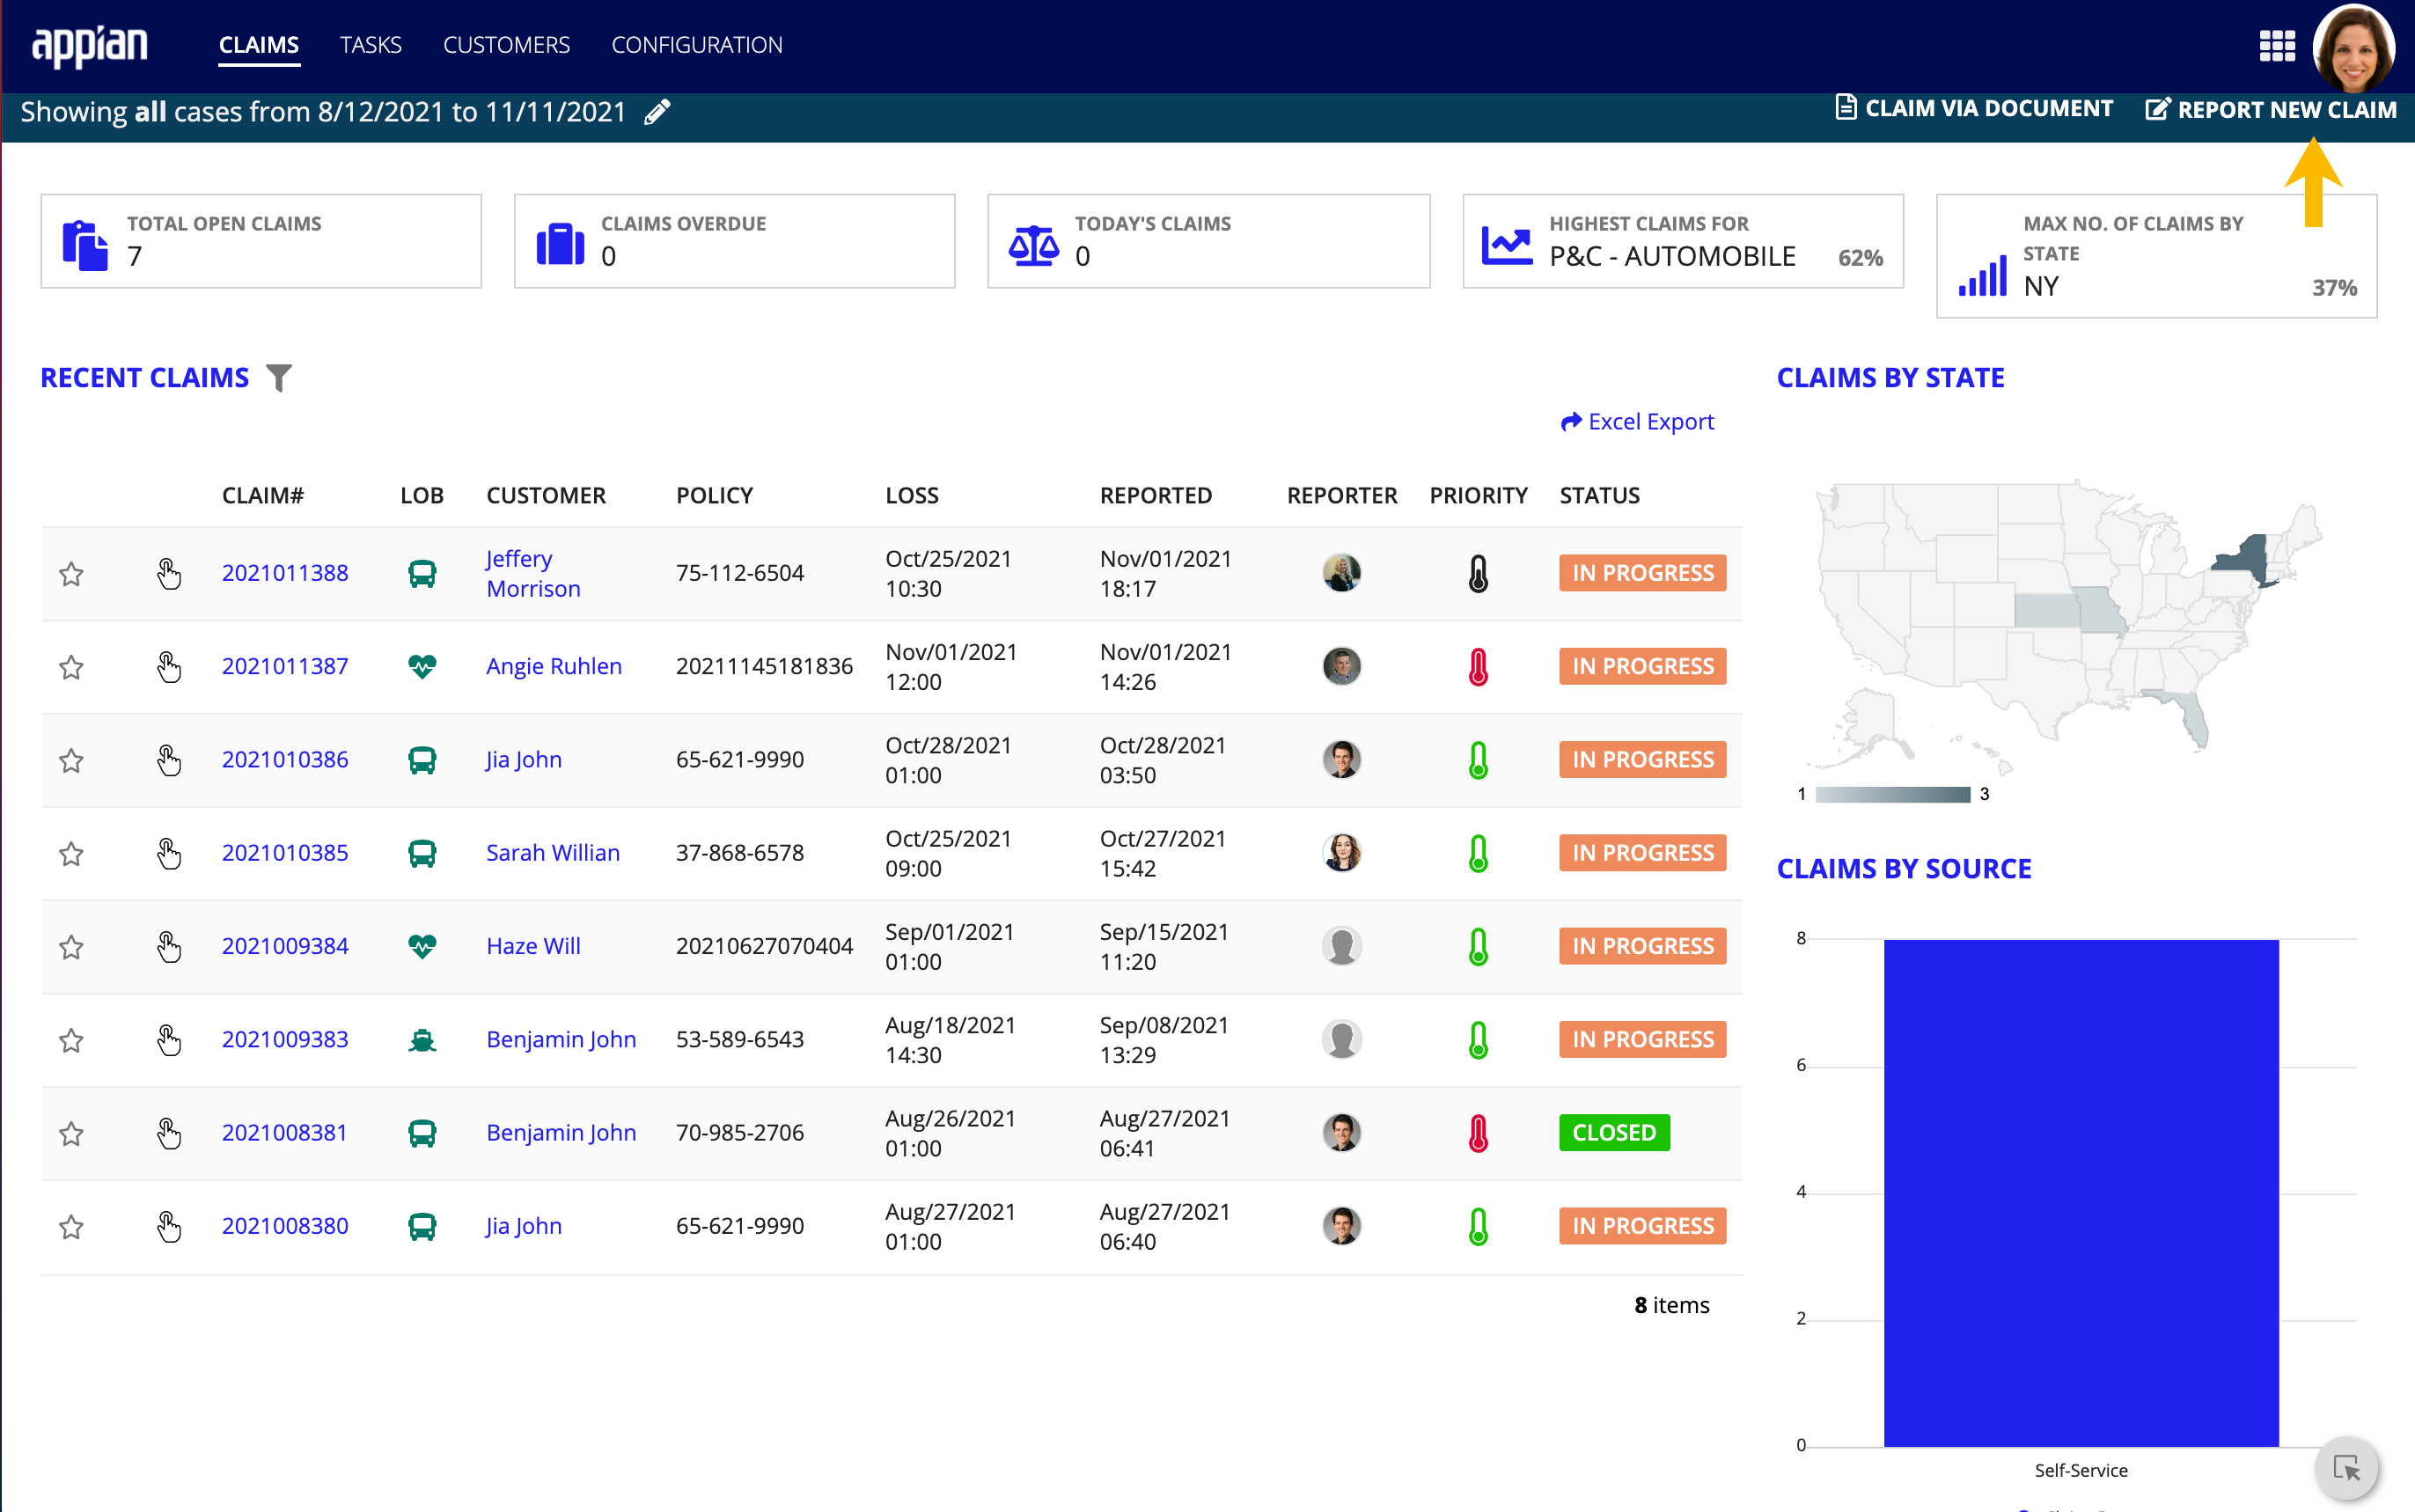
Once in the FNOL module, the claims dashboard is the first view she sees. From here, she can review key metrics at the top of the page to see how many active claims are currently in the claims pipeline. She can also see relevant KPIs that summarize claims and overall process health.
Right now, she needs to log Maria's claims as quickly as possible, so she clicks REPORT NEW CLAIM at the top of the CLAIMS page. Since Maria called her claim in instead of submitting it through another communication channel, Lisa knew this was the right choice.
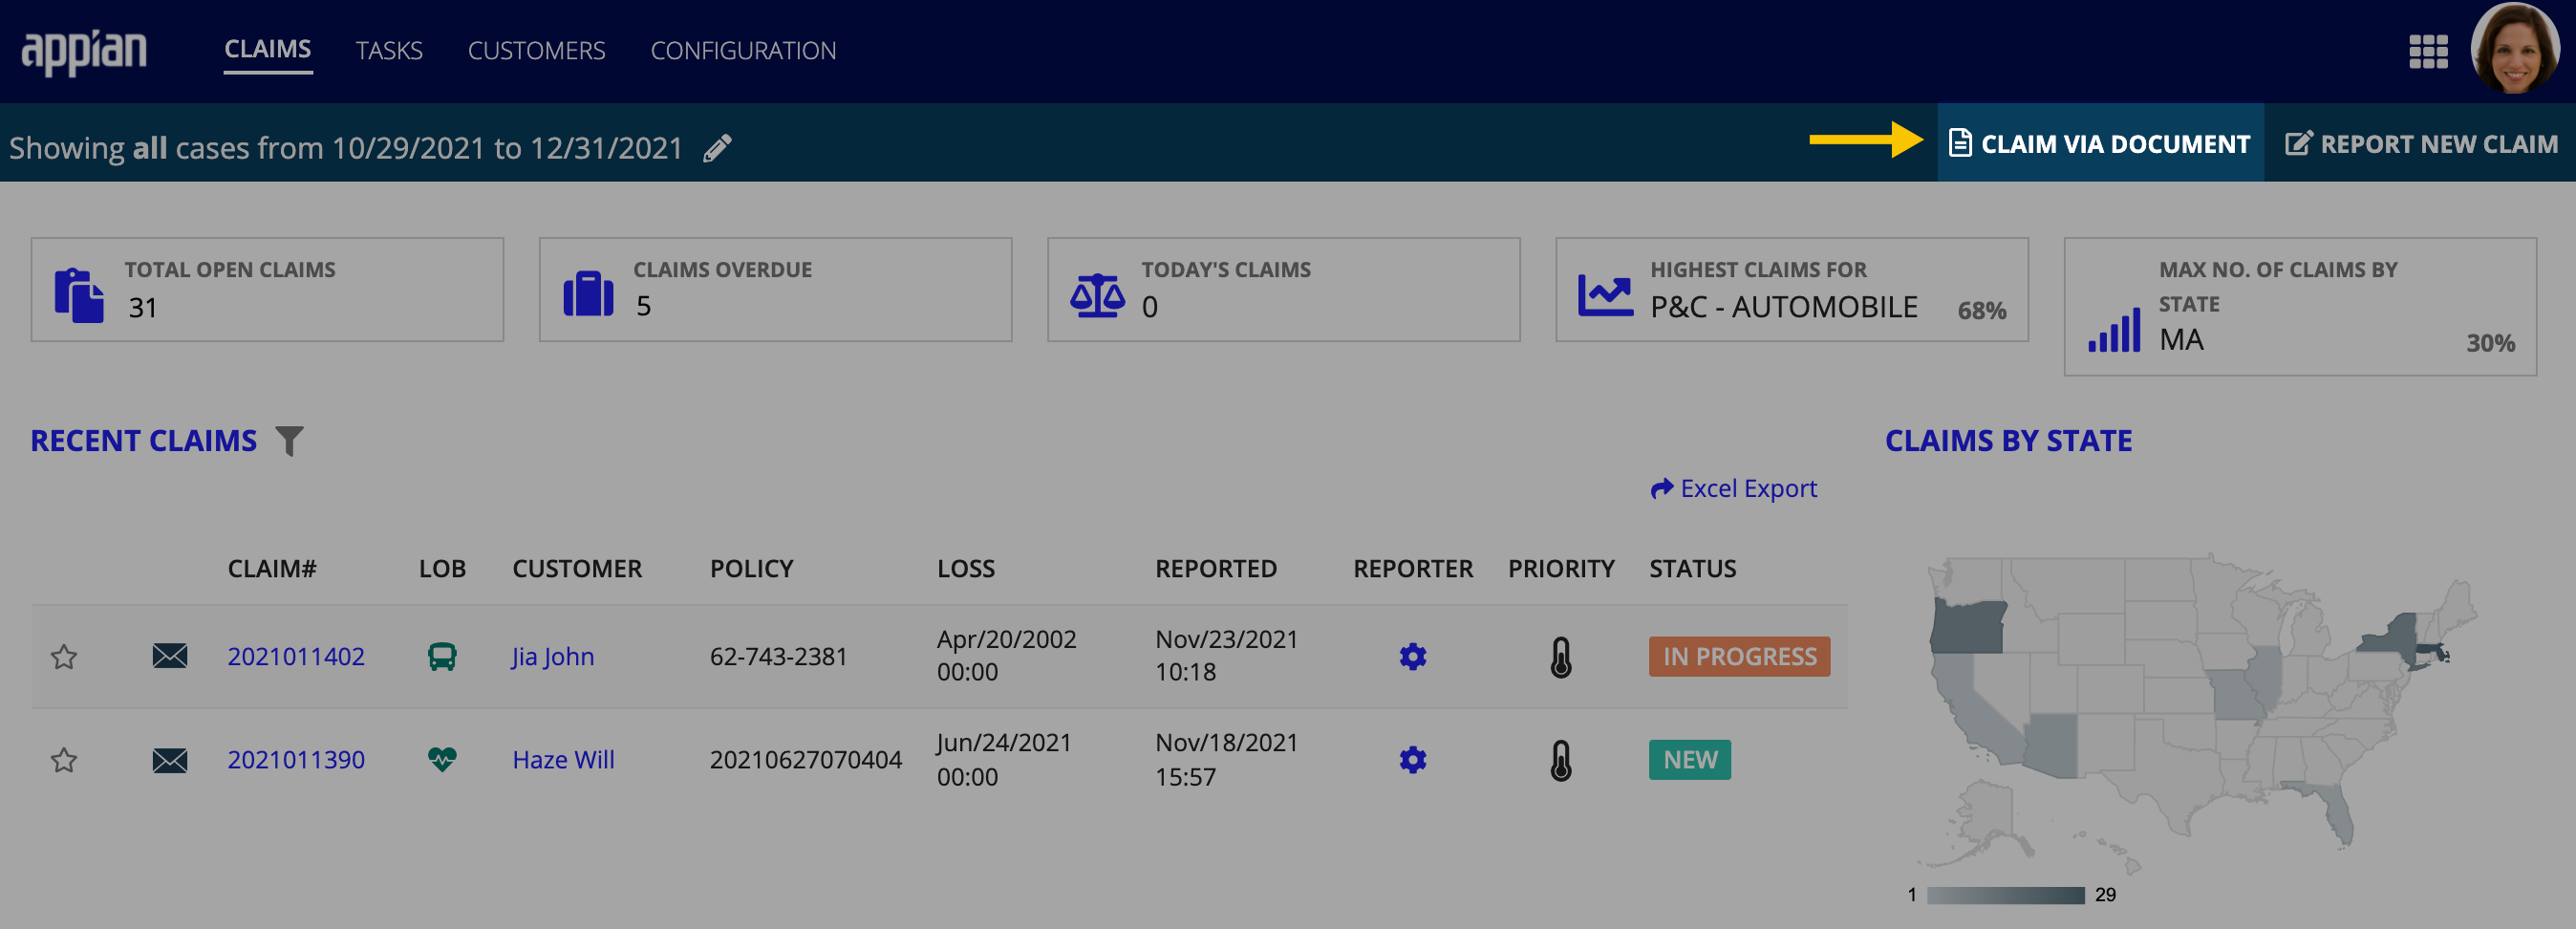
Note that you can also log a new claim for a specific line of business via a document upload from the CLAIMS page or by performing a policy search and manually entering the details of the claim.
Searching customer recordsCopy link to clipboard
Lisa starts by searching for Maria's insurance policies, another key capability of the FNOL module. It lets Lisa quickly locate Maria's existing insurance policies with your organization. Since you can integrate the application with all your core policy systems, Lisa doesn't have to worry about struggling to find the related information or policies she needs.
After entering Maria's first and last name in the Customer Name field and clicking SEARCH POLICY, Connected Claims returns the following results.
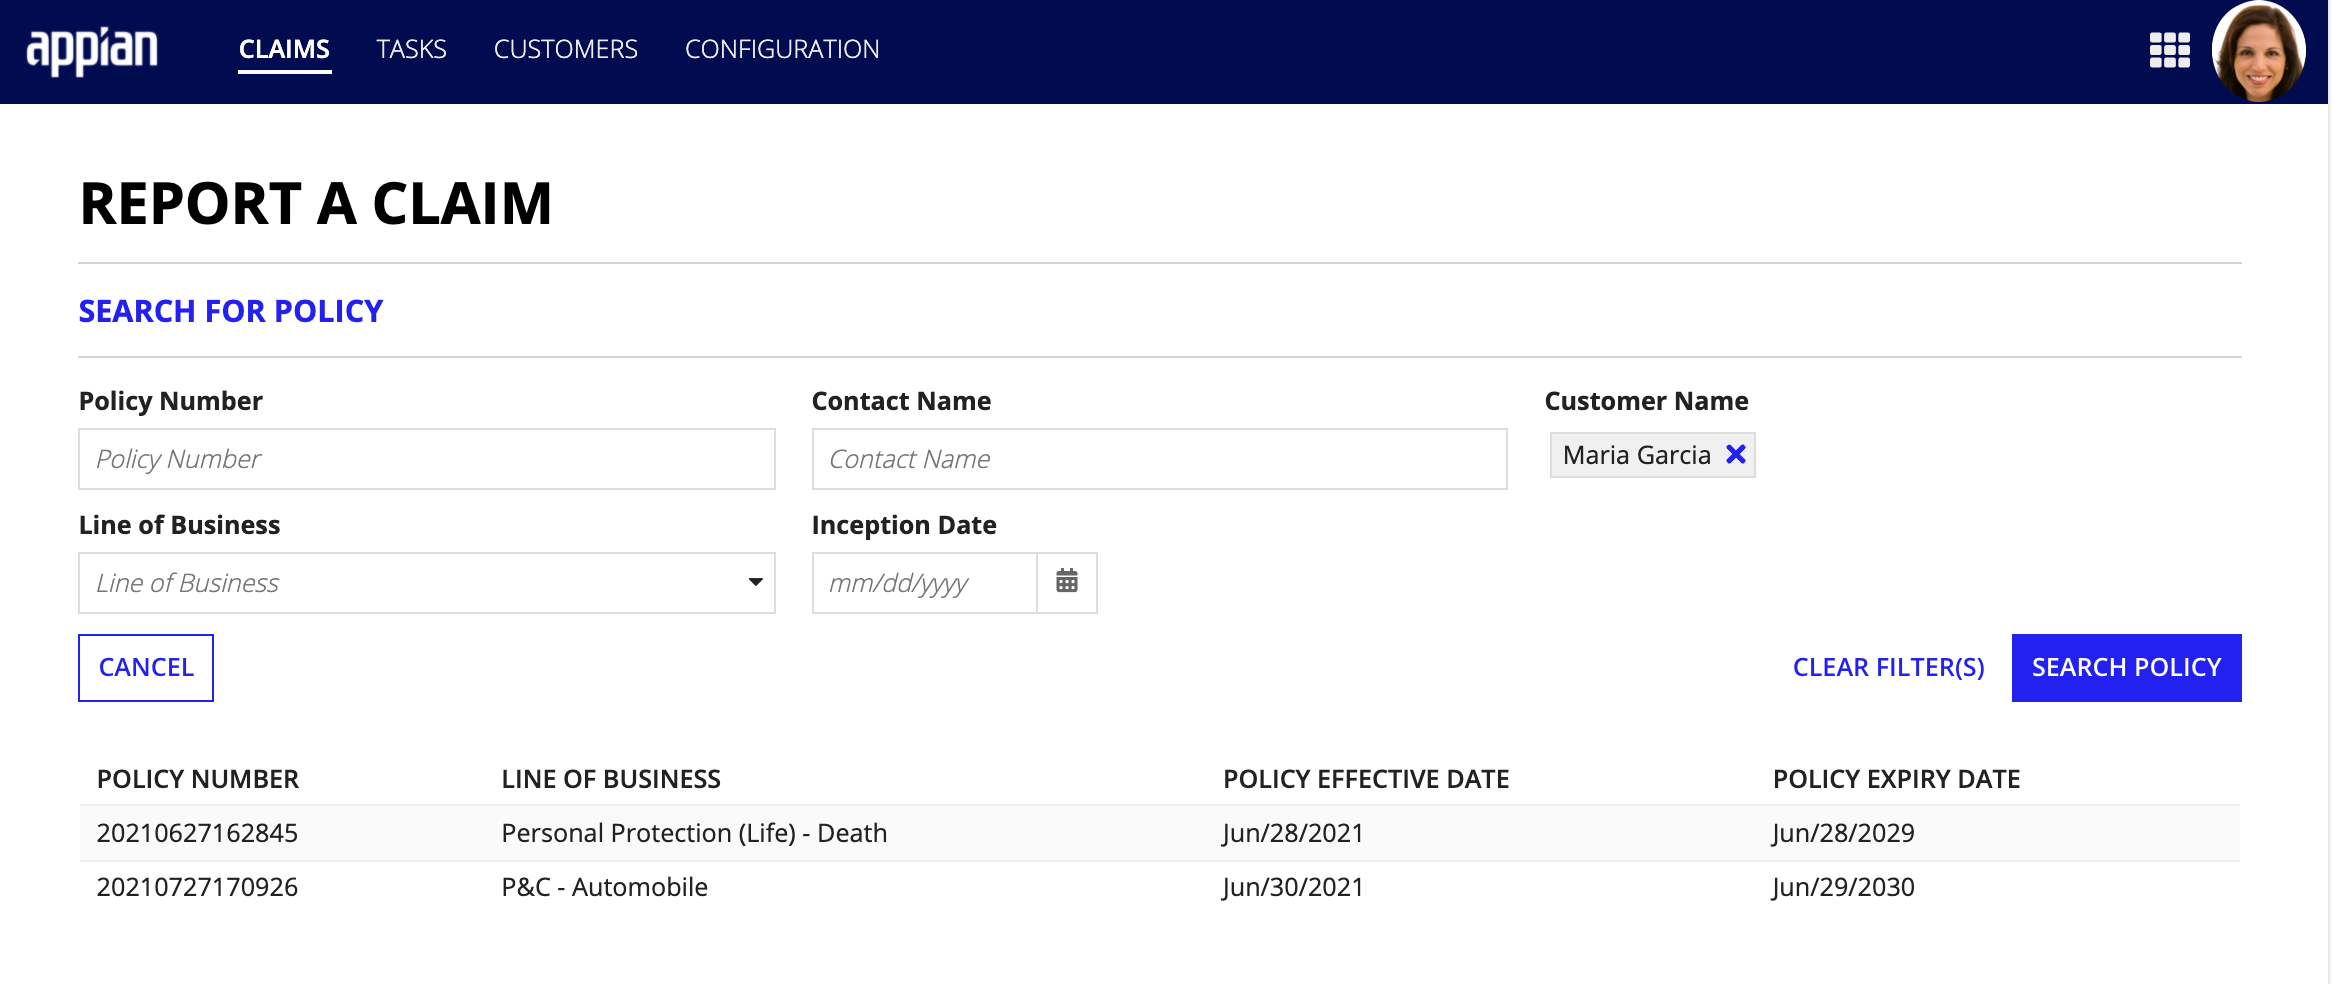
Connected Claims provides a list with detailed information about Maria's active automobile policy and life insurance policy. Lisa must select the right policy from the list to log Maria's claim against. The default Claimant Type is Insured, which is accurate since Maria is filing the claim.
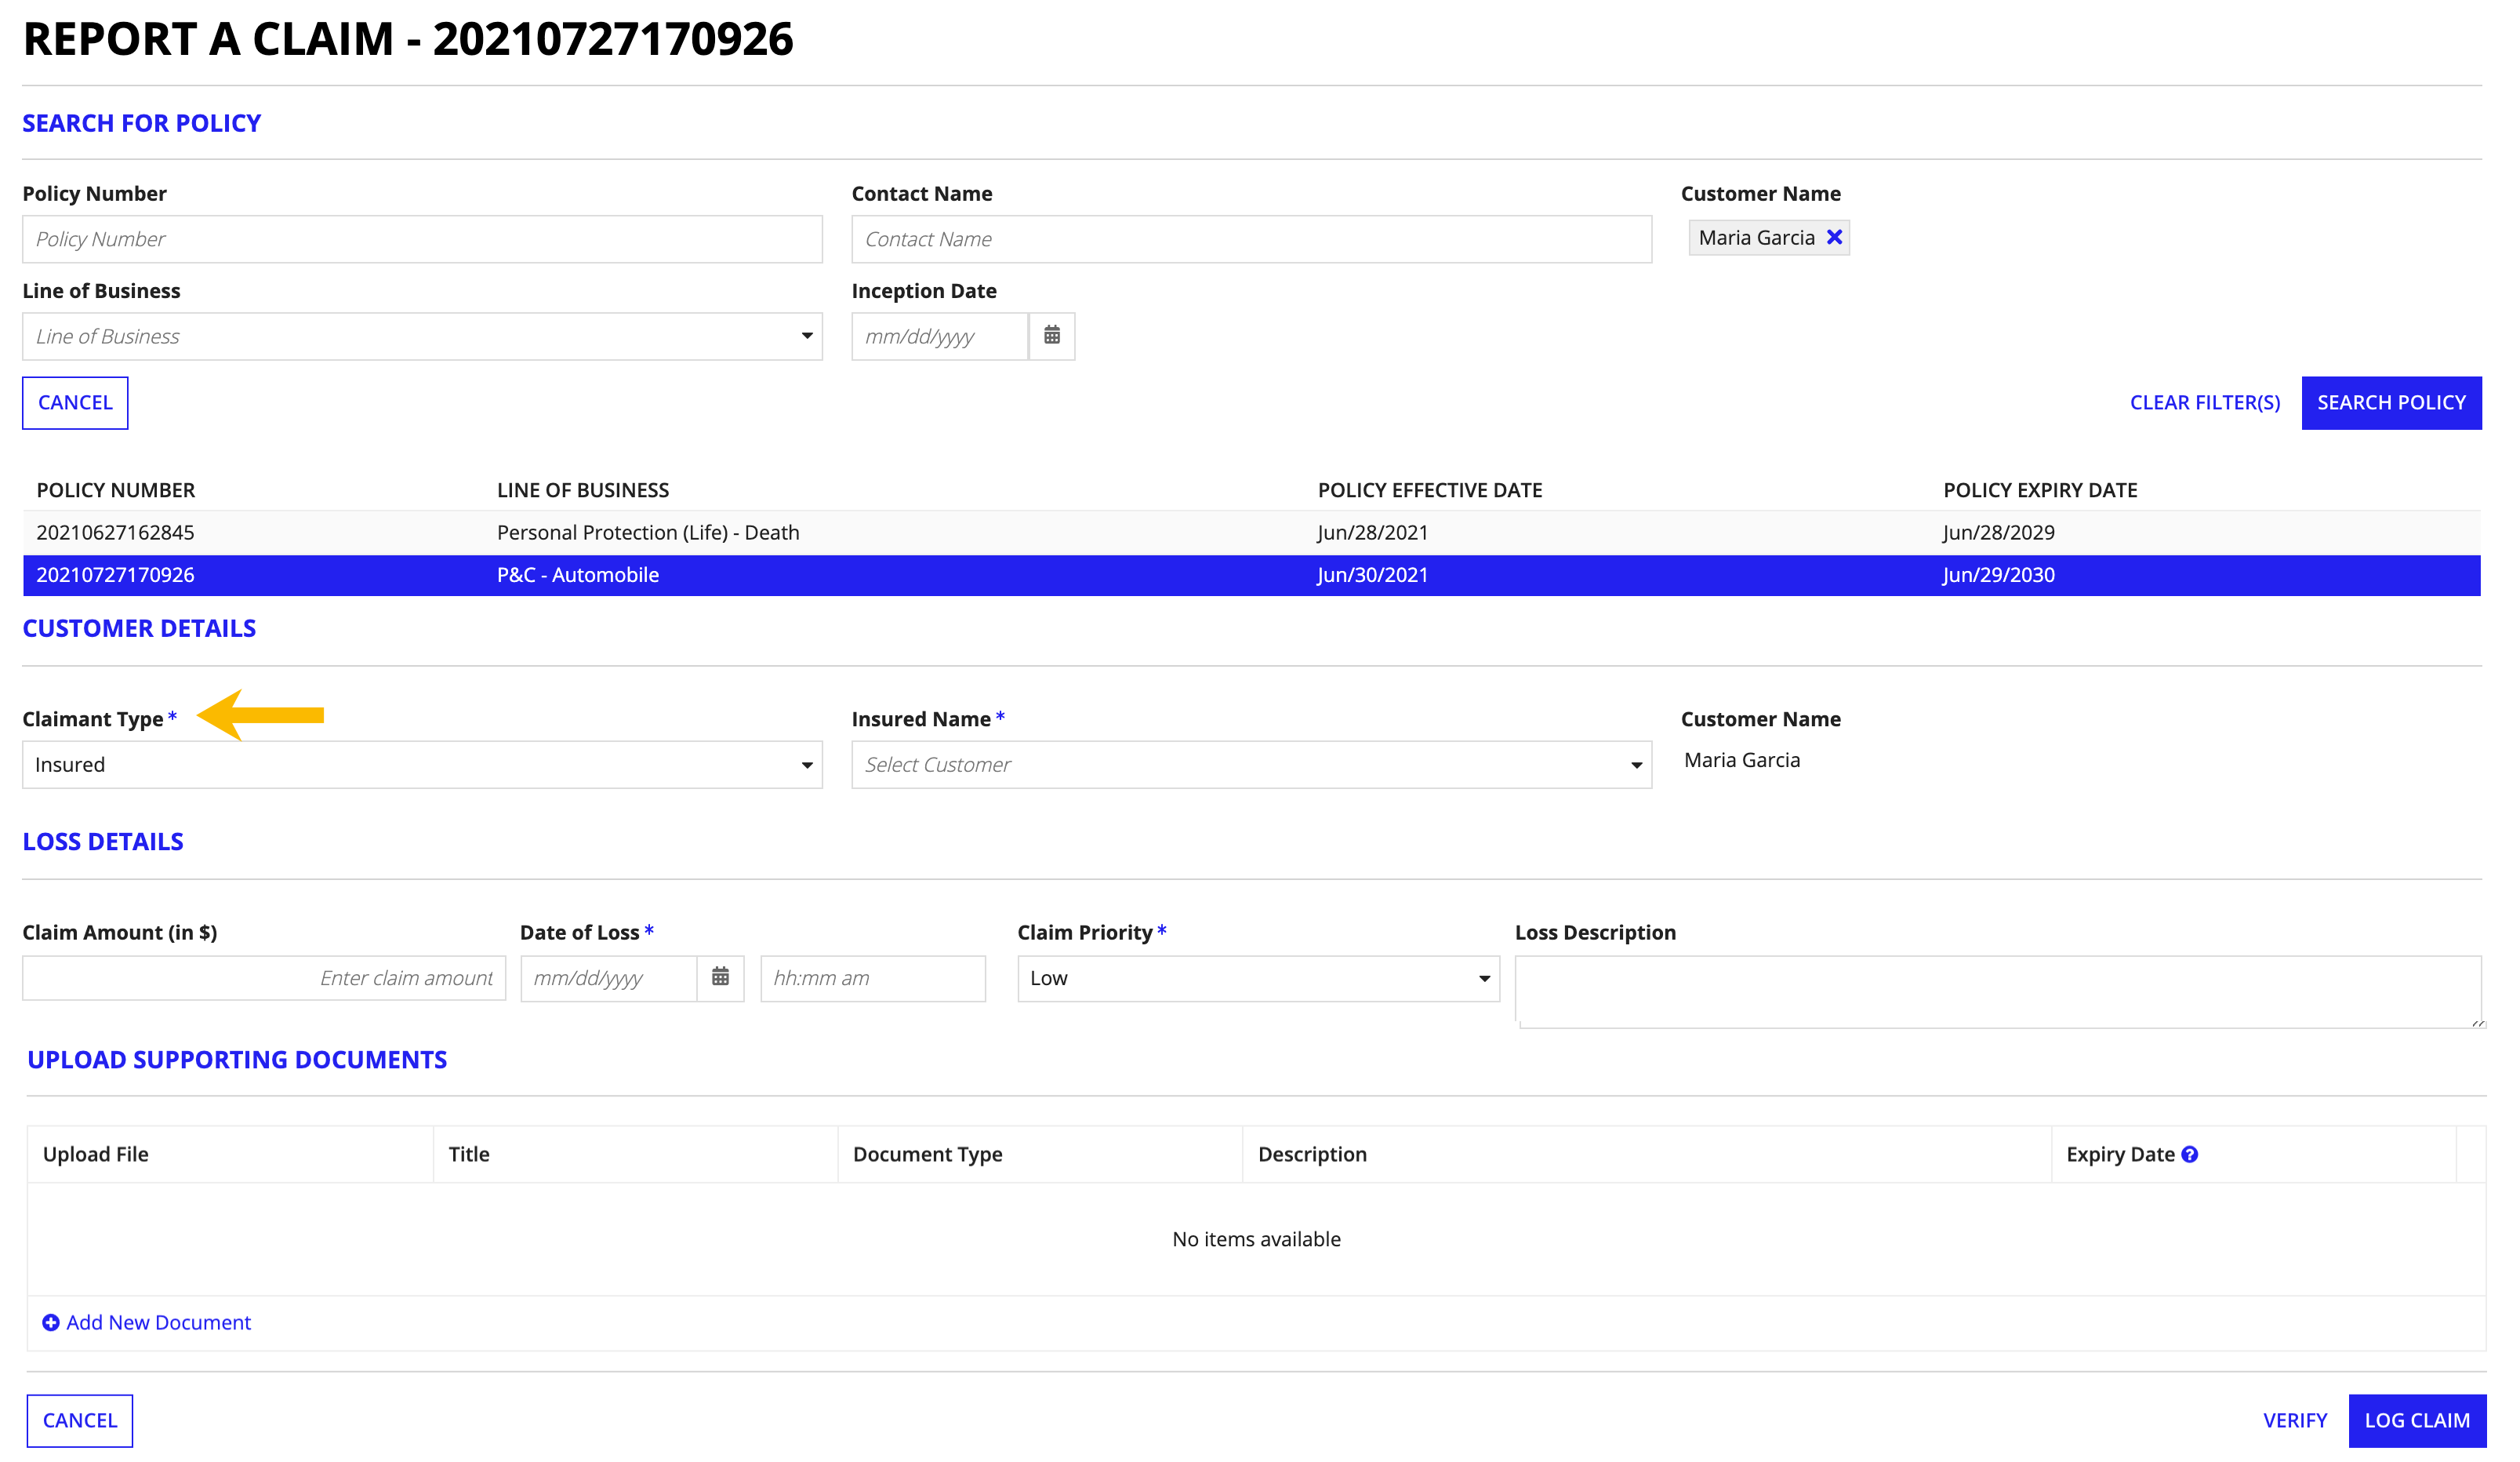
Note that depending on who is filing the claim, Lisa would have the option to select one of the following for Claimant Type:
- Beneficiary
- Estate
- Insured
- Policyholder
- Third-Party
Entering claim detailsCopy link to clipboard
Now Lisa is ready to enter the claim details. The information entered here populates a new claim record for Maria and determines which line of the business to execute the claim against.
After entering all the information she's captured from Maria about the accident, including her customer details, the policyholder associated with that policy, and a description of the accident, Lisa is ready to submit the claim.
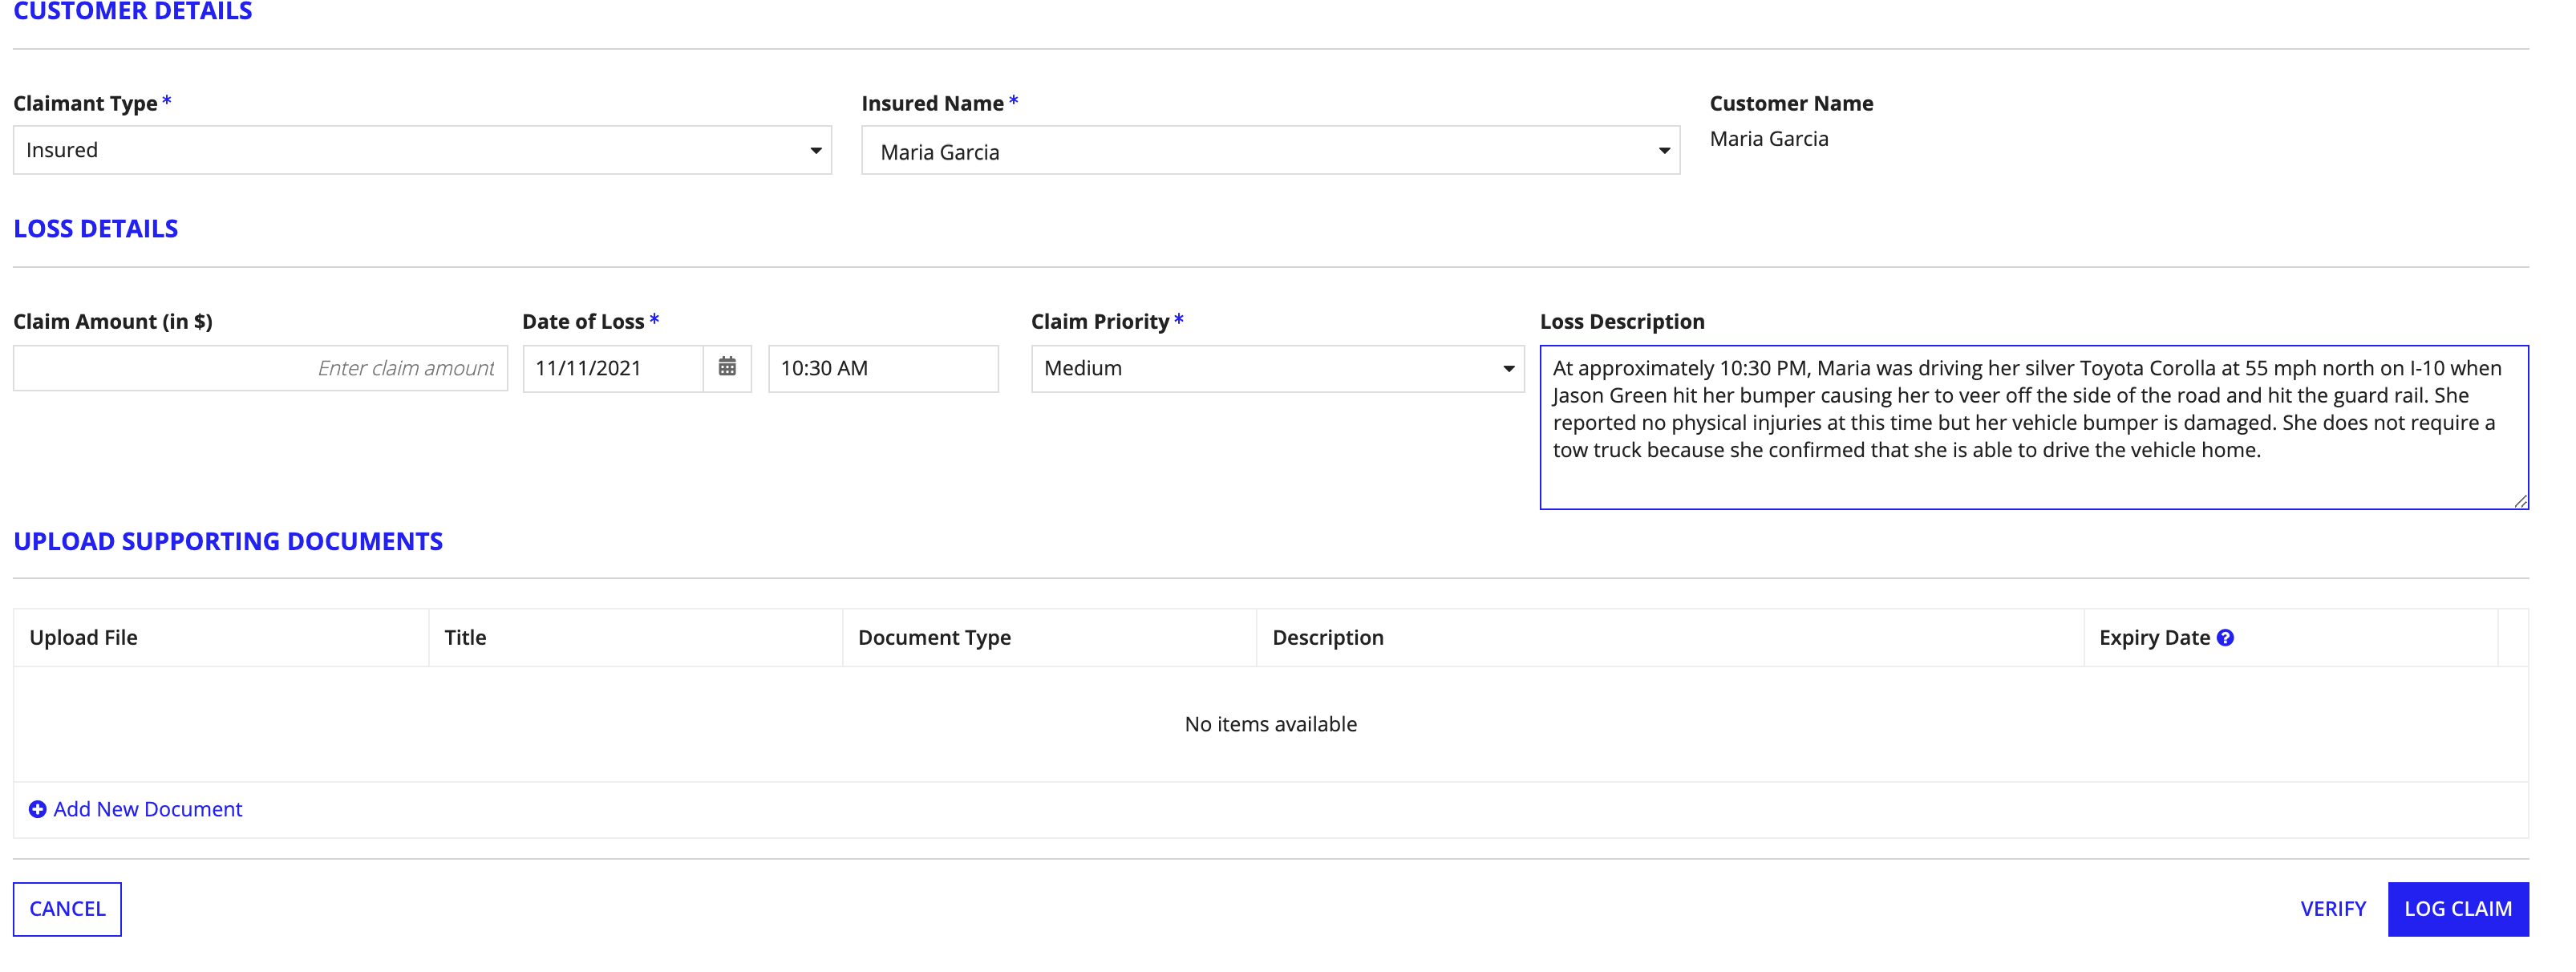
She has no supporting documentation at the time, so she skips that section and clicks LOG CLAIM.
Connected Claims processes the claim information Lisa entered, creates a claim record, and provides the following confirmation message.

Lisa can provide Maria with her Claim Number, which allows any agent to access her claim record as it moves the process. She informs Maria that an adjuster will contact her soon and closes out the call, providing Maria with the assurance she needs. Now she's ready to move on to her next steps.
Viewing the claim recordCopy link to clipboard
Now that the claim report is complete, Connected Claims makes the case details available for Lisa and the rest of your team to view and act on. Enabled by Appian Records, the solution includes a simple, informative record interface that lets end users view and maintain logged claim information. From the claims confirmation dialog, Lisa clicks the Claim Number, which takes her to the claim record.
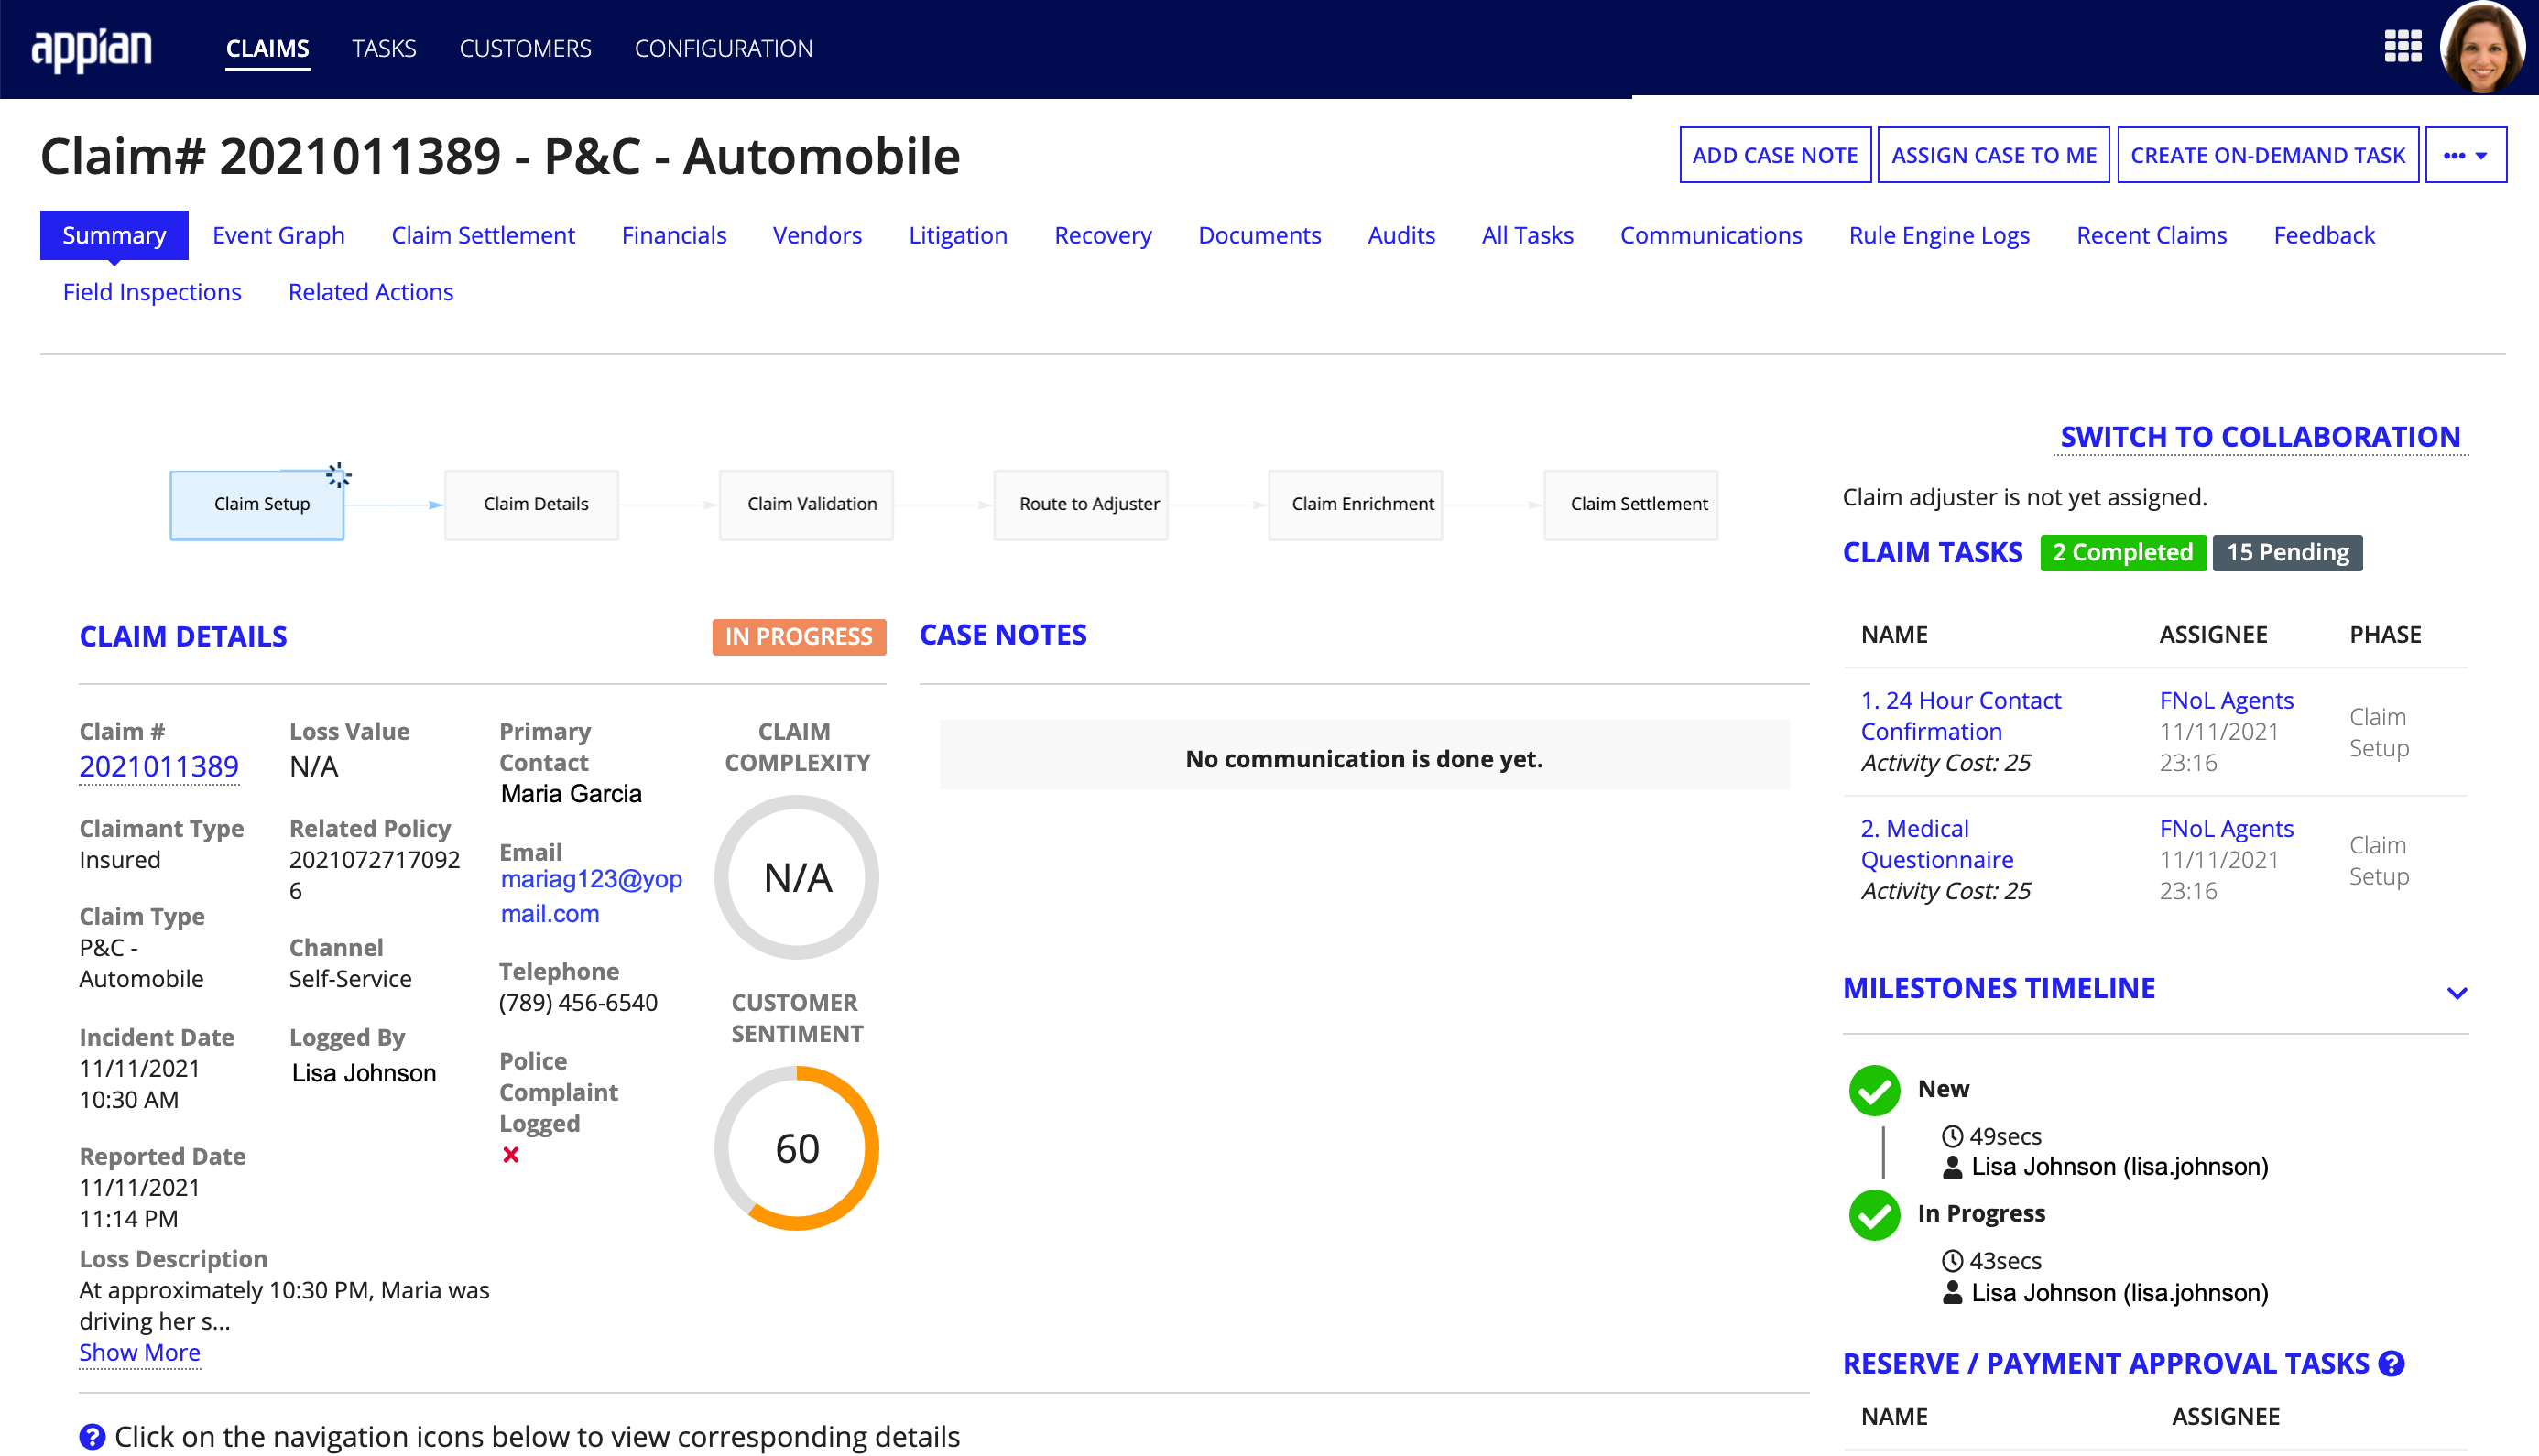
The Summary view opens, which displays a workflow visual of where the claim is in the process. Lisa can see the claim details she just entered, Completed and Pending tasks assigned to the claim, a milestone timeline, details about any related entities, communications, documents, and so much more. She can also add case notes, create on-demand tasks, or perform other related actions against the claim.
Note that if Lisa or another team member needs to access the Summary view for a reported claim, they can do so by navigating to the CLAIMS page and locating the claim number in the RECENT CLAIMS list for the claim they want to view. Once located, they'll click on the claim number link to access this view of the claim's Summary view.
Navigating the Claims DashboardCopy link to clipboard
After logging the claim and confirming its details, Lisa can move on and view key metrics about claims currently in the claims pipeline. The Claims dashboard, accessed by navigating to the CLAIMS page, displays KPIs at the top of the page that allow Lisa and other customer service representatives to quickly assess how many open, overdue, and daily claims are in the process. By evaluating these KPIs, Lisa has visibility into trends, source data, and overall claims health.
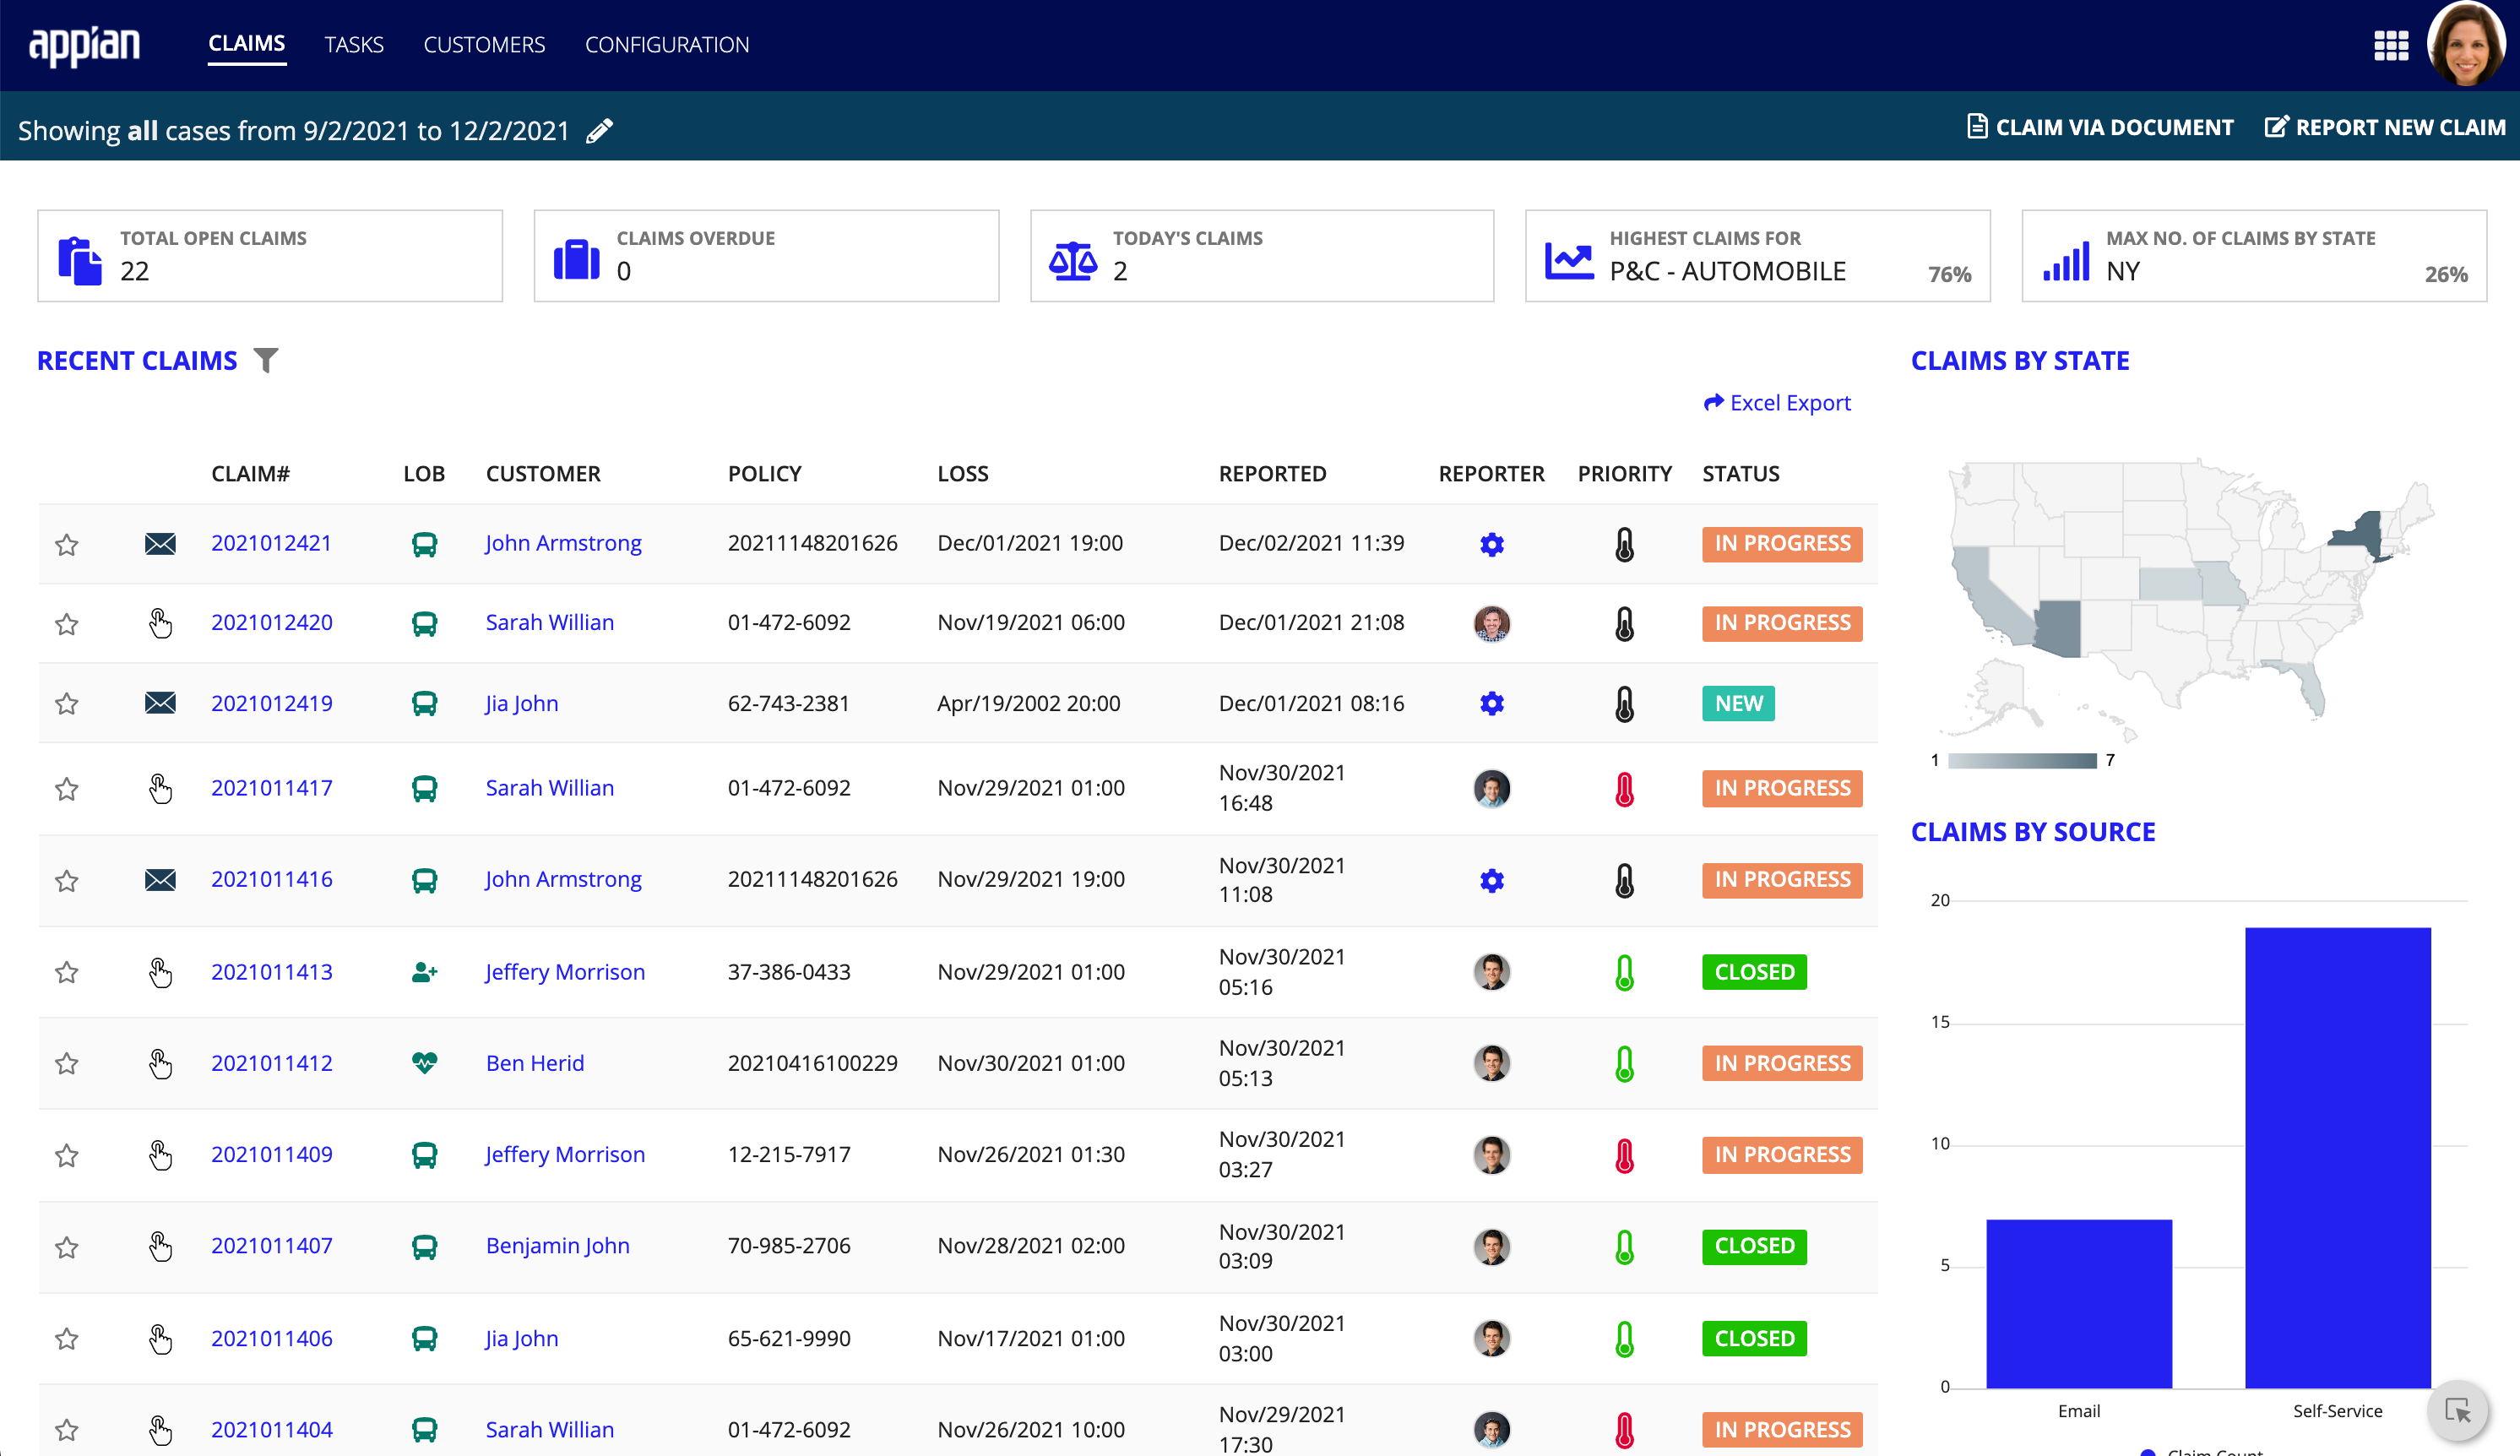
The Claims dashboard also lists all recent claims that have entered the claims pipeline in the last 90 days.
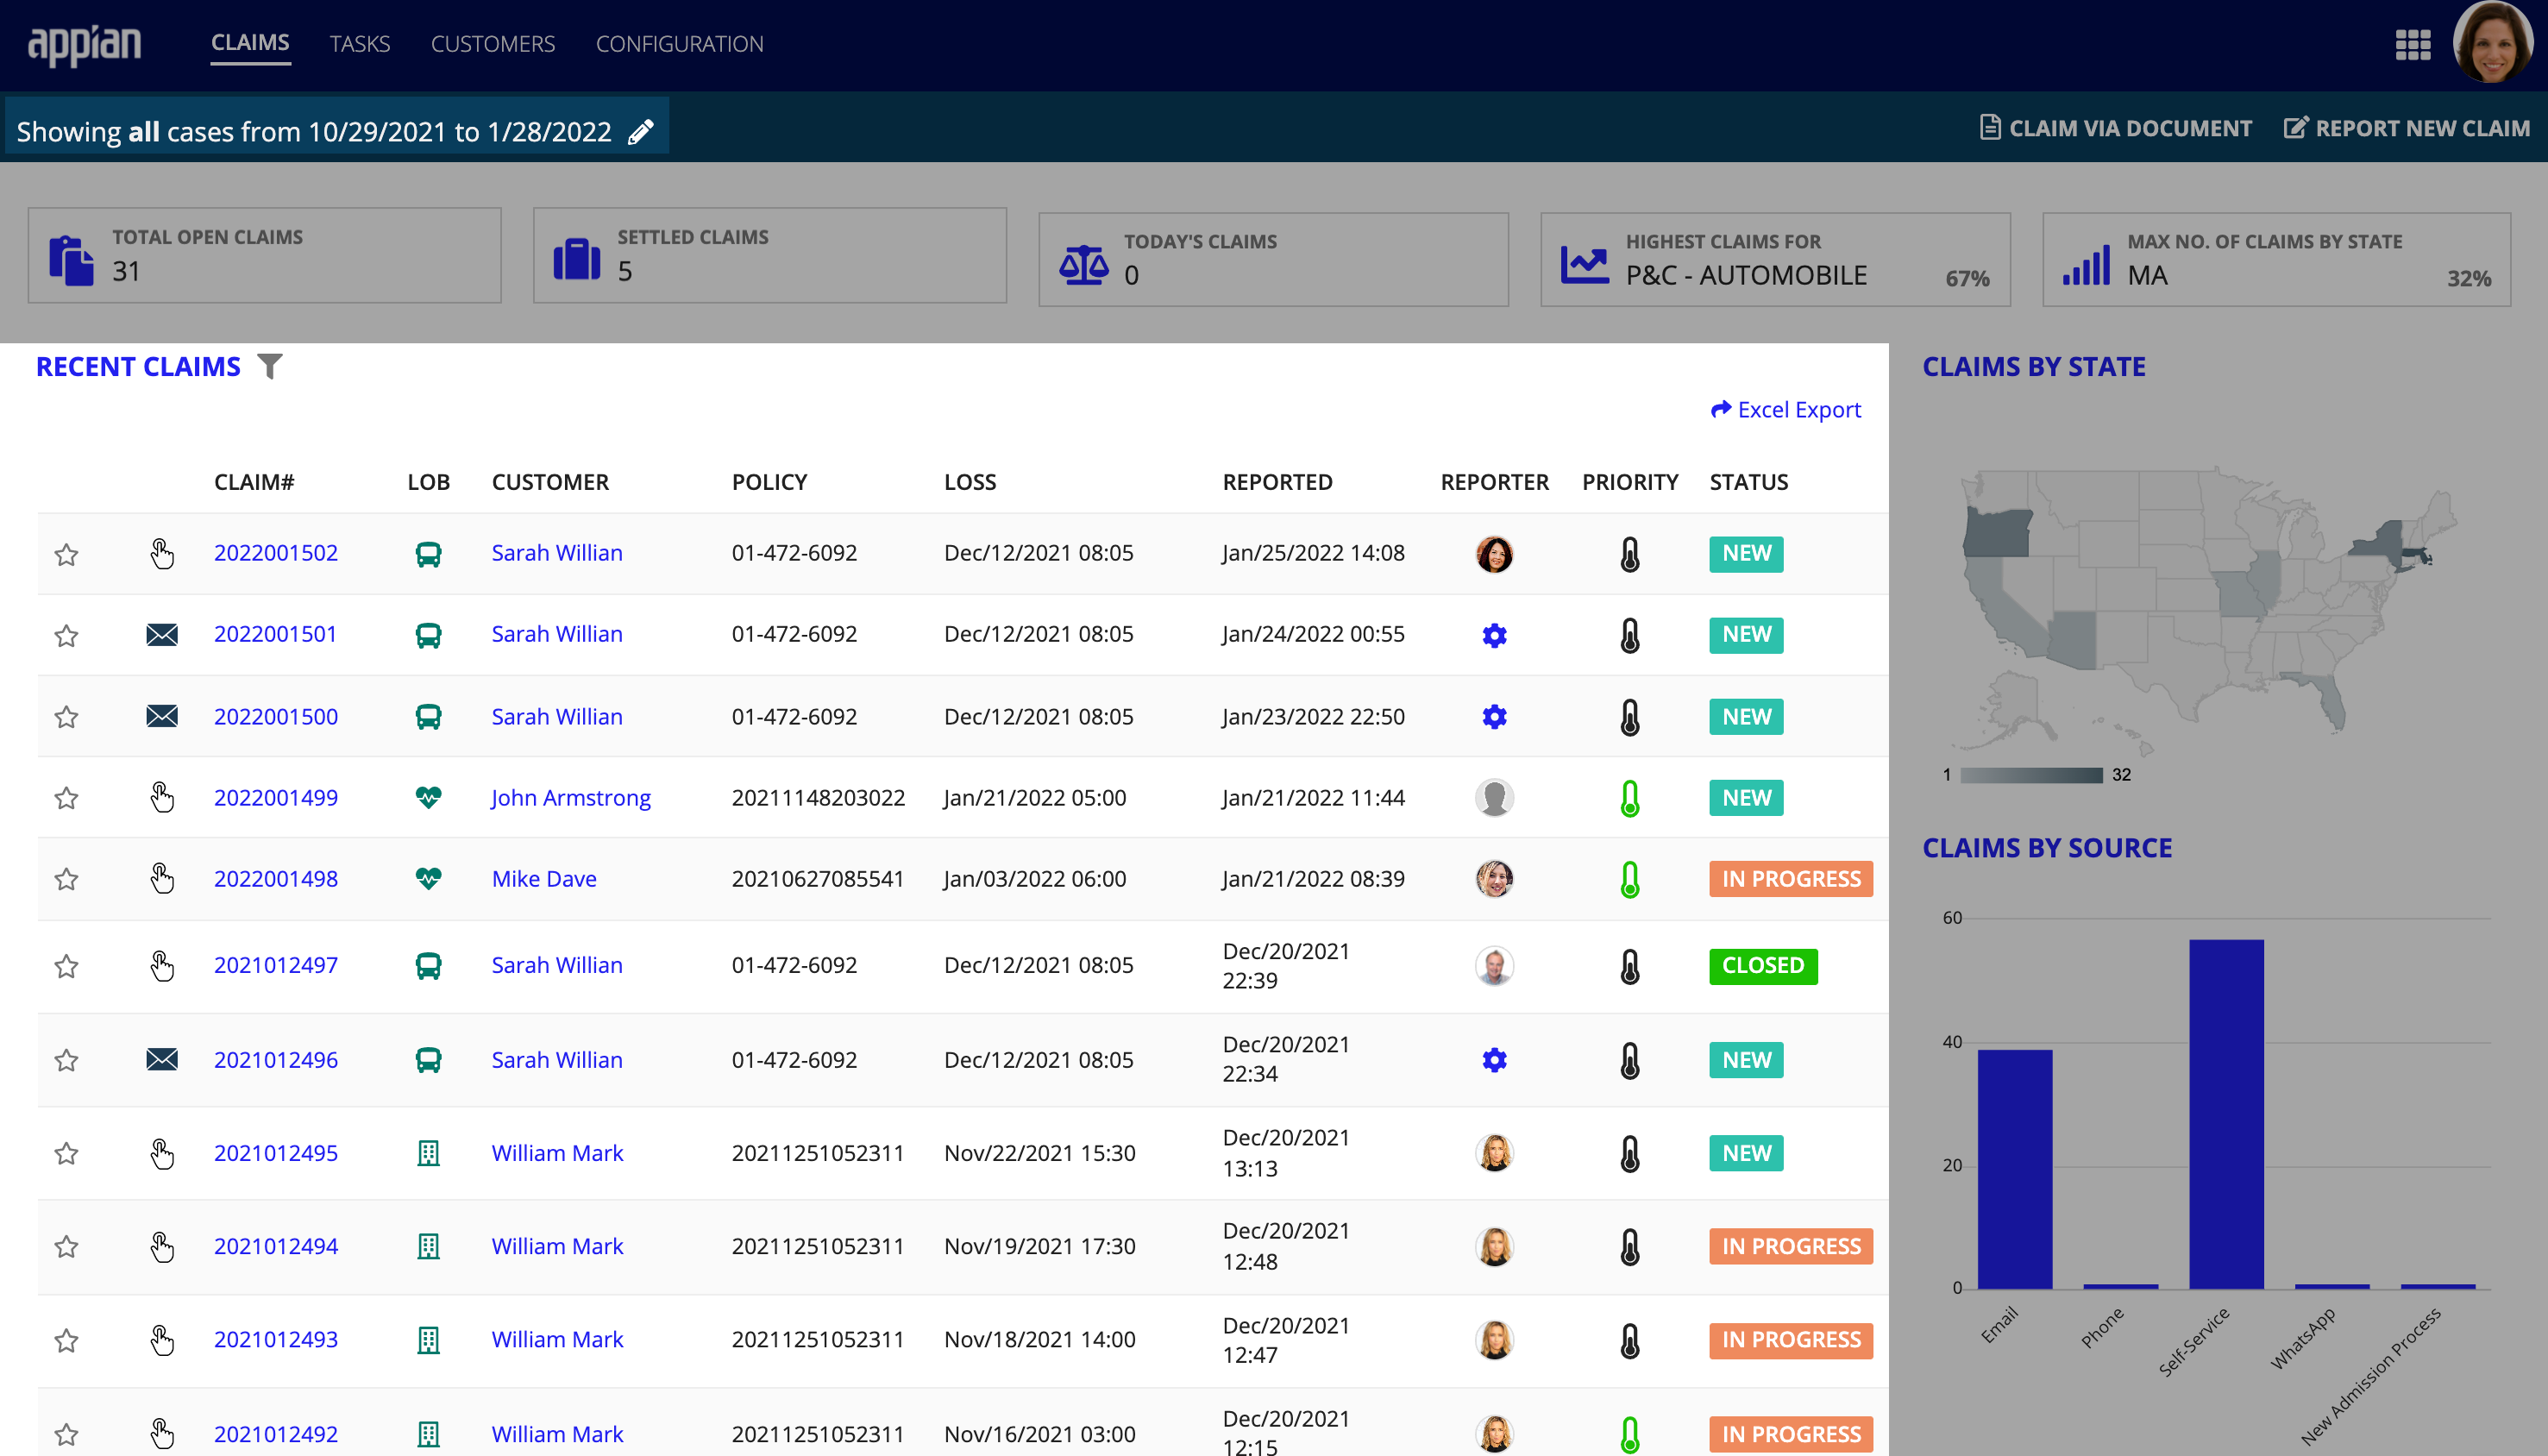
Connected Claims provides several ways to filter the data displayed in the Claims dashboard. You can use the date range, state, and source filters for quick and easy filtering. For more advanced filtering, use the filter icon to search by a task or case number or filter by module, assignee, group, priority, or deadline.
Use the date filter to evaluate claims data for a specific period quickly. Do you want to see the claims for a particular state only? The CLAIMS BY STATE map allows you to filter your claims data for a single state. Similarly, you can filter your claims data by source using the CLAIMS BY SOURCE bar graph. All these filters give you more control over your claims data by allowing you to capture and view only the data you want to see.
To filter the Claims dashboard data:
- To filter the claims data and return all the claims within a specific date range, click the edit icon next to Showing all cases from.
- Enter new dates in the Start Date and End Date fields.
- Click the Save icon.

Do you need to see all the claims for a particular state? From the CLAIMS BY STATE map, click on a state and Connected Claims will automatically filter the claims list and display the claims submitted for that region only.

Ready to startCopy link to clipboard
Now that you have walked through this simple workflow for processing a car insurance claim and understand some basic features and views, you can start using Connected Claims to process your insurance claims.
