| The capabilities described on this page are included in Appian's standard capability tier. Usage limits may apply. |
The agent is a software component you install on the host machine so it can communicate with Appian. The agent must be running on the host machine so that the robot has access to the data it needs to execute robotic tasks. You can also start a robotic task execution directly on the host machine using the agent.
This page covers the steps to set up the agent and use it to monitor activity on the connected host machine.
To set up the agent, you need to:
Note: Before setting up a new agent on your host machine, make sure you remove any previously installed agents and automatic sign-in service files. For RPA 9.4 and later, an "Appian RPA" folder with an uninstaller is automatically created. Users who upgraded to RPA 9.4 before Sept 21, 2023 need a hotfix (jidoka-9.4.0-659cdfad6216, 21 Sep 2023); those after don't. Later versions have the folder and uninstaller automatically.
Your choice of how to launch the agent determines what's included in the installer and what options you may need to configure on the host machine.
Before a robotic task begins, a user session needs to be started on the host machine so that the agent can establish a connection with Appian. This user session can be started manually or automatically. In both cases, carefully consider which user account you want to use, because the agent will have the same privileges on the host machine as the OS user that's signed in when the agent is launched.
To launch the agent automatically, configure Appian to sign in to the host machine automatically as needed. You can configure Appian to sign in with a user account that has basic or administrator privileges.
If you prefer to launch the agent manually, first sign in to the host machine with a user account that has administrator privileges. The agent needs administrator privileges in case it needs to unblock any locked sessions on a virtual machine. The agent may also need administrator privileges to work with files on the host machine, as well as access the web driver for browser actions. See the FAQs for more information.
You'll install the agent on a host machine, or a PC or virtual machine where robotic tasks are executed. You can deploy, configure, and execute robots on one or several host machines. A robot requires an agent to be installed and running in order to execute a robotic task on a host machine. Every robot has a corresponding agent, which can only be used on one host machine.
You can create a virtual machine in the leading virtualization systems, such as Citrix, VMware or VirtualBox, to use as a host machine and execute robotic tasks.
Note: Be sure to add the host machines to your Appian environment's firewall allow list, if applicable. The robotic task may not be able to execute successfully if the firewall blocks communication between the agent, host machine, and server.
To launch the agent on a host machine, Java 8 must be installed. You can download Java 8 from Oracle's website. If you don't know what version of Java you have installed, you can find the version in the Java Control Panel on Windows and Mac. For more detailed instructions on finding your version of Java, go to How can I find which version of Java is installed on the Java website.
Caution: Windows host machines: Download the .msi Java installer from the Oracle website to install on your host machine. The .msi installer sets the Windows registry keys that the agent uses to determine if the correct version of Java is installed. The agent won't be able to detect the Java version if you use another installation file or package.
If you can't install JVM, it is possible to make the agent work using a version downloaded and located beside the agent itself. In this case, contact the Appian support team so they can provide a robot adapted to your needs.
If you choose to allow Appian to sign in, the installer will include additional files to support this functionality.
For the automatic sign-in service to work as expected, you must first complete several prerequisite steps. These steps and installation require administrator privileges. Once the service is installed, you can execute a robotic task using a standard user account.
Additionally, the host machine must use a Windows 64-bit OS (x64-based) and the user account Appian uses to sign in should be configured in the following ways:
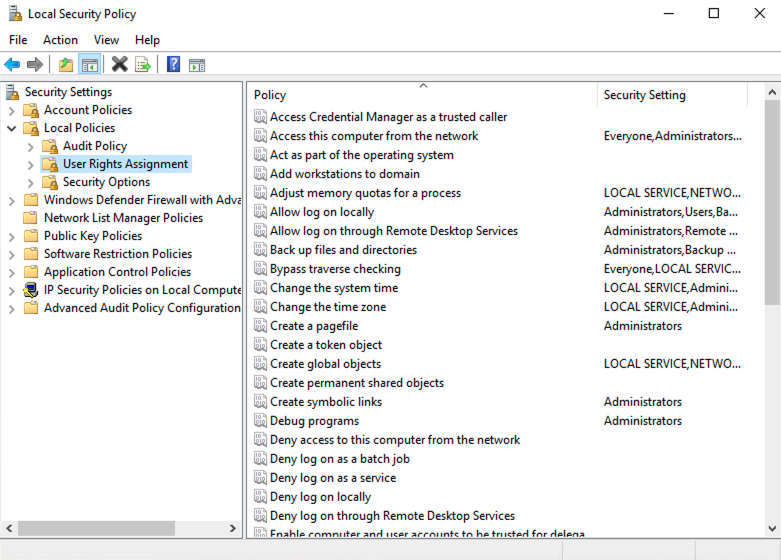
To add the user account, go to Computer Management > Local Users and Groups > Groups > Remote Desktop Users.

Local Security Policy > Local Policies > User Rights Assignment:
Allow log on through Remote Desktop Services
Remote Desktop Settings.You'll download the agent in the Operation Console from an available robot or when you create a new one. To make setup easier, we recommend that you carry out the following steps on the host machine where you wish to install the agent.
Note: Install and run only one agent per user session. The agent executable file is associated with the robot entry in the Operations Console. This file can only be used on one host machine. When you download the agent, any previous installations of the same agent are invalidated. To prevent installation issues, remove any previously installed agents before installing a new one. There should be only one agent executable file per directory.
Note: If you chose to allow Appian to sign in, the installer includes files to install the automatic sign-in service as well as the agent. To prevent installation issues, remove any previously installed automatic sign-in service files and agents before using the installer again.
You'll need administrator privileges to complete installation when the installer includes the agent and automatic sign-in service.
C:\Users\<username>\AppData\Local. The installer will create a folder titled Appian RPA in this location with all the necessary files.Note: The agent launches automatically after you complete installation.
Note: Recommendation: Sign in as an administrator when you launch the agent to prevent connection disruptions in the future.
You can check that the agent is running from the host machine and the console.
You'll download the agent in the Operations Console from an available robot. To make setup easier, we recommend that you carry out the following steps on the host machine where you wish to install the agent.
Note: Install and run only one agent per host machine. The agent executable file is associated with the robot entry in the Operations Console and can only be used on one host machine. When you download the agent, any previous installations of the same agent are invalidated. To prevent installation issues, remove any previously installed agents before installing a new one. There should be only one agent executable file per directory.
AppianRPA on the desktop.To launch the agent on Mac or Linux:
Note: Recommendation: Sign in as an administrator when you launch the agent to prevent connection disruptions in the future.
chmod +x AppianRPAagent.run../AppianRPAagent.run.You can check that the agent is running from the host machine and the console.
Once the robot is configured, the agent is running and ready to execute robotic tasks. To check that the agent is running on the host machine, look at the taskbar. The agent icon color appears blue when the agent is connected to the console.
![]()
You can also select Element inspector in the menu to check whether the connection is established or not.
To check that the agent is running on the Operations Console, the robot's status should be Online if the agent is properly connected and running.
Tip: When you abort a robotic task execution, the agent may take a minute or two to come back online while it resets to ensure a clean and efficient state for your next task.
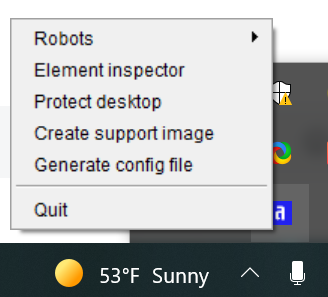
To view the agent's menu, right-click on the agent icon. You'll see the following options:
The Robots menu lists robotic tasks available for this host machine. Click on a robotic task to execute it. You should only run robotic tasks that do not have required input variables on their setup. If you launch a robotic task with required input variables in this way, the process won't run properly because it doesn't have the variables it needs to begin the execution.
The Element inspector shows information to help you develop your robotic task.
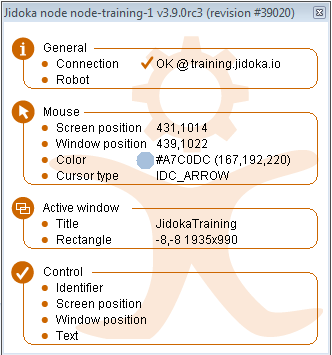
The Element inspector is a tool that shows detailed information about the application elements with which your robotic tasks are going to interact (buttons, text fields, menus, etc.). The information provided is different depending on your robotic task's development strategy: keyboard commands, Windows API, image recognition, etc.
Additionally, this tool informs you of the connection status of the host machine with the server, the position of the mouse pointer on the screen, and information about the active windows and controls. This window is very helpful for finding out the position of any control that your robotic task needs to interact with.
Your robotic tasks can interact with Windows controls using their IDs, which the element inspector provides. To get the ID, place your mouse over the control on the active window. The ID appears in the Control > Identifier area of the element inspector. You can use the ID to reference that control from a robotic task and use it to read or enter data.
Tip: IDs may vary depending on the operating system version. Make sure you are running your robotic task on robots that use the same operating system version as the one used for its development.
The Protect desktop option allows you to protect the desktop where the agent is running. This option obscures the screen so no one can see what's happening during execution. The window that appears covering the screen is an "invisible" window. If a user right-clicks on the screen, they would see the desktop menu.
To disable this window, click in the zone where the taskbar should be. When the taskbar appears, click on the agent again to deactivate desktop protection.
You can use the agent to capture images and send them to robotic tasks that will use them as support files.
Learn more about this option on the Image Recognition module page.
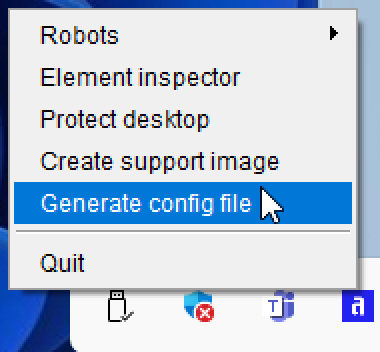
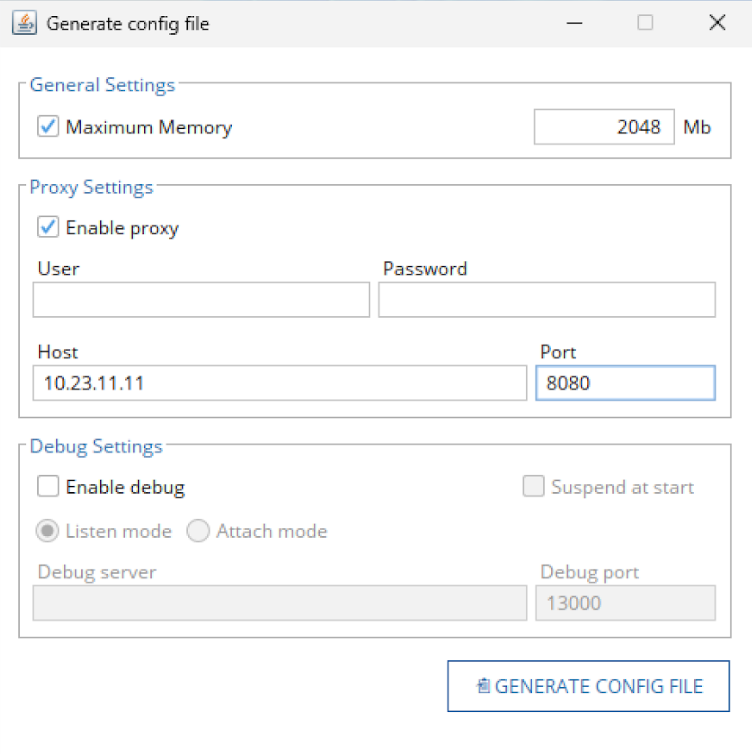
The configuration file is not required, but it allows you to tailor the agent's JVM settings. These settings may either be unknown when the agent is initially deployed or may vary during the lifespan of the robot. The file is formatted as a properties file, where each setting occupies a single line. The syntax for each line mirrors the format used for defining system properties (-D<name>=<value>) when running a Java program from the command line.
<name>.exe, the configuration file should be named <name>.l4j.ini.The most common parameters used in the config file include:
-Xdebug-Xrunjdwp:transport=dt_socket,server=y,suspend=n,address=[PORT]-Xdebug-Xrunjdwp:transport=dt_socket,server=n,suspend=n,address=[X.X.X.X]:[PORT]-Dhttp.proxyUser=USER-Dhttp.proxyPassword=PASSWORD (the password can be encrypted using the agent itself)-Dhttp.proxyHost=DIRECTION_PROXY-Dhttp.proxyPort=8080-Xmx1GbYou can manually create the config file; however, you can use the Generate config file option in the Agent menu to have it automatically generated for you.
Select Password encryption in the menu to obtain a hash from a password in plain text. This enables you to include encrypted passwords in the jidoka.l4j.ini configuration file, if necessary. The agent can detect if it is an encrypted password and will process it accordingly, thus protecting sensitive information.
When you launch a robotic task, the agent communicates with the server and downloads the libraries and artifacts needed for execution. This download is done only for the first execution of that robotic task, since at that time no library has been downloaded to the host machine. In later executions, these libraries should be available on the host machine, and they will be downloaded only if they are not found. The number of libraries to download depends on the dependencies and modules used during development.
Caution: It is important that the agent is in a folder whose full path has no blanks to prevent it from encountering any problem during a robotic task execution.
The directory hierarchy is described below, assuming the agent is in the folder C:\AppianRPA. Upon execution, the agent will create the correct files and folders within C:\AppianRPA and run the robotic task.
C:\AppianRPA: Host machine's root directory. You can find certain files here that serve as your robotic task's activity log files.
AppianRPAagent.exe: Agent's executable file..jidoka-cache: Libraries required for robotic task's executions.Jidoka-workspace: Libraries and other files required by the robotic tasks.example: Specific support files for the robotic task "example".anotherRobot: Specific support files for the robotic task "anotherRobot"..jidoka-cache: The folder in which the necessary libraries for the robotic task's proper operation will be stored.Jidoka-workspace: Folder containing the individual directories of each robotic task. Within the folder Jidoka-workspace, there are as many subfolders as robotic tasks that have executed on the host machine. The folders use the robotic task's unique ID, consisting of letters and numbers. For example, a robot called abc123 would have an associated subfolder in C:\AppianRPA\Jidoka-workspace\abc123, which is the folder where all components required for its specific execution would be downloaded, and the files created during its execution would be stored. Appian RPA provides easy access to this folder programmatically.Whenever Appian RPA upgrades to the latest version, active agents do as well. During the upgrade process, you may see a concurrency warning in the Appian RPA console. This message is temporary and expected. If you see this warning during an upgrade, try back in a few minutes.
To ensure smoother and faster upgrades, Appian recommends robots have more than the minimum 2 GB RAM. View System Requirements to learn more about required Appian RPA configurations.
If the warning persists or you have other issues during an upgrade, contact Appian Support for help troubleshooting the issue.
Agents
