| The RWM application was deprecated with Appian 24.1. The application will no longer be updated or pre-installed for new Appian Cloud sites with Appian RPA enabled. RWM will be removed in a future release and we encourage customers to use the Operations Console to manage robots instead. |
Robotic Workforce Manager (RWM) is built on Appian's low-code platform and is as flexible as any application developed in Appian. To keep your application scalable and aligned with best practices, this page guides you through some of the most common changes. This guide provides expert Appian designers with the best practices, guidelines, and recommendations for configuring RWM to their unique needs.
In the Control Center, on the Exceptions page, there is a sub-tab and statistics titled Business Exceptions. Because business exceptions vary from organization to organization based on the Business Process Management (BPM) Appian processes created, the situations that generate business exceptions, as well as the content, can vary significantly. Thus, customization is necessary to display these exceptions.
RWM provides a standard process and case management interface as an example for a business exception sub-process. However, you aren't required to use this process for a business exception, as any process will work.
To configure a business exception process:
RWM Business Exception Template process model. Type a new name specific to your business exception scenario. In this example, we'll refer to this as New process.RWM_FM_businessExceptions interface, and optionally duplicate this form. We'll refer to this as Exception form.
Review Case node in New process to use this new form instead.a!sectionLayout at line 92 with your business exception page interface containing content and fields that should be displayed. Configure the rule inputs field to pass values from the process model into your interface.New process need to be displayed on the form, update the Review Case node with variables to pass into the Exception form.Replace with Write to Datastore node in New process with a Write to Datastore node to save any values the user inputs on the business exception form to the database.Exception process.Exception process. In this node, call the New process created in the first several steps.New process, update the Business Exception Initialization node to get the businessExceptionId and caseTitle values as inputs from the Exception process.For a business exception to appear in the Exceptions page of the Control Center:
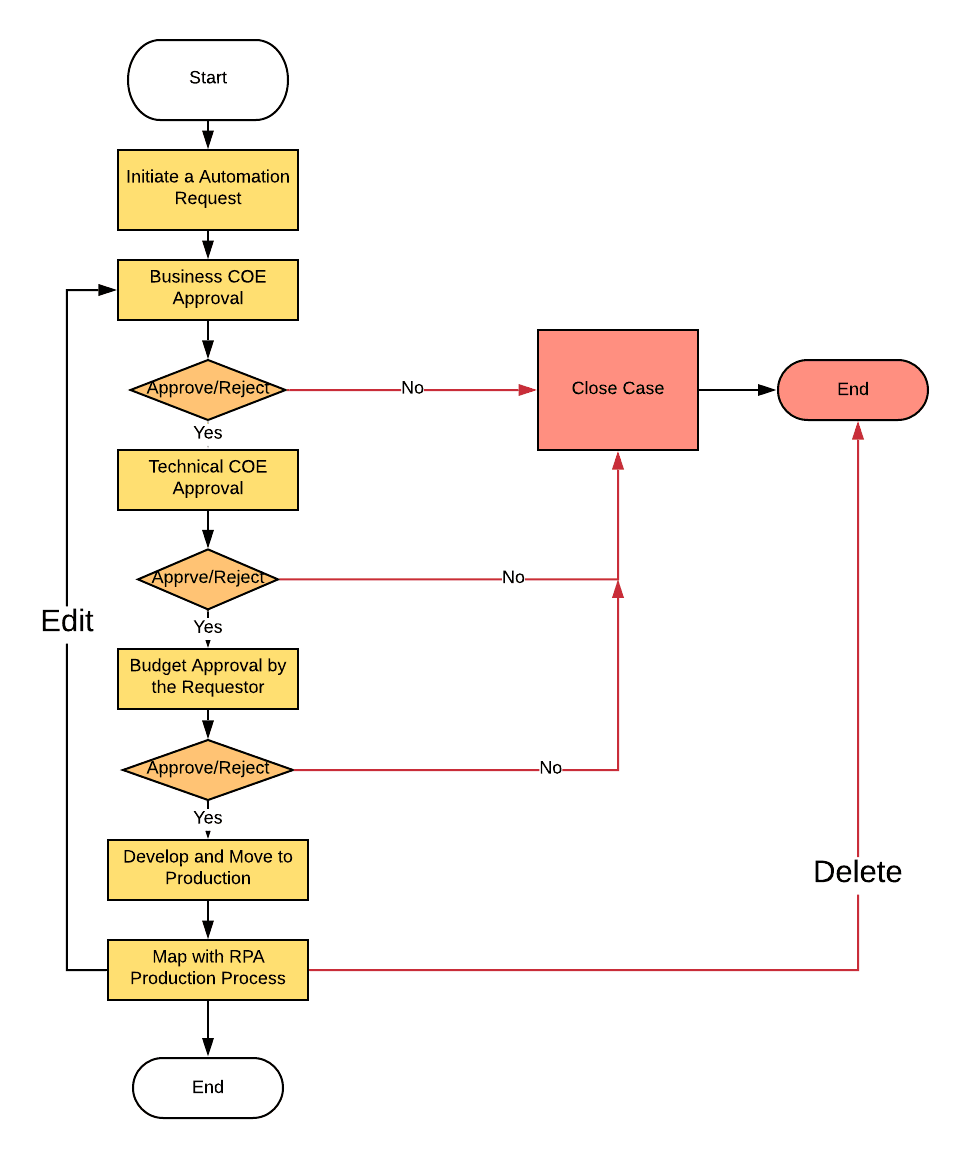
RWM_PM_BUSINESS_EXCEPTION_CASE_MANAGEMENT constant, add a process model containing the user input form to display.RWM_PM_BUSINESS_EXCEPTION_CASE_MANAGEMENT.RWM_UTIL_getBusinessExceptionTasks to further filter variables contained in the business exception process models.In the Automation Planner, users request a new RPA automation using the RWM Request New RPA Process process model. Using this feature, the requestor or a member of the CoE can track the specific automation request until the request is taken to production.
You can customize these areas of the Automation Planner module:
Every organization has its own approval process to approve a new RPA request. The approval built in this application can be customized for your organization's needs. RWM's main workflow is shown below:
See Security and Role-Based Access to customize roles in your RWM application.
RWM uses the following statuses for each step in the workflow. These values are mentioned in the RWM_VAL_PROCESS_STATUS constant and RWM_LOOKUP_STATUS database table.
To modify the value of an existing status, update the RWM_VAL_PROCESS_STATUS constant. Note that the value will be changed if a new version of the application is imported to the environment.
Adding a new status in RWM is made of three steps:
RWM_VAL_PROCESS_STATUS constant and RWM_LOOKUP_STATUS database table and add the new status name.RWM_LOOKUP_STATUS table.The following constants contain the index of each status:
RWM_VAL_DEP_MAN_STATUS_REQUESTRWM_VAL_DEP_MAN_STATUS_BIZ_COE_REVIEWRWM_VAL_DEP_MAN_STATUS_TEC_COE_ANALYSISRWM_VAL_DEP_MAN_BUDGET_APPROVALRWM_VAL_DEP_MAN_STATUS_IN_DEVRWM_VAL_DEP_MAN_STATUS_IN_PRODRWM_VAL_DEP_MAN_STATUS_AI_REVIEWDon't delete any status constants since they are integral to the entire request workflow.
After you add a status in RWM, you'll need to update the approval interface, described below.
The interface RWM_DM_FORM_requestNewRPAProcess displays the same content for review in each of these stages:
The status process variable determines which feedback given by a previous approver is shown. For the new step, the comment section should be added and configured to conditionally shown based on the status.
If additional data points are required, create an additional CDT with one-to-one mapping to the RWM default CDT and add the new data points there. This will require an additional query entity and Write to Datastore node. Several of the solution objects, such as process models and interfaces, will also need to be updated to accommodate the new data.
Tip: Keep in mind that this customization will make future upgrades more difficult. Importing a new version of RWM will overwrite these changes, so they'll need to be recreated manually.
Additionally, don't change the CDTs (RWM_PROCESS_ONBOARDING, RWM_PROCESS, RWM_VALUE_ASSESSMENT) because they will be overwritten by the next version of the RWM application.
You can customize the Charts, Grids, and Dashboards that are part of the Control Center module.
While customizing, be aware that all the below content will be overwritten while upgrading the application to the newer version. To avoid these issues, we suggest:
In charts and grids, you can customize colors and labels. Don't change the View/Stored Procedure expressions. If any database content is changed that can override the current functionality of the charts and that also may have an impact on other functionalities if they were reused.
You can also add new charts, grids, dashboards, and other contents in RWM.
For general guidelines on customization, please refer to Backward Compatible Design: Planning for Subsequent Deployments.
You can customize the RWM application to support Oracle DB in addition to MySQL cloud DB.
