| The capabilities described on this page are included in Appian's standard capability tier. Usage limits may apply. |
This page provides step-by-step guidance on creating a web API to retrieve a JSON-encoded list of records.
Web APIs allow a third-party system to get data from Appian or cause Appian to do something.
For example, you can use a web API to share your Appian data with a third-party organization, like the government or an academic institution. Another example would be when an external system receives a complaint email, the web API could send a request to Appian to open a new case.
Appian provides a low-code experience for configuring your web APIs, so it’s much like configuring an expression rule. This tutorial can help get you started by creating a sample web API. You'll use a template to create an API that queries a list of employees from the Employee record type, and return the list of employees as a JSON-encoded list.
This tutorial contains four steps:
Before you can create the web API, you first need to create the record type that you'll use to query data from. To create the record type used in this tutorial, complete the Records Tutorial.
The Records Tutorial will walk you through creating an Employee record type that uses a database table as the source and has data sync enabled.
Once you’ve configured the Employee record type, you can start building your web API.
In this tutorial, we’ll use the QUERY RECORD TYPE template to configure the web API. This template uses a constant to reference a record type in an expression of a!queryRecordType(); however, you can also directly reference your record type using the recordType! domain within your a!queryRecordType() expression.
For the purposes of this tutorial, you'll use a constant to reference the record type.
To create a constant referencing the Employee record type:
In the Create Constant dialog, configure the following properties:
| Property | Description |
|---|---|
| Create from Scratch | Leave selected. |
| Name | Enter AT_EMPLOYEE_RECORD_TYPE. |
| Type | Select Record Type. |
| Value | Select the AT Employee. |
| Save In | Use the picker to select the AT Rules & Constants folder. |
After you create the record type constant, you're ready to create the web API.
Within the web API's configuration, you’ll specify the record type constant, the API name, and the endpoint. The endpoint is used as part of the web API's URL to identify it and in log files for network devices and servers.
To create the web API:
In the Create Web API dialog, configure the following properties:
| Property | Description |
|---|---|
| Record Type Constant | Select the AT_EMPLOYEE_RECORD_TYPE constant. |
| Name | Enter AT_QueryEmployees. |
| Description | Enter Web API to retrieve employee data. |
| Endpoint | Enter query-employees. |
Click SAVE. The web API opens in a new tab with an expression generated by the template.
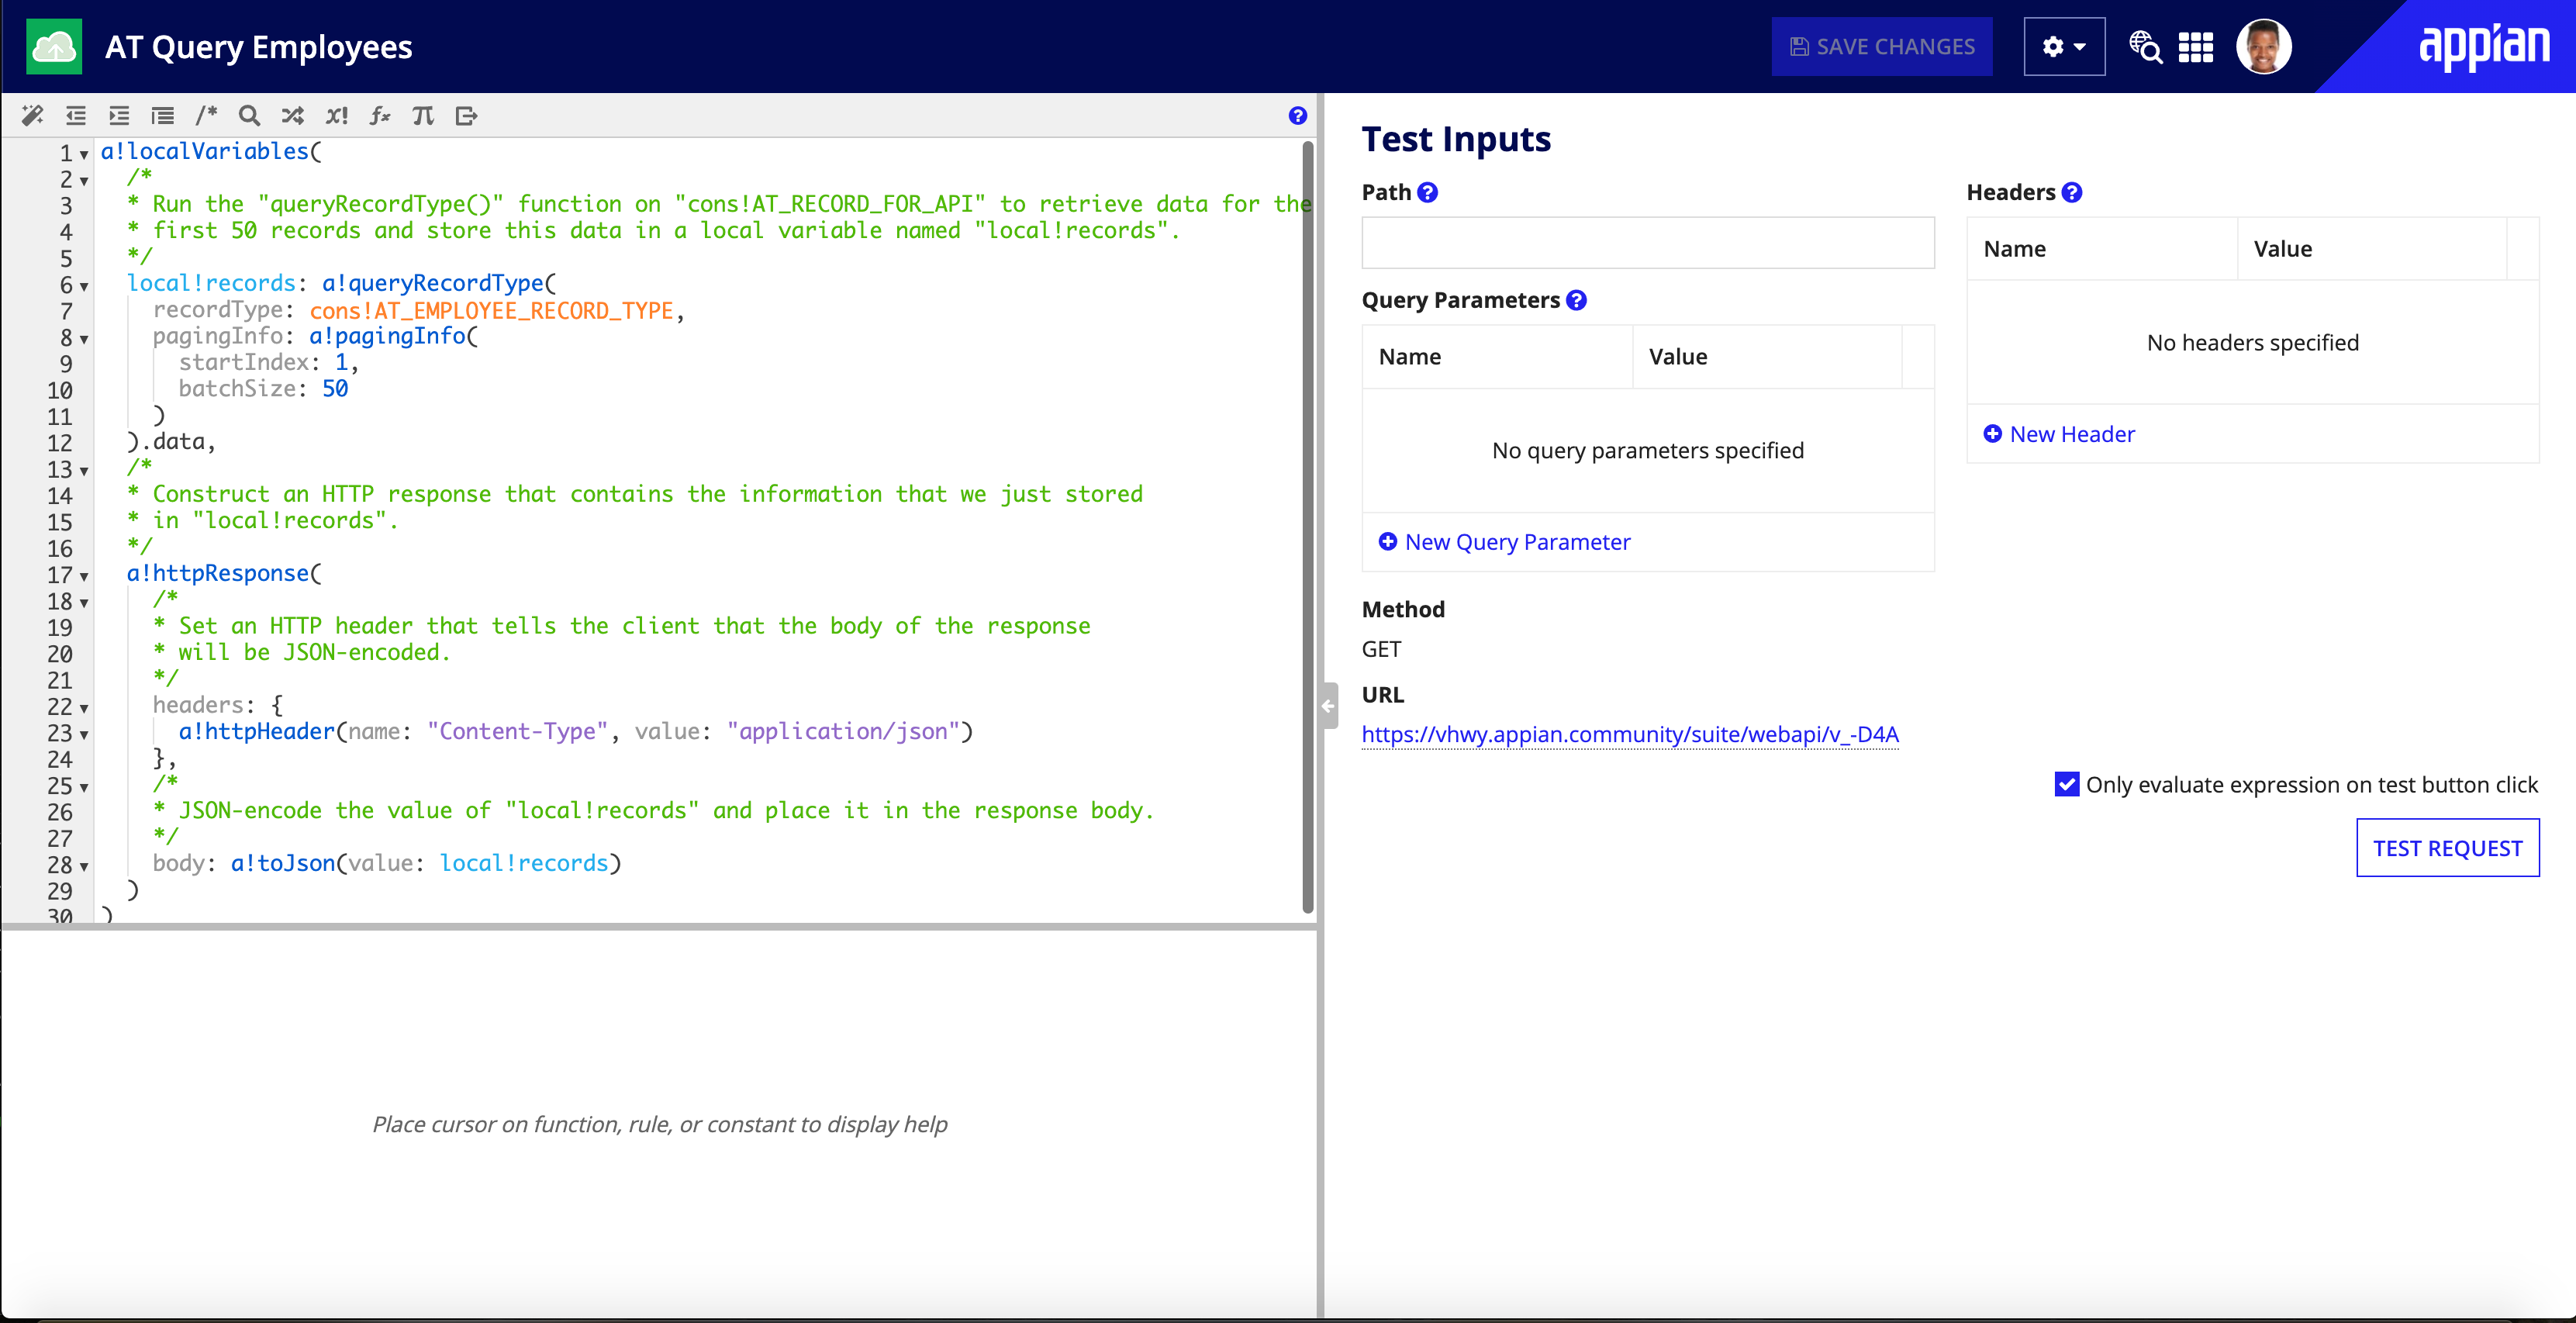

Now that you’ve created the web API, let’s test it out!
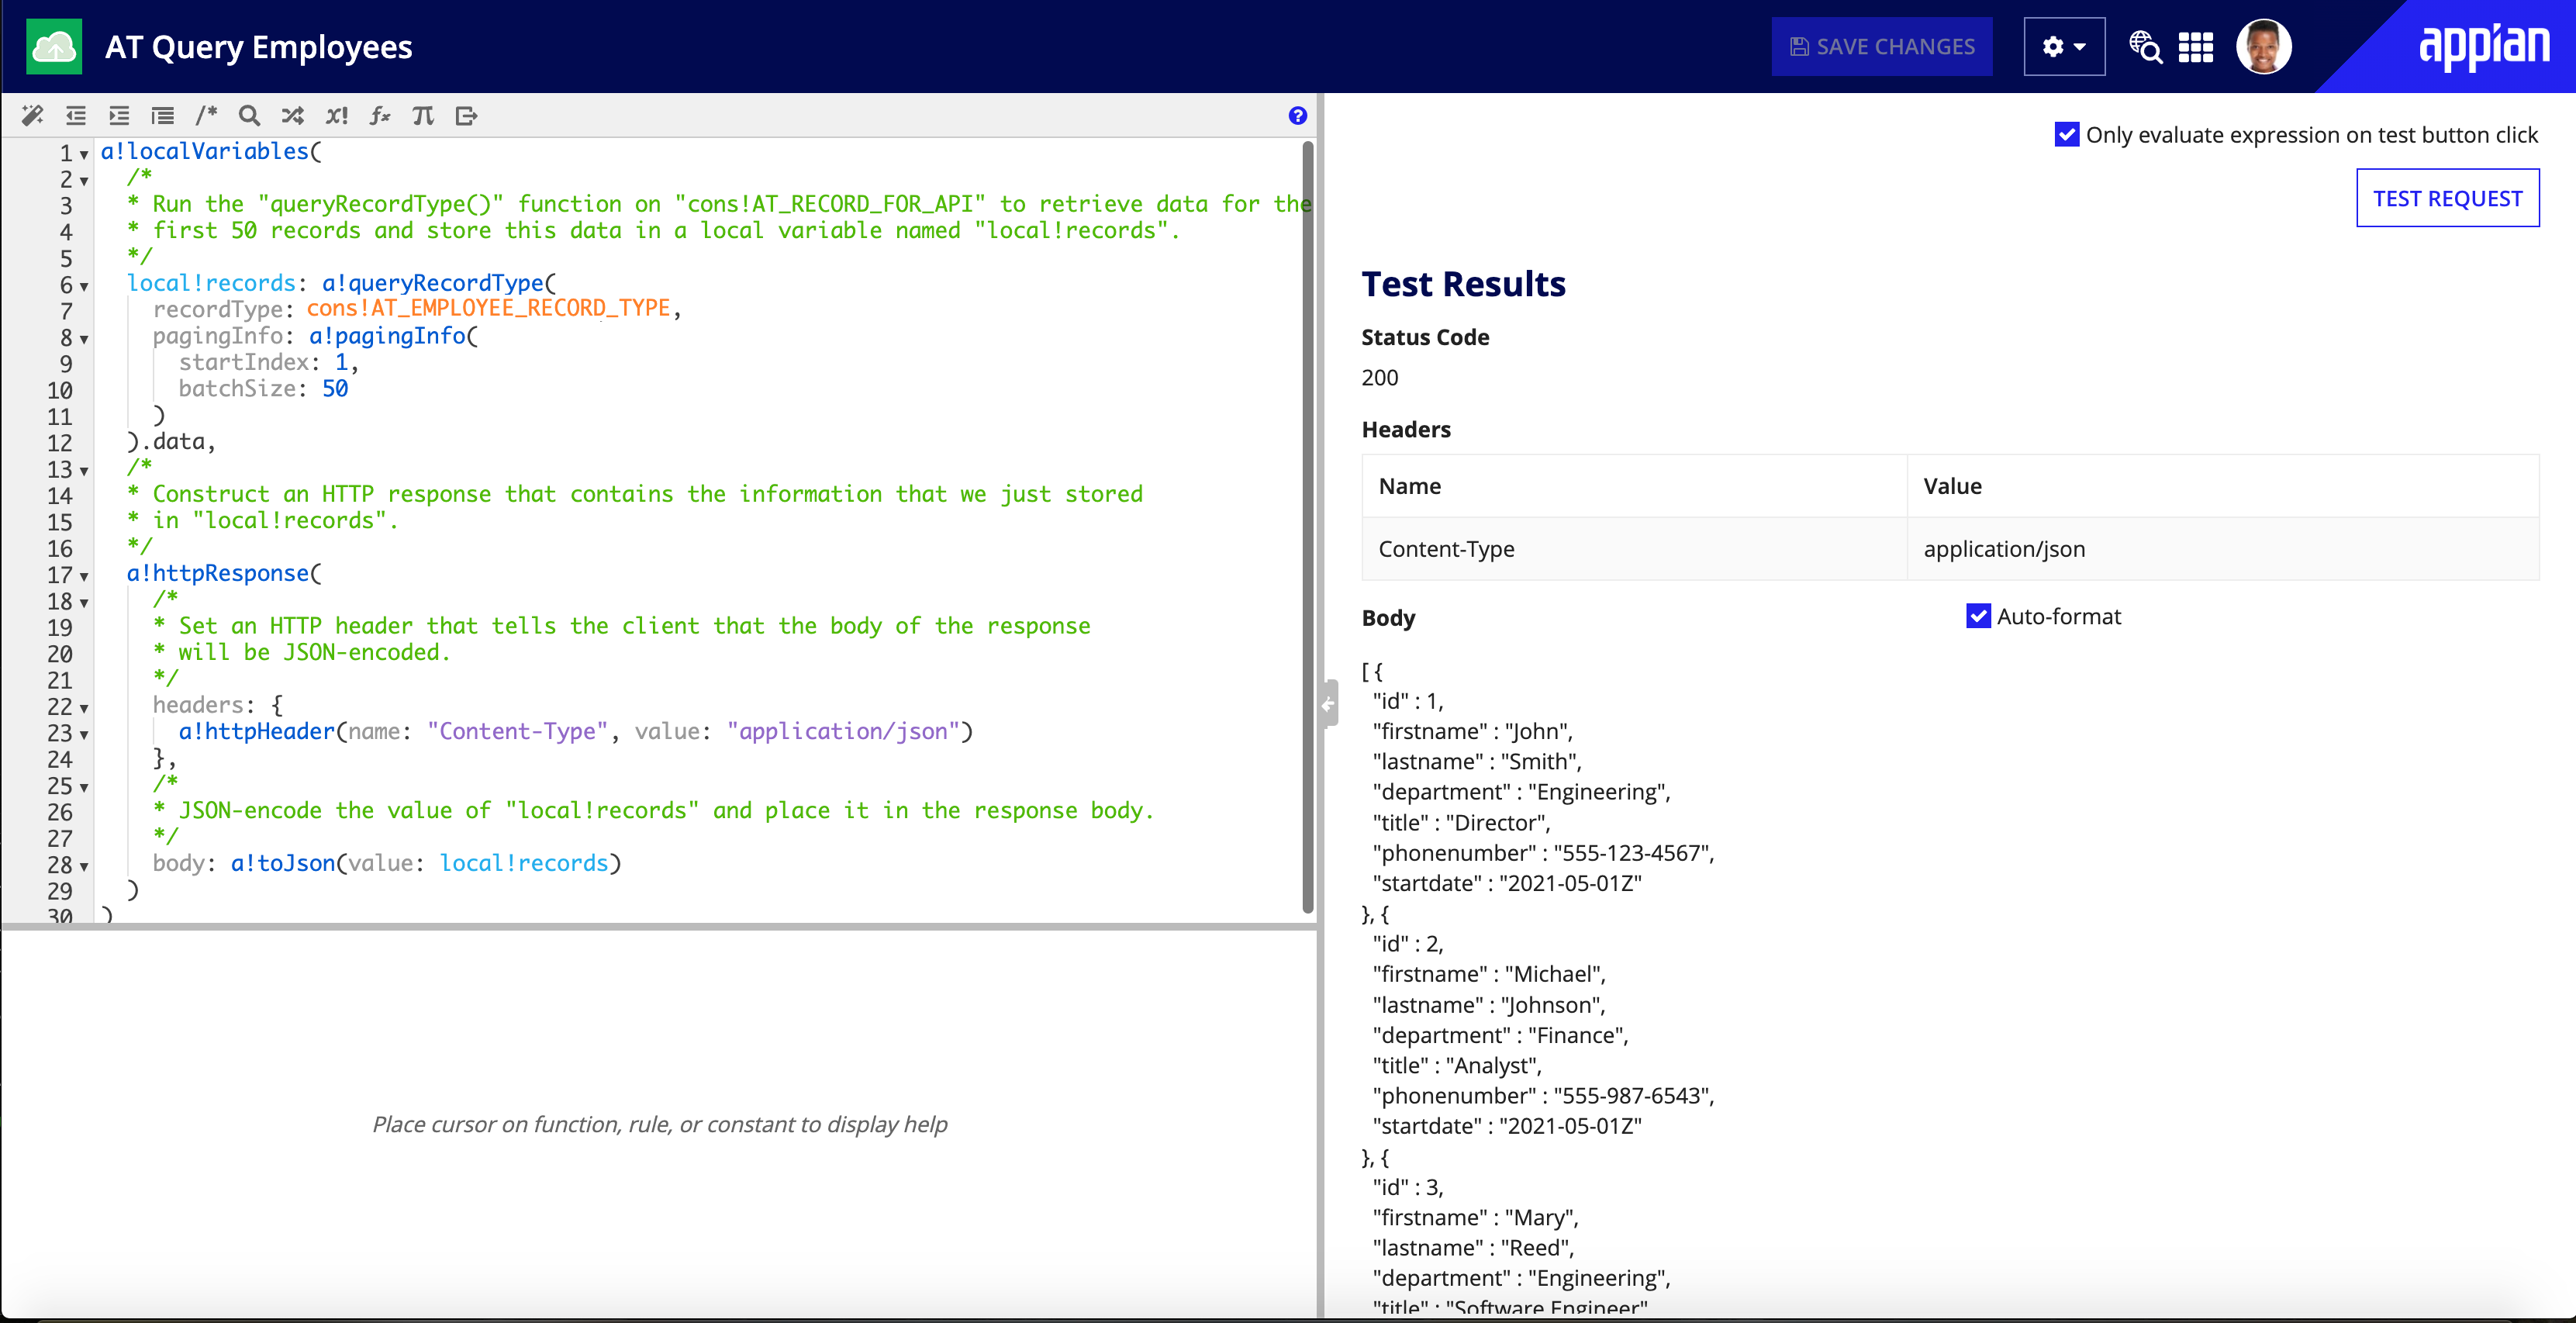
To test the default configuration:
The Test Results section appears with the result of the expression. As you can see, it is a JSON-encoded list of values from the Employee record type.
This looks good, but let’s filter out some of the data so we only see employees from the Sales department.
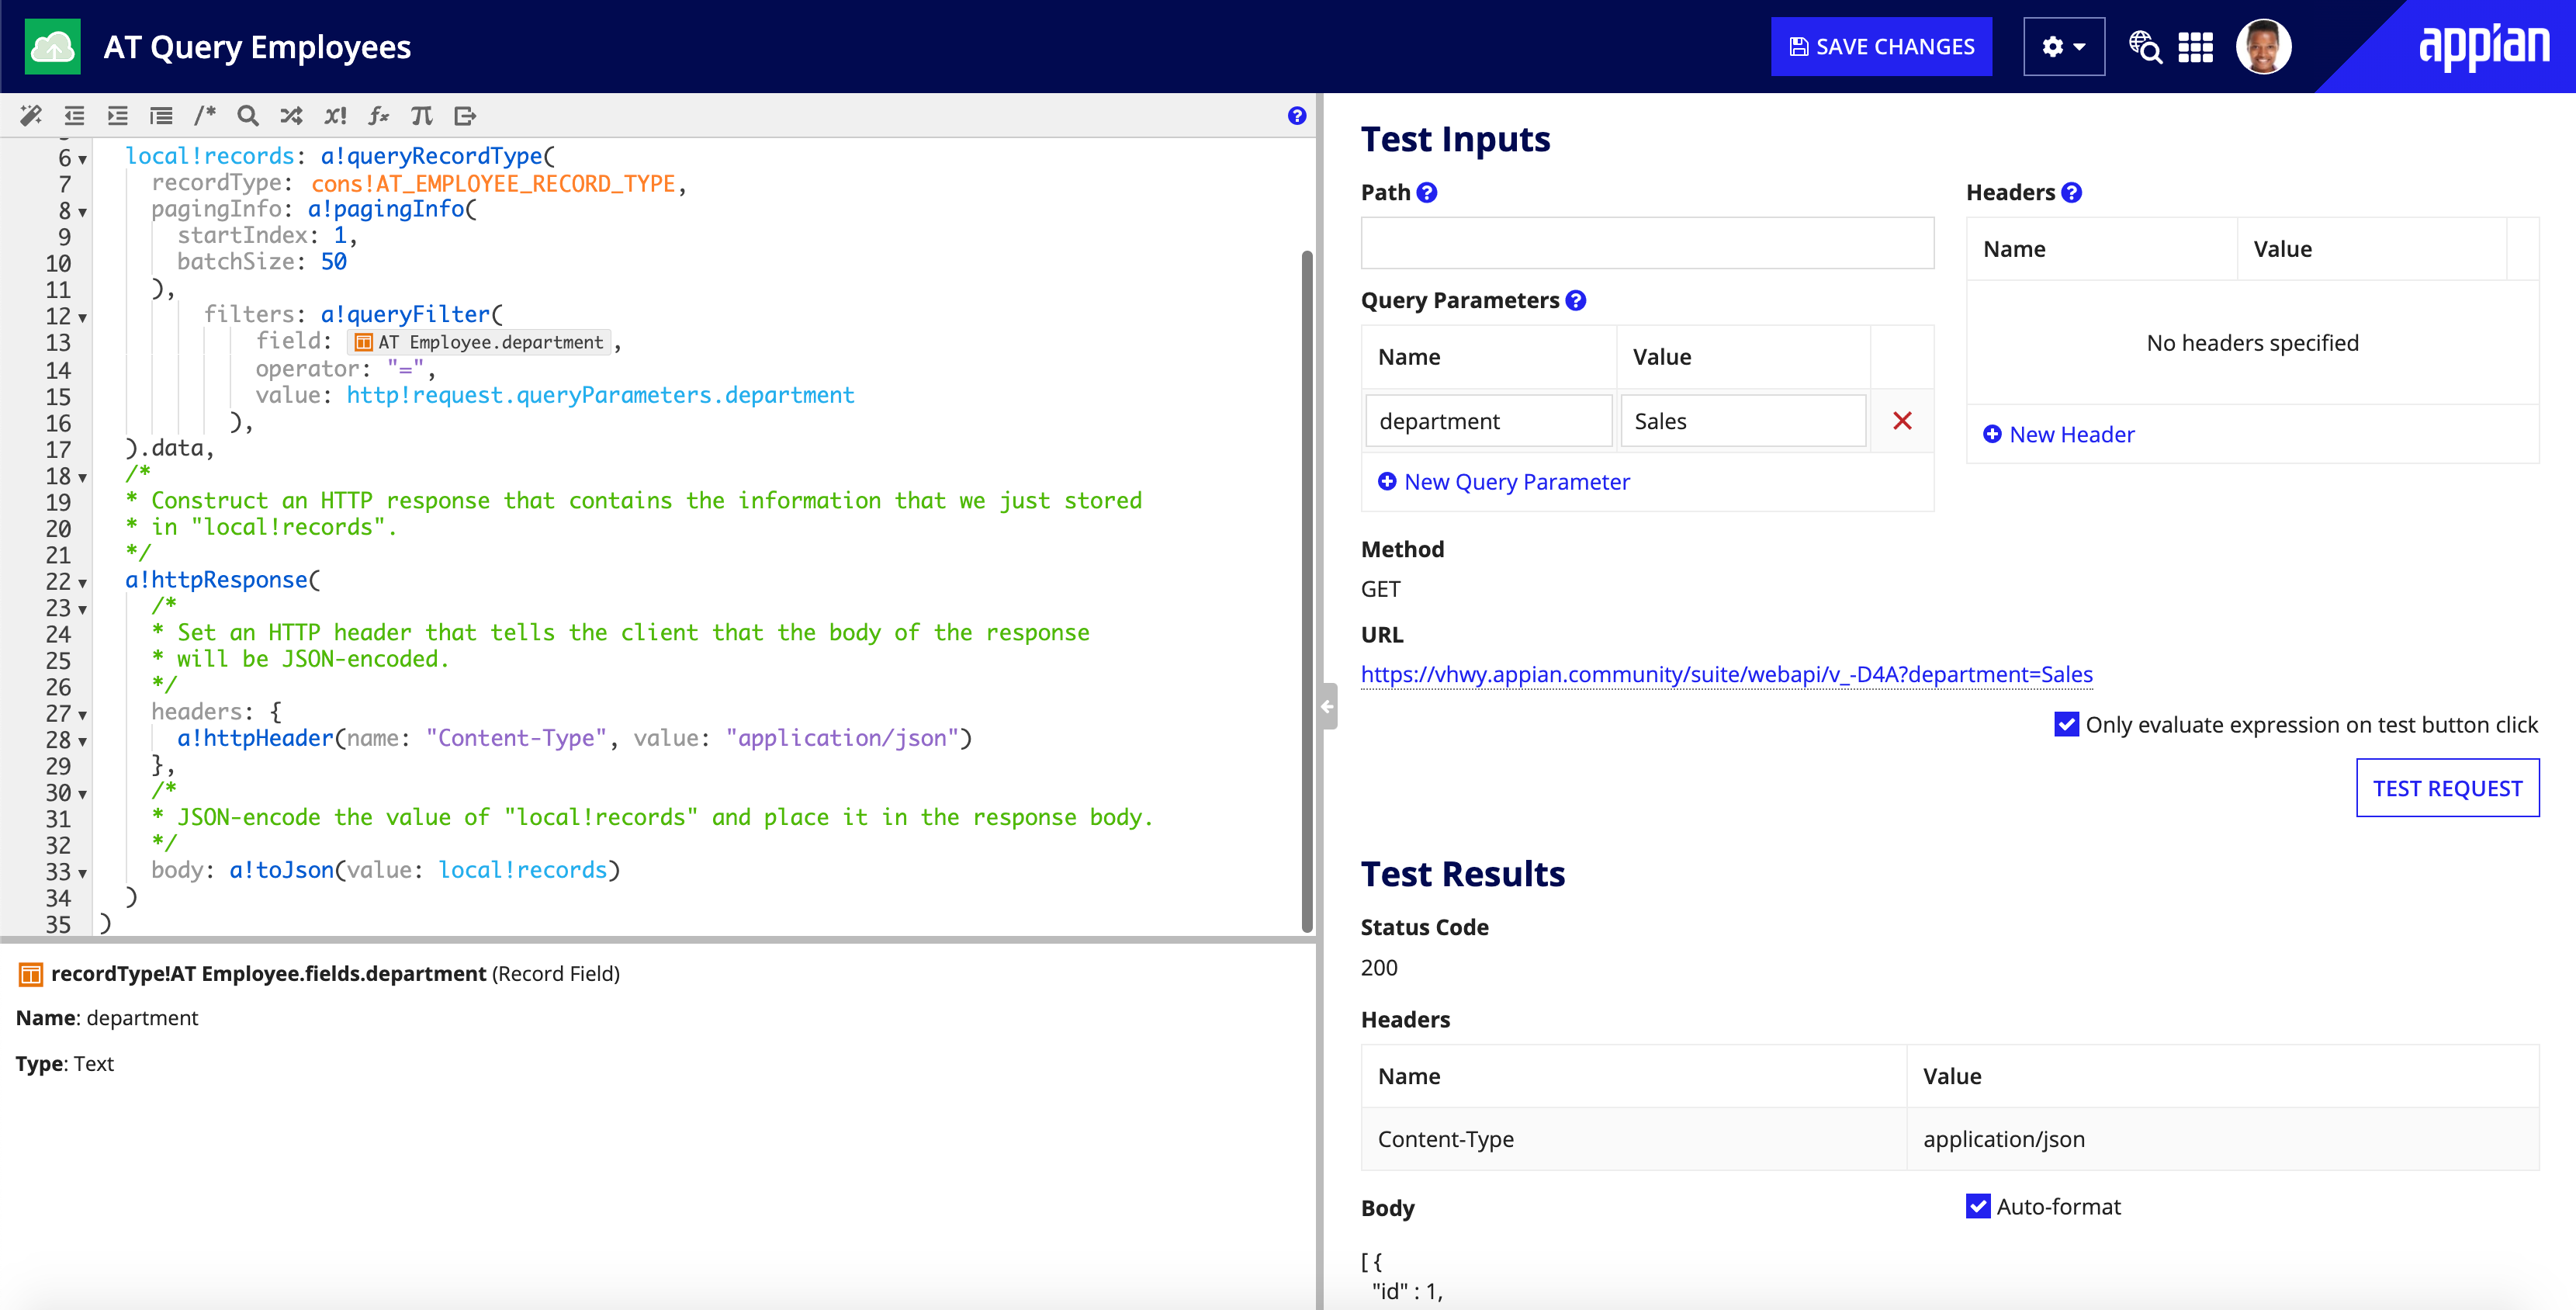
To filter the employees returned from the query, you'll use the filters parameter in a!queryRecordType and add an a!queryFilter() expression.
However, instead of adding a static value to filter by (like "Sales"), you'll use the http! domain so you can more dynamically filter the query using query parameters. Query parameters are appended to the end of the url so you can pass specific values into your HTTP request.
You can use query parameters for a variety of reasons, but in this case, you'll use them to filter the data returned from the query.
To filter employees by department:
In the Expression Editor, add the following to your expression:
Note: If you copy and paste this expression, you will need to change the record type references to use the record type reference in your environment.
1
2
3
4
5
6
7
8
9
10
11
12
13
14
15
16
17
18
19
20
21
22
23
24
25
26
27
28
29
30
31
32
33
34
35
 a!localVariables(
   /*
   * Run the "queryRecordType()" function on "cons!AT_EMPLOYEE_RECORD_TYPE" to retrieve data for the
   * first 50 records and store this data in a local variable named "local!records".
   */
   local!records: a!queryRecordType(
     recordType: cons!AT_EMPLOYEE_RECORD_TYPE,
     pagingInfo: a!pagingInfo(startIndex: 1, batchSize: 50)`,`
+    filters: a!queryFilter(
+      field: recordType!AT Employee.fields.department,
+      operator: "=",
+      value: http!request.queryParameters.department
+    )
   ).data,
   /*
   * Construct an HTTP response that contains the information that we just stored
   * in "local!records".
   */
   a!httpResponse(
     /*
     * Set an HTTP header that tells the client that the body of the response
     * will be JSON-encoded.
     */
     headers: {
       a!httpHeader(
         name: "Content-Type",
         value: "application/json"
       )
     },
     /*
     * JSON-encode the value of "local!records" and place it in the response body.
     */
     body: a!toJson(value: local!records)
   )
 )
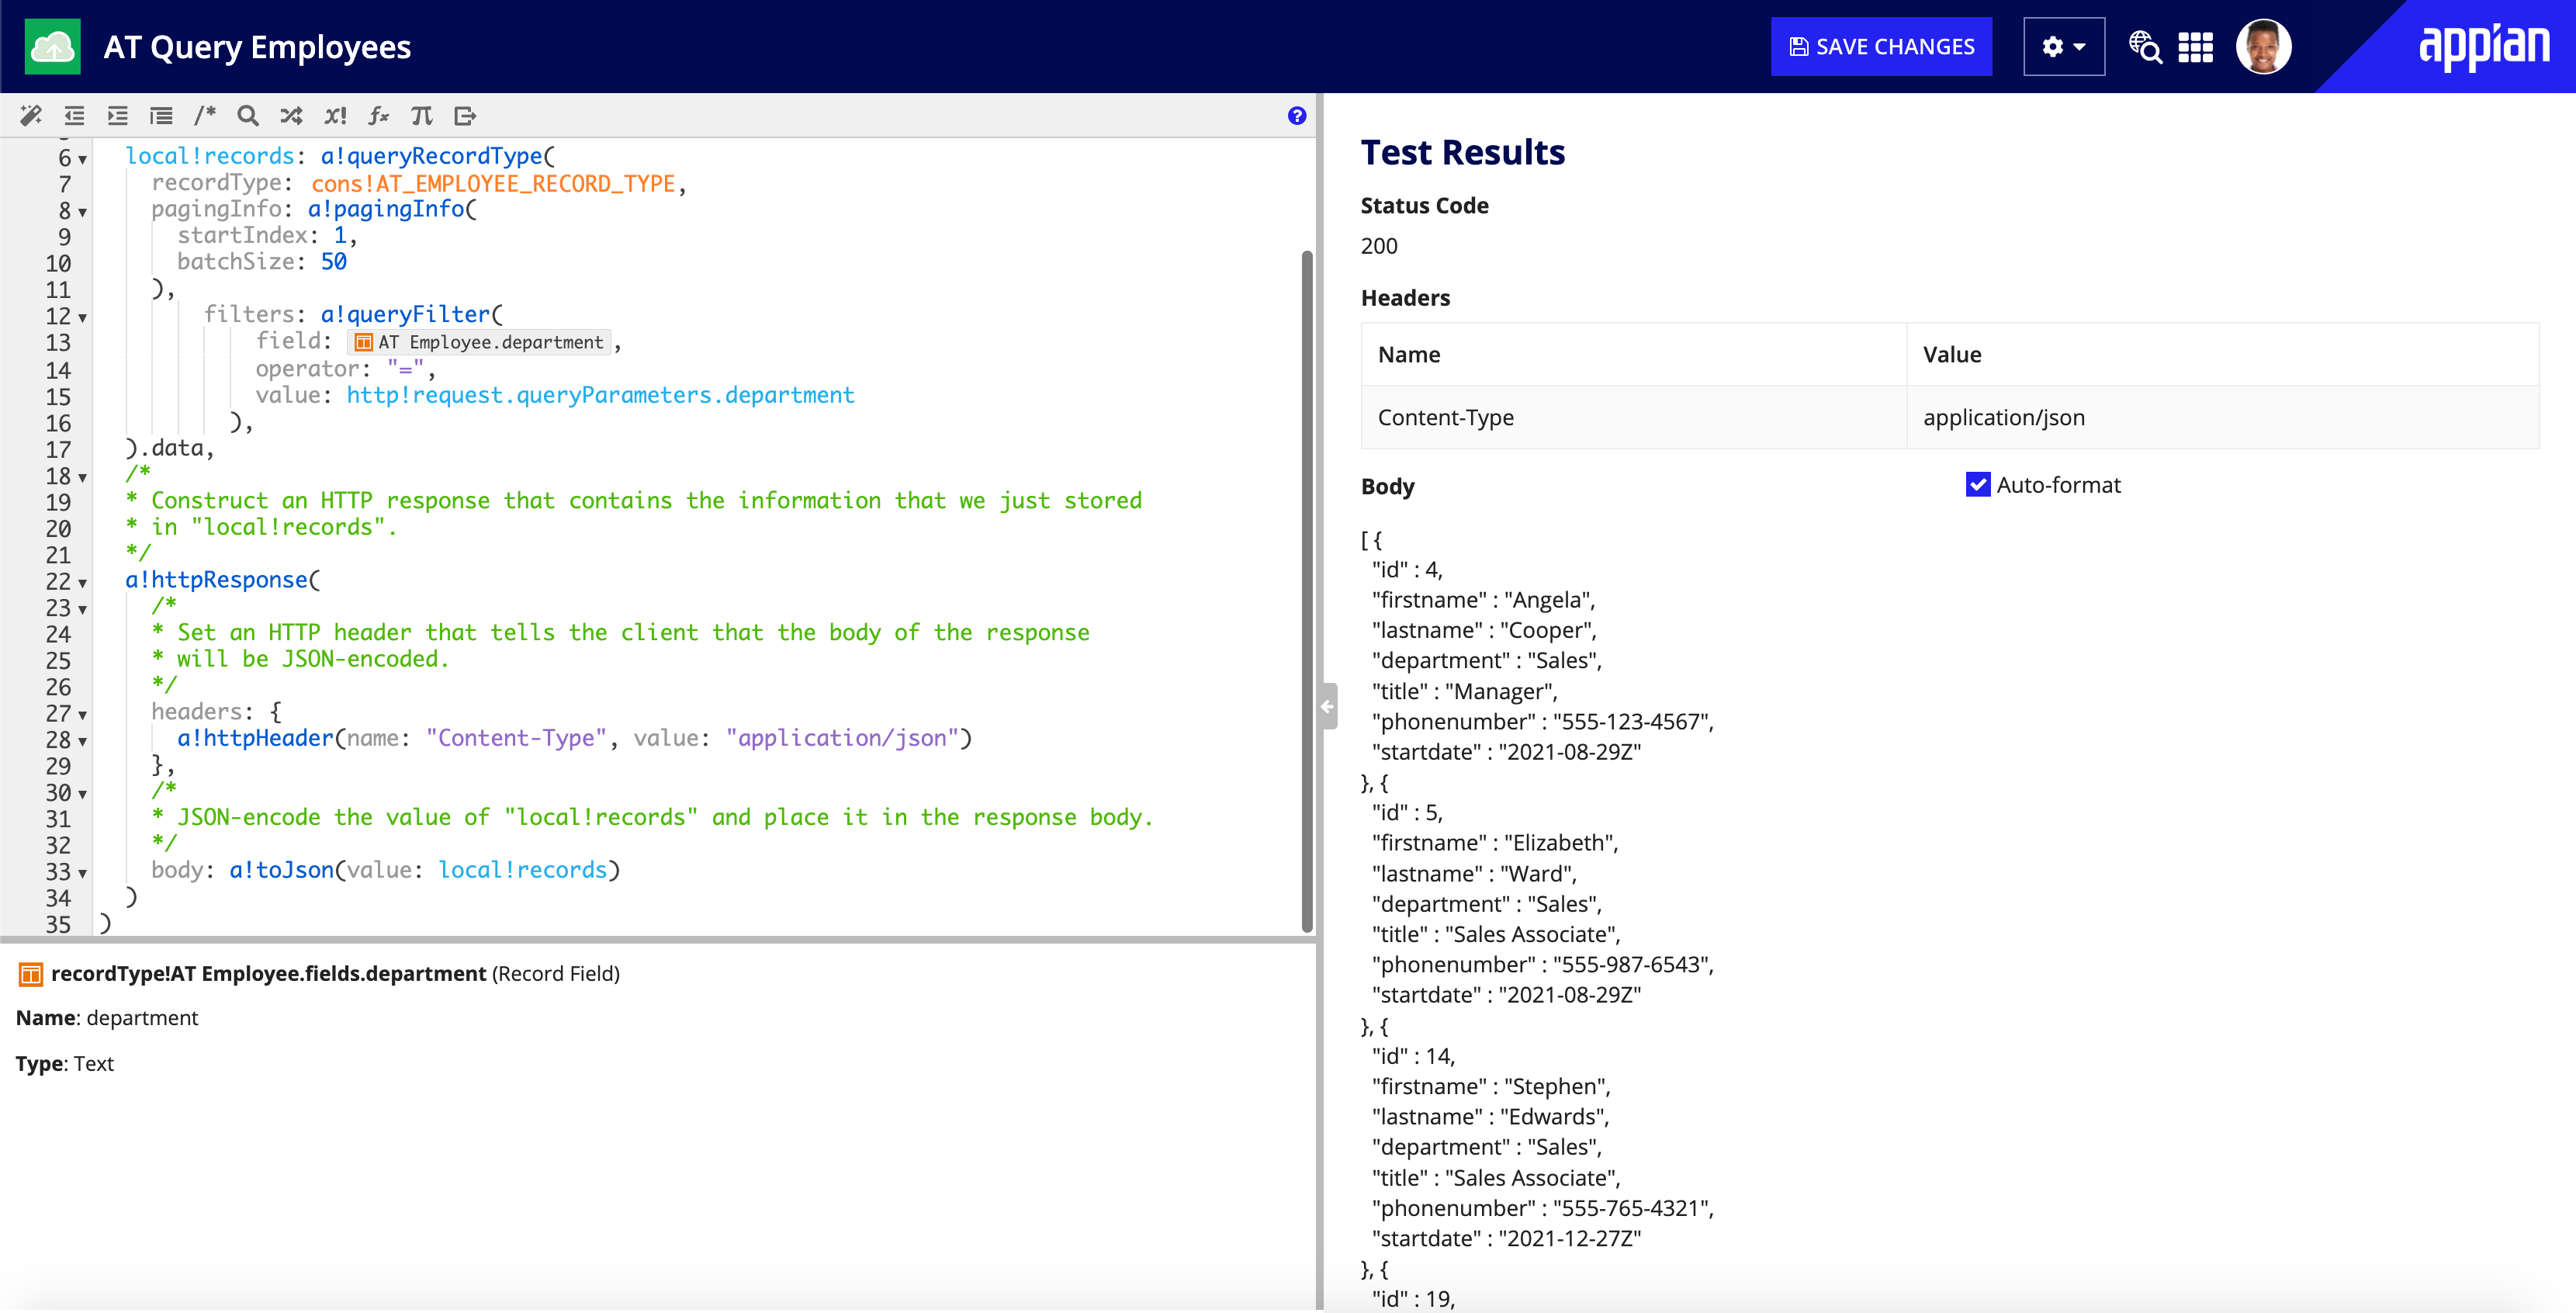
For Value, enter Sales. Notice that the URL updates to include ?department=Sales.
Click Test Request. In the Test Results, only employees in the Sales department are returned.
You can always replace the Value parameter with a different department. Try replacing Sales with one of the values below:
As you change the Value parameter, notice that the URL updates to match your changes.
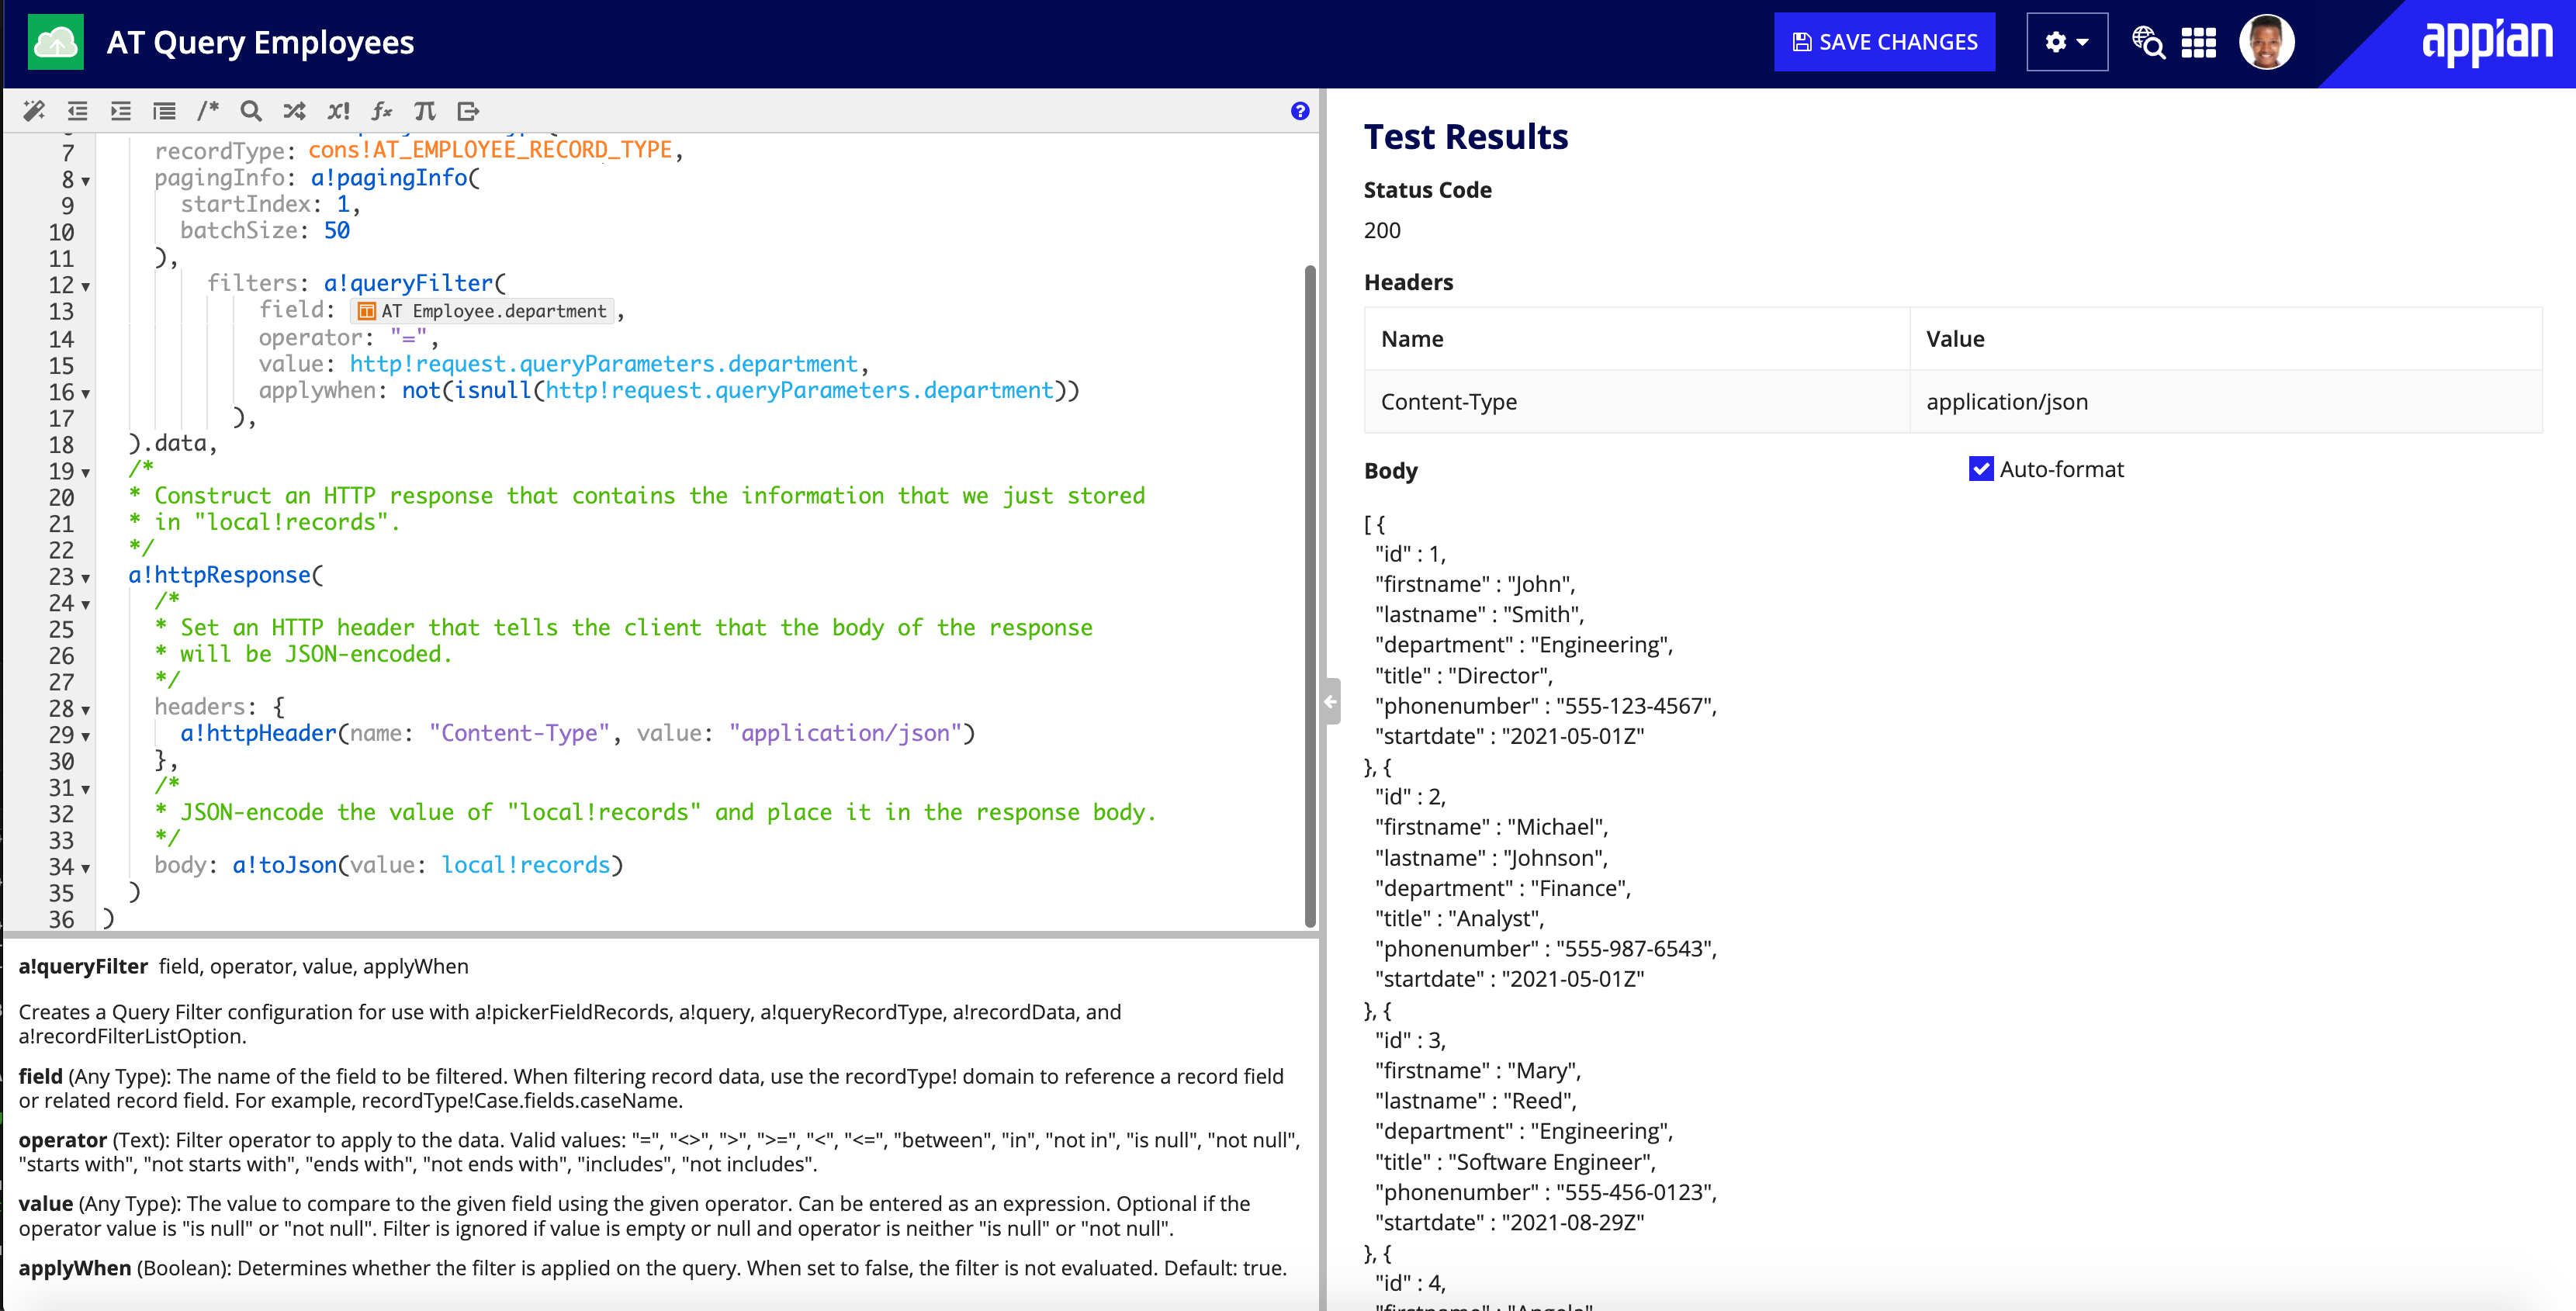
As you test your request, you may notice that if the Value parameter is null, the expression will error. This is because you can't pass a blank value into the value parameter of a!queryFilter(). To account for null values, you'll want to specify that the filter should only be applied when http!request.queryParameters.department is not null.
To account for null values:
In the Expression Editor, add the applyWhen parameter to a!queryFilter:
1
2
3
4
5
6
7
8
9
10
11
12
13
14
15
16
17
18
19
20
21
22
23
24
25
26
27
28
29
30
31
32
33
34
35
36
37
 a!localVariables(
 /*
 * Run the "queryRecordType()" function on "cons!AT_EMPLOYEE_RECORD_TYPE" to retrieve data for the
 * first 50 records and store this data in a local variable named "local!records".
 */
 local!records: a!queryRecordType(
   recordType: cons!AT_EMPLOYEE_RECORD_TYPE,
   pagingInfo: a!pagingInfo(startIndex: 1, batchSize: 50),
   filters:
     a!queryFilter(
       field: 'recordType!{6c1372eb-af9b-4c3a-8770-e0a5804828dc}AT Employee.fields.{62474e29-2a2f-4da2-a539-7a86934dc06e}department',
       operator: "=",
       value: http!request.queryParameters.department,
+      applywhen: not(isnull(http!request.queryParameters.department))
     )
 ).data,
 /*
 * Construct an HTTP response that contains the information that we just stored
 * in "local!records".
 */
 a!httpResponse(
   /*
   * Set an HTTP header that tells the client that the body of the response
   * will be JSON-encoded.
   */
   headers: {
     a!httpHeader(
       name: "Content-Type",
       value: "application/json"
     )
   },
   /*
   * JSON-encode the value of "local!records" and place it in the response body.
   */
   body: a!toJson(value: local!records)
 )
 )
Click TEST REQUEST. The web API returns an unfiltered list of employees.
You did it! You made it through all of the steps to successfully create a web API to query employee data. You're ready to move on to the Web API Tutorial - Level II, or start creating your own web APIs!
Web API Tutorial
