In Appian, document extraction occurs within a process model.
This process model relies on a series of nodes that leverage artificial intelligence (AI) to map fields from a document to fields in a custom data type (CDT). Once the data is extracted, users can confirm or correct the results using a simple task interface. As you test your process model and reconcile results, the extraction will become smarter and more accurate over time.
This page will walk you through how to create your own document extraction process in three steps:
Tip: If you plan to create a document extraction process without personalized business rules or criteria, consider using the Intelligent Document Processing application that is already pre-configured to extract data and classify documents.
The AI that extracts your document's data can be powered by either Google Cloud Document AI or using Appian's built-in document extraction functionality. You have the option to choose which vendor extracts your data based on your document extraction needs.
Visit the Admin Console > Document Extraction section to configure document extraction vendor availability. Here you'll see options regarding Appian's built-in services as well as Google Cloud Document AI configuration options. If you plan to use Google as your document extraction vendor, you must set up a Google Service Account in the Admin Console for authentication.
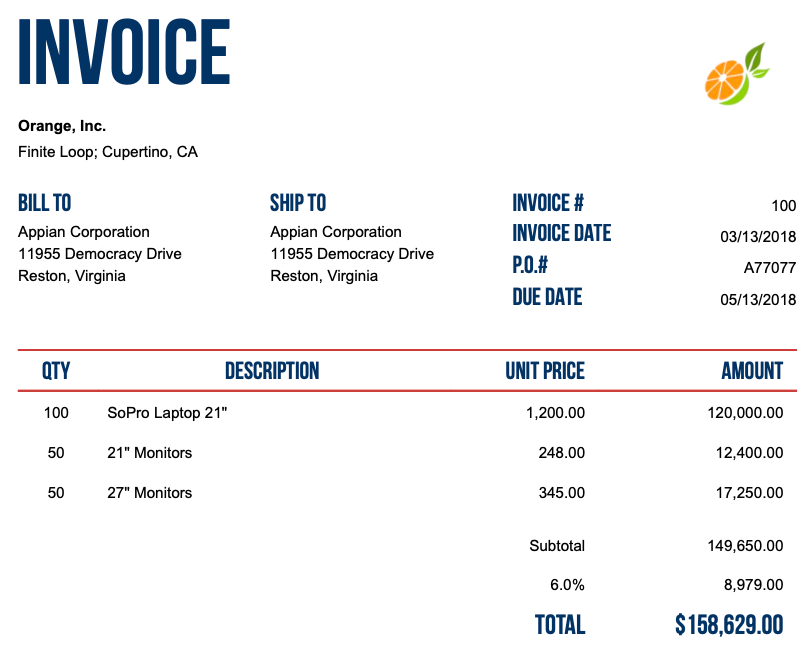
When extracting data, the process will identify and map key-value pairs from the document to the fields of a CDT. This CDT should be constructed to reflect the data available in your document. Therefore, it's important that your CDT fields match the data that will be extracted from your document.
Depending on the structure of your document, you may only need to create one CDT. For example, if you plan to extract data from an employee application that consists of several form fields, you'll create one CDT to match these fields.
However, if your document contains field names and a table, like a invoice document that contains a table of items, you'll ultimately create two CDTs: one that represents the document, and one that represents the table.
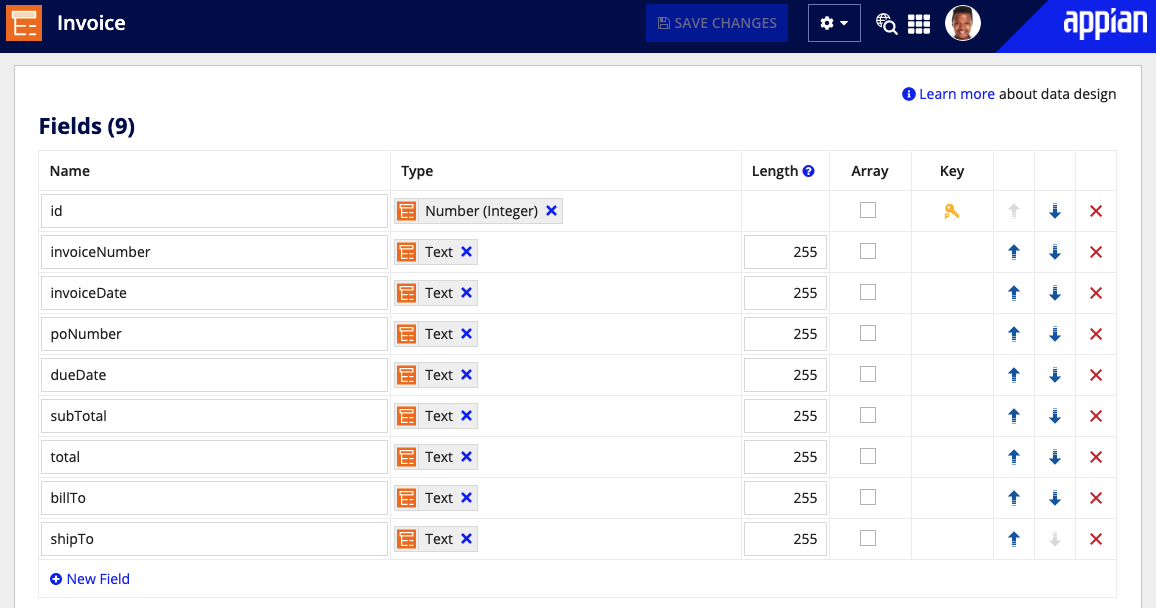
To create a CDT for your document, you'll want to create all the form fields as fields in your CDT.
Note: If you're working with a document that includes a table, do not add the table fields to this CDT. You will create a second CDT to represent the table.
To create a CDT for a document:
Name the fields so that they match the form field names as closely as possible.
For example, if your document has a field called Customer Name, create a CDT field called customerName.
If your form contains a checkbox, create a field for every checkbox option, even mutually exclusive options.
For example, if your document has the field Membership type ☐ Basic ☐ Premium, create two fields: isMembershipBasic and isMembershipPremium.

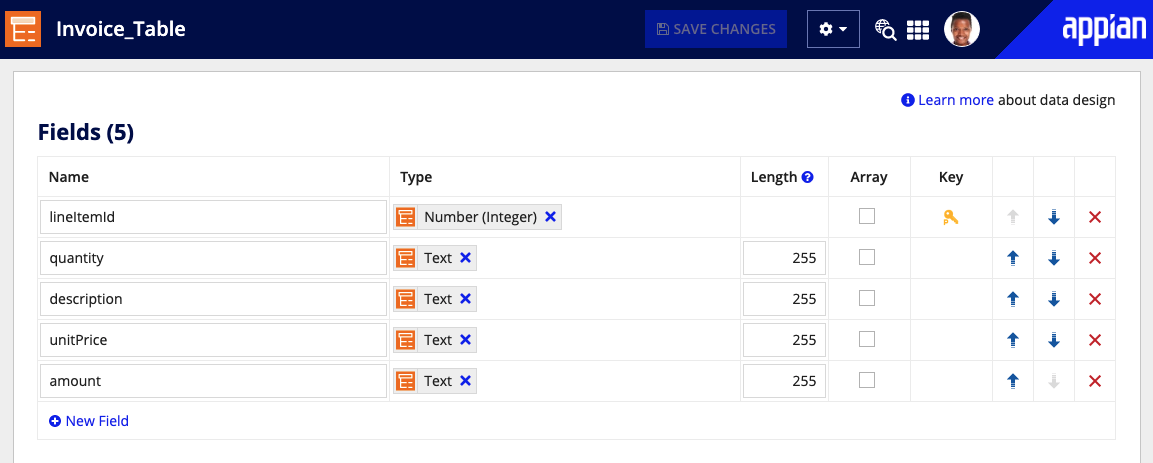
To extract and save table data from your document, you need to create a separate CDT to represent the table. After, you will nest this new CDT inside the CDT representing the document.
Although Appian doesn't recommend nesting CDTs for writing data with a one-to-many relationship, nesting your CDTs is recommended in the case of tables in document extraction.
To create a CDT for a table:
Next, you will need to nest this CDT inside the document CDT:
parentid in all lowercase.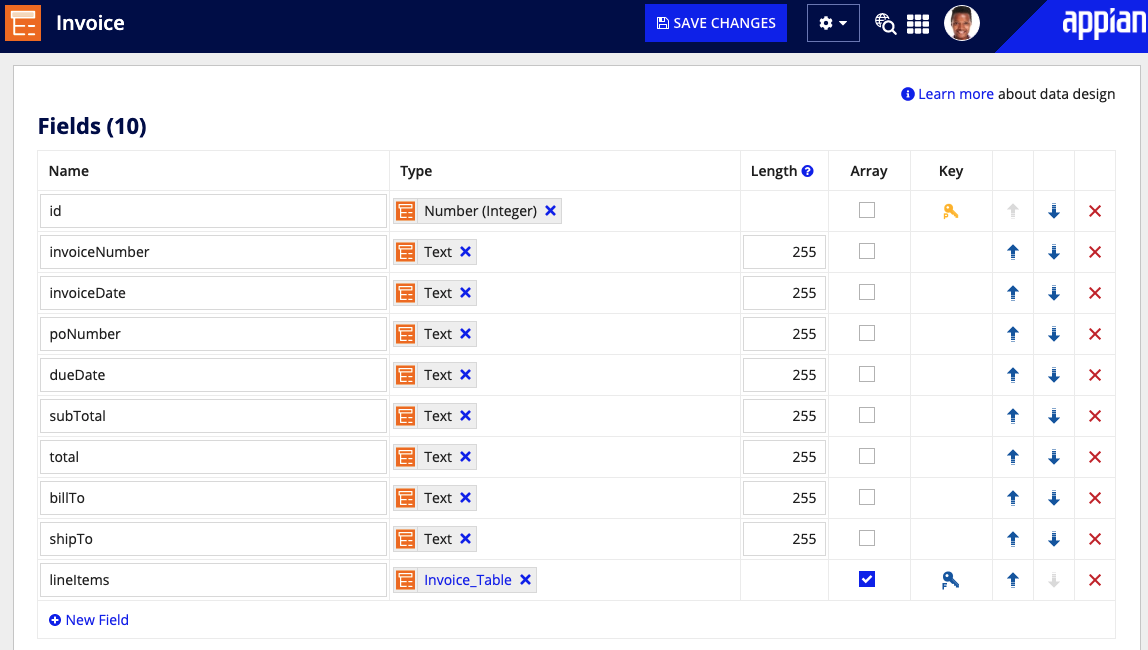
Once you have created your CDTs, create a data store and use it to map your CDTs to the external database. When you publish the data store for the first time, Appian will create tables in the database. This is the database table creation pattern we recommend.
If you manually create database tables, you'll have to modify the CDT's XSD definition to map the CDTs to the corresponding tables and also manually add a parentid column to the child database table. This foreign key column is created in the child database table automatically when you publish the datastore as recommended.
With your CDTs and data store in place, you can now start building your end-to-end process.
The following instructions walk you through how to configure your process model and the four key nodes of a document extraction process.
As you build your process, you have the flexibility to incorporate other design objects and decisions that fit your specific business needs. See some additional process configuration options you can add to your own process model.
To easily pass data throughout your process, you'll want to create process variables that represent your document, vendor, CDT, extraction ID, and extraction status:
Create the following process variables:
| Name | Type | Value | Parameter? | Required? |
|---|---|---|---|---|
| document | Document | Blank | Yes | Yes |
| vendor | Text | Google or Appian |
Yes | No |
| docExtractionId | Number (Int) | Blank | No | No |
| docExtractionStatus | Text | Blank | No | No |
| documentCDT | The CDT that represents your document | Blank | Yes | No |
After defining your process variables, the first node to add to the process is the Start Doc Extraction Smart Service. This smart service will start the document extraction process using the vendor of your choosing.
To configure the smart service:
Runtime Document is the document to process. Use pv!document as the Value to dynamically pass documents.Preferred Vendor is either Google or Appian. Use pv!vendor as the Value to dynamically choose which vendor to process the documents. See which vendor best suites your document extraction needs.Processor ID is the ID of the processor you set up in Document AI. This is an optional value for customers who wish to leverage capabilities of Google's Document AI API v1. Processor ID is not supported when Appian is selected for Preferred Vendor.Doc Extraction Id so the Target is set to pv!docExtractionId. This will store the document extraction ID produced from the smart service.After the extraction process has started, you need to track the progress of the extraction results. To monitor the status, configure a Script Task to use the a!docExtractionStatus() function.
To configure the Script Task:
Check Doc Extraction Status.Check Doc Extraction Status and select the Data tab.docExtractionId and set the following field properties:
pv!docExtractionIdpv!docExtractionIda!docExtractionStatus(pv!docExtractionId). Set the Target to pv!docExtractionStatus.The a!docExtractionStatus() function will return one of four possible extraction statuses: COMPLETE, IN PROGRESS, INVALID ID, or ERROR. When the extraction begins, the status will be IN PROGRESS until the analysis is finished. Once the analysis completes, the status will change to COMPLETE and you can move to the next node in the process. To account for each status, you will configure a gateway to direct the process.
To configure the XOR gateway:
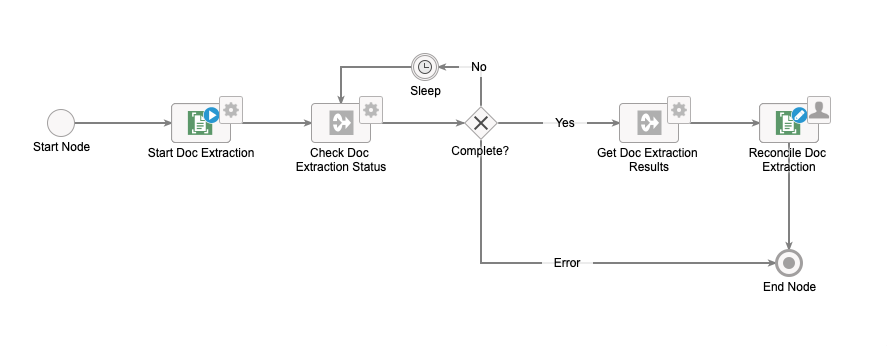
Complete?.Complete? gateway and Check Doc Extraction Status. This will form a loop for when pv!docExtractionStatus="IN PROGRESS".Complete? gateway and Check Doc Extraction Status. Rename the Timer Event to Sleep.Sleep event and select the Setup tab. Configure a delay for 1 Minute after activation of the timer event and click OK.At this point in the design, your process model will look like this:

Next you'll add another Script Task to direct the process when pv!docExtractionStatus="COMPLETE". This Script Task will call the a!docExtractionResult() function to retrieve the results of the extraction.
To configure the Script Task:
Complete? gateway. Rename the Script Task node to Get Doc Extraction Results.Get Doc Extraction Results and select the Data tab.a!docExtractionResult(pv!docExtractionId, typeof(pv!documentCDT)) to dynamically pass the document extraction ID and get the type number of your CDT. Learn more about the typeof() function.pv!documentCDT.Finally, create a connection from the Complete? gateway to the End Node to handle the process when pv!docExtractionStatus is INVALID ID or ERROR.
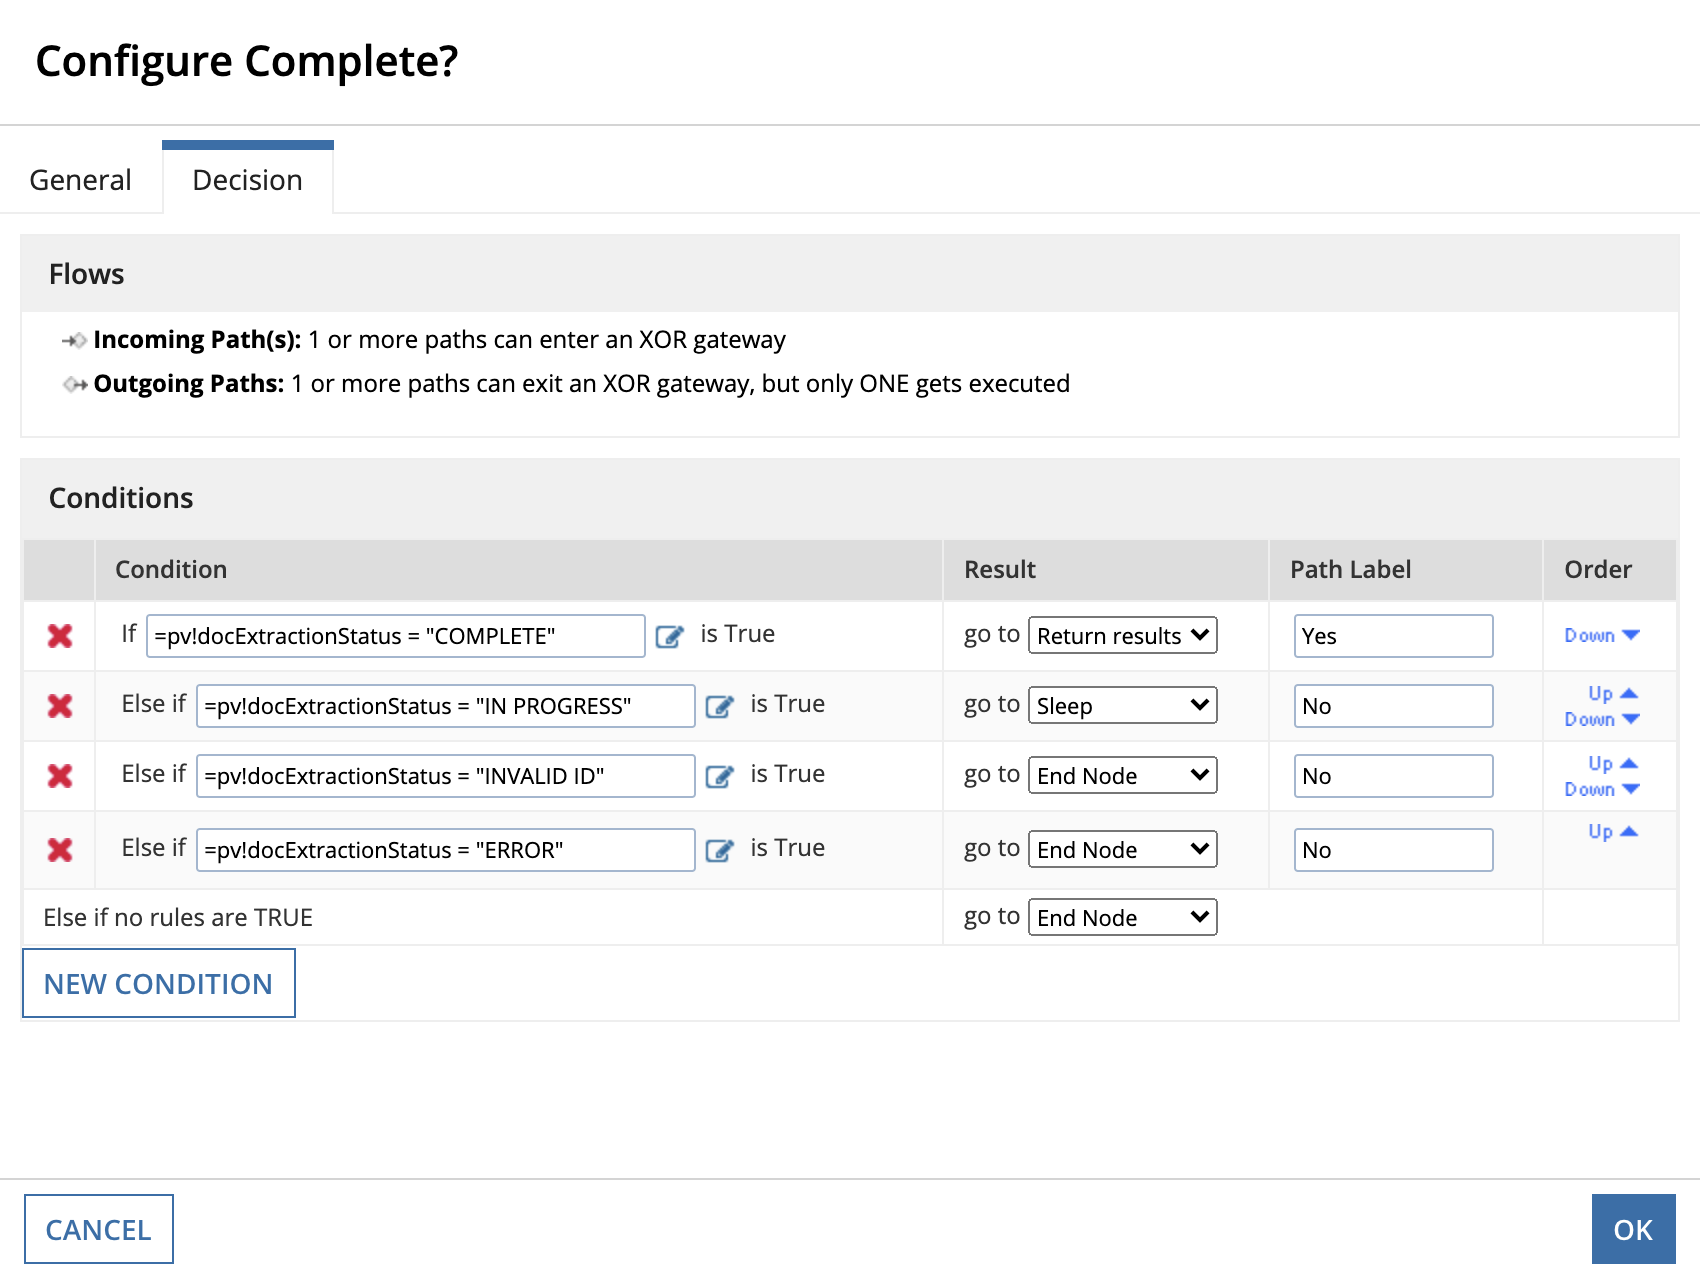
With each connection configured, you can now define the gateway's decisions.
Complete? gateway and select the Decisions tab.pv!docExtractionStatus="COMPLETE": Analysis is done and Appian has downloaded the results, you can now proceed to Get Doc Extraction Results.pv!docExtractionStatus="IN PROGRESS": Analysis is still in progress. Return to the Check Doc Extraction Status after 1 minute.pv!docExtractionStatus="INVALID ID": The document extraction ID is invalid. End the process if this status occurs.pv!docExtractionStatus="ERROR": An internal evaluation error happened during processing. End the process if this status occurs.The Complete? gateway configuration should appear like this:
The last node you will configure is the Reconcile Doc Extraction Smart Service. This smart service will assign a reconciliation task to a user to confirm or correct the extracted results.
To configure the smart service:
Doc Extraction Id requires the extraction ID stored in pv!docExtractionId.Data Type Number is the type to which the values should be cast. Use the typeof() function with pv!documentCDT.extractedData so the Target is set to pv!documentCDT. This will store the results of the document's extracted data and the data that was reconciled by a user.
That's it! Your process is set up to extract data. It should look like this, but it may contain additional nodes based on how you customized it:
The process model detailed above provides the basic nodes needed to create an extraction process, but you aren't bound to this model. In fact, the major benefit of creating your own document extraction process is the flexibility to add additional rules or decisions that are specific to your business needs.
There a few ways you can enhance or modify this model, for example:
isnull(index(pv!invoice,"invoiceNumber",null)) could result in going to reconciliation, but a populated result would skip the reconciliation task.isSubmit is true when the user selects the Submit button on the reconciliation task. Add logic after this smart service to use isSubmit=true() to trigger an email notification or a confirmation dialog.isException is true when the user selects the Mark as Invalid button on the reconciliation task. Add logic after this smart service to use isException=true() to route to a chained user input task, where the user provides more information.If you find that you don't need to customize your document extraction process, consider using the Intelligent Document Processing application that is already pre-configured to extract data and classify documents.
After creating your process model, run it with a few samples to test the extraction and to see how your auto-extracted results change.
To test the document extraction process created above, you can assign a document as the value of pv!document and use Start Process for Debugging to pass the document through the process model.
As you test, Appian will use the field names from the data type to find a match. Over time, Appian learns how to map your data to your data type fields from the user interactions with the reconcile interface.
Appian will delete document extraction runs after 30 days, or when the total amount of data surpasses 10 GB. If you attempt to access a run that has been deleted, you will see an error. Appian will not delete the documents you uploaded. Learn more about your document's security.
