
| The capabilities described on this page are included in Appian's advanced and premium capability tiers. Usage limits may apply. |
OverviewCopy link to clipboard
This topic covers how to create an AI skill to extract text from documents using machine learning (ML) models.
A document extraction skill takes a document as input via the Extract from Document smart service, analyzes the document, and returns a map of the text extracted from the document. You'll create a document extraction AI skill for each type of document you want to extract data from.
The Document Extraction skill takes care of digitizing your documents, even if they're scanned or image-based. It automatically applies Optical Character Recognition (OCR) to identify text so you can extract the information you need with ease.
Tip: AI skills created before the 23.4 release use pre-trained models for document extraction. To create custom models for document extraction, create a new AI skill.
Before you beginCopy link to clipboard
Before setting up your AI Skill for document extraction, determine the type of documents you'll be working with. This decision will guide you toward the best extraction method for your needs:
-
Structured or Semi-structured Documents: If your documents have a consistent format with predictable fields (like forms, tables, or invoices), use Semi or highly structured document extraction. This method allows you to define specific fields for precise data extraction.
-
Unstructured Documents: If your documents are free-form—such as contracts or other text-heavy files without a fixed layout—or if you need to extract data from visual elements like checkboxes, charts, or images, use Unstructured document extraction. This method focuses on flexible prompt configuration to capture key information from varied formats.
Choosing the right approach ensures that your extraction process is efficient and tailored to your document type.
Note: This AI skill type is only available in select regions.
Semi or highly structured documentsCopy link to clipboard
This section covers the steps for extracting data from semi-structured or highly structured documents. These types of documents typically follow a consistent layout, with predictable fields and labels, making it easier to identify specific data points like names, dates, and values. By defining fields and configuring extraction parameters, you can tailor the model to accurately capture the information you need from these structured formats.
Follow the steps below to set up and refine your model for structured documents.
- Create an AI skill
- Provide documents
- Add fields to extract
- Label field data
- Start training
- Assess the results
- Train a new model
- Publish the model
- Use the skill!
1. Create an AI skillCopy link to clipboard
The first step in setting up document extraction is to create an AI Skill. This skill acts as the foundation for processing your documents, allowing you to configure and fine-tune the model to recognize and extract the information you need.
-
In the Build view, click NEW > AI Skill.
-
In the Extraction section, select Documents.

-
Choose Semi or Highly Structured as the document type.
-
Configure the following properties:
Property Description Name Enter a name that follows the recommended naming standard. Description (Optional) Enter a brief description of the AI skill. - Click CREATE.
- On the Review AI Skill Security window, configure security.
- Click SAVE. The AI skill opens in a new dialog or window.
- Complete one of the following actions.
- Click CREATE FIRST MODEL to proceed and provide documents.
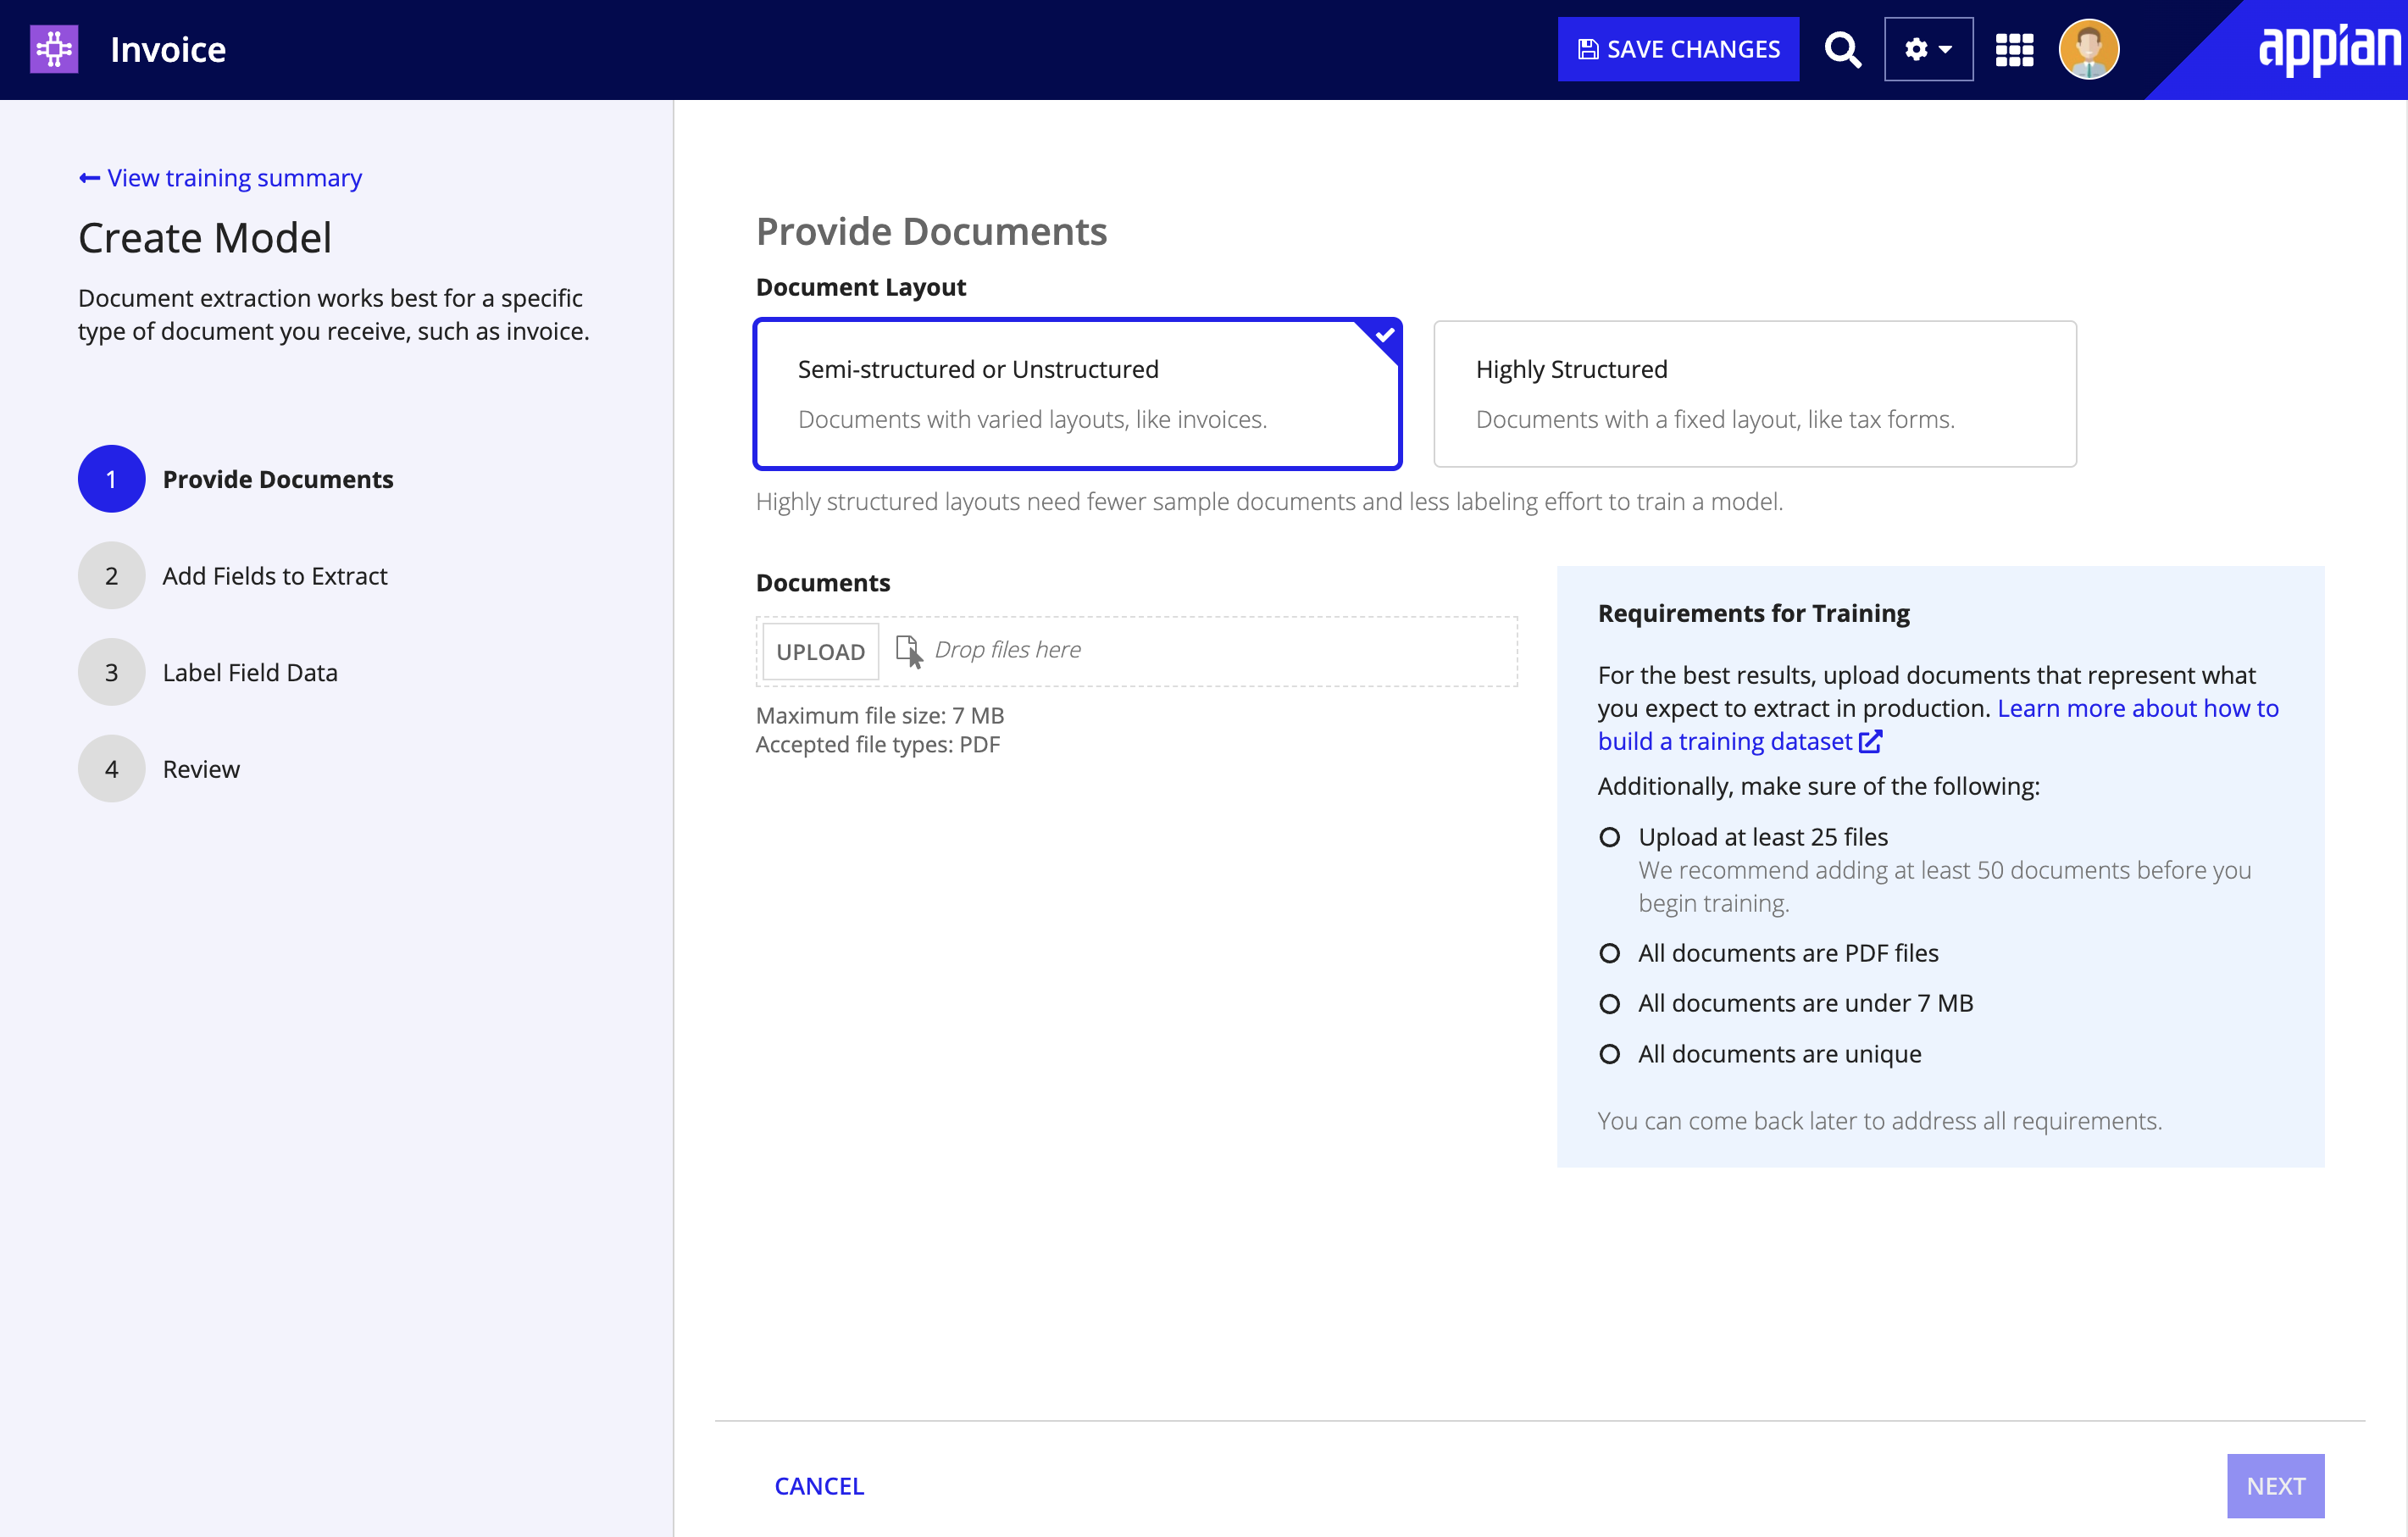
2. Provide documentsCopy link to clipboard
The document extraction AI skill is powered by a machine learning model designed to extract data from documents businesses commonly receive or interact with, such as invoices, purchase orders, insurance claims, ID cards, and more.
Before you add the fields you want to extract, you need to upload samples that represent the document you want to extract data from. The model needs training documents to learn about the patterns or traits of the fields within the documents. The model also uses some of these training documents to test its knowledge after training.
The model can only learn from the documents you provide, so be sure to build a comprehensive and diverse set of documents that represent what you expect to extract in your process.
Training documents must meet the following requirements:
- Upload at least 25 documents, though you may need many more based on your use case. We recommend you start with at least 50 documents.
- Each document is 7 MB or less.
- Each document is 15 or fewer pages.
- Each document has 50 or fewer text fields.
- All documents must be PDFs.
- Each document must be unique.
In Step 1: Provide Documents:
- Choose your Document Layout:
- Semi-structured: These documents include similar pieces of information, but in varying layouts. Invoices, receipts, and utility bills are good examples of documents with semi-structured data.
- Highly Structured: These documents contain information that is arranged in a fixed layout. Tax forms, passport applications, and hospital forms are good examples of documents with structured data. Due to the predictable and consistent positions of labels and values in highly structured documents, you won't need to label as many fields in step 4.
- In the Documents section, click UPLOAD.
- Browse for and select the sample documents you want to add.
- Click NEXT when the files are finished uploading.
3. Add fields to extractCopy link to clipboard
Next, you'll add the fields that commonly appear in the document type. For example, if you're building an AI skill to extract data from invoices, you'll want to add common fields that contain the data you want to extract, such as Invoice Number, Date, and Vendor Name.
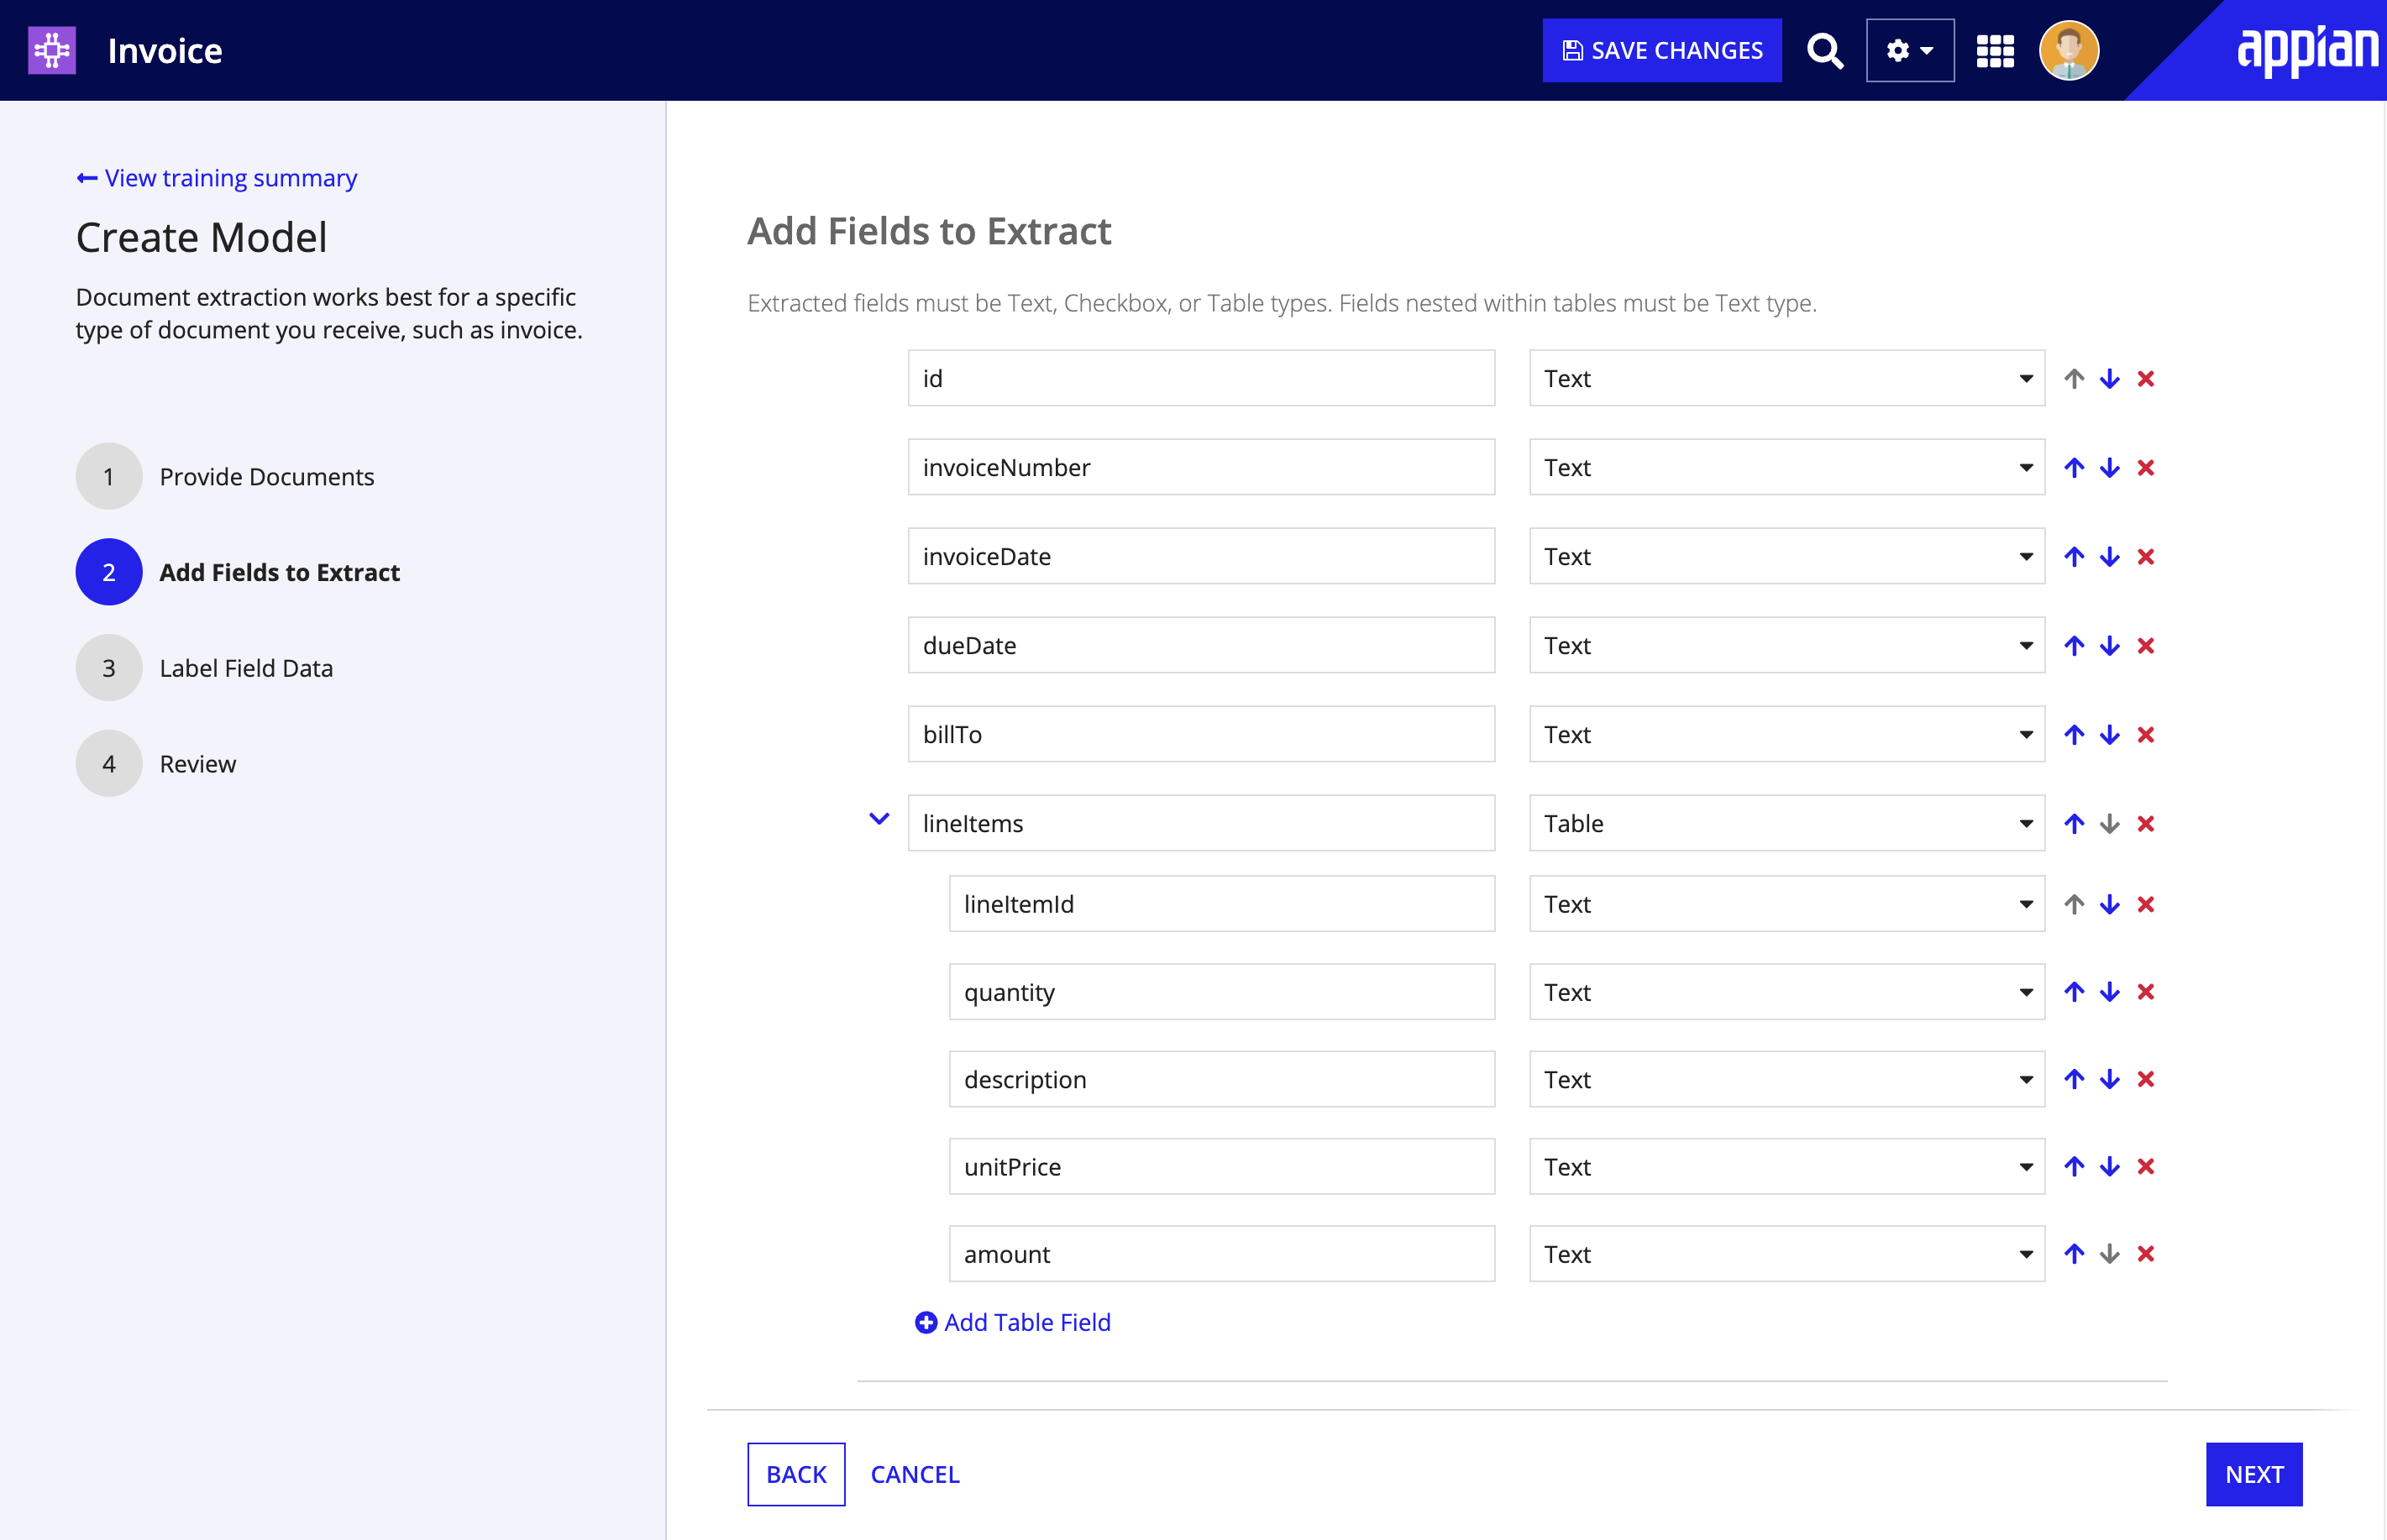

Before Appian can extract data from your documents, you'll need to define what those fields are and the type of data they contain:
- On the Add Fields to Extract page, enter a field name. If you plan to save extracted data to a record type or CDT, see field naming guidelines below.
- Choose the data type for this field. Extracted fields must be Text, Checkbox, or Table types. Fields nested within tables must be Text type.
- Click Add Field to add more fields.
- Continue to add field names and data types until you've defined all of the fields you want to extract from this document type. You can add up to 50 text fields.
Tip: Add a field for each piece of data in the document you want to extract using the AI skill. If you don't add a field, the skill won't know to extract the data or how to label it.
Mapping extracted dataCopy link to clipboard
The document extraction AI skill extracts data as type Text or Boolean (for checkboxes). However, your document data may be of different data types, such as Dates or Numbers. Additionally, you may want to save this extracted data in specific data objects, such as record types or custom data types (CDTs).
To ensure your data reaches the intended destination and in the proper format, you'll need to properly name and map fields as you configure your AI skill and smart service.
Mapping data as you define the document structureCopy link to clipboard
Pick the right name for the field as you define your document structure in the AI skill.
Flat data: If you're planning to save extracted data to a flat CDT or record type, name each field in the document structure to match the target field so Appian casts it properly.
- Example: You want to extract data from invoices. Each invoice has a field containing the name of the vendor. You want to configure your process so that the smart service saves this value into the
invoiceNumberfield in yourInvoicesReceivablerecord type. To achieve this, create ainvoiceNumberfield (type: Text) in your skill to match its ultimate destination (theinvoiceNumberfield in your record type) in Appian.
Tables (nested data): If you plan to extract document data that's formatted in a table, you'll need to carefully name these fields as well. When Appian extracts data from a table in a document, the results is a list of maps, with each map representing a row in the table. The name you choose for the table field helps Appian cast all of this data properly.
Name the table fields based on the data object where you plan to store it:
- Record type relationships: name the field to match the Relationship Name.
- CDTs: name the field to match the field name you assigned the table CDT in the parent CDT.
Example: You want to extract data from invoices. Each invoice has a table containing a list of items you ordered, the unit costs, and how many of each item you ordered. Invoice data is stored in the Invoice CDT, which contains a field lineItems (type: Invoice_Table CDT) to store itemized data from tables in each invoice. You want to configure your process so that the smart service saves the itemized values into the Invoice_Table CDT.
To achieve this, create a lineItems (type: Table) field in your skill to match its ultimate destination (the Invoice_Table CDT, by way of the lineItems field of the Invoice CDT) in Appian. Additionally, name each field within the table to match the corresponding fields within the CDT as well.
The following image include numbers to demonstrate the fields that should match when extracting table data with an AI skill.
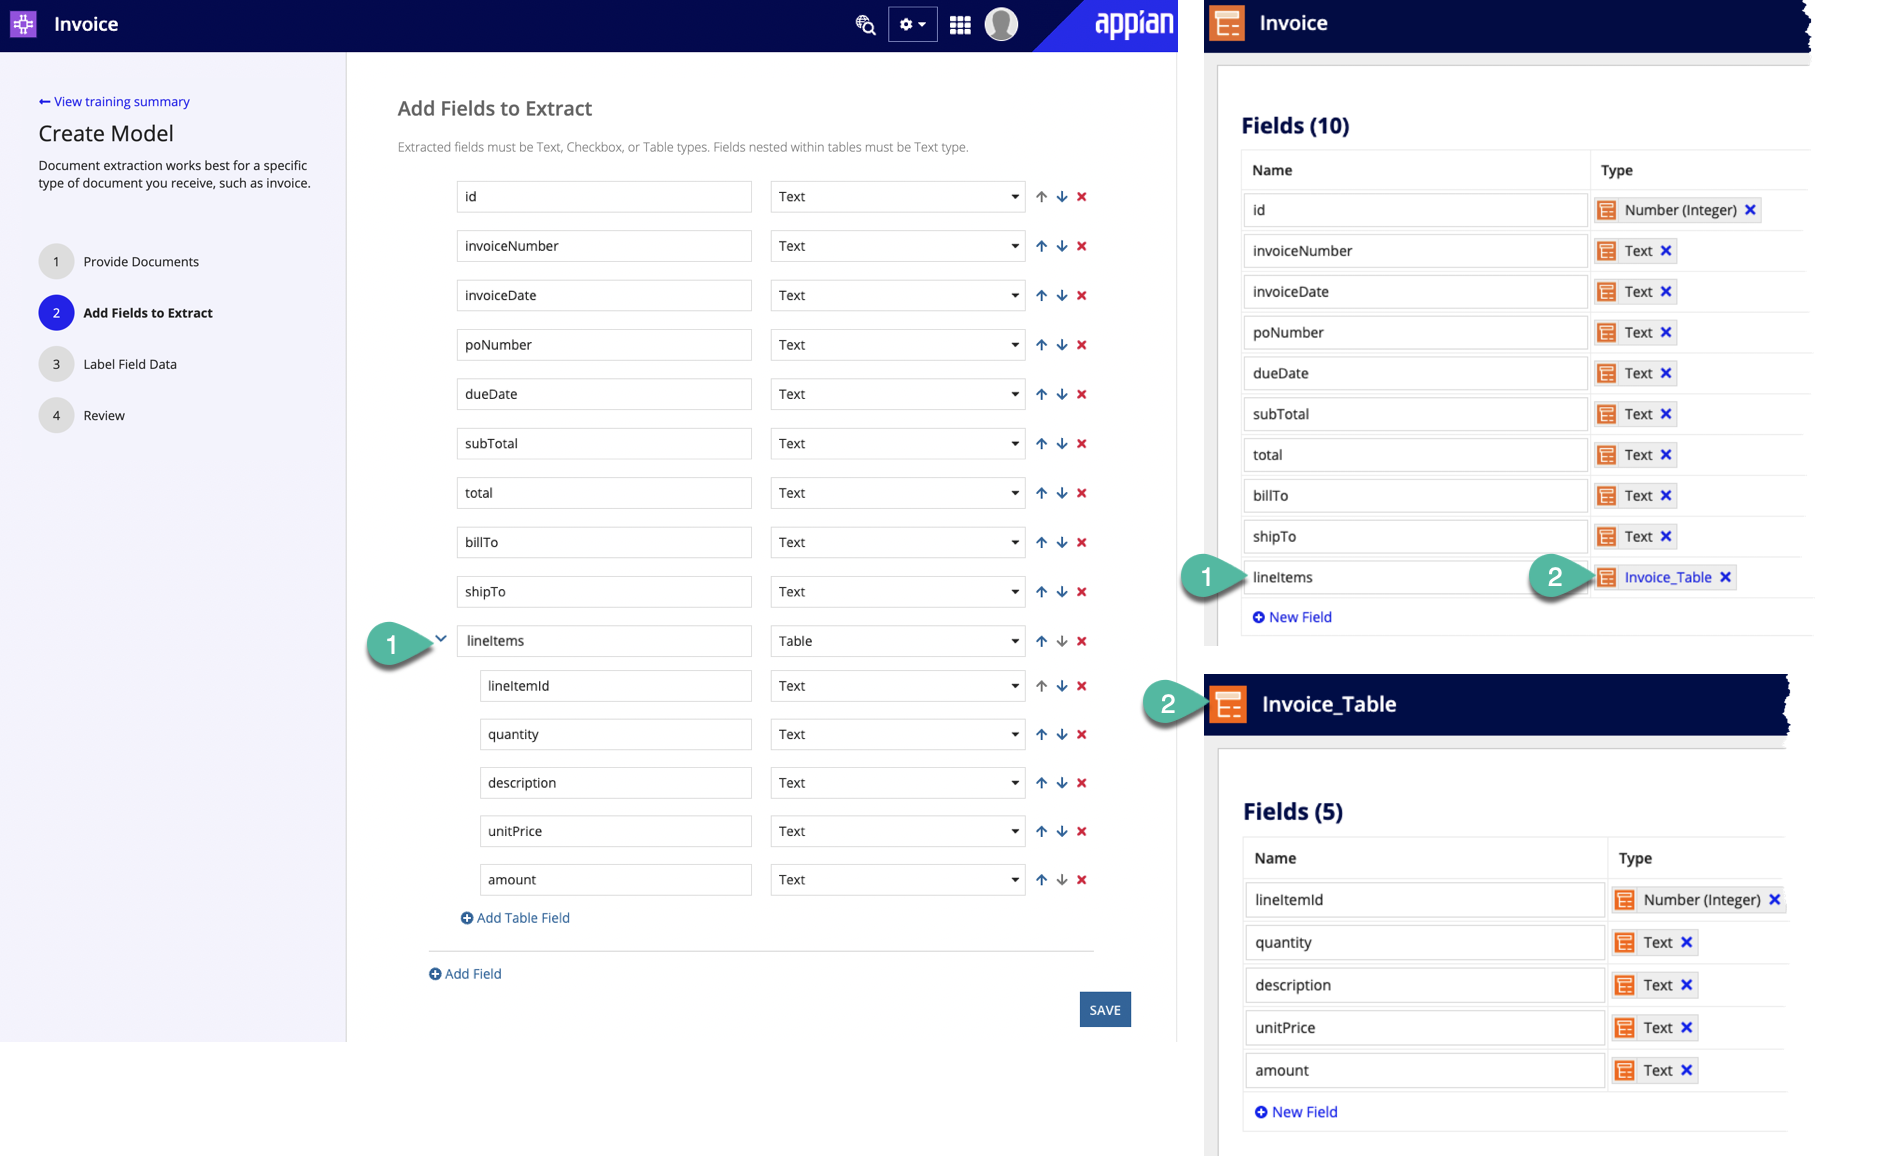
The following table summarizes guidance for naming fields in your document structure:
| Extracted data type | Target location | Field name requirement | Example field name |
|---|---|---|---|
| Text or Boolean | Record type or CDT | Field name must match the target field. | invoiceNumber |
| Table | Record type relationship | Field name must match the name of the relationship. | maInvoiceItems |
| Table | CDT | Field name must match the name of the field that contains table data. Fields within the table must match the names of the fields within the CDT. | lineItems |
Mapping data as you configure the processCopy link to clipboard
As you build your process, you'll map the smart service output to process variables. Appian supports casting data from Maps to CDTs or record types so you can use the extraction results to write to your database.
Note: Review the design guidance to ensure that the fields in your AI skill are named based on how you want to cast the data.
To ensure that the AI skill extracts and uses your data as you intend, carefully map the Extract from Document smart service output to the proper variables so your data is used or stored properly:
- Double-click the Extract from Document smart service node.
- Go to the Data tab.
- Go to the Outputs tab.
- In the Results section of the outputs tree, click Extracted Data. The results properties display in the right pane.
- In the Target field, select the process variable you want to use to store this data, including Record Types or CDTs.
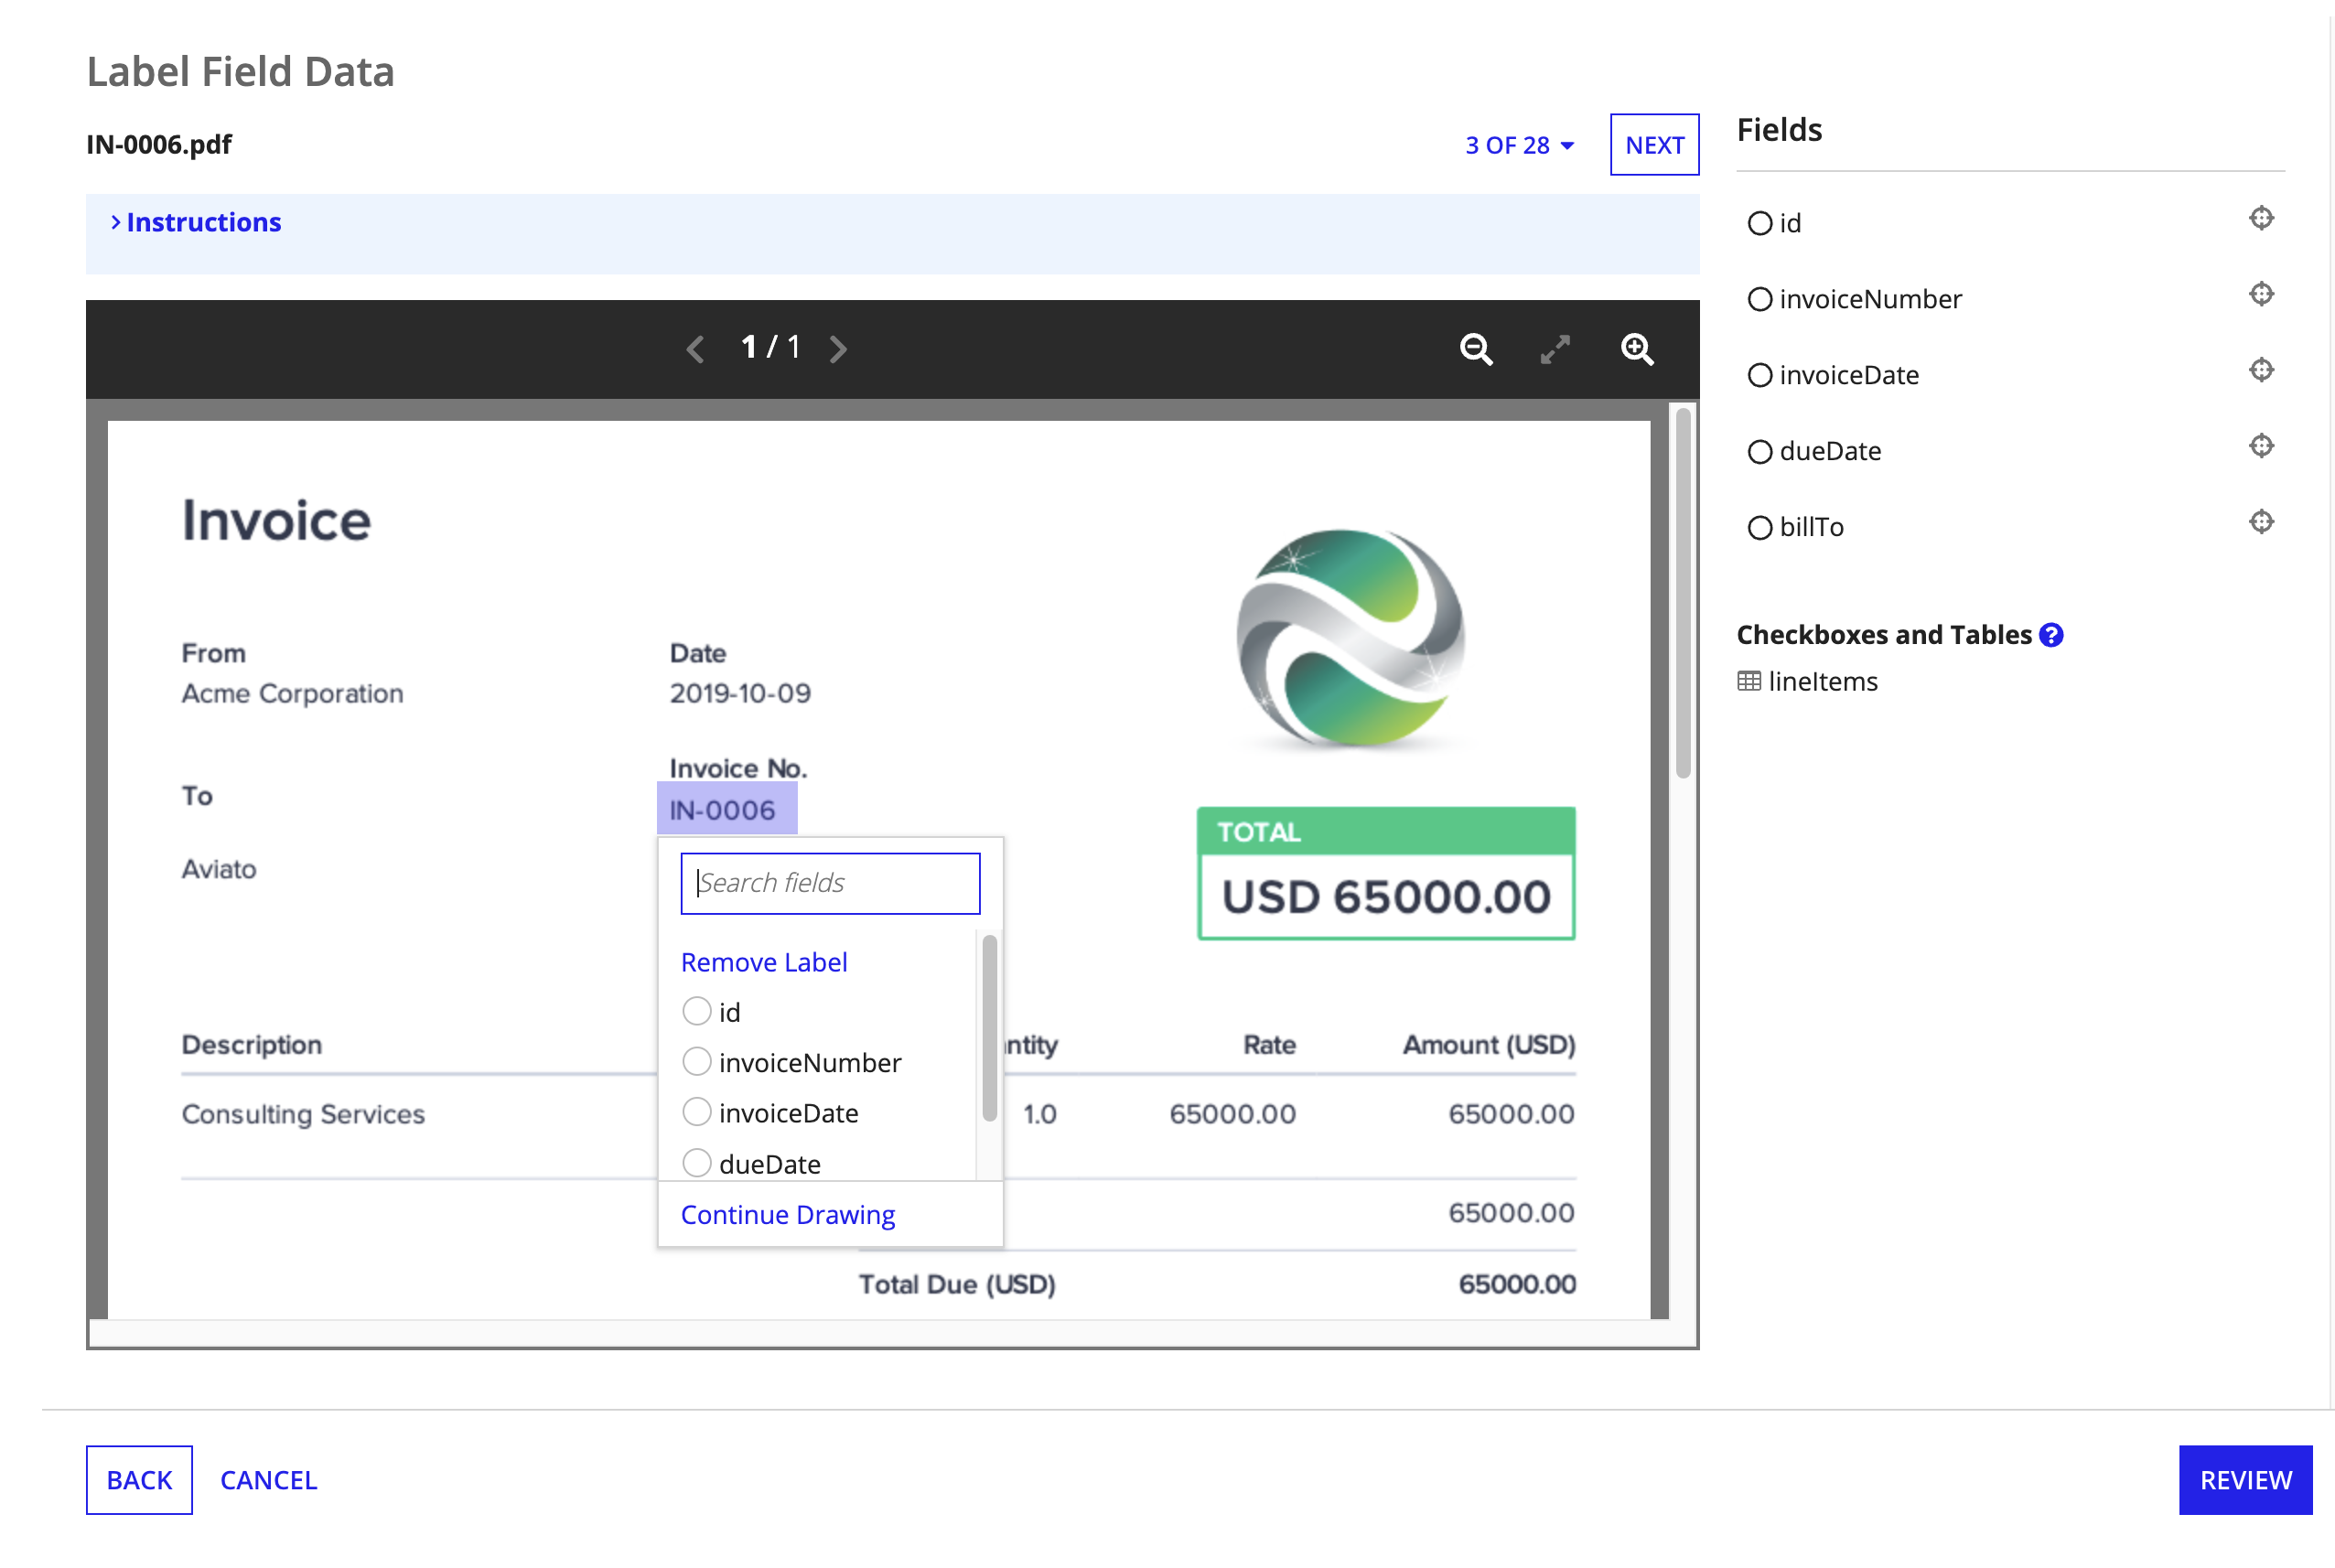
4. Label field dataCopy link to clipboard
After you tell Appian which fields you want to extract from the document, you'll indicate the values that correspond to those fields in the sample documents. This process is called labeling, and it helps the model understand what the data might look like or where it might appear in other documents.
Tip: You'll only label Text values in this step. Although you won't label tables and checkboxes, these fields will still be extracted.
- In the document preview, click and drag your mouse around a value to create a selection box.
- Click the field this value represents. For example, if you created a selection box around the value
$4,000in the document, you might selecttotalas the field it maps to. - Repeat steps 1 and 2 until you've labeled values for all fields in your document structure. Regularly click SAVE CHANGES to save your progress, especially if you're labeling a lot of fields and documents.
-
Above the document preview, click NEXT to view other sample documents and label additional values. To select a specific document, use the dropdown menu labeled with a count of the documents you uploaded.
Tip: Each field will need labels in at least half of the documents you uploaded.
- Click REVIEW to see a summary of how many labels appear for each field.
The final step of creating a document extraction AI skill asks you to review the fields you've labeled in the sample documents. The more fields you label, the more the model can learn about your fields. This is what makes the model smarter and better at extracting data of interest.
If you haven't labeled enough fields in the set of documents you uploaded, you'll see a message encouraging you to add more files and fields.
5. Start trainingCopy link to clipboard
You'll manually prompt the model to start training based on the training documents and labeled fields you provided. When you've labeled all the fields you can, click TRAIN MODEL on the Review page.
During training, the model analyzes a portion of your training documents to learn about the traits or patterns that identify each field.
After learning about your documents, the model uses the remaining portion of the training documents to test itself. The model training will display metrics to show how it performed.
Tip: Training can take a few minutes. You can close the Training Summary page and return later to view the results.
6. Assess the resultsCopy link to clipboard
After the model is finished training and testing, you're shown a number of metrics measuring its performance. You'll use this information to determine if this model is ready to publish, or if you'd like to provide more documents or labels for the model to continue training.
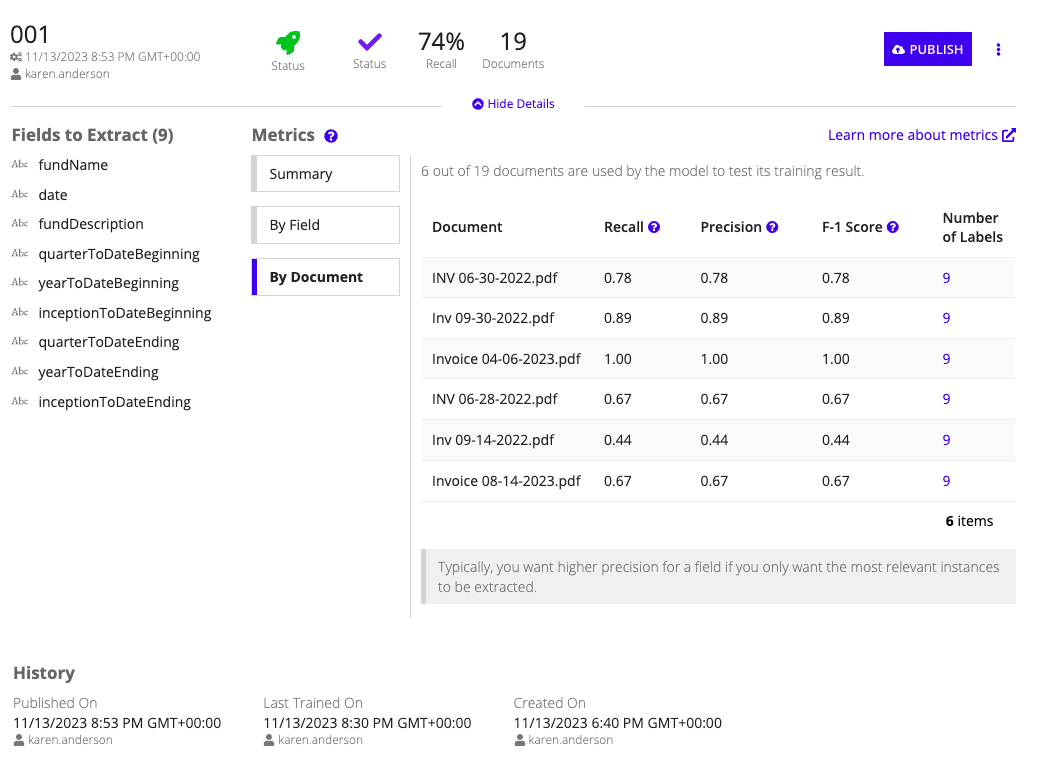
Some of these metrics might be more or less relevant based on your use case and the fields you expect to extract.
Learn more about evaluating model performance.
7. Train a new modelCopy link to clipboard
If the model's training metrics don't yet meet your requirements, you can continue training to try to boost the model's performance. Each time you retrain, you're creating a new model. Provide the new model with additional training documents to help it learn more about the document fields. Be sure your training documents represent the documents you expect to see in production.
Tip: Training a new model doesn't make the AI skill unavailable or otherwise impact a published model. The AI skill uses the existing published model until you publish a new one.
To continue training by creating a new model:
- In the AI skill, click CREATE MODEL.
- Choose how you want to start:
- I want to create a model using previous configurations and data: Start building a new model using previously configured fields, labels, and sample documents. When you create a new model from an existing model, you can add or remove sample documents, add new fields and labels, or remove existing fields and labels. In this way, you have multiple options to configure the model so it can learn more about your data. This option doesn't change anything within the model you're using as the basis for the new model.
- I want to create a model without data: Start with an entirely new model. With this option, you'll create fields, upload sample documents, and label the fields in those documents to start training from scratch.
- Click CONTINUE. A Create Model page appears, where you can continue refining and training the model.
Retraining vs. creating a new skillCopy link to clipboard
As you expand how you use machine learning models throughout your applications, you might wonder: when should I train a new model vs. creating an entirely new skill?
Keep in mind you can only publish one model for a skill. In practice, this means that a Extract from Document smart service will only be able to access one model for the skill the smart service is configured to use.
Also keep in mind that ML models are designed for a specific purpose. To help the model specialize and hone in on key traits in your document, consider creating one at the lowest level possible for your process. That is, if a single step in a process requires you to extract data from invoices, don't bother including fields for fields that appear on purchase orders. Adding this extraneous information will only serve to distract the model, so it's best to exclude. Instead, create fields specific to the documents you expect to extract from in your specific use case.
8. Publish the modelCopy link to clipboard
When the model's training metrics meet your requirements, you're ready to put it to use. Publish the model to make it available for use in your process, through the Extract from Document smart service.
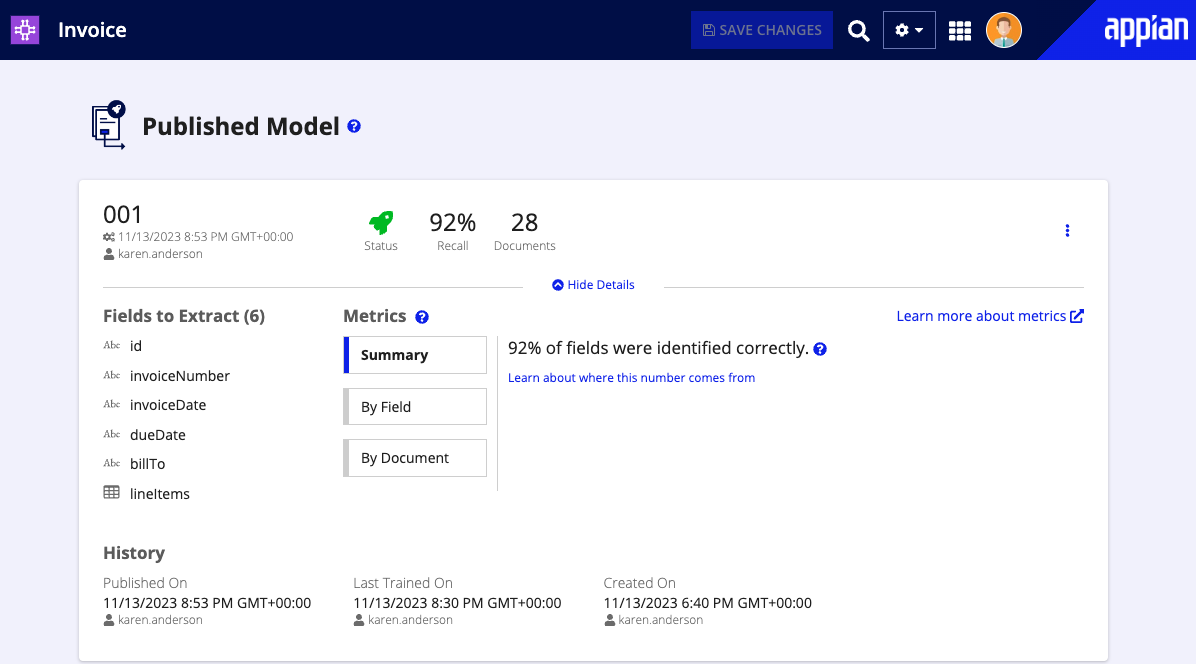
You'll configure the Extract from Document smart service to use your AI skill. When the process reaches the smart service node, it uses the published model within the skill to analyze your document and extract field data.
9. Use the skillCopy link to clipboard
Now you're ready to use your document extraction skill in a process.
Add the Extract from Document smart service and configure it to call your new skill.
You'll also want to add the Reconcile Doc Extraction smart service so a person can verify that the extracted table and checkbox data maps to the proper fields.
Unstructured documentsCopy link to clipboard
The following steps guide you through configuring and testing a prompt specifically for unstructured document extraction. Unlike semi-structured documents, unstructured documents lack a consistent format, which means they require a flexible approach to data extraction. By setting up a clear prompt and testing it with sample documents, you can train the model to identify and extract key information accurately, even from varied layouts.
Use these steps to define your prompt, adjust the model's settings, and refine the extraction process to ensure reliable results.
- Create an Al skill
- Identify document type
- Define the Prompt
- Set temperature
- Provide example inputs and outputs (text document type only)
- Test the Prompt
- Refine the Prompt (if needed)
- Save the configuration
- Use the skill
1. Create an AI skillCopy link to clipboard
The first step in setting up document extraction is to create an AI Skill. This skill acts as the foundation for processing your documents, allowing you to configure and fine-tune the model to recognize and extract the information you need.
-
In the Build view, click NEW > AI Skill.
-
In the Extraction section, select Documents.
-
Choose Unstructured as the type of document.
-
Configure the following properties:
Property Description Name Enter a name that follows the recommended naming standard. Description (Optional) Enter a brief description of the AI skill. - Click CREATE.
- On the Review AI Skill Security window, configure security.
- Click SAVE. The AI skill opens in a new dialog or window.
2. Identify document typeCopy link to clipboard
In this step, specify whether your unstructured document is text-only or includes visual elements like checkboxes, charts, or images. This choice helps configure the model to process the content accurately, whether it's focusing solely on text or handling both text and visual data.
- Go to the Identify Document Type section.
-
Select what kind of documents you will be uploading for extraction.
Option Description Text only Extract data from text within documents. Supports up to 100 pages. Visual elements and text Extract data from visual elements, like checkboxes, charts, or images, as well as text within documents. Supports up to 20 pages.

3. Define the promptCopy link to clipboard
Now it's time to set up a prompt that tells the AI exactly what to look for in your unstructured documents. A clear, specific prompt helps the model focus on the right details, even when the document format varies. Think about the key info you need–like names, dates, or specific terms—and build your prompt around that to get the best results.
- Go to the Prompt section.
- Enter a description of what you want the model to do with the document.
- Use clear and specific instructions that outline the data you need extracted. For example: "Extract contractor name, address, and contract date from the document."
- Use entity labels (like
contractorName,contractorAddress) to make the extracted data easy to map.

4. Set temperatureCopy link to clipboard
In this step, you'll set the temperature to control how the AI reads your documents. Lower temperatures keep things consistent, while higher temperatures let the model be more flexible.
- A lower temperature (0-25) will make the model more consistent and predictable.
- A higher temperature (75-100) will make the model more flexible when interpreting text and images but may be less consistent. This could be helpful if key information appears in varied formats like dates in different layouts or names appearing in unconventional places.
- Go to the Temperature section.
- Adjust the slider to control the output variability.
Tip: For most unstructured document extractions, start with a lower temperature to ensure stable results.

5. Provide example inputs and outputs (text document type only)Copy link to clipboard
Adding sample inputs and expected outputs helps the model understand your requirements better. This option only appears if you selected Text only as the document type.
- Go to the Provide Examples section.
- In the Example Input field, add a sample document or text that represents the type of unstructured data you'll be working with. This helps the AI model learn the structure and context of your documents.
-
In the Example Output field, specify how you'd like the extracted data to appear. Use a structured format (like JSON) with labels for each piece of information, such as:
1
2
3
4
5
{
"contractorName": "NexGen",
"contractorAddress": "4567 Rose Blvd, Rosetown",
"contractDate": "02/07/2024"
}
Copy - Click ADD ANOTHER to add more examples if needed. This improves the model's ability to extract the correct data. This can improve the model's accuracy across various document types.

6. Test the PromptCopy link to clipboard
Now it's time to test your prompt to see how well the model extracts the information you need. Testing helps you evaluate and refine the prompt to ensure accurate results.
- In the Test Input section on the right, upload a document similar to what you'll be using for extraction.
- Click TEST to evaluate how well the model performs with your prompt.
- Review the output to ensure the extracted data matches your expectations.

7. Refine the Prompt (if needed)Copy link to clipboard
Based on the test results, adjust the prompt to improve accuracy. Modify the prompt instructions for clarity or add more example inputs and outputs. Keep testing until you get the extraction results you're looking for.
8. SaveCopy link to clipboard
Once the model provides consistent, accurate results, click SAVE CHANGES to finalize your AI skill.
Your AI skill is now configured to extract data from unstructured documents based on your custom prompt and you're ready to use the skill in a process.
9. Use the skillCopy link to clipboard
With your AI skill configured, you're ready to integrate it into your process. This allows you to automatically extract and process information from documents as part of your workflow.
Add the Execute Generative AI Skill smart service and configure it to call your new skill.
See alsoCopy link to clipboard
Learn more about how document extraction works in Appian.
Review the feature's compliance to ensure it aligns with your organization's security requirements.