
IntroductionCopy link to clipboard
After installing the My Cases module, you must set it up before using it with the Case Management Studio Base application. This guide walks you through the required setup steps, which include:
- Updating security and permissions.
- Updating the Case record.
- Updating the Create Case interface.
- Adding record actions.
- Adding the Submitter role.
- Applying email updates.
Step 1: Security and permission updatesCopy link to clipboard
The first step in setting up the My Cases module with your Case Management Studio Base application involves modifying group membership and setting up user permissions to allow external users to access My Cases.
Modify group membershipCopy link to clipboard
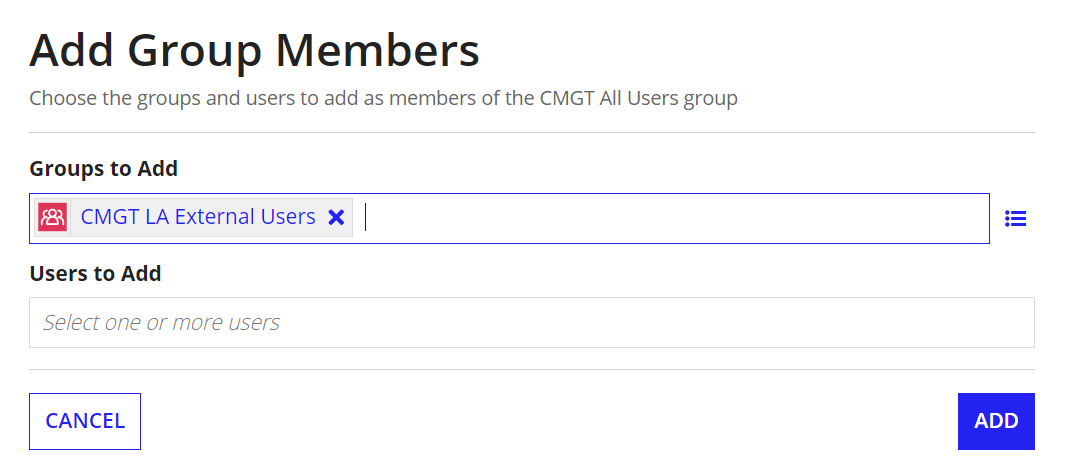
This step involves updating the CMGT All Users group to include the CMGT LA External Users group. This will allow authenticated external users access to My Cases.
To modify the CMGT All Users group:
- In Appian Designer, go to the CMGT Case Management Studio Base application.
- Search for and open the
CMGT All Usersgroup. - Click Add Members.
- Search for
CMGT LA External Usersin Groups to Add. -
Click Add.
Set user permissionsCopy link to clipboard
Next, you must grant the External Users group access to the CMGT process models.
To modify user permissions:
- In Appian Designer, go to the CMGT Case Management Studio Base application.
-
Click Create Package and name the package Grant External Users group access to CMGT Process Models.
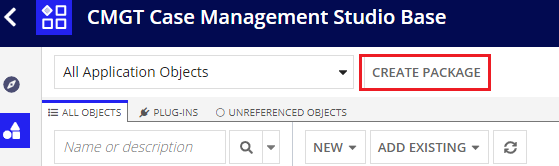
- Add the following process models to the package:
Submit CaseCMGT_Document_CreateCMGT_Entity_CreateUpdateCMGT_Role_AddCMGT_SUB_DocumentStorageCMGT_SUB_OpenNextTasksCMGT_SUB_SendEmailCMGT_SUB_SetCaseFolderSecurityCMGT_TasK_Complete_AutomatedTask_WrapperCMGT_Task_CreateCMGT_Task_Complete
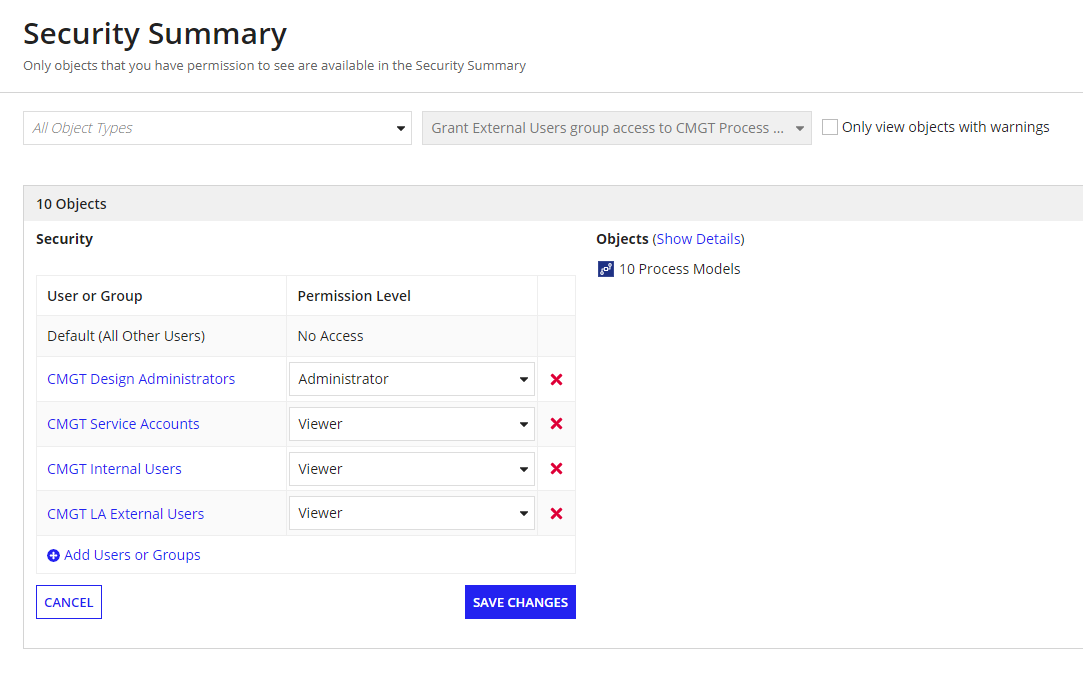
- Open up the package and navigate to the Security Summary.
-
Update the security for the CMGT LA External Users group to Viewers.
Step 2: Update the Case recordCopy link to clipboard
After you set up user permissions, you must configure the Case record with the case views you want your users to see.
Add the Wrapper Summary interfaceCopy link to clipboard
The steps in this section involve updating the Summary view of the CMGT_Case record type to enable authenticated users to view the Case Summary for their cases on the My Cases site. You will do this by adding the CMGT_LA_Case_RecordView_Summary_Wrapper interface to the CMGT_Case record type Summary view.
To add the CMGT_LA_Case_RecordView_Summary_Wrapper interface to the Case record summary:
- In Appian Designer, go to the CMGT Case Management Studio Base application.
- Search for and open the
CMGT_Caserecord type.- Click Views.
- Click the Edit icon next to the Summary view.
- Replace the
CMGT_Case_RecordView_Summaryinterface with theCMGT_LA_Case_RecordView_Summary_Wrapperinterface. -
Pass in
rv!recordto thecaseparameter.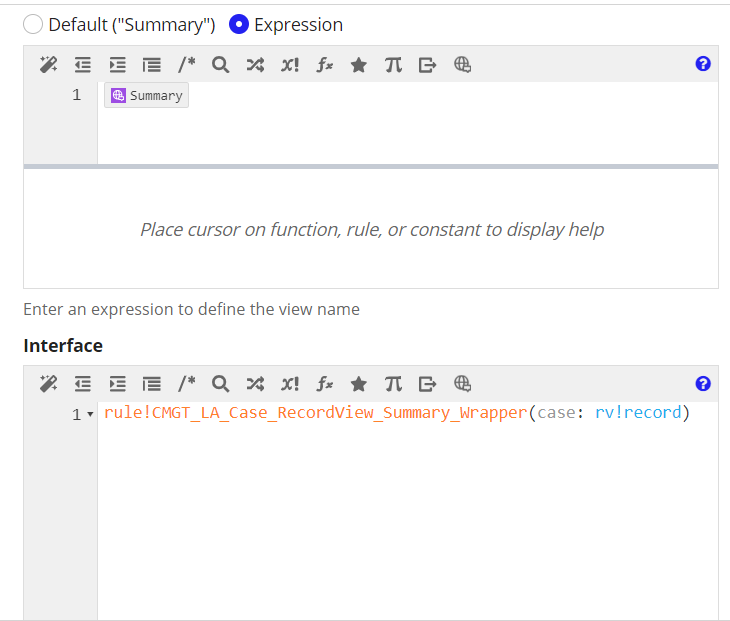
- Replace the
Configure the External Messages viewCopy link to clipboard
Adding the CMGT_LA_Case_RecordView_Messages interface to the CMGT_Case record type Summary view enables authenticated users to view all messages and public comments about their case on the My Cases site.
To add the External Messages view to the CMGT_Case record:
- In Appian Designer, go to the CMGT Case Management Studio Base application.
- Search for and open the
CMGT_Caserecord type.- Click Add View Manually.
- In the View Name code block, enter in the External Messages translation string from the
CMGT_LA_Translationsobject. - Select the
CMGT_LA_Case_RecordView_Messagesunder the interface section.-
Pass in
rv!identifierto thecaseIdparameter.
-
- In the View Name code block, enter in the External Messages translation string from the
- Navigate to the Views and Actions Security tab within the record type.
- Click the Edit icon associated with the External Messages view.
-
In the Who can see this view? section, select “Only users…” and add the
CMGT Internal Usersgroup to the Found in groups selection.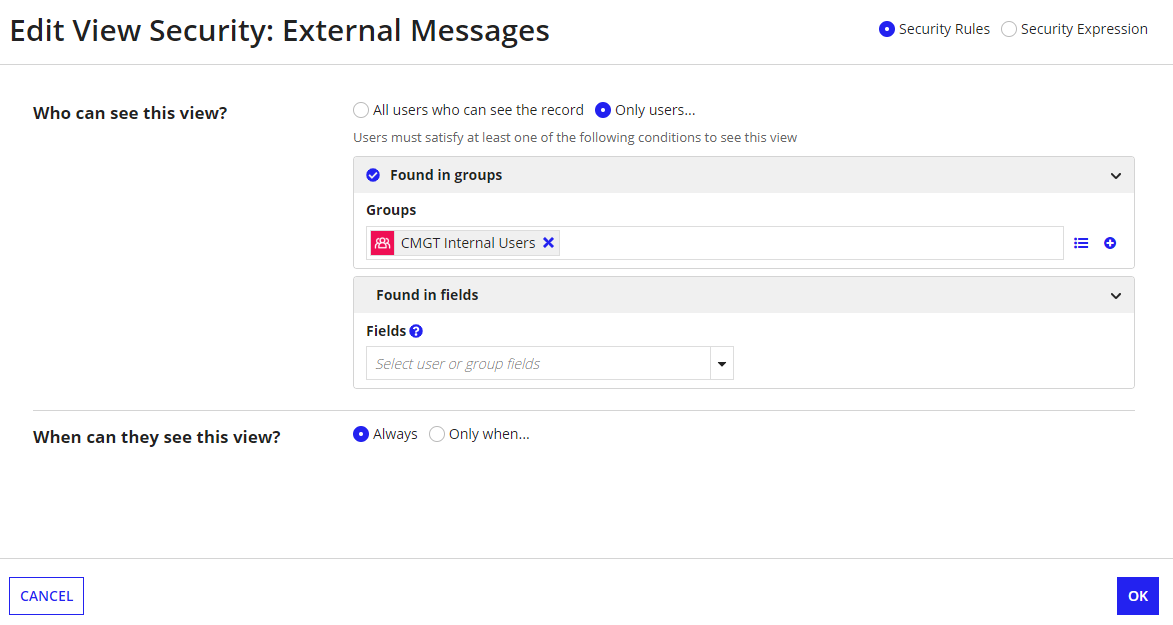
-
- Click the Edit icon associated with the External Messages view.
- Click Add View Manually.
Step 3: Update the Create Case interfaceCopy link to clipboard
This next step involves updating the Create Case interface by modifying object references, rules, display logic, and forms.
Update object rule referencesCopy link to clipboard
In this step, you will update several object references that call the Portal Utility expression rule and replace it with the My Cases Utility expression rule:
- In Appian Designer, go to the CMGT Case Management Studio Base application.
- For each of the following objects, replace all references to the
CMGT_UTIL_IsOnPortalexpression rule withCMGT_LA_UTIL_IsLimitedAccessOrPortal:CMGT_Document_Sub_UploadDocumentCMGT_Document_RecordAction_CaseUpload_SaveLogicCMGT_Case_Sub_Create
Update case confirmation ruleCopy link to clipboard
In this step, you will update the expression rule that checks whether to display case confirmation with a new condition that enables authenticated users to see this confirmation on My Cases.
To update the expression rule:
- In Appian Designer, go to the CMGT Case Management Studio Base application.
- Search for and open the
CMGT_Create_Case_DisplayConfirmationScreen_Conditionsexpression rule.-
Add the following code block after the first condition in the expression rule:
1
ri!case['recordType!{d81cdd0e-c54d-4b8e-beec-b7ae37fefe7f}CMGT_Case.fields.{8a645dfc-516a-4ed4-8a22-858b04b67a2a}source'] = cons!CMGT_LA_TXT_SOURCE_APPIAN_LIMITED_USERS,
Copy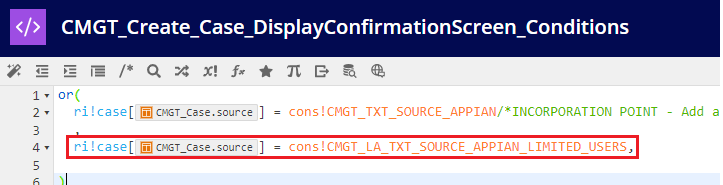
-
Click SAVE CHANGES.
-
Update the Create Case formCopy link to clipboard
In this step, you will add the Read Only Case Type field to the Create Case form.
To update the form:
- In Appian Designer, go to the CMGT Case Management Studio Base application.
- Search for and open the
CMGT_Case_Sub_Createinterface.-
Add the following code block in the first
thenparameter of thea!matchstatement, right above the firsta!sectionLayout():1 2 3
rule!CMGT_LA_Sub_CreateCase_CaseType( caseType: ri!case['recordType!{d81cdd0e-c54d-4b8e-beec-b7ae37fefe7f}CMGT_Case.relationships.{8beba714-f253-41d2-9232-e0c0f51bed2e}caseType'] ),
Copy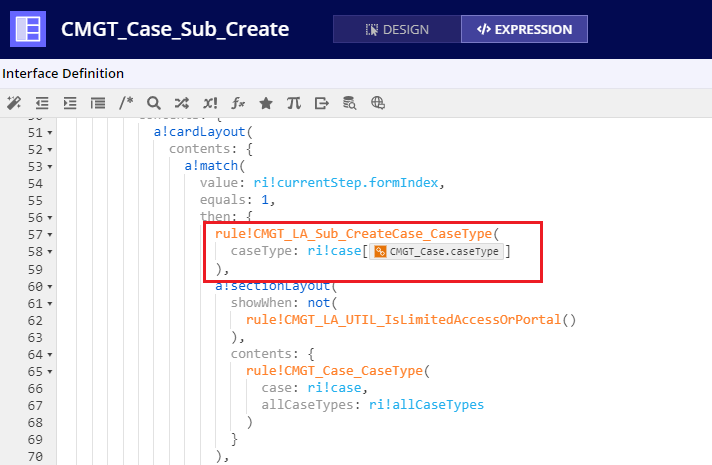
-
Click SAVE CHANGES.
-
Update the Submit Case record formsCopy link to clipboard
This step involves updating the Start and Confirmation forms in the Submit Case record to enable users to see the case creation record action and case creation confirmation on My Cases.
To update the Start and Confirmation forms:
- In Appian Designer, go to the CMGT Case Management Studio Base application.
- Search for and open the
Submit Caseprocess model.- From the File menu, select Properties….
- Select the Process Start Form tab.
- Replace the
CMGT_Case_RecordAction_Createinterface with theCMGT_LA_Case_RecordAction_Create_Wrapperinterface. -
Pass in
casefor thecaseparameter anddocumentsToDeletefor thedocumentsToDeleteparameter.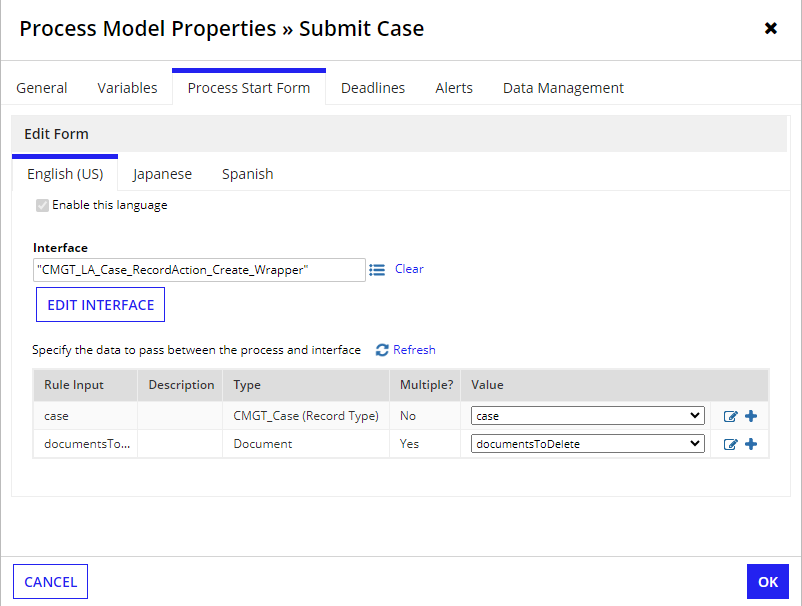
- Replace the
- Click OK to confirm the changes.
- Select the Process Start Form tab.
- From the File menu, select Properties….
- Still in the
Submit Caseprocess model, open the Case Confirmation node.- Select the Forms tab.
- Replace the
CMGT_Sub_CreateCase_Confirmationinterface with theCMGT_LA_Sub_CreateCase_Confirmation_Wrapperinterface. -
Pass in
casefor thecaseparameter andisCaseSubmissionSuccessfulfor theisCaseSubmissionSuccessfulparameter.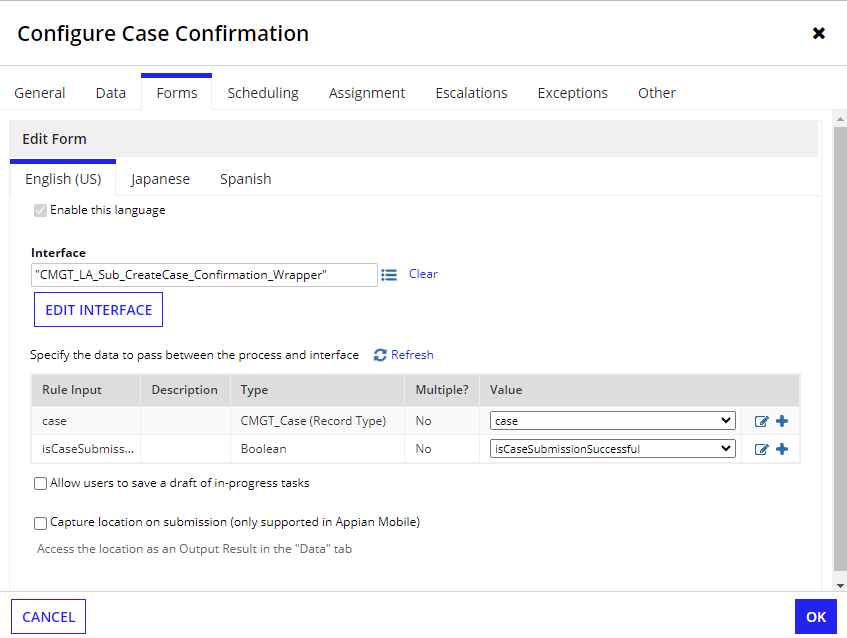
- Replace the
- Click OK to confirm the changes.
- Select the Forms tab.
- From the File menu, click Save & Publish.
Step 4: Add the Update Message and Delete Message record actionsCopy link to clipboard
Next, you will add record actions to the CMGT_Comment record type to allow users to update and delete messages.
Add the Update Message record actionCopy link to clipboard
Follow the steps in this section to add the Update Message action to CMGT_Comment record type, update the record action security, and add the action to the appropriate interface.
To add the Update Message record action:
- In Appian Designer, go to the CMGT Case Management Studio Base application.
- Search for and open the
CMGT_Commentrecord type.- Click Actions.
- In the Related Actions section, click CONFIGURE NEW ACTION MANUALLY.
- In the Display Name field, enter the
Update Messagetranslation string from theCMGT_LA_Translationsobject. - In the Key field, enter
updateMessage. - In the Icon field, select
pencil-square-o. - Select
Mediumfor Dialog Box Size. - Select
CMGT_LA_Message_CreateUpdatefor the Process Model. -
Enter the following code block in the Context:
1
2
3
4
5
6
7
   {
 comments: rule!CMGT_QR_GetComment(
 commentId: rv!identifier,
 includeUserTagsAndDocumentMaps: true,
 returnType: "SINGLE_OBJECT"
 )
}
Copy
- Click OK to confirm the changes.
- In the Display Name field, enter the
- Click SAVE CHANGES.
Modify the Update Message record action securityCopy link to clipboard
Next, you will need to update the security on the Update Message record action.
To modify the action security:
- In the
CMGT_Commentrecord type, go to the Views and Actions Security tab.- Click the Actions tab.
- In the Related Actions section, click the Edit icon for the Update Message action.
- In the Who can see this view? section, select the Only users… radio button option.
-
Select the createdBy field under the Found in fields dropdown.
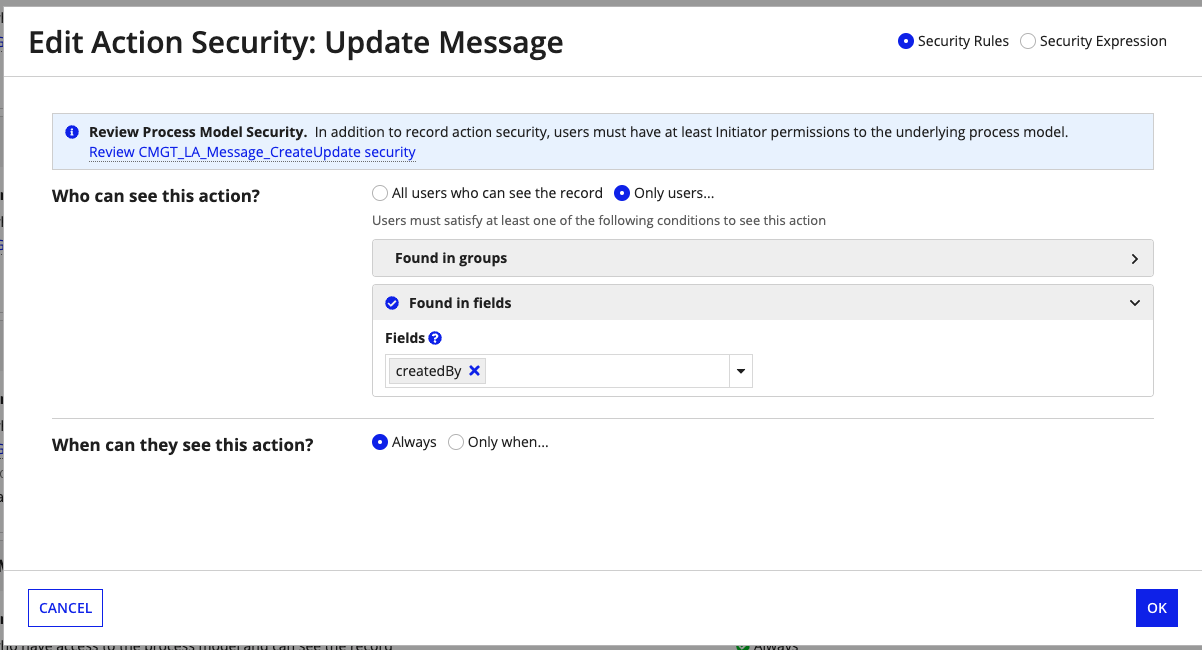
- Click OK to confirm the changes.
- In the Related Actions section, click the Edit icon for the Update Message action.
- Click the Actions tab.
- Click SAVE CHANGES.
Add the Update Message record action to the Message Thread interfaceCopy link to clipboard
Adding the Update Message record action to the Message Thread interface allows authenticated users to view and provide message updates on their created and claimed cases.
- Navigate back to the CMGT Add-On - My Cases Module application.
- Search for and open the
CMGT_LA_Message_Sub_MessageThread_DisplayMessageinterface.-
Add in the newly created Update Message related action within the existing
a!recordActionField()as follows:1 2 3
a!recordActionItem( action: 'recordType!{e57250b0-f216-4a23-afd9-39e7d532d302-cmgt}CMGT_Comment.actions.{dff1e723-214c-4e20-844a-34fdc02efec1}updateMessage', identifier: ri!comment['recordType!{e57250b0-f216-4a23-afd9-39e7d532d302-cmgt}CMGT_Comment.fields.{2aed81c0-a799-4904-8f3b-b3792a9ee294-cmgt}commentId'] ),
Copy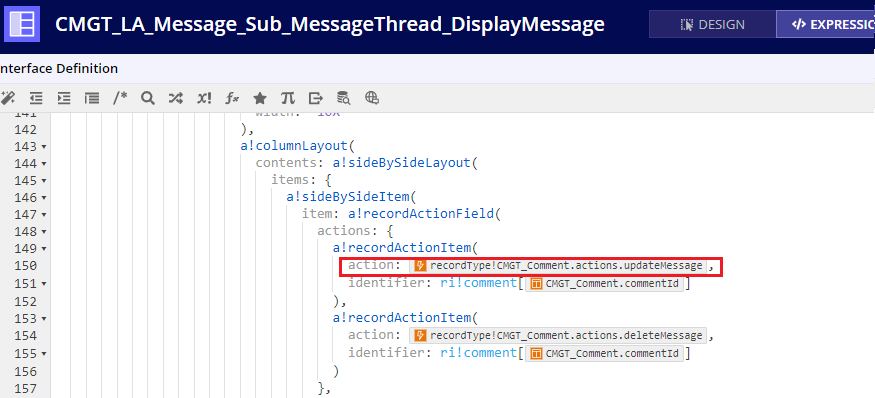
-
Click SAVE CHANGES.
-
Add the Delete Message record actionCopy link to clipboard
Follow the steps in this section to add the Delete Message record action to the CMGT_Comment record type, configure security, and add the action to the appropriate interface.
To add the Delete Message record action:
- Navigate back to the CMGT Case Management Studio Base application.
- Search for and open the
CMGT_Commentrecord type.- Click Actions.
- In the Related Actions section, click CONFIGURE NEW ACTION MANUALLY.
- In the Display Name field, enter the
Delete Messagetranslation string from theCMGT_LA_Translationsobject. - In the Key field, enter
deleteMessage. - In the Icon field, select
trash. - Select
Smallfor Dialog Box Size. - Select
CMGT_LA_Message_Deletefor the Process Model. -
Enter the following code block in the Context:
1
2
3
4
5
6
    {
     comments: rule!CMGT_QR_GetComment(
     commentId: rv!identifier,
     includeUserTagsAndDocumentMaps: true
     )
    }
Copy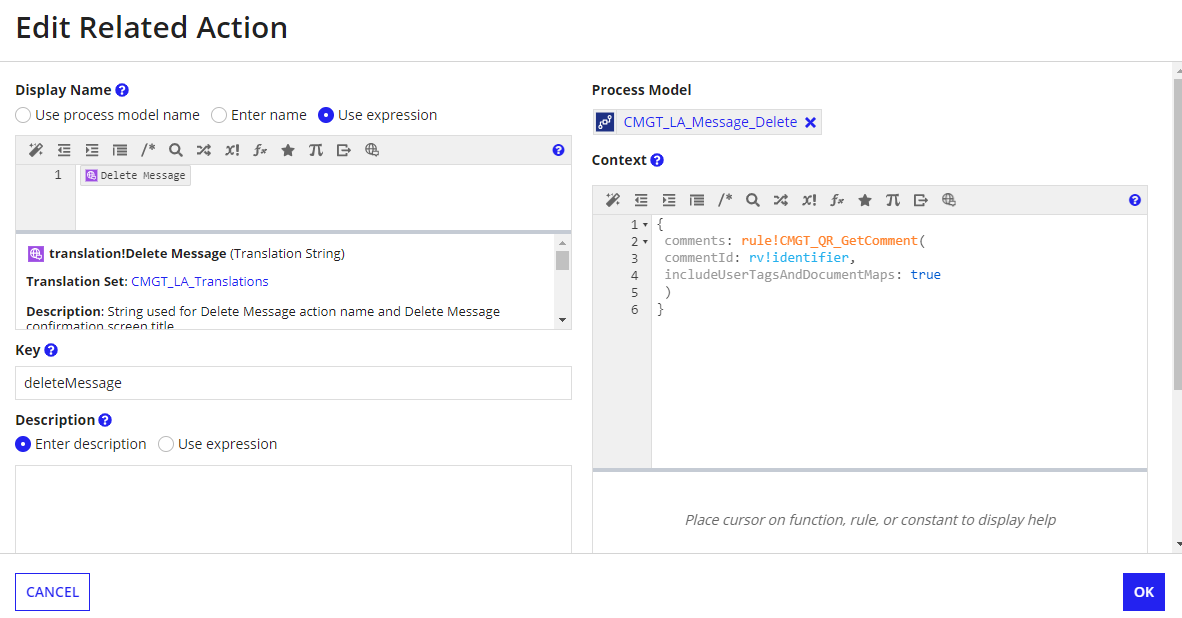
- Click OK to confirm the changes.
- In the Display Name field, enter the
- Click SAVE CHANGES.
Modify the Delete Message record action securityCopy link to clipboard
In this section, you will update the user security on the Delete Message record action.
- In the
CMGT_Commentrecord type, navigate to the Views and Actions Security tab.- Click the Actions tab.
- In the Related Actions section, click the Edit icon for the Delete Message action.
- In the Who can see this view? section, select the Only users… radio button option.
-
Select the createdBy field under the Found in fields dropdown.
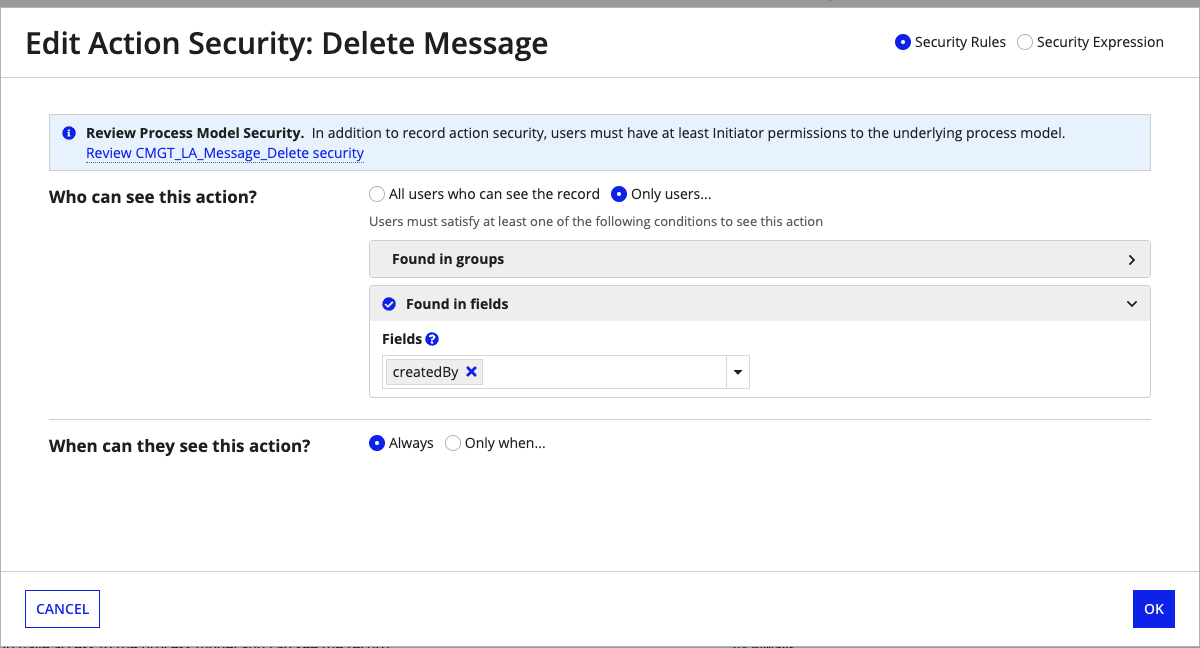
- Click OK to confirm the changes.
- Click SAVE CHANGES.
Add the Delete Message record action to the Message Thread interfaceCopy link to clipboard
In this section, you will add the Delete Message record action to the Message Thread interface.
To add the Delete Message record action:
- Navigate back to the CMGT Add-On - My Cases Module application.
- Search for and open the
CMGT_LA_Message_Sub_MessageThread_DisplayMessageinterface.-
Add in the newly created Delete Message related action within the existing
a!recordActionField()under the Update Message action as follows:1 2 3 4
a!recordActionItem( action: 'recordType!{e57250b0-f216-4a23-afd9-39e7d532d302-cmgt}CMGT_Comment.actions.{4801d2e7-2924-4086-b501-6ab6a212794a}deleteMessage', identifier: ri!comment['recordType!{e57250b0-f216-4a23-afd9-39e7d532d302-cmgt}CMGT_Comment.fields.{2aed81c0-a799-4904-8f3b-b3792a9ee294-cmgt}commentId'] )
Copy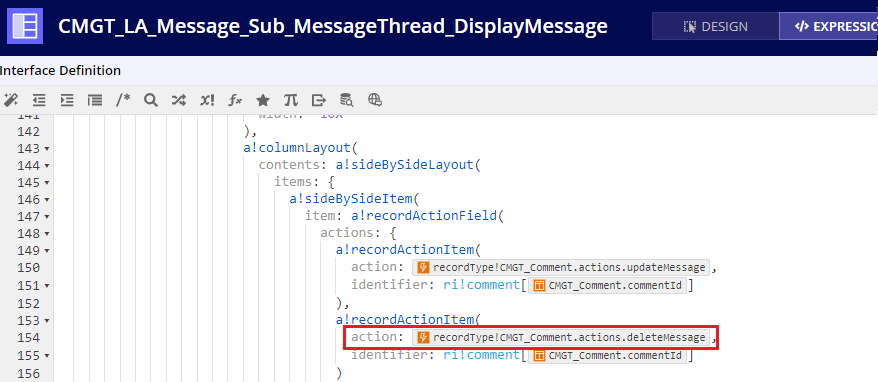
-
Click SAVE CHANGES.
-
Update the case event historyCopy link to clipboard
The final step in this section involves updating the expression rule that formats the case event history to include message events:
To update the case event history:
- In Appian Designer, go to the CMGT Case Management Studio Base application.
- Search for and open
CMGT_EventHistory_Case_FormatDetailsexpression rule.-
Add the following code block above the
default: local!details.valuecondition in thea!match():1 2 3 4 5 6 7 8 9 10 11 12 13 14 15 16 17 18 19 20 21 22 23 24 25 26 27 28 29 30 31 32 33 34 35 36 37 38 39 40 41 42 43 44 45 46 47 48 49 50 51 52 53 54 55 56 57 58 59
whenTrue: contains( { cons!CMGT_LA_REFID_EVENT_TYPE_CASE_CREATE_MESSAGE, cons!CMGT_LA_REFID_EVENT_TYPE_CASE_UPDATE_MESSAGE, cons!CMGT_LA_REFID_EVENT_TYPE_CASE_REPLY_TO_MESSAGE, cons!CMGT_LA_REFID_EVENT_TYPE_CASE_DELETE_MESSAGE }, fv!value ), then: concat( 'translation!{d0339ad7-e175-458f-9219-ed1620be6e1d}CMGT_LA_Translations.{48b61db9-42d4-44e5-988d-8ac713130a6c}Message: {value}'( 'translation!{d0339ad7-e175-458f-9219-ed1620be6e1d}CMGT_LA_Translations.{48b61db9-42d4-44e5-988d-8ac713130a6c}Message: {value}.translationvariables.{26bedc4f-aa52-4263-b7f2-7bdfc9a2c3de}value': rule!CMGT_UTIL_StripHtmlTags( value: local!details.commentText, isFormatted: true ) ), if( rule!CMGT_UTIL_IsBlank( local!details.taggedUsers ), "", concat( char( 10 ), 'translation!{765a2893-6d2c-4330-8d7a-ac85f4a6f417}CMGT_BaseTranslations.{1989f3c9-20e5-4be9-822b-7b1dc48f424b}Tagged users: {value}'( 'translation!{765a2893-6d2c-4330-8d7a-ac85f4a6f417}CMGT_BaseTranslations.{1989f3c9-20e5-4be9-822b-7b1dc48f424b}Tagged users: {value}.translationvariables.{0ceb2d10-7e2a-44f9-919d-e51150bb29d3}value': joinarray( a!forEach( items: local!details.taggedUsers, expression: rule!CMGT_UTIL_DisplayUserFullName( username: fv!item ) ), ", " ) ) ) ), if( rule!CMGT_UTIL_IsBlank( local!details.documents ), "", concat( char( 10 ), 'translation!{765a2893-6d2c-4330-8d7a-ac85f4a6f417}CMGT_BaseTranslations.{c0d05eca-625c-4aba-afba-fda052e49cb2}Linked documents: {value}'( 'translation!{765a2893-6d2c-4330-8d7a-ac85f4a6f417}CMGT_BaseTranslations.{c0d05eca-625c-4aba-afba-fda052e49cb2}Linked documents: {value}.translationvariables.{7299566d-8206-4962-bb5e-71475e411afb}value': joinarray( a!forEach( items: local!details.documents, expression: fv!item ), ", " ) ) ) ) ),
Copy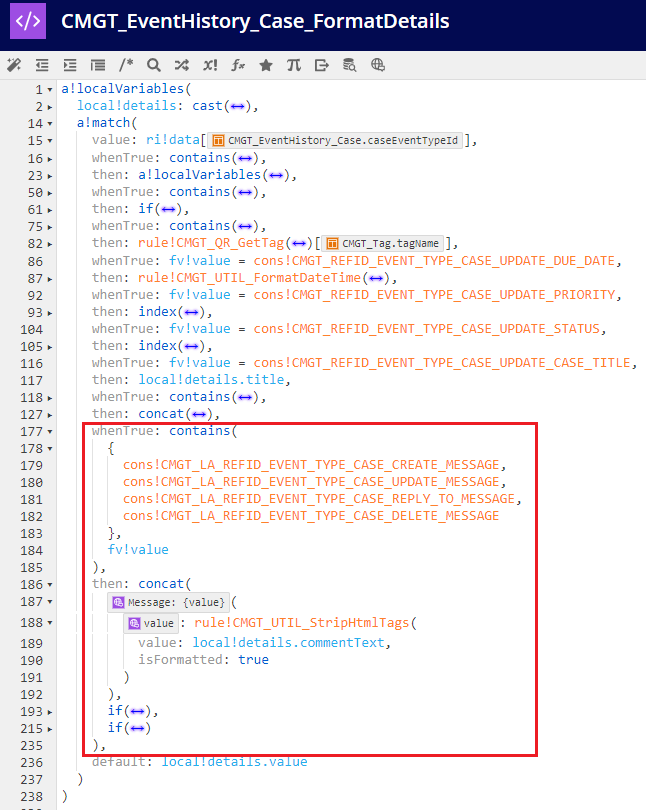
-
- Click SAVE CHANGES.
Step 5: Add the submitter roleCopy link to clipboard
Next, you will add the Submitter role to the rules, audit history, and events.
Add Submitter Role during Case CreationCopy link to clipboard
In this step, you will add the submitter role to the case creation process by updating the Case Creation expression rule.
To update the Case Creation expression rule:
- In Appian Designer, go to the CMGT Case Management Studio Base application.
- Search for and open
CMGT_Role_CreateCase_CreateRoles_Wrapperexpression rule.-
Add the following code block after the first item in the square brackets
{}:1 2 3 4
rule!CMGT_LA_Role_CreateCase_Submitter( case: ri!case, initiator: ri!initiator ),
Copy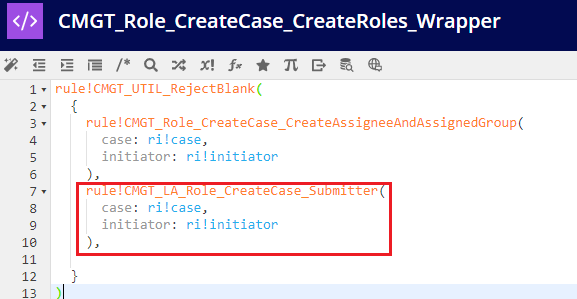
-
- Click SAVE CHANGES.
Update Audit History to include the Submitter Role eventCopy link to clipboard
Next, you will need to add the Submitter role event to the Audit History by updating the Case Event History expression rule.
To update the Event History expression rule:
- In Appian Designer, go to the CMGT Case Management Studio Base application.
- Search for and open
CMGT_EventHistory_Case_FormatDetailsexpression rule.-
Add the following code block within the second
whenTrueclause of thea!match():1
cons!CMGT_LA_REFID_EVENT_TYPE_CASE_ADD_SUBMITTERCopy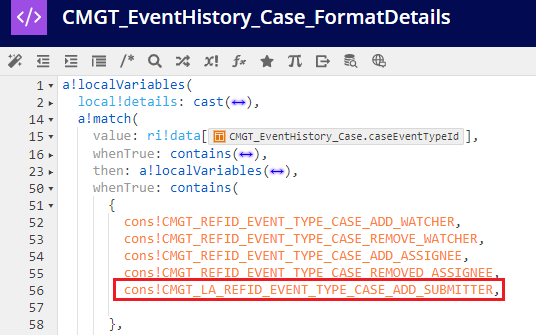
-
- Click SAVE CHANGES.
Update Events to include ‘Submitter Role’ EventCopy link to clipboard
In this step, you will update the Events expression rule to include the Submitter Role.
To add the Submitter role event to Events:
- In Appian Designer, go to the CMGT Case Management Studio Base application.
- Search for and open
CMGT_Role_SetEventsexpression rule.-
Add the following code block after the last
thenclause and before thedefaultclause in the nesteda!match():1 2
equals: cons!CMGT_LA_REFID_ROLE_TYPE_SUBMITTER, then: cons!CMGT_LA_REFID_EVENT_TYPE_CASE_ADD_SUBMITTER,
Copy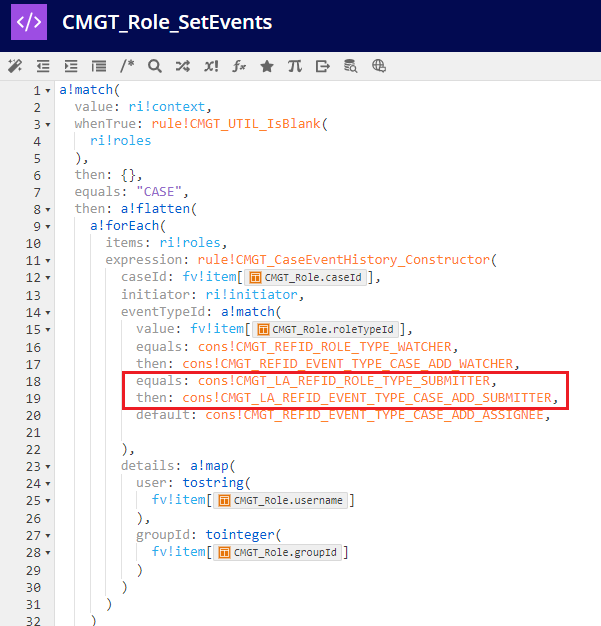
-
- Click SAVE CHANGES.
Step 6: Applying email updatesCopy link to clipboard
Finally, you must update the External Messages URL Stub constant for emails.
- In Appian Designer, go to the CMGT Case Management Studio Base application.
- Search for and open the
CMGT_Caserecord type.- Navigate to the Views tab.
- Copy the URL stub for the External Messages view.
- Navigate to the Views tab.
- Navigate back to Appian Designer and go to the CMGT Add-On - My Cases Module application.
- Search for and open the
CMGT_LA_TXT_URL_STUB_CASE_RECORD_MESSAGES_TABconstant.- Paste the copied URL stub in for the value of the constant.
- Click SAVE.