
OverviewCopy link to clipboard
Sites allow you to create a custom, well-tailored experience for your users that provides them with quick access to the pages, tasks, and information that they need in a professional and polished way.
This page provides you with detailed information on how to create and configure a site object. To learn more about how to use sites, see Using Sites. To learn more about how to create functional and beautiful sites, see Designing Sites and Portals.
Create a siteCopy link to clipboard
To create a site object:
- In your application, go to the Build view.
- Click NEW > Site.
-
Configure the following properties:
Property Description Name Enter a name that follows the recommended naming standard. Display Name Enter a name that will be displayed in the site navigation menu and the browser tab to identify the site. Description (Optional) Enter a description of the object to display to developers only. Web Address Identifier Specify a web address identifier to use as the site's URL. The identifier must be unique in the Appian environment. By default, Appian constructs this property using the Name property you entered, but you can modify the identifier as needed. - Click CREATE. Appian opens the site for you to further configure.
PropertiesCopy link to clipboard
To edit the site Name and Description, click Properties in the settings menu .
ConfigurationsCopy link to clipboard
The Configurations section allows designers to modify the primary site configurations that determine how users experience the site.
The following table describes these primary site configurations.


| Field | Description |
|---|---|
| Display Name |
The name that is displayed in the site navigation menu and the browser tab. You can create a Static display name, or create a dynamic display name using an Expression.
|
| Web Address | The section of the site's URL that identifies it. The web address id appears in the URL and in log files. |
| Show Tempo link in Navigation Menu | Option to show or hide the Tempo link in the navigation menu. You can select to always show it, never show it, or for one or more selected groups. |
| Show Record News | Option to show or hide the news view on records. When enabled, all records displayed in the site will include the news view. In addition, the latest news will be displayed on the summary view when viewing user records. |
| Show Task List on Mobile |
Option to enable a mobile site task list.
|
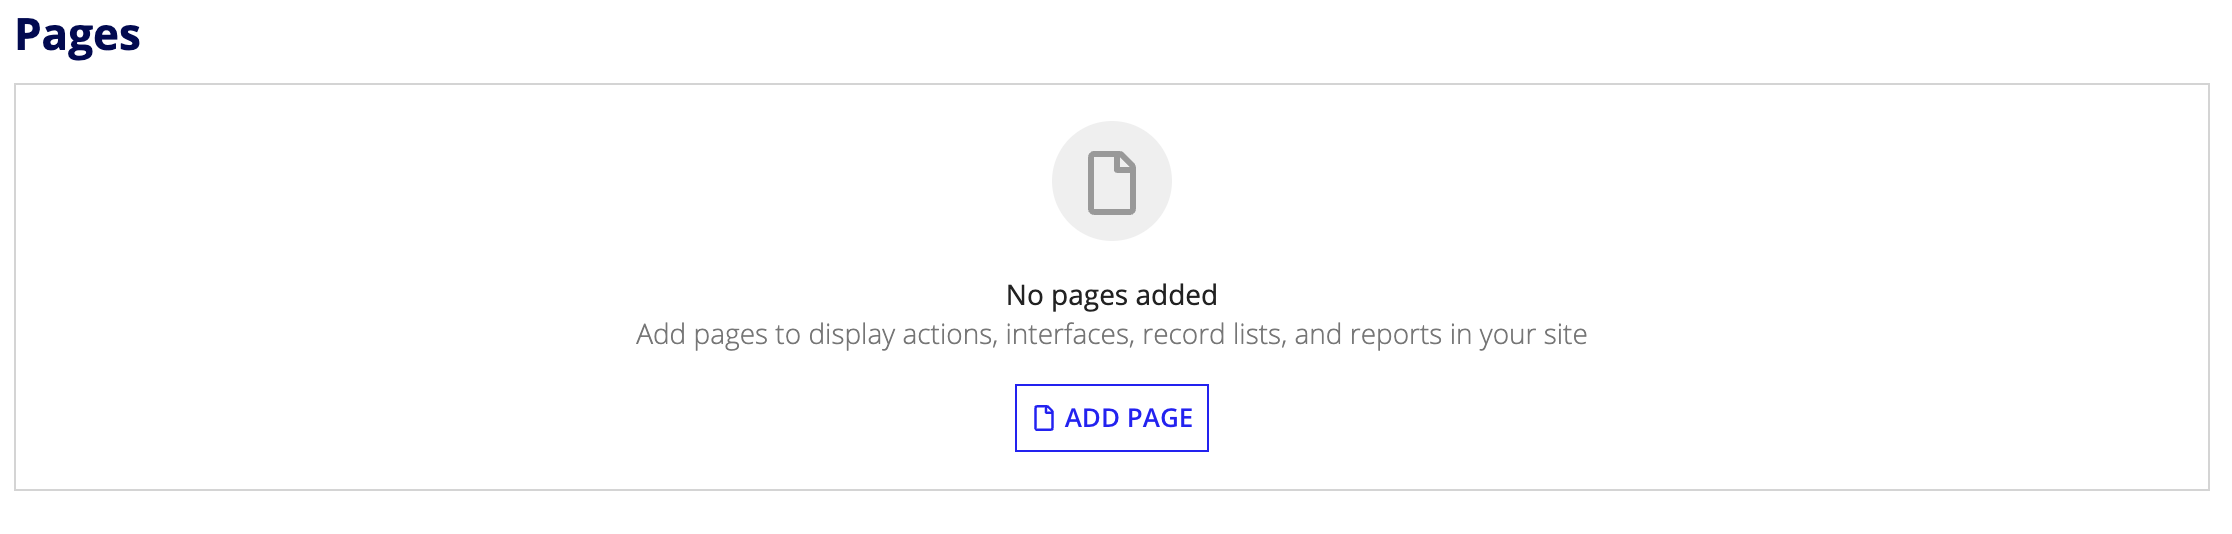
PagesCopy link to clipboard
The pages section allows you to add, remove, modify, or re-order the pages that are displayed in a site.
While you can configure up to ten pages in a site, configuring eight or fewer pages will usually offer the best experience for users. See Designing Sites and Portals: Pages for guidance to help you create better user experiences and Mobile Considerations for guidance about mobile-first sites.
Each page within a site can be configured with an action, an interface, a report (task report or Tempo report), or a record list.
To add and configure a site page:
- In the Pages grid, click Add Page.
- Complete the Add Page dialog and click OK
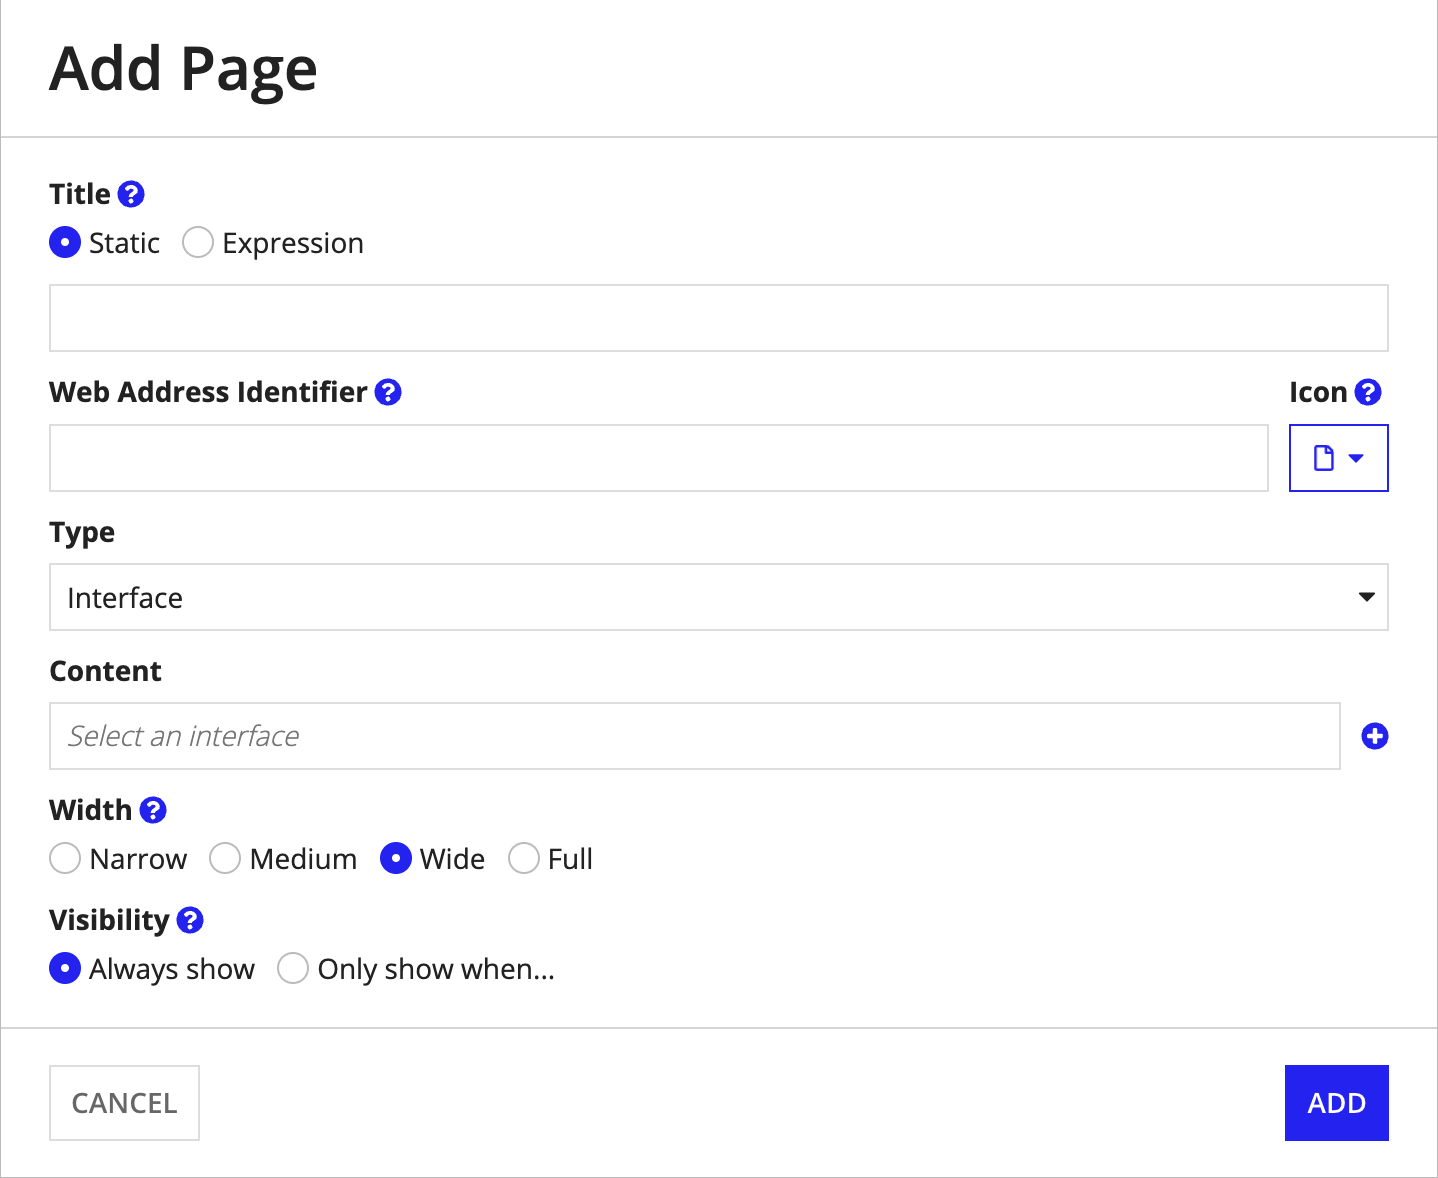
The following are the options available when adding or modifying a page.
| Field | Description |
|---|---|
| Title | The page title displayed to users in the header bar. This parameter is required and can be configured as a static string or as an expression. |
| Web Address Identifier | The section of the URL that identifies the page. It appears in the URL and in log files for network devices and servers. By default, Appian constructs this field using the Title you entered. |
| Width | Determines the width of the content area for the page. The width options are Narrow, Medium, Wide, and Full. Default is Wide. |
| Icon | The icon to display with the page title in the header bar. The file-o icon is selected by default. Icons display when using Helium style or when viewing the site on Appian Mobile. |
| Type | Indicates the type of content available on the page. The type options are Action, Interface, Record List, and Report. |
| Content | Specifies which design object is available on the page. In the dropdown list, select an existing object of the Type you selected. For the Interface type, instead of selecting an existing object, you can create a new one by clicking the + icon next to the selection box. |
| Visibility | Determines which users and groups can view the page. If Only show when is selected, the page is only visible when the entered expression evaluates to true. Otherwise the page is hidden. |
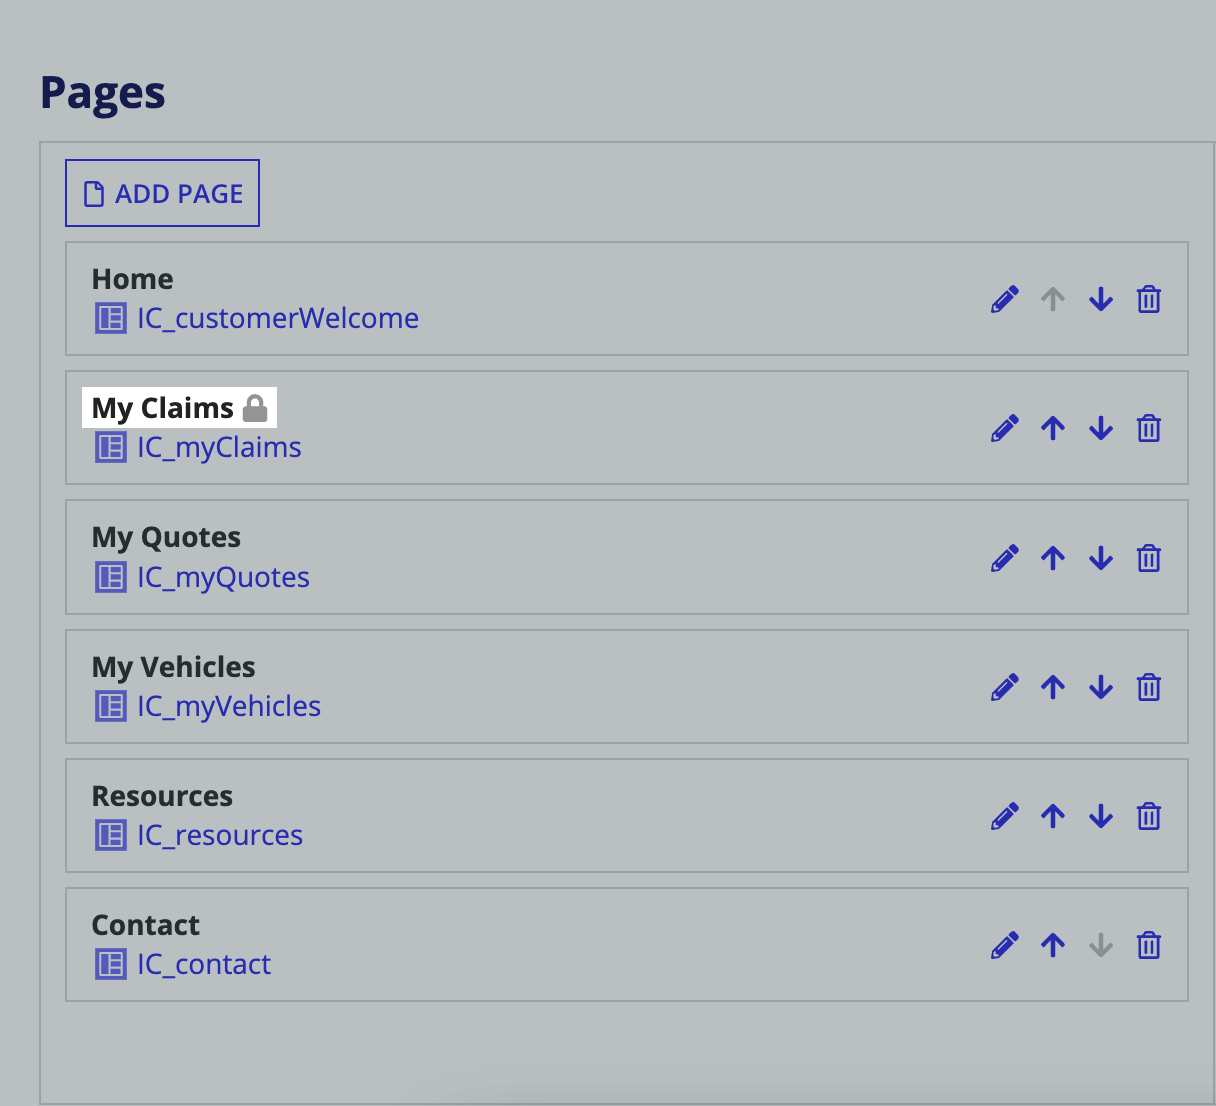
The order of the page titles in the site object determines the order of the page titles in the header bar. To reorder the pages, use the and arrows.
The icon displays to the right of the page title if the Visibility option is set to Only show when.
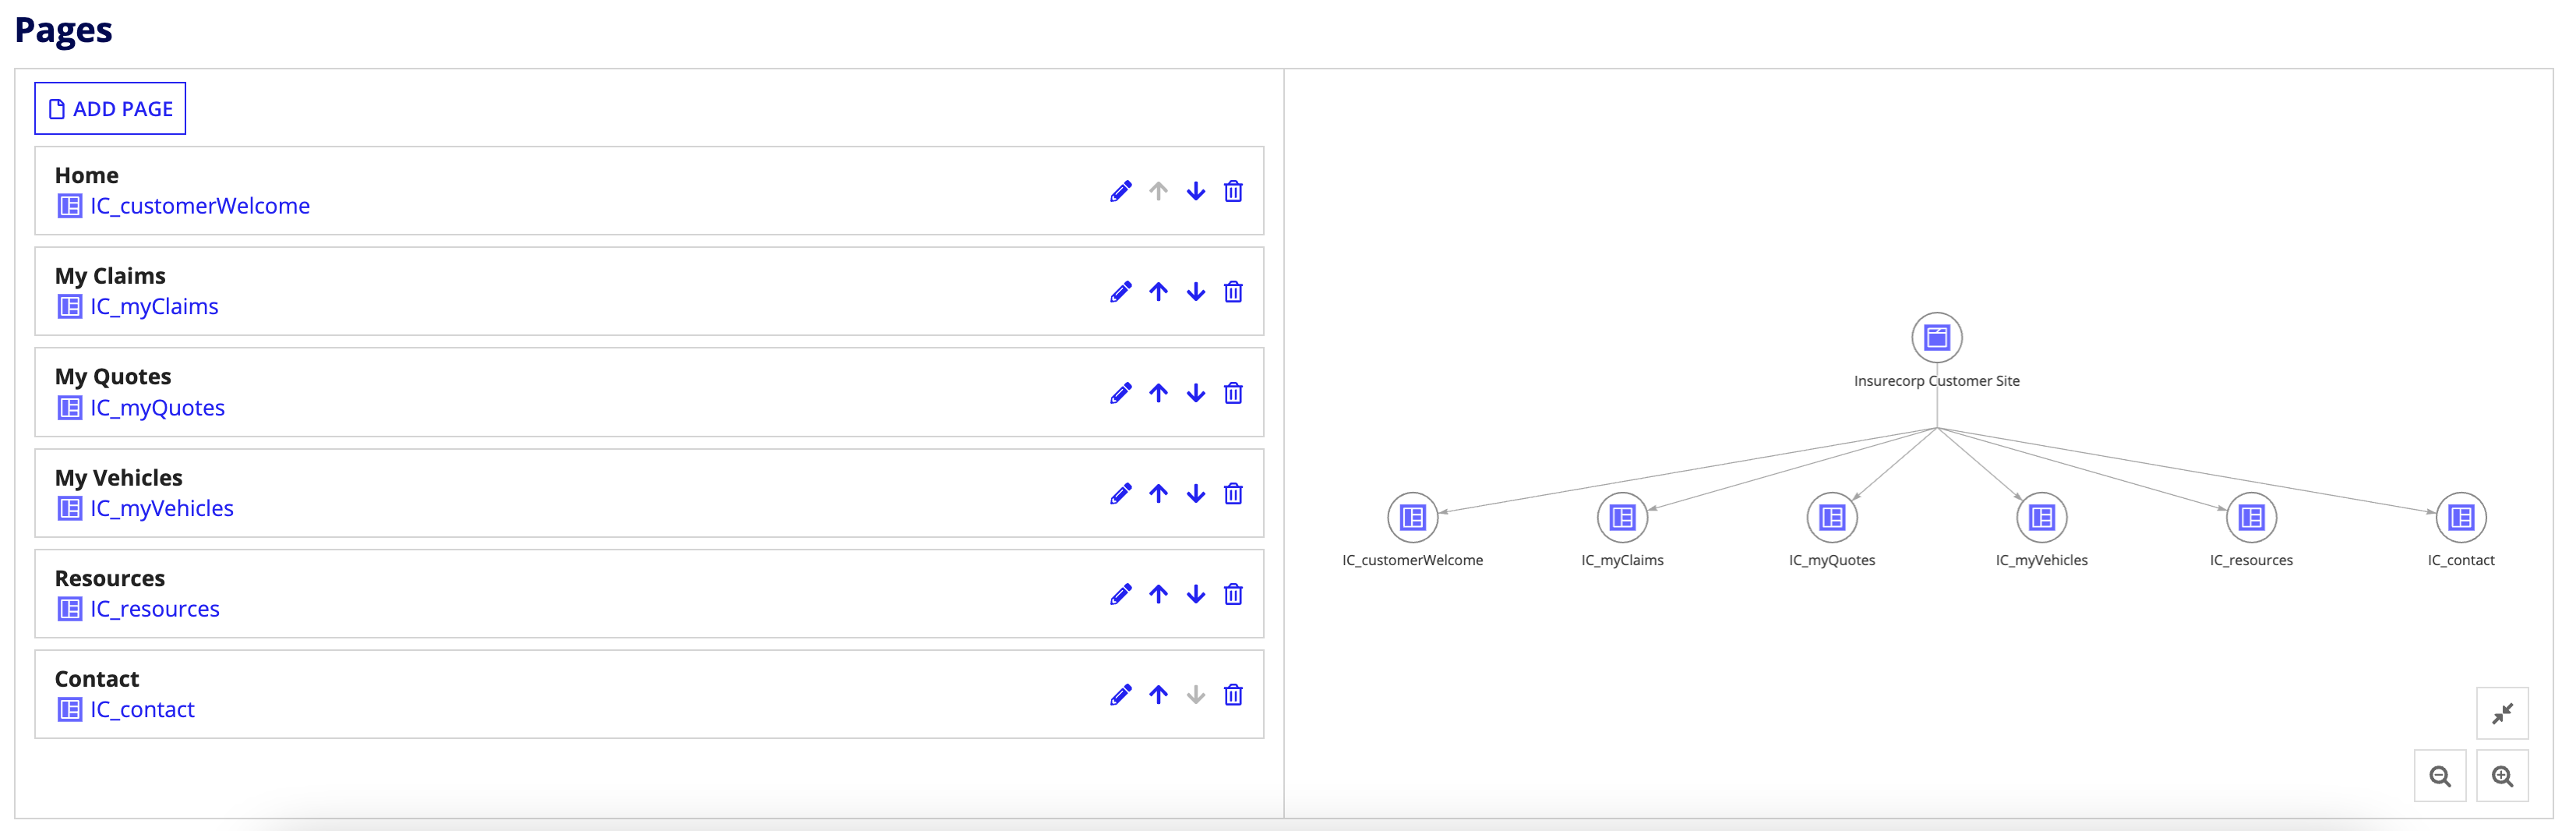
After you add at least one page to a site, the hierarchy diagram appears. This diagram is a visual representation of what powers your site and its pages, with each related object appearing as a node. For site pages that use a process model or a report, the diagram also shows the interface behind the corresponding start form or report.
![]()
As you add, reorder, or delete pages, the diagram automatically updates. You can also double-click an object in the diagram to open it.
Header and brandingCopy link to clipboard
The branding section allows designers to customize the look and feel of a site. These configurations can be set as static or dynamic values.
You can configure the following for each site:
- Site logo.
- Colors.
- Page icons.
- Header bar style.
- Input and button shape.
For further information on configuring site branding, see Designing Sites and Portals.
The following sections explain the branding configuration options.
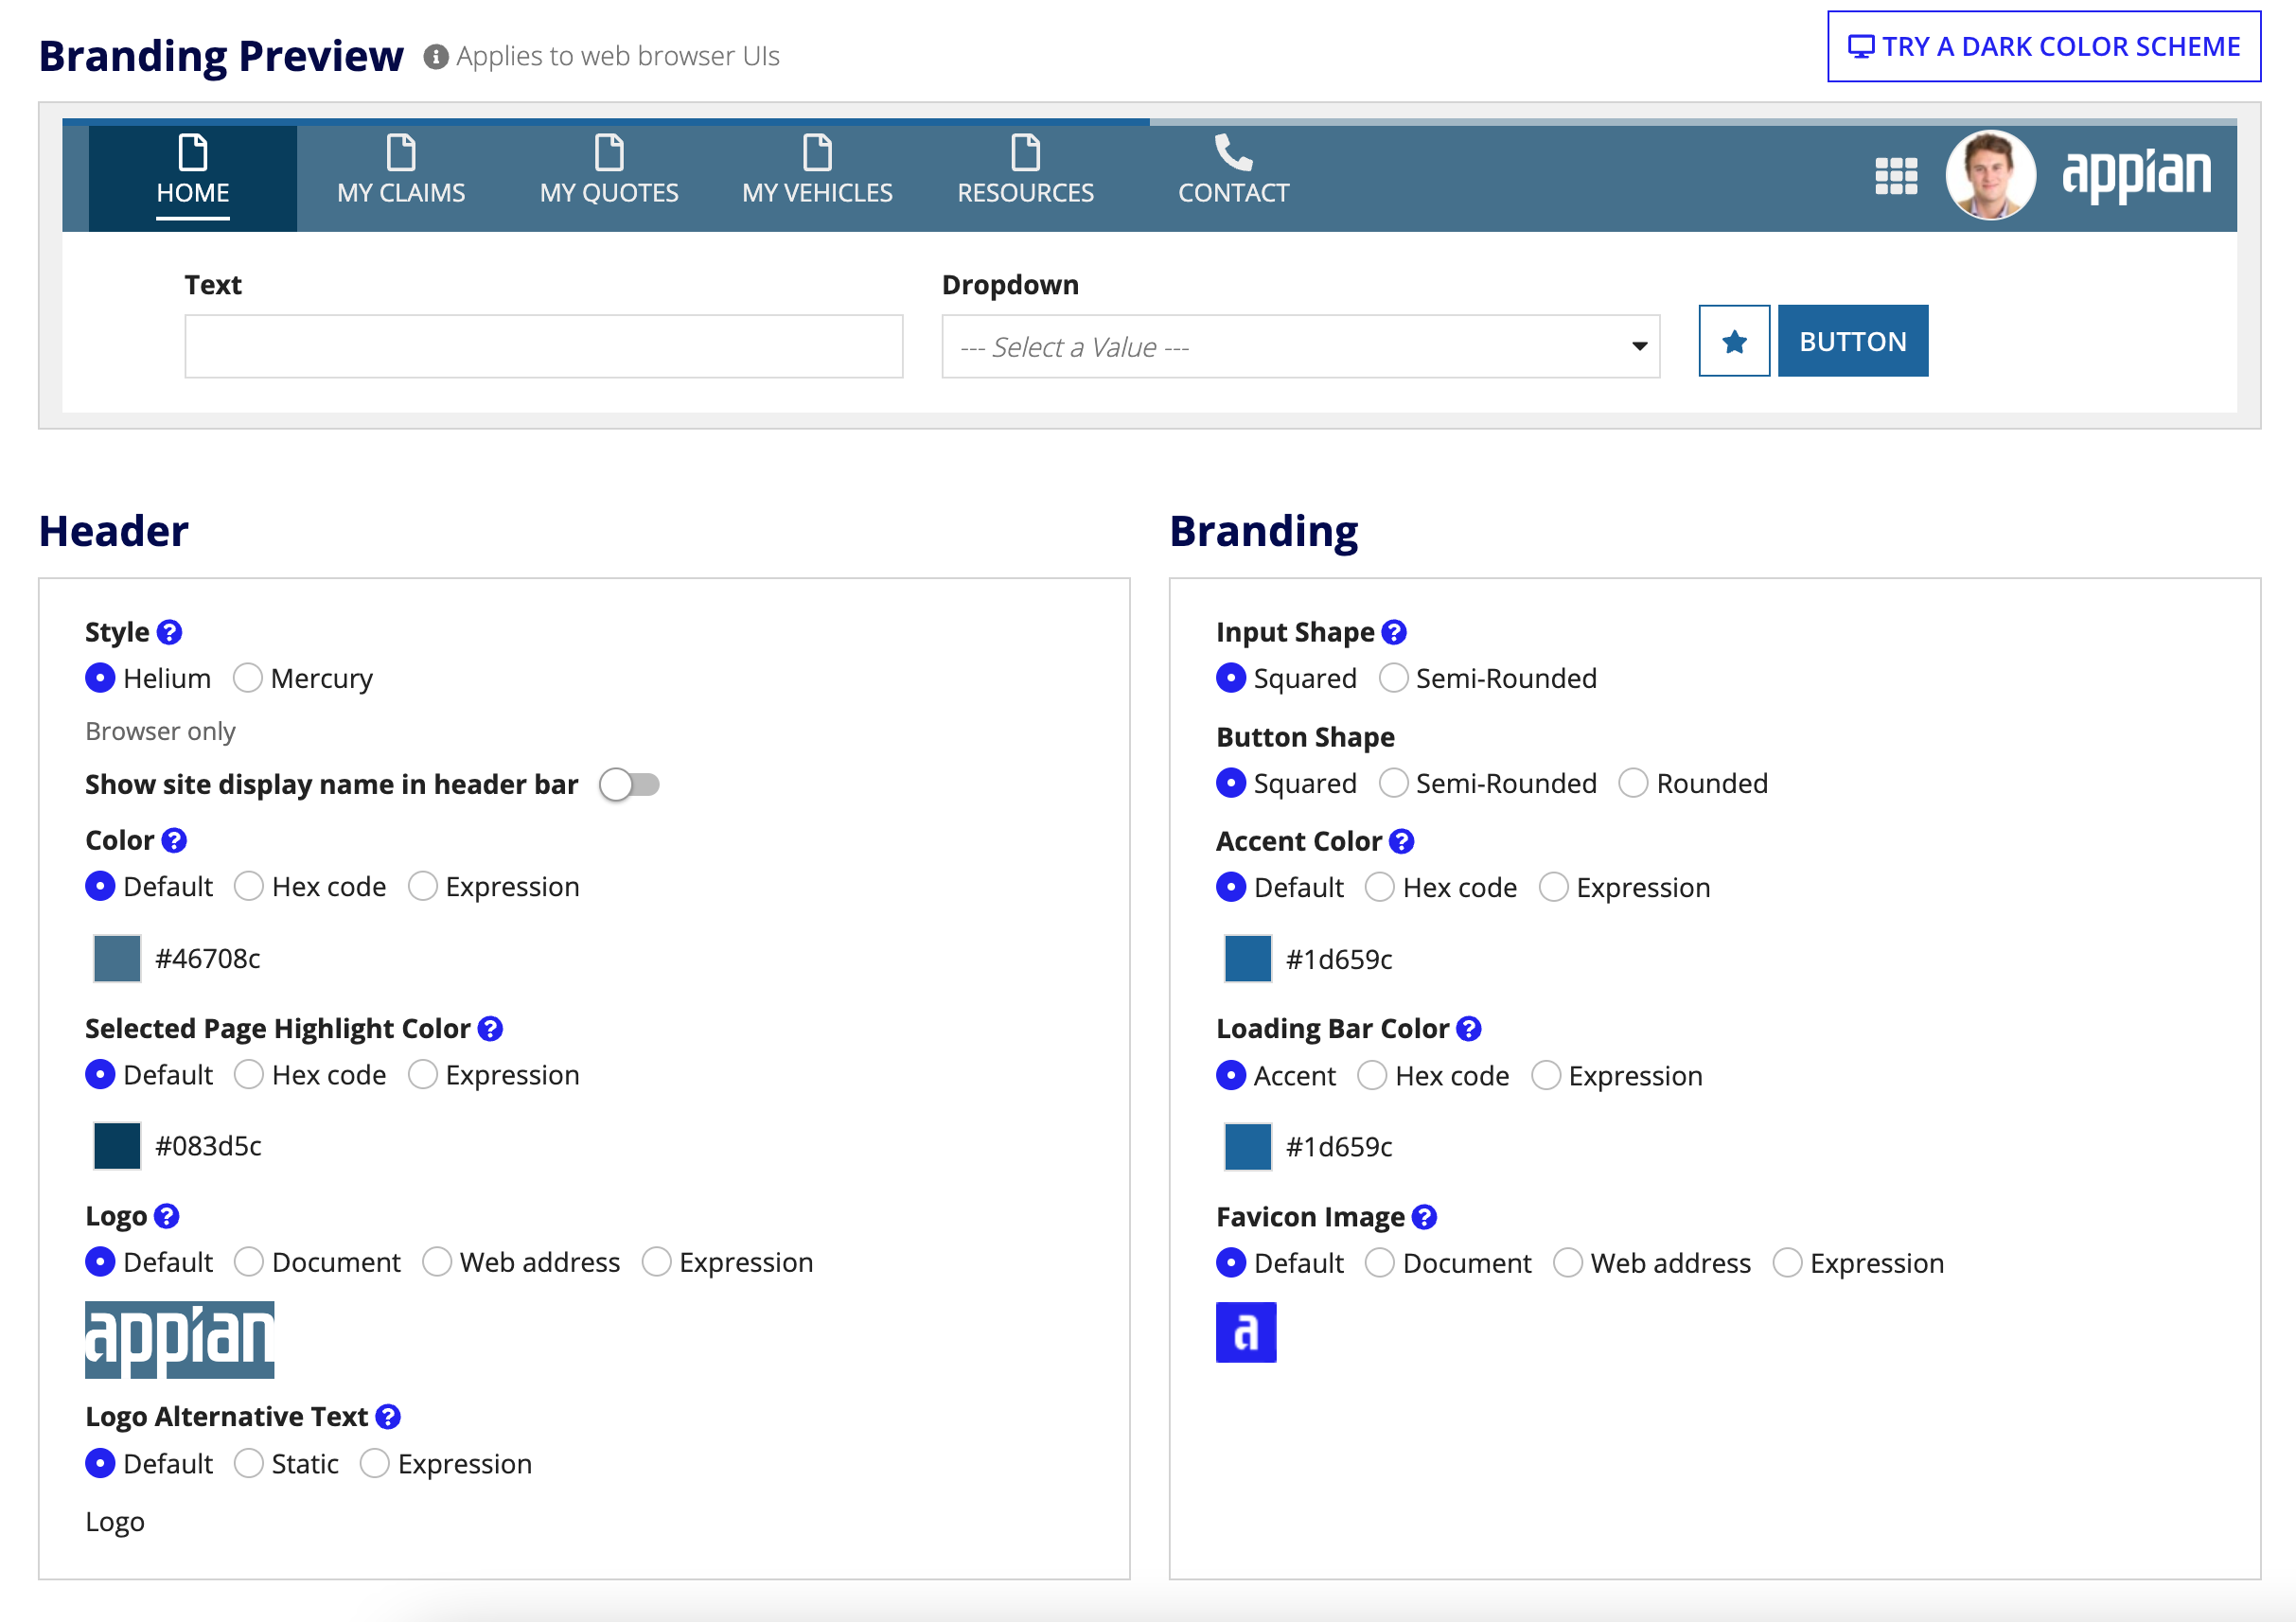
Branding PreviewCopy link to clipboard
Check out the Branding Preview to get a better idea of what your site configurations and branding will look like. To see these configurations applied to the site, save the site object and click the link under Web Address to open the site. Note that the branding preview doesn't reflect how the site will appear in Appian Mobile.
Click TRY A DARK COLOR SCHEME to choose a dark color scheme for your site and view instructions to configure your site interfaces to use the color scheme. See Using predefined dark color schemes for more information.
HeaderCopy link to clipboard
| Field | Description | Default | More Info |
|---|---|---|---|
| Style |
The style of the site header bar determines if icons are displayed with page titles, which side the logo is on, and the style of the Selected Page Highlight Color. There are two styles: Helium and Mercury.
|
Helium | The header bar style only applies to browsers. It doesn't affect sites in Appian Mobile. |
| Show site display name in header bar | Determines whether the navigation menu displays as the Display Name of the site, or the icon. | Turned off | This setting only affects web browsers, not Appian Mobile. |
| Color |
|
#46708c | - |
| Selected Page Highlight Color | The highlight color of the selected page in the header bar. | #083d5c | For Helium style, this is the underline color of the selected page. For Appian Mobile and Mercury style, this is the background color of the selected page. |
| Logo | The logo to display in the header bar. The placement of the logo depends on the header bar style:
|
Appian logo | File requirements:
|
| Logo Alternative Text | Text used by screen readers to describe the logo for accessibility. You should update the default value to something that conveys the same information as the logo, such as the company or entity name or any text used in the logo. | Logo |
The alternative text can be set by a logo, web address, or expression. To use either a document or web address, select Static. |
BrandingCopy link to clipboard
| Field | Description | Default | More Info |
|---|---|---|---|
| Input Shape | The shape applied to all input fields, selection fields, and picker components on all pages in a site. | Squared | Options: squared and semi-rounded. |
| Button Shape | The shape applied to all buttons on all pages in a site. This includes all buttons for record view tabs and record actions. | Squared | Options: squared, semi-rounded, and rounded. |
| Accent Color | Affects the color of many elements in all site pages, such as buttons, links, active field border colors, milestone bars, and section titles. | #1d659c | Avoid grayscale colors (black, white, and gray), since these are similar to colors used for interface elements. Avoid green/red colors, since these are commonly used to indicate positive/negative values. |
| Loading Bar Color | The color of the bar at the top of the page that indicates when the system is processing. | The accent color | Select a loading bar color with sufficient contrast against the header bar color to ensure users notice it. |
| Favicon Image | The favicon, or favorite icon, is the icon that appears in the browser tab or URL bar. | Appian "a" icon | File requirements:
|
Configuring colorsCopy link to clipboard
Each color field has three color configuration options to choose from:
- Default: The default color depends on your field.
- Hex Code: Select this option to define a hex code, or choose a color using the color picker.
- Expression: Select this option to dynamically set a color defined by an expression.
- If an expression's output is an invalid hex code, the field will show the default color.
If you select a predefined dark color scheme, the values for the header bar color, selected highlight color, accent color, and loading bar color are all provided for you.
For more information on sites color schemes and color configurations, see the site color scheme design guidance.
Configuring logo and favicon imagesCopy link to clipboard
The logo and favicon fields have four configuration options to choose from:
- Default: Select this to use the Appian logo.
- Document: Select this to use an image that is stored as an Appian document.
- Web Address: Select this to use a static image hosted on a web server or a content delivery network.
- Expression: Select this to dynamically display an image defined by an expression. The expression must point to a document, output a document ID (integer), or output a text value (web address). If an expression's output is invalid, the default image will display.
Design guidanceCopy link to clipboard
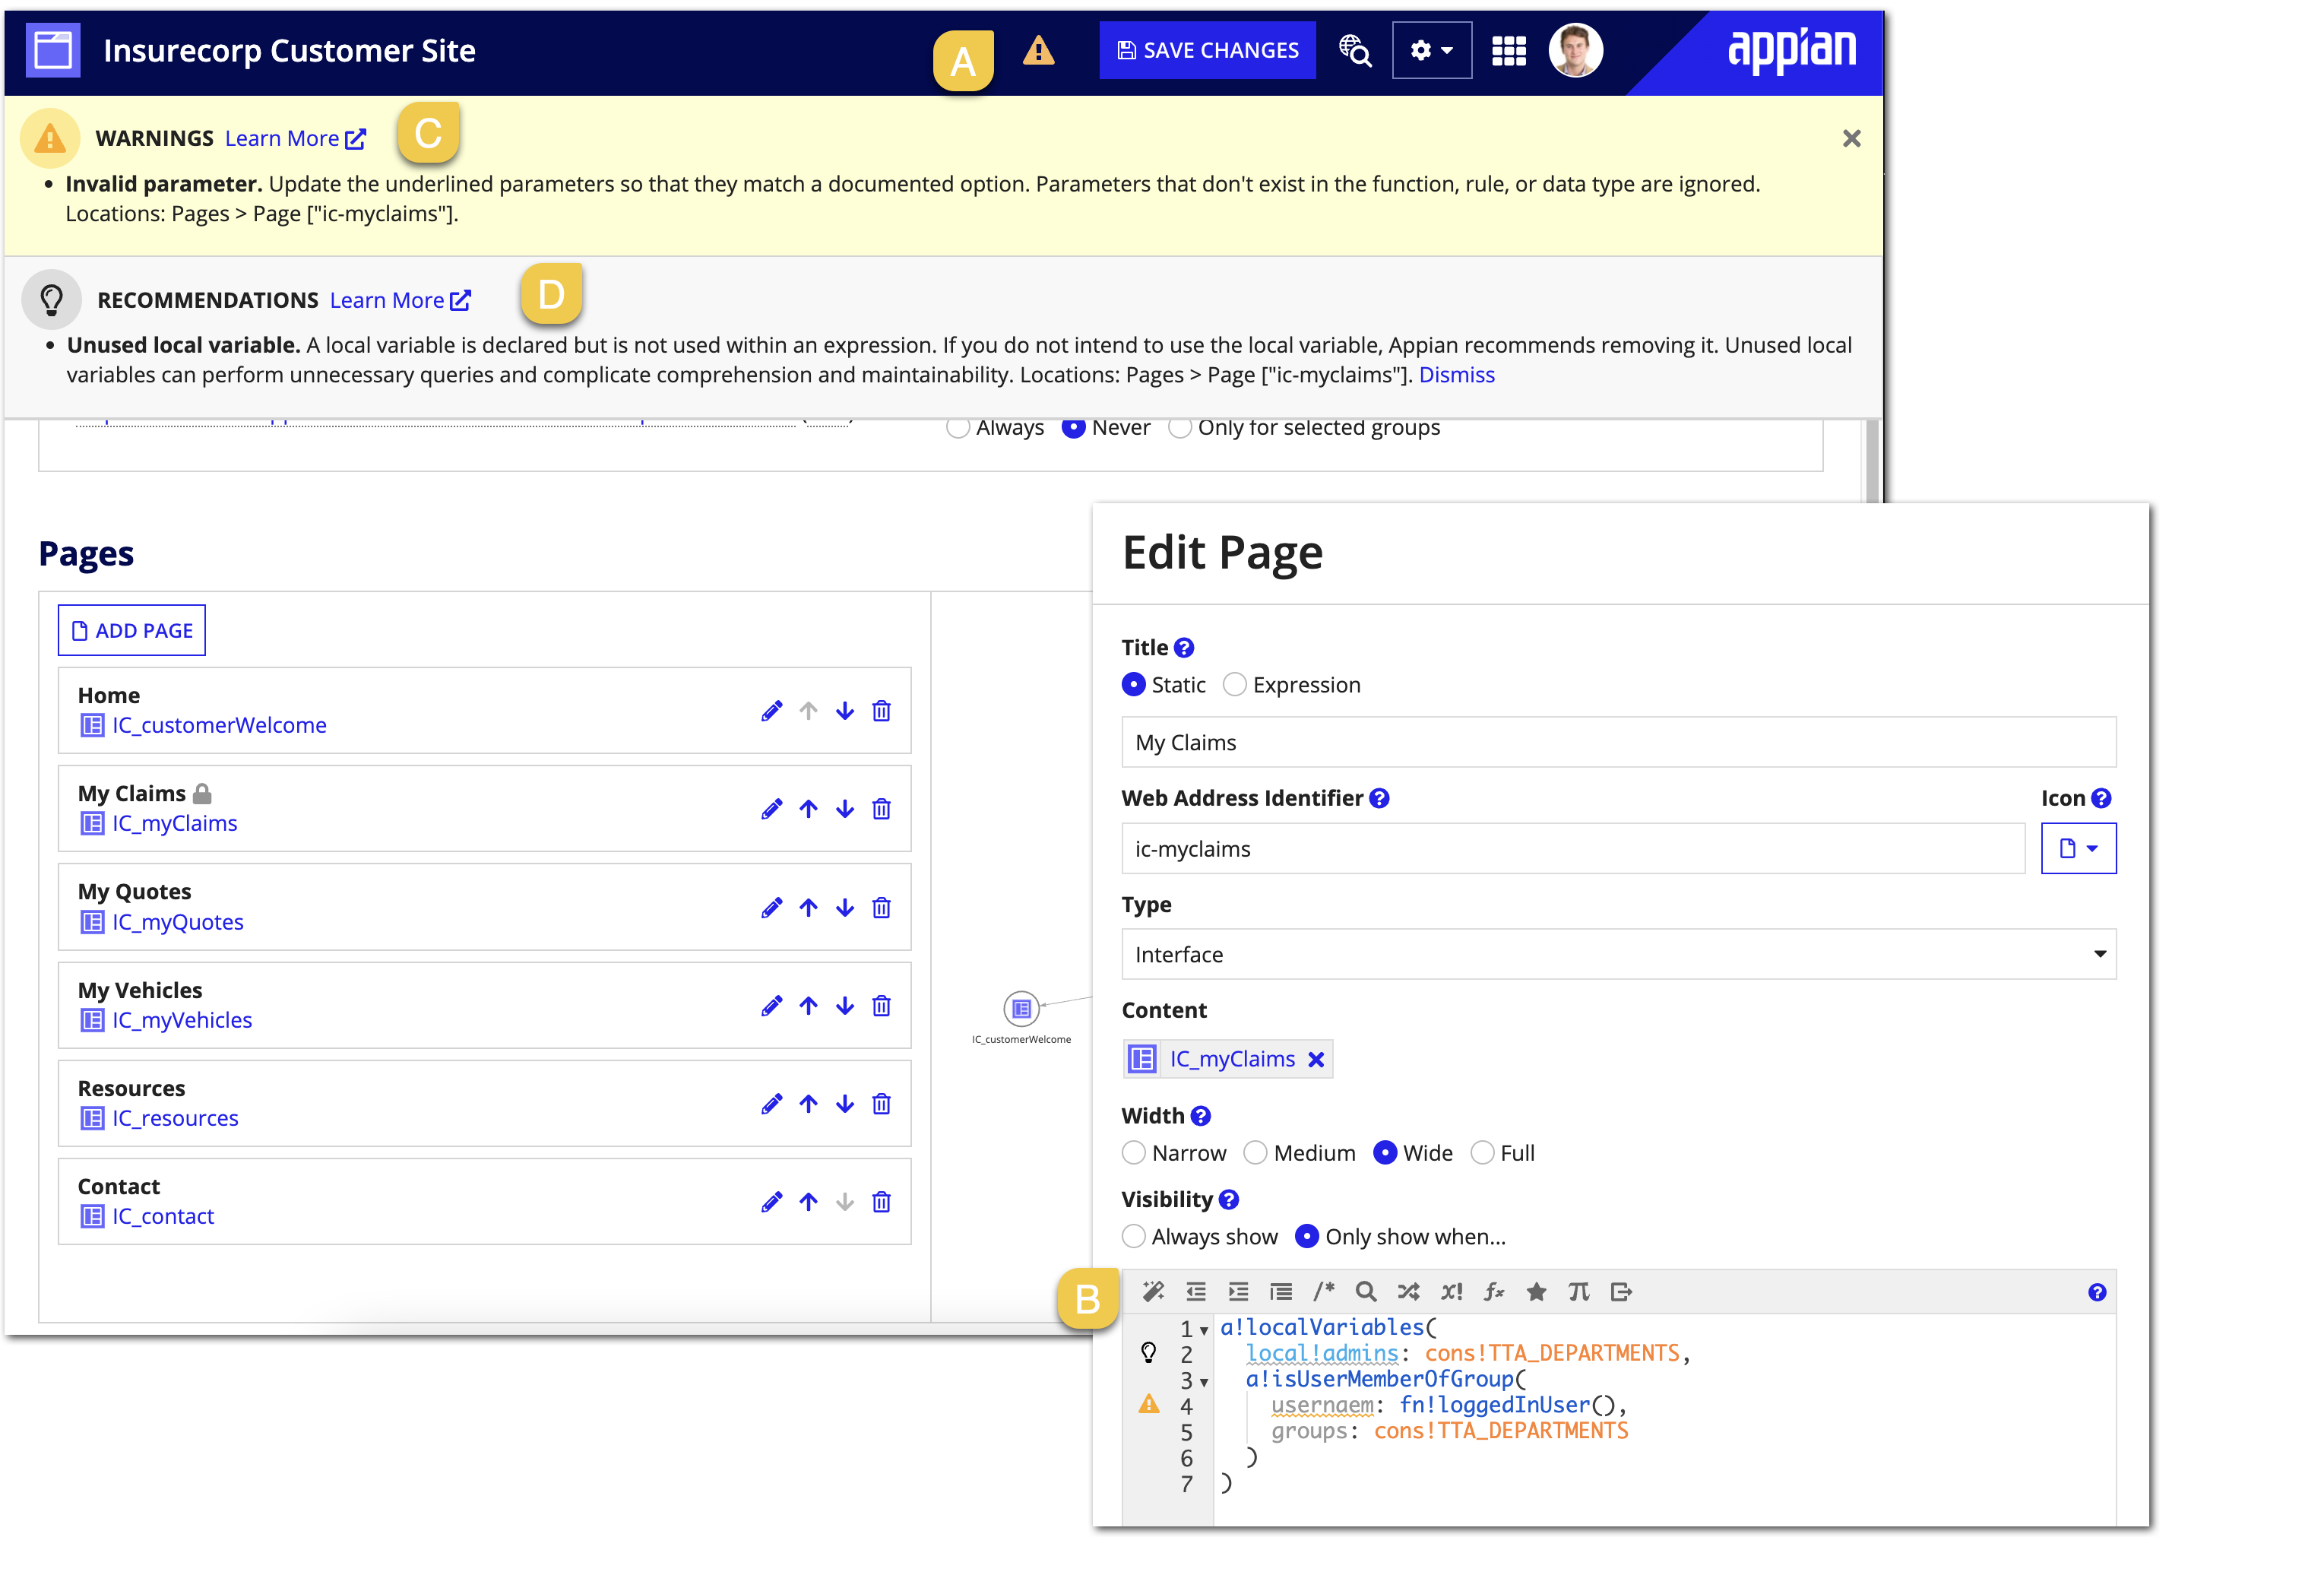
As you edit your site you may encounter design guidance. Appian design guidance reinforces best practice design patterns that should be implemented in your objects. Guidance is calculated while editing expressions within the site or when a precedent of the site is updated.
When a recommendation or warning is triggered you'll see an indicator icon in the header (A) and next to the corresponding line in the expression editor (B).
Click on the icon in the header to learn more about the suggested guidance (C) and how it can be addressed.
If a recommendation is not applicable to your use case, you can Dismiss (D) that individual recommendation for that site. Learn more about recommendation dismissal. Warnings cannot be dismissed and should always be addressed to avoid complications when the logic in the object is executed.
Site design guidance is also visible outside of the object on the Health Dashboard.
See design guidance for the full list of possible guidance.
Save and view the siteCopy link to clipboard
To save and view the site:
- In the header bar, click SAVE CHANGES.
- In the Configurations section, under Web Address, click the link to open the site.
Tip: Once you preview the site, you can easily navigate back to an object's configuration using the Show Objects button available on any site page as long as you belong to the Designers system group.
Considerations for configuring sitesCopy link to clipboard
This section provides you with guidance and tips to keep in mind while you're creating and configuring your site.
See Designing Sites and Portals for design guidelines you should follow to give your users the best user experience.
Interfaces as sites pagesCopy link to clipboard
Use interfaces as sites pages to create dynamic dashboards, landing pages, and custom navigation experiences for your users. For design examples and inspiration, check out our complete list of drag and drop patterns to help you craft an efficient and engaging user experience.
Do not use interfaces with rule inputs as sites pages. Instead, use local variables and queries to display data on your sites page.
Reports as sites pagesCopy link to clipboard
Use a report to allow the information in a sites page to be quickly accessible from the Reports tab in Tempo.
If the information in your sites page doesn't need to be accessible from the Reports tab on Tempo, use an interface for your sites page.
Reports cannot reference interfaces that use rule inputs. Instead, use local variables and queries to call and display data in the report's interface.
Records and actions as sites pagesCopy link to clipboard
Configuring sites to show record news can help improve the collaboration around records. Users can collaborate on existing record news entries in sites, but not create new entries. However, records can be designed to include related actions that can generate new record entries via process.
Minimum Appian Mobile version to see more than five pagesCopy link to clipboard
For sites with more than five pages, Appian Mobile users must be on at least version 23.2 of the app to see any page past the fifth page.
TypefacesCopy link to clipboard
You can configure a custom typeface in the Admin Console. Typefaces are universally applied to all sites and portals in the environment.
See Custom Typefaces for more information.
Using predefined dark color schemesCopy link to clipboard
- The predefined dark color schemes for sites include predefined colors for the header bar and selected highlight color.
- When you select one of the predefined dark color schemes for your site, make sure that all of your site pages are using the same color scheme. To do this:
- In the interface for your site page, use a header content layouts with the backgroundColor parameter set to the same color scheme used for your site: Charcoal, Navy, Plum.
- Then, put the page's contents into card layout with the style parameter of each card layout set to the same color scheme used for your site.
- Do not use dark color scheme pages and non-dark color scheme pages together in a site. If all pages in your site don't work well with the predefined dark color schemes, you can create your own custom color scheme for your site and interfaces.
- Dark color schemes shouldn't be applied to pages used on Tempo or across multiple sites with different color schemes. Dark color schemes also do not work with the News and Related Actions tabs on records, record lists, and record related actions. If your site requires any of these, we recommend using the default white background across all site pages.
Components that aren't affected by input shape roundingCopy link to clipboard
Input shape rounding is not applied to the following UI elements:
- Layouts
- Display fields
- Actions
- Grids
- Charts
- Browsers
- Record banners
Using site display names in URLs and navigation menusCopy link to clipboard
After you've created a site, the web address identifier (URL) won't automatically update if you edit the site display name or define it using an expression.
Site display names appear in the navigation menu. If you use an expression to create a site display name, that expression will evaluate whenever sites in the environment load or refresh in order for the site display name to appear in the navigation menu. To avoid your sites loading slowly, don't use long-running expressions, like queries.
Site security and loggingCopy link to clipboard
The security and monitoring of your site is important. Configure site security to control who can see and edit your site. Monitor your site by checking out site usage and metrics in your environment's logs.
SecurityCopy link to clipboard
Note: A user must have at least Viewer permissions to a site to access it. In addition, a user must have visibility to site pages and at least Viewer permissions to each interface, report, record type, or process model configured as a site page's content.
The security role map of a site controls which users can see or modify the site and its properties.
If default security groups are configured for your application, the default security groups pre-populate the role map when you create a site. If default security groups are not configured for your application, you are automatically assigned Administrator permissions for any site object you create. System administrators can always access a site object, regardless of object-level permissions.
See Editing Object Security to modify a site's security.
The following table outlines the actions that can be completed for each permission level in a site's security role map:
| Actions | Administrator | Editor | Viewer |
|---|---|---|---|
| View the site | Yes | Yes | Yes |
| View the definition | Yes | Yes | Yes |
| View the security | Yes | Yes | Yes |
| Update the definition | Yes | Yes | No |
| Update the security | Yes | No | No |
| Delete the site | Yes | No | No |
LoggingCopy link to clipboard
Site usage is logged in <APPIAN_HOME>/logs/audit/sites_usage.csv. See Sites Usage Audit for details.
Sites metrics are logged in <APPIAN_HOME>/logs/data-metrics/sites.csv. See Sites Metrics Log for details.