| The capabilities described on this page are included in Appian's standard capability tier. Usage limits may apply. |
Note: If RPA isn't enabled for your Appian environment, you won't be able to use the Operations Console.
This page discusses the Operations Console, where you can manage robots.
A robot is a digital worker that's made up of two parts: a host machine and an agent. A robot needs a workspace, just like a human worker does. The host machine is the environment in which the digital worker completes robotic tasks. The host machine can be a physical machine, such as a separate computer, or a virtual machine on a cloud server. Multiple robots can map to the same host machine.
Create a robot for each physical or virtual machine (VM) to run robotic tasks. Every robot has a corresponding agent, which can only be used on one host machine.
Note: Avoid trying to run multiple robotic tasks on the same machine at the same time because they will likely conflict with each other.
When running your robotic tasks in a production environment, we recommend using a dedicated machine, whether it is a provisioned virtual machine (VM) or physical machine.
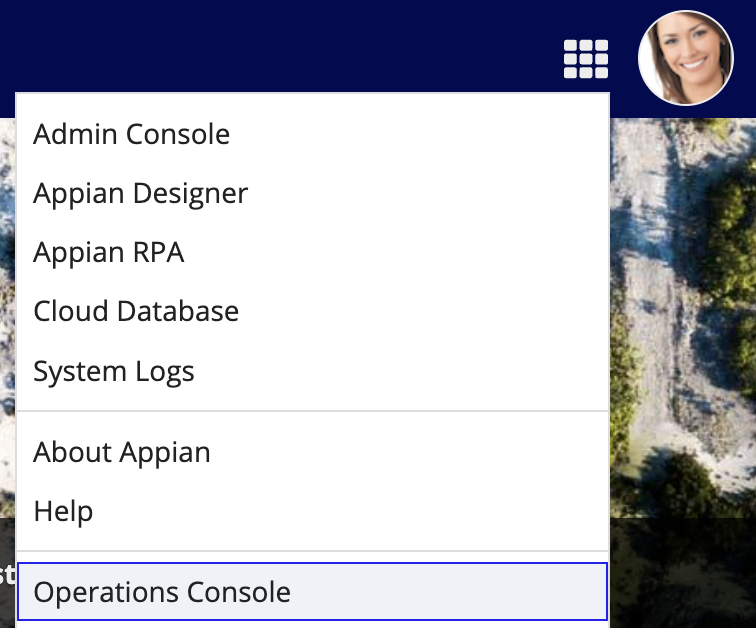
Open the Operations Console through the Appian navigation menu.
Required role: Administrator
The Operations Console is designed to allow Operations Managers to set up and maintain a fleet of robots to support robotic task executions. Any user who is added to the Designer role, System Administrator role, or a member of the RPA Operations Managers system group has access to the Operations Console.
Administrators can control who has access to the Operations Console by updating a user's group membership in Appian.
By default, Operations Managers can perform the following actions:
Additionally, Operations Managers can perform the following actions when they share permissions with the robot they're interacting with:
Tip: Only administrators can create and delete robots in the Operations Console.
Required role: Administrator
Note: Next steps
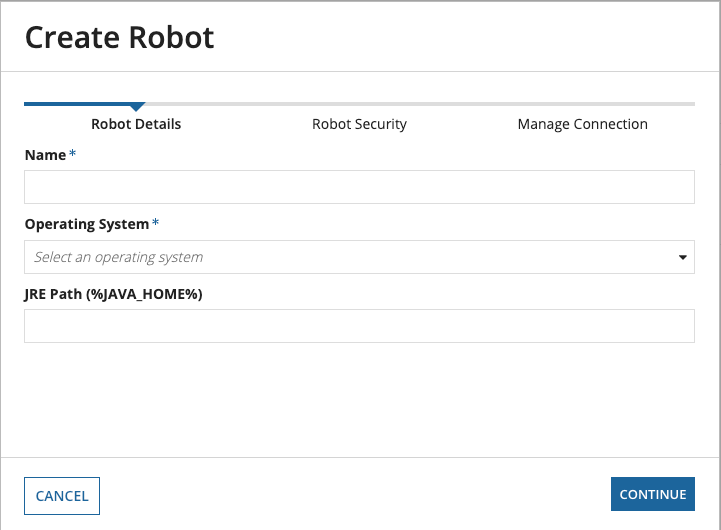
To enable a new robot to execute robotic tasks, ensure you install the agent on the host machine. The agent facilitates communication between Appian and the host machine, including relaying the robot's status. Before installation, make certain the host machine is properly configured.
You can use a VM to run robotic tasks. By default, VMs may timeout and become unavailable after a period of inactivity.
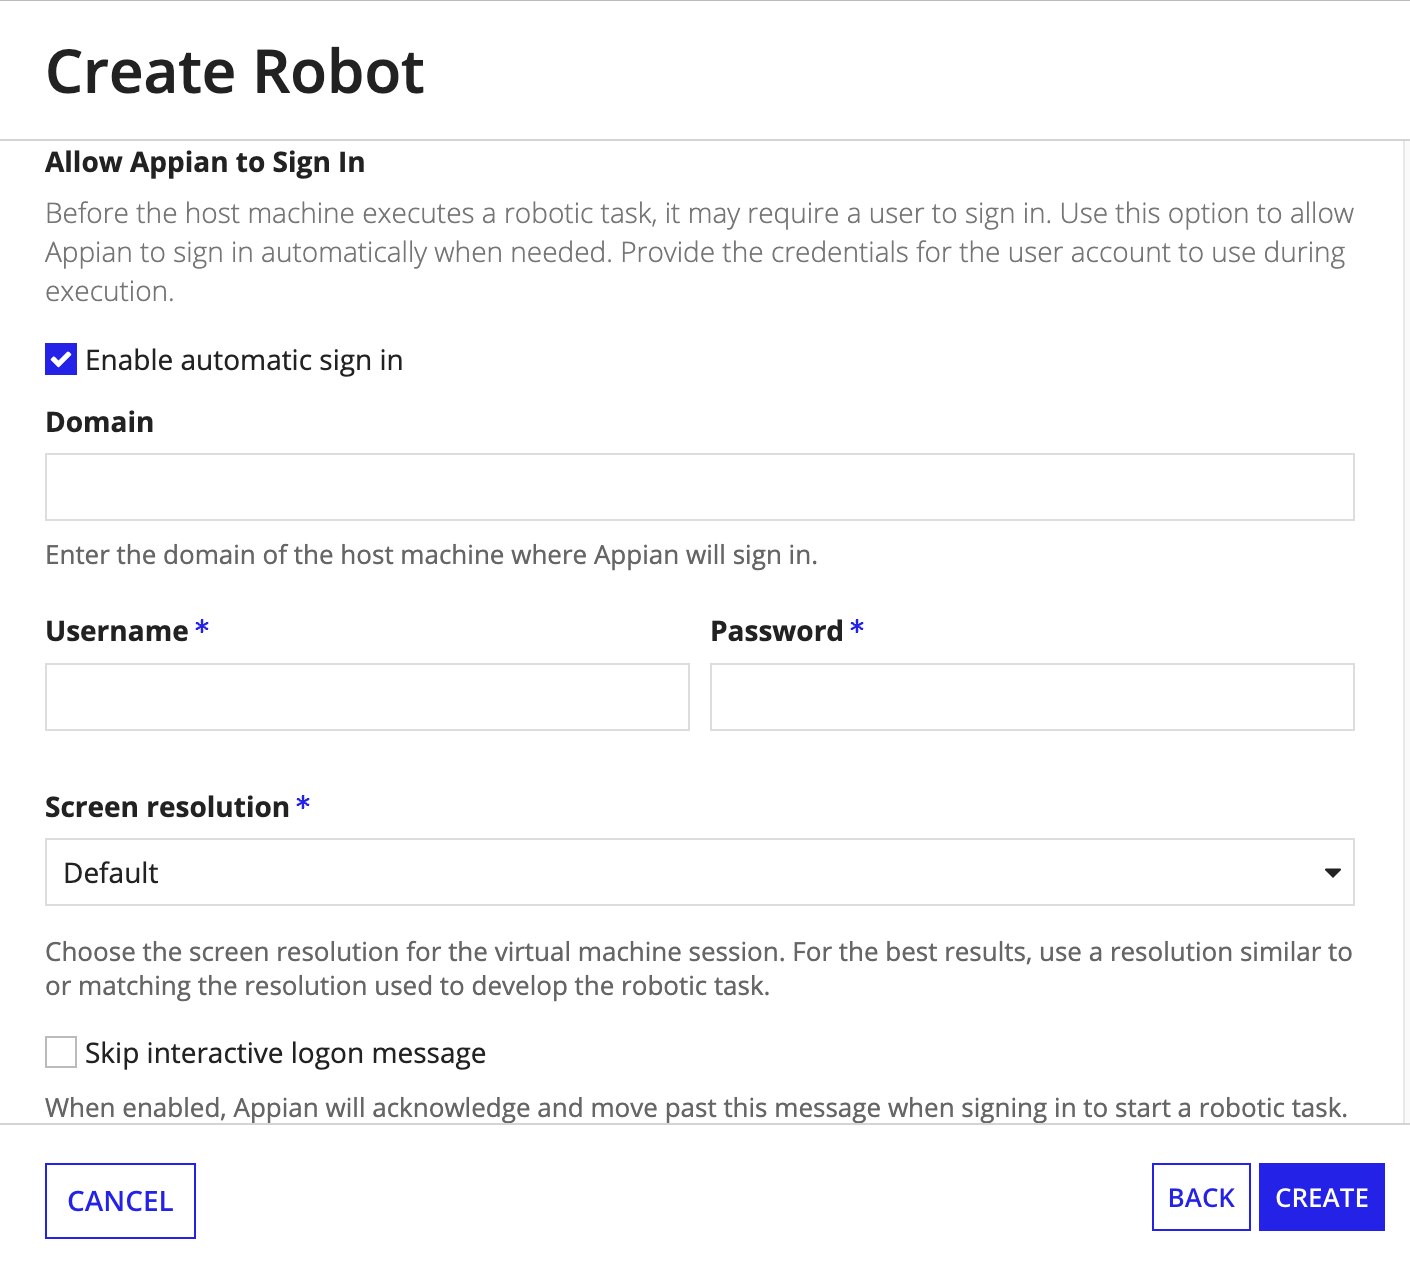
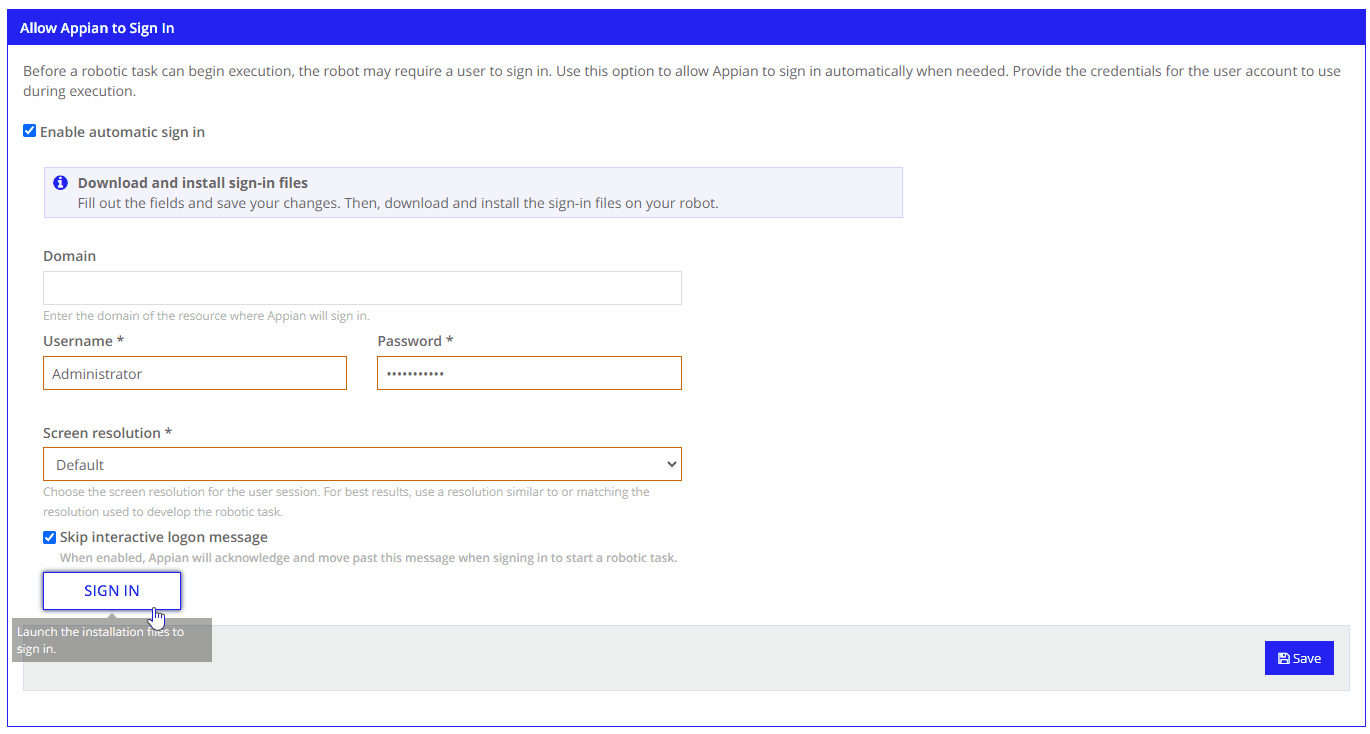
To ensure the VM remains available, you can allow Appian to sign in to the host machine to start an execution. You can also complete additional configurations on the VM. Microsoft Remote Desktop users can configure the following to prevent VM host machines from timing out:
Additionally, ensure that the agent you have downloaded on the host machine has administrator privileges to allow them to unblock sessions as needed.
Before a robotic task starts, it may need to access your host machine and start a user session if one isn't already active. On top of that, your business may restrict the privileges available to this user session.
You can configure your robot to allow Appian to automatically sign into a virtual machine as any designated user (basic or administrator) in order to start a robotic task. This means that you won't need to keep user sessions active on virtual machines in case a robotic task needs to start. Instead of keeping user sessions active, Appian can start a session as needed for robots with Standby status.
Appian can also automatically sign out of the host machine if there are no more robotic tasks to run after the last execution. Configure this option to build more flexibility into your unattended automations.
Note: Appian only supports Enable automatic sign in on Windows host machines.
You can find these configuration options when you create a robot or edit a robot's details.
To allow Appian to sign in:
Existing robots only: If you're allowing Appian to sign in for a robot you already set up, you need to replace the agent on the host machine by downloading the installer again:
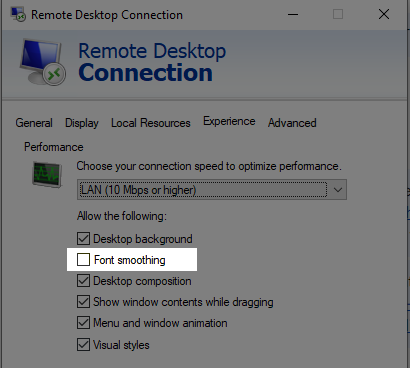
To improve image recognition for automatic sign in, try disabling font smoothing before taking screenshots. If you're having trouble with the image recognition, this could help.
Required role: Any
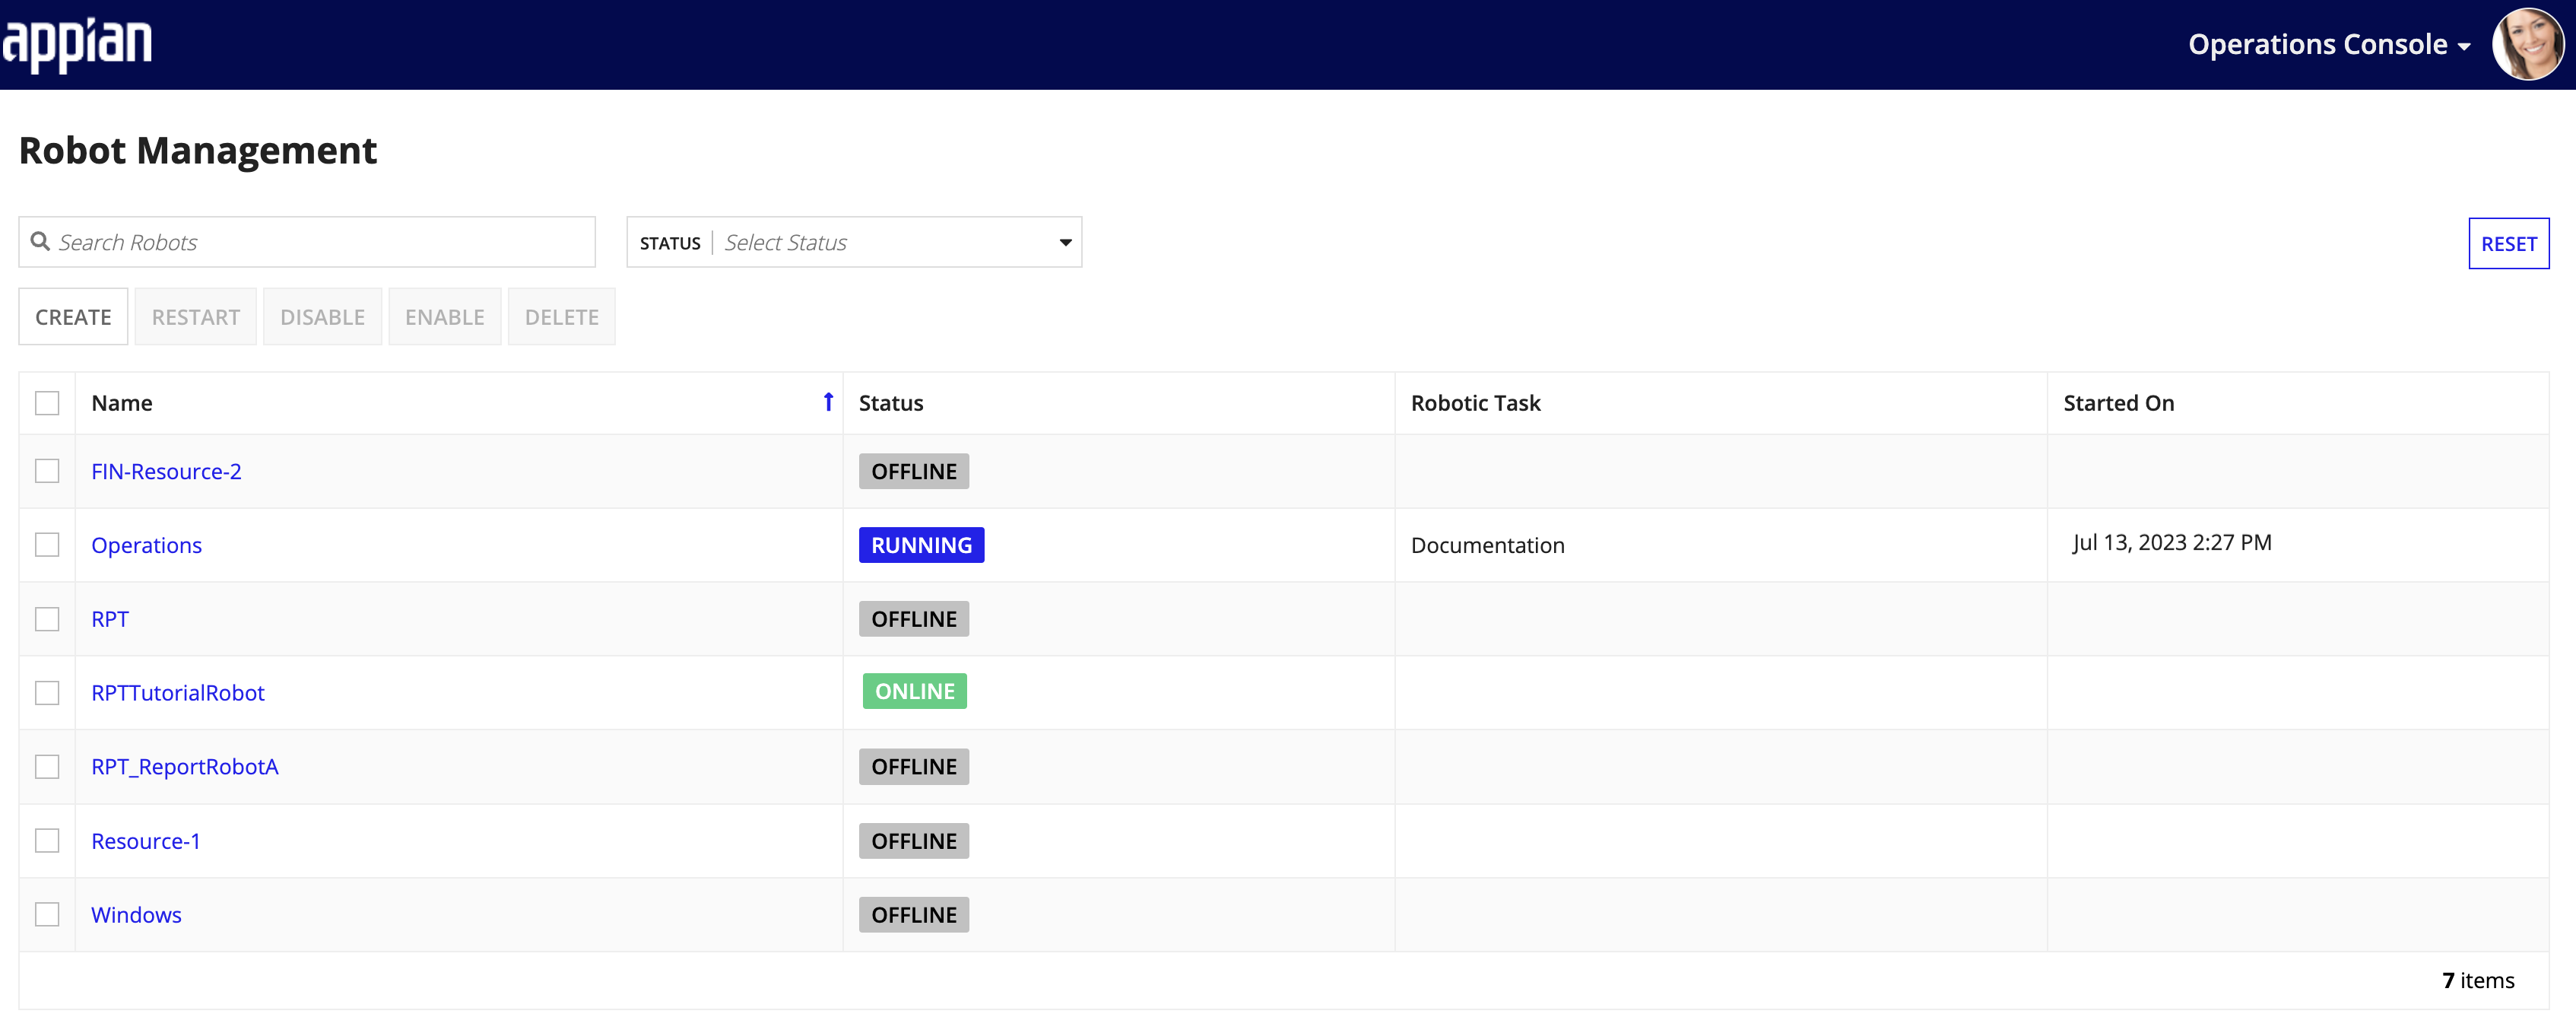
The Operations Console contains all robots available to you. Click a robot to view its details.
The robots are listed in alphanumerical order in a grid with the following information:
For each robot in the list, you'll see a status to indicate what the robot is currently doing.
| Status | Description |
|---|---|
| Online | Robot is online and ready to run a robotic task. |
| Outdated | The agent is updating or failed to update. Check back soon. If still outdated, manually reinstall and launch the agent. |
| Offline | Robot is offline and can't run a robotic task. Run the robotic task on your local host machine or allow Appian to sign in to the robot automatically. |
| Disabled | This robot is disabled, so it can't run robotic tasks. Enable the robot to run a robotic task. |
| Blocked Keys | There is an issue with the keys on the robot. A robotic task can run, but may produce unexpected results. To fix the issue, run a robotic task to release the keys, or restart the user session. |
| Running | Robot is online and busy running a robotic task. |
| Concurrence | The robot is using an agent that's installed and launched in more than one place. Disconnect one agent and allow Appian to sign in to the robot automatically. |
| Standby | Robot is ready to run a robotic task. |
| Recording | Robot is online and busy recording interactions. |
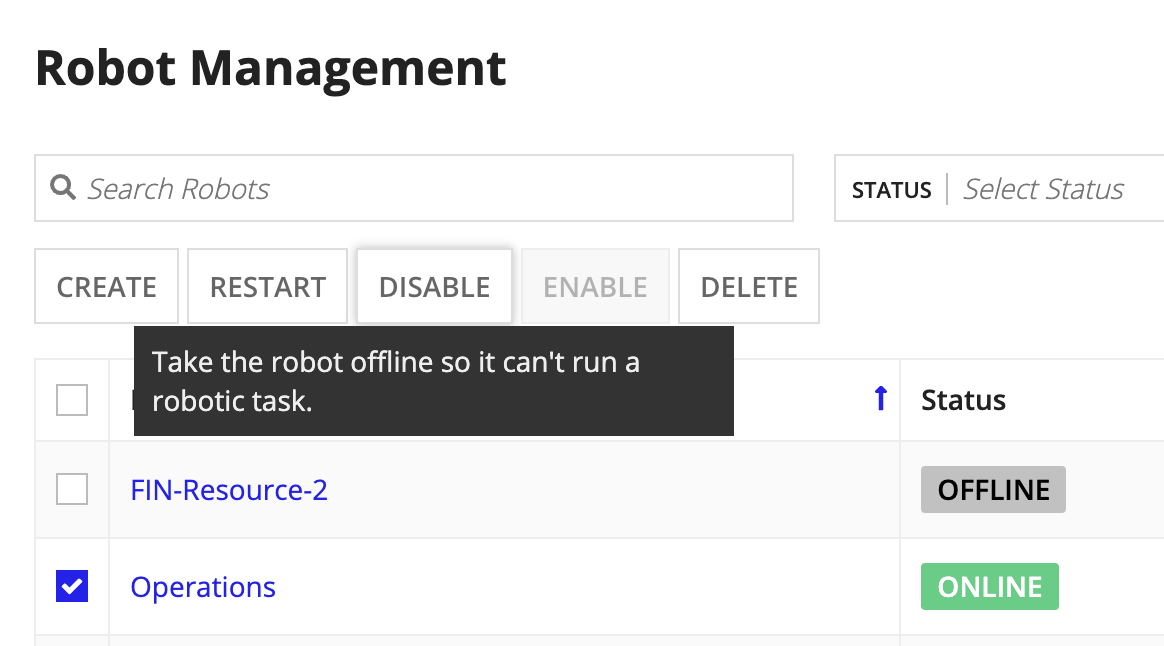
You can perform several actions from the list of robots. Available actions depend on the robot's connectivity and status.
Additional actions are available from the Robot detail page.
| Action | Description |
|---|---|
| CREATE | See above |
| SECURITY | See below |
| RESTART | See below |
| DISABLE | Changes the robot status to Disabled and prevents that robot from executing robotic tasks. Only available for robots that are Online. |
| ENABLE | Changes the robot status to Online and makes that robot available to execute robotic tasks. Only available for robots that are Disabled. |
| DELETE | Permanently delete the robot. |
Required role: Any
In the Operations Console, click any robot to view its details and perform certain actions.
On the Robot Detail page, you can find information related to the robotic tasks the robot performed, including:
Tip: You can only view robotic tasks if you have the necessary permissions, either through permission tags or the security role map.
Use the search bar and filters to refine the list of executions. Click RESET to clear the filters and see all available information.


Different actions are available from the Robot Detail page, depending on the robot's status.
| Action | Description |
|---|---|
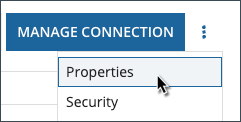
| Robot properties | Edit and review key details about the robot. Here, you can edit the robot's name and permissions, as well as allow Appian to sign in. |
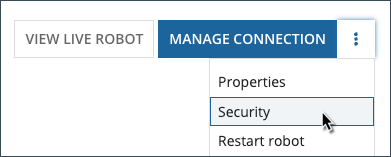
| MANAGE CONNECTION | Download the installer associated with this robot. |
| VIEW LIVE ROBOT | Available only for Online robots. View the desktop where the robotic task is running. |
| Manage Security | Assign or swap out user or group role maps. |
| Lock keyboard input | Available only for Online robots. The agent must be installed on the host machine using an administrator profile. |
| Unlock keyboard input | Available only for Online robots. The agent must be installed on the host machine using an administrator profile. |
| Restart | Restarting the robot agent can prevent, among other things, low memory problems on the host machine where it is running. |
| Enable | Make a robot available to execute robotic tasks. |
| Disable | Prevent a robot from executing robotic tasks. |
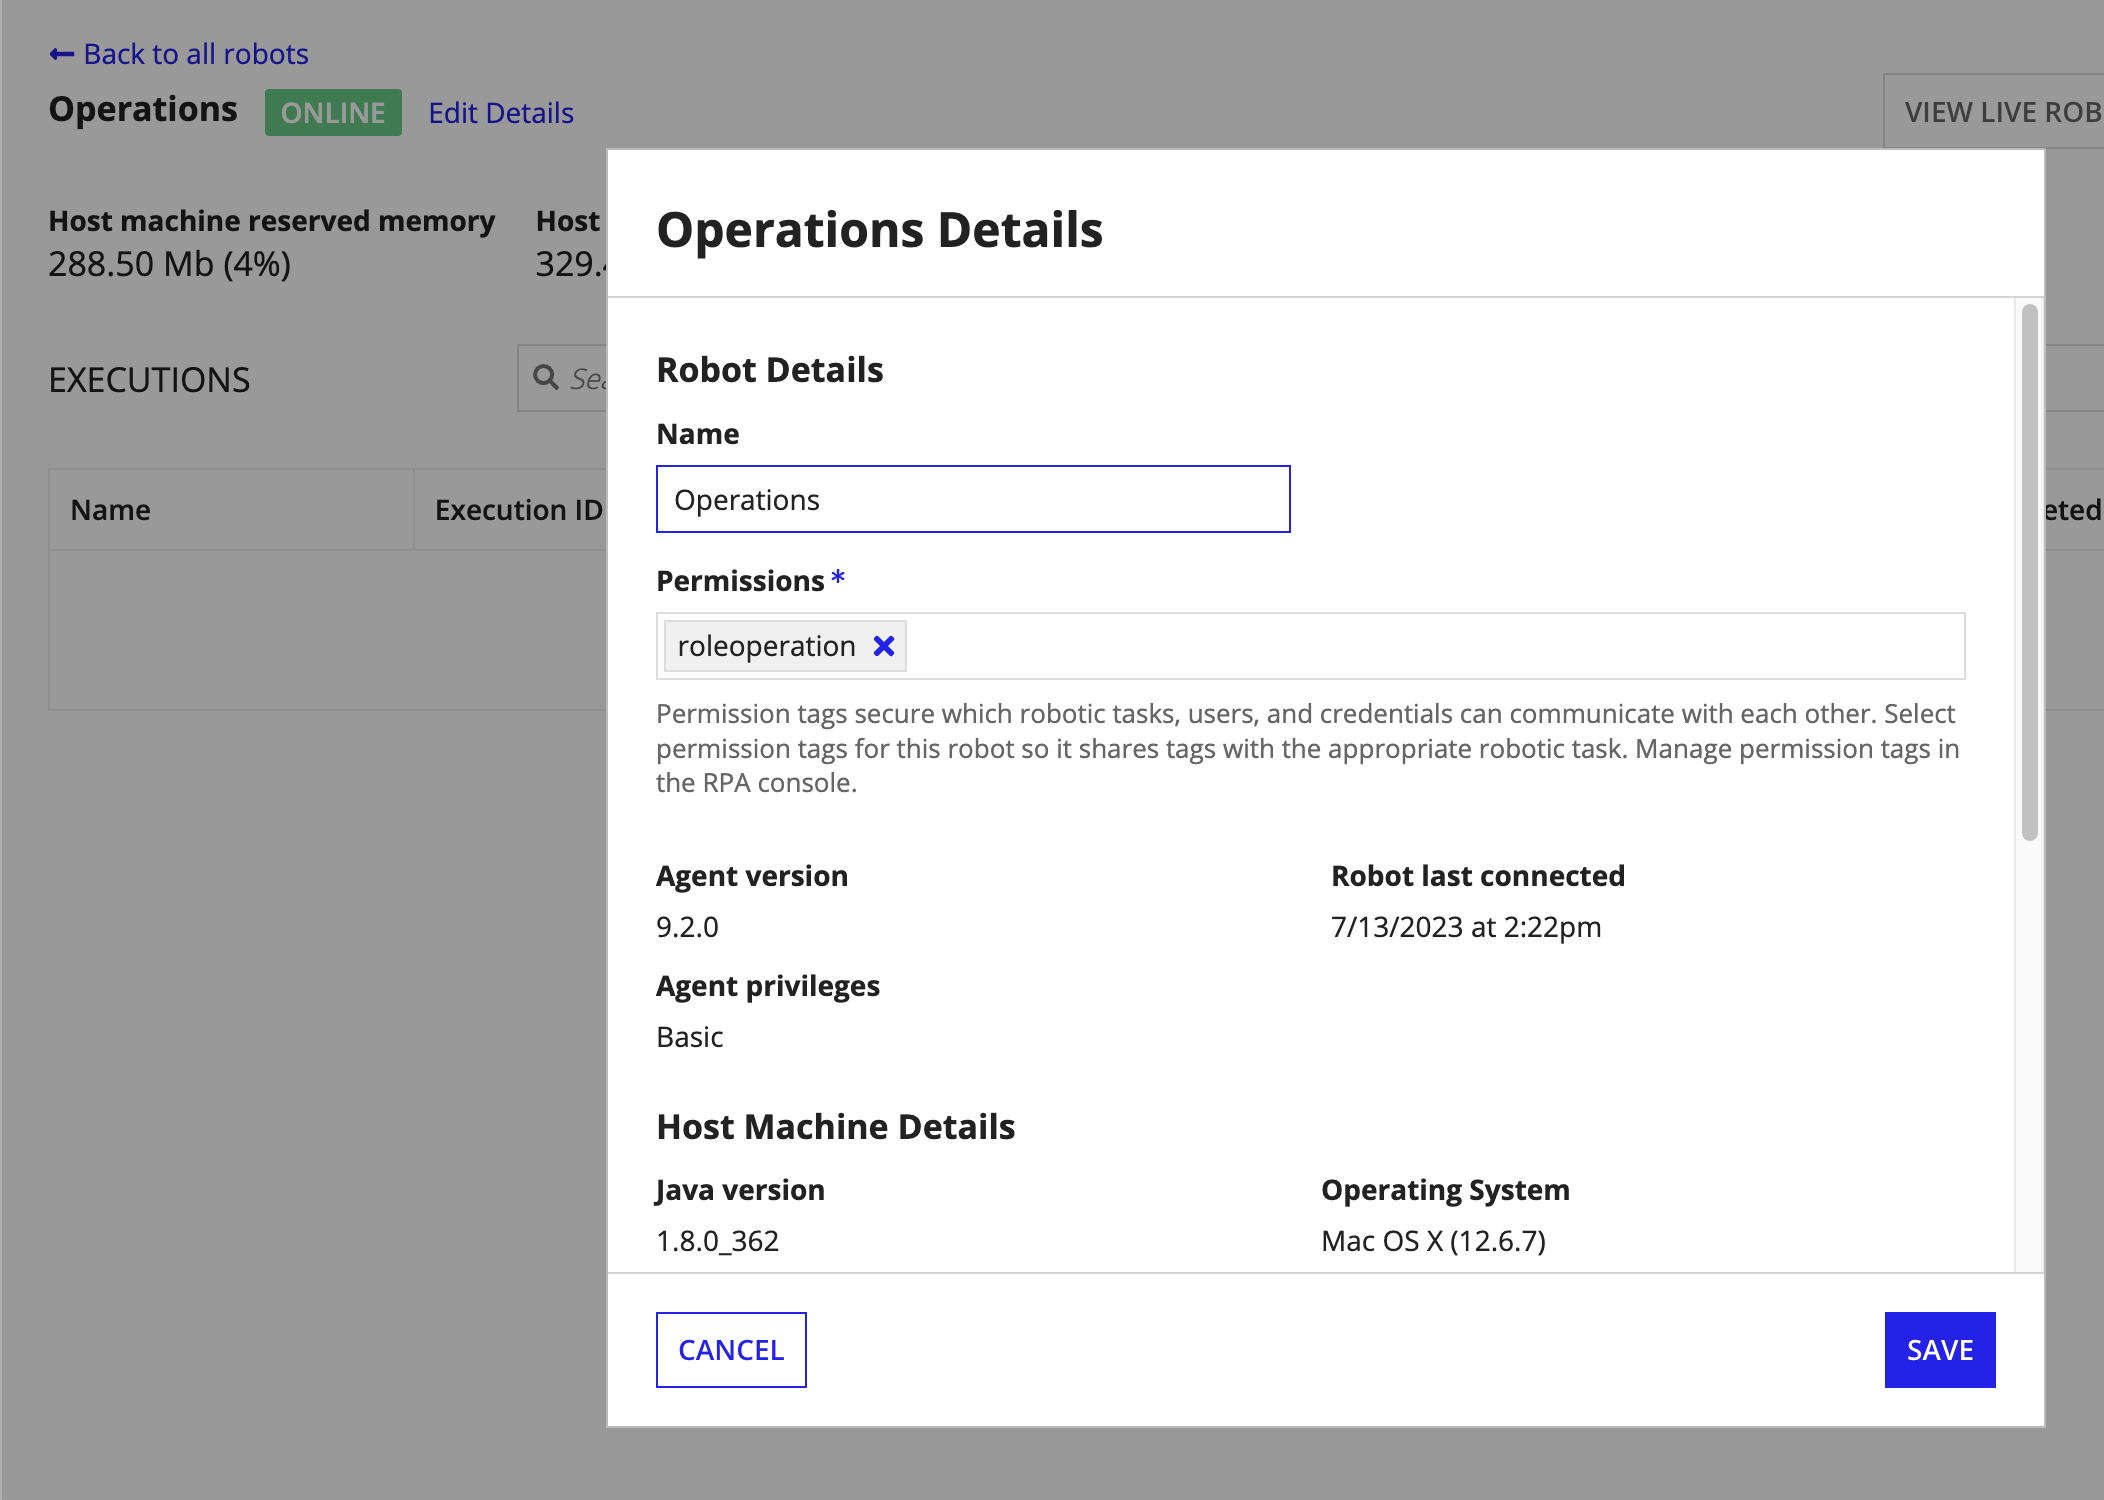
When you click Properties from the action menu, you can see the following information about the robot:
| Field | Description | Editable? |
|---|---|---|
| Name | Name of the robot that is shown throughout Appian instead of the identifier. | Yes |
| Permissions | Permission tags assigned to the robot. | Yes |
| Agent version | Version of the agent on the robot and the internal build number. | No |
| Robot last connected | Last time the agent connected with Appian. | No |
| Java version | Java version used by the agent. | No |
| Operating System | Name and version of the operating system on the host machine. | No |
| Current folder | Current folder where the agent is located. | No |
| Temporary folder | Temporary folder for the user who launched the agent. | No |
| Architecture | Processor architecture for the host machine. | No |
| # User session | Session identifier used by a robot with elevated privileges to unlock the session. | No |
| Processors | Number of available processors on the host machine. | No |
| IP addresses | IP addresses assigned to the host machine (can be several due to the existence of different network interfaces). | No |
| Resolution | Screen dimensions on the image representing your monitor. | No |
| Host machine reserved memory | Reserved memory status of the JVM for the agent. | No |
| Host machine disk space | Available disk space status on the computer. | No |
| Reserved memory threshold (percent) | When the memory percentage is over the maximum specified, an event "robot_LIMIT_MEMORY" is generated. | Yes |
| Available disk space threshold (percent) | When the free disk space percentage is under the minimum specified, an event "robot_LOW_FREE_HARD_DISK_SPACE" is generated. | Yes |
For the automatic sign-in service to work as expected, you must first complete several prerequisite steps. These steps and installation require administrator privileges. Once the service is installed, you can execute a robotic task using a standard user account.
Additionally, the host machine must use a Windows 64-bit OS (x64-based) and the user account Appian uses to sign in should be configured in the following ways:
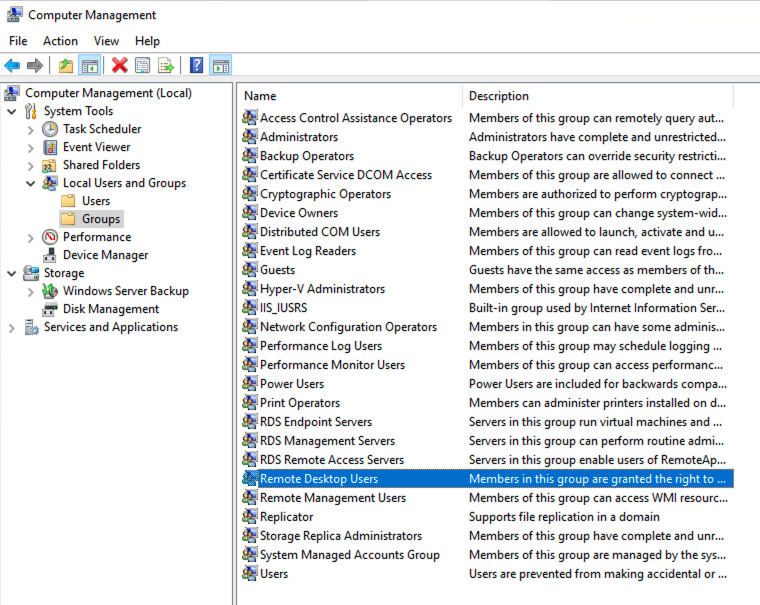
To add the user account, go to Computer Management > Local Users and Groups > Groups > Remote Desktop Users.
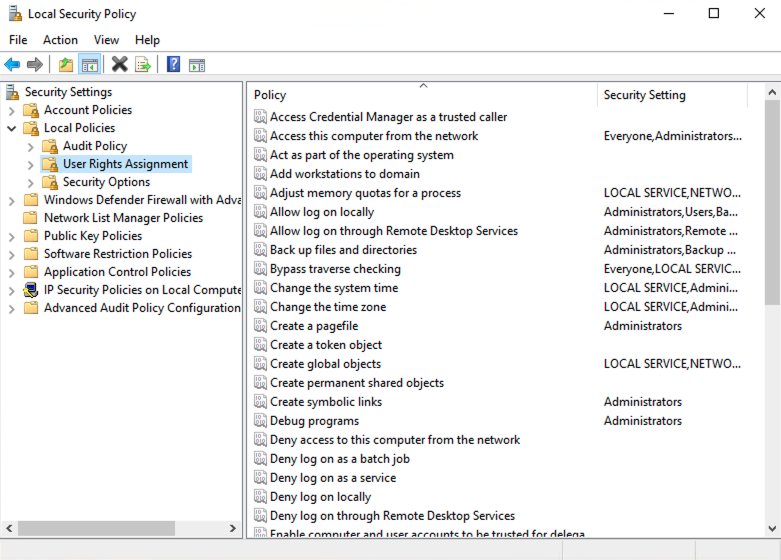
Local Security Policy > Local Policies > User Rights Assignment:
Allow log on through Remote Desktop Services
Remote Desktop Settings.Tip: You need administrator privileges on the host machine to install the sign-in service using the instructions below.
After you configure the host machine, install the sign-in files using the installation wizard:
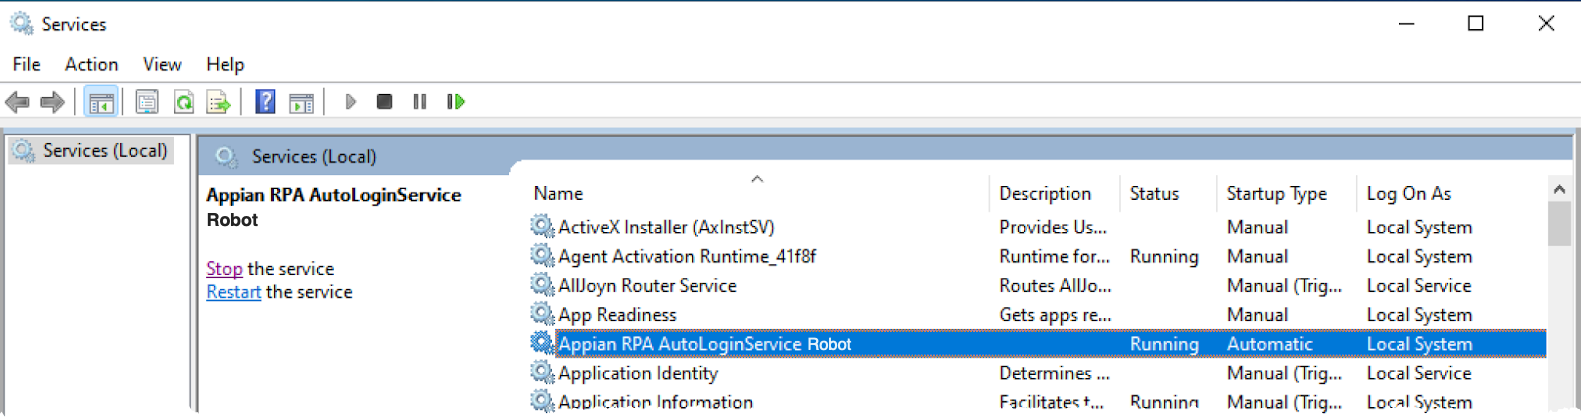
C:\Users\<username>\AppData\Local. The installer will create a folder titled Appian RPA in this location with all the necessary files.Services. You should see the new service in the list: Appian RPA AutologinService [Host Machine Name].You are now ready to use automatic sign-in.
Note: If your Windows OS uses a proxy for internet access, configure the auto-login service to use this proxy too. See the Configure the proxy for the auto-login service information on this page.
When installing the automatic sign-in service, the service is automatically started by the Local System account, which is the predefined local account used by the service control manager. You can change it to be another user if you'd like to use a separate account. This user account does not need administrator privileges.
To modify which account starts the service:
If your Windows OS uses a proxy for internet access, you need to configure the auto-login service to use this proxy too.
Before you begin, make sure you've set up a local account on the Windows Virtual Machine specifically for the auto-login service. You can choose any name for this account.
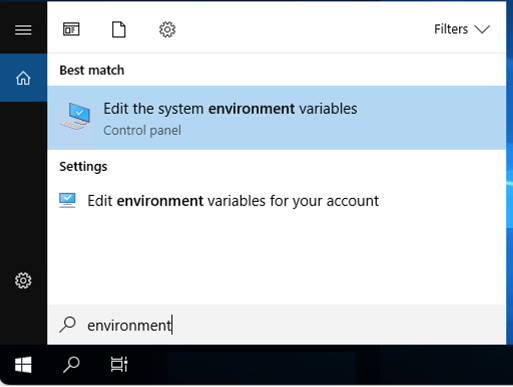
| If you are logged in with... | Then... |
|---|---|
| an admin account | select Edit the system environment variables from the search results. The System Properties window displays. Next, click the Environment Variables button. |
| a service account that does not have admin privileges | select Edit environment variables for your account from the search results. |
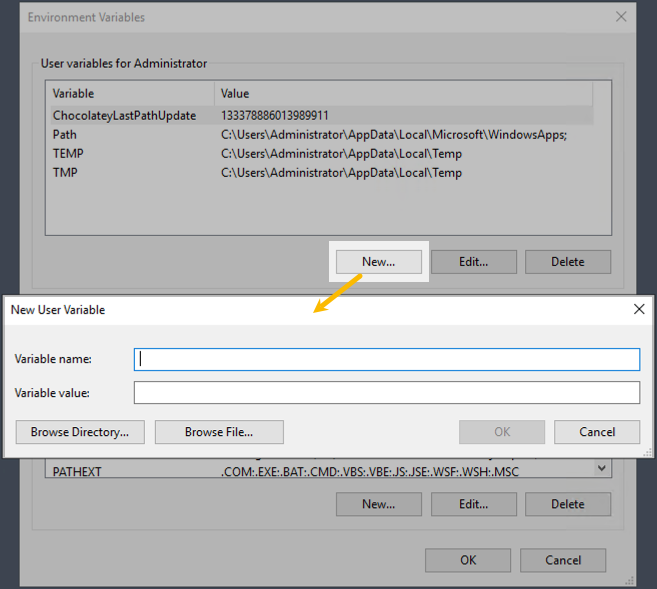
b. Configure the following fields:
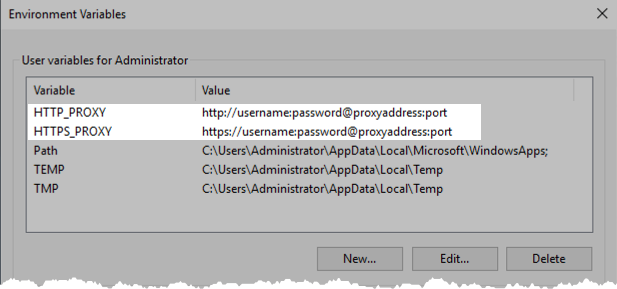
http or https. | If your proxy... | Then... |
|---|---|
| does not require authentication | enter each address as a regular URL. For example: http://proxyaddress:port |
| requires authentication | embed the username and password in the URL like this: http://username:password@proxyaddress:port. Note: If your password includes the @ symbol, replace the symbol with |
Example
c. Click OK on each open window to close them and return to the desktop.
| Configuration Option | Description |
|---|---|
| User-scoped environment variables (Recommended) |
We recommend using this user-scoped environment variables approach, because it is more secure and less likely to interfere with other programs that may be running on the same machine.

|
| Machine-scoped environment variables | Select the Local System account radio button.  |
Back in the Operations Console, you can test the connection to the host machine remotely. Appian does this through Remote Desktop Protocol (RDP).
Tip: If there is an active user session on the robot, Appian may not be able to sign in successfully. For the best results, ensure there is no active user session for the user account Appian uses to sign in to the robot.
If your test was successful, then you're all set! Appian will automatically sign in to this host machine using the provided credentials whenever the robot is called upon to execute a robotic task.
To help keep you on track, Appian may display messages to show you when it's unable to sign in. Use the following table to understand the error and learn how to fix the issue.
| Error message | Reason | Guidance |
|---|---|---|
| Invalid sign-in credentials. Unable to sign in because the credentials are invalid. Check the username and password are correct and try again. | Appian tried to sign into the user sessions using the credentials you provided, but it didn't work. The credentials may be inaccurate, or they don't match an account found on the domain. | Check the domain, username, and password fields to make sure they're correct. |
| Robot not found. Unable to sign in because RDP couldn't locate the agent on the host machine. Check that the agent is installed on the host machine and try again. | Appian was unable to locate the agent file on the host machine. The agent is required to allow the host machine to communicate with Appian RPA. | Check that the agent is installed and that the user account configured to sign in to the host machine has permissions to run the agent. |
| RDP is not enabled. Unable to sign in because Remote Desktop is disabled on the host machine. Enable Remote Desktop and try again. | Appian tried to sign in to a user session on the virtual machine, but RDP isn't enabled. | Enable RDP on the host machine. |
| Error: Active user session. Unable to sign in because the host machine has an active session. Sign out from the active session and try again. | Appian tried to sign in to the virtual machine, but there is already an active user session. Note that this message appears for standard Windows operating systems. |
Sign out of the active user session on the host machine. |
| Error: Active user session. Unable to sign in because the host machine has an active session for the OS user account you're using to sign in. Sign out from the user's active session and try again. | Appian tried to sign in to the virtual machine, but there is already an active user session for the user account you're using to sign in. Note that this message appears for Windows Server operating systems. |
Sign out of your active user session on the host machine. |
| Error with automatic sign-in. Unable to sign in because of an issue with Remote Desktop. Review the Remote Desktop settings and try again. | Appian tried to sign in to the virtual machine, but was unable for an unknown reason. | Verify that the RDP settings on the host machine match the configurations listed above. |
| Error with automatic sign-in. Unable to sign in because Remote Desktop didn't respond. Verify that the sign-in service is running on the host machine and try again. | Appian tried to sign in, but the sign-in service didn't respond in time. It might be that the sign-in service isn't running on the host machine. | Confirm that the sign-in service is running on the host machine. |
| Error: Interactive logon message. Unable to sign in because the host machine has an interactive logon screen. Enable the Skip interactive logon message option on the Robot Details page and try again. | Appian tried to sign in, but the host machine has an interactive logon message. The robot wasn't configured to allow Appian to skip the interactive logon message. | Edit the robot details to allow Appian to skip the interactive logon message. |
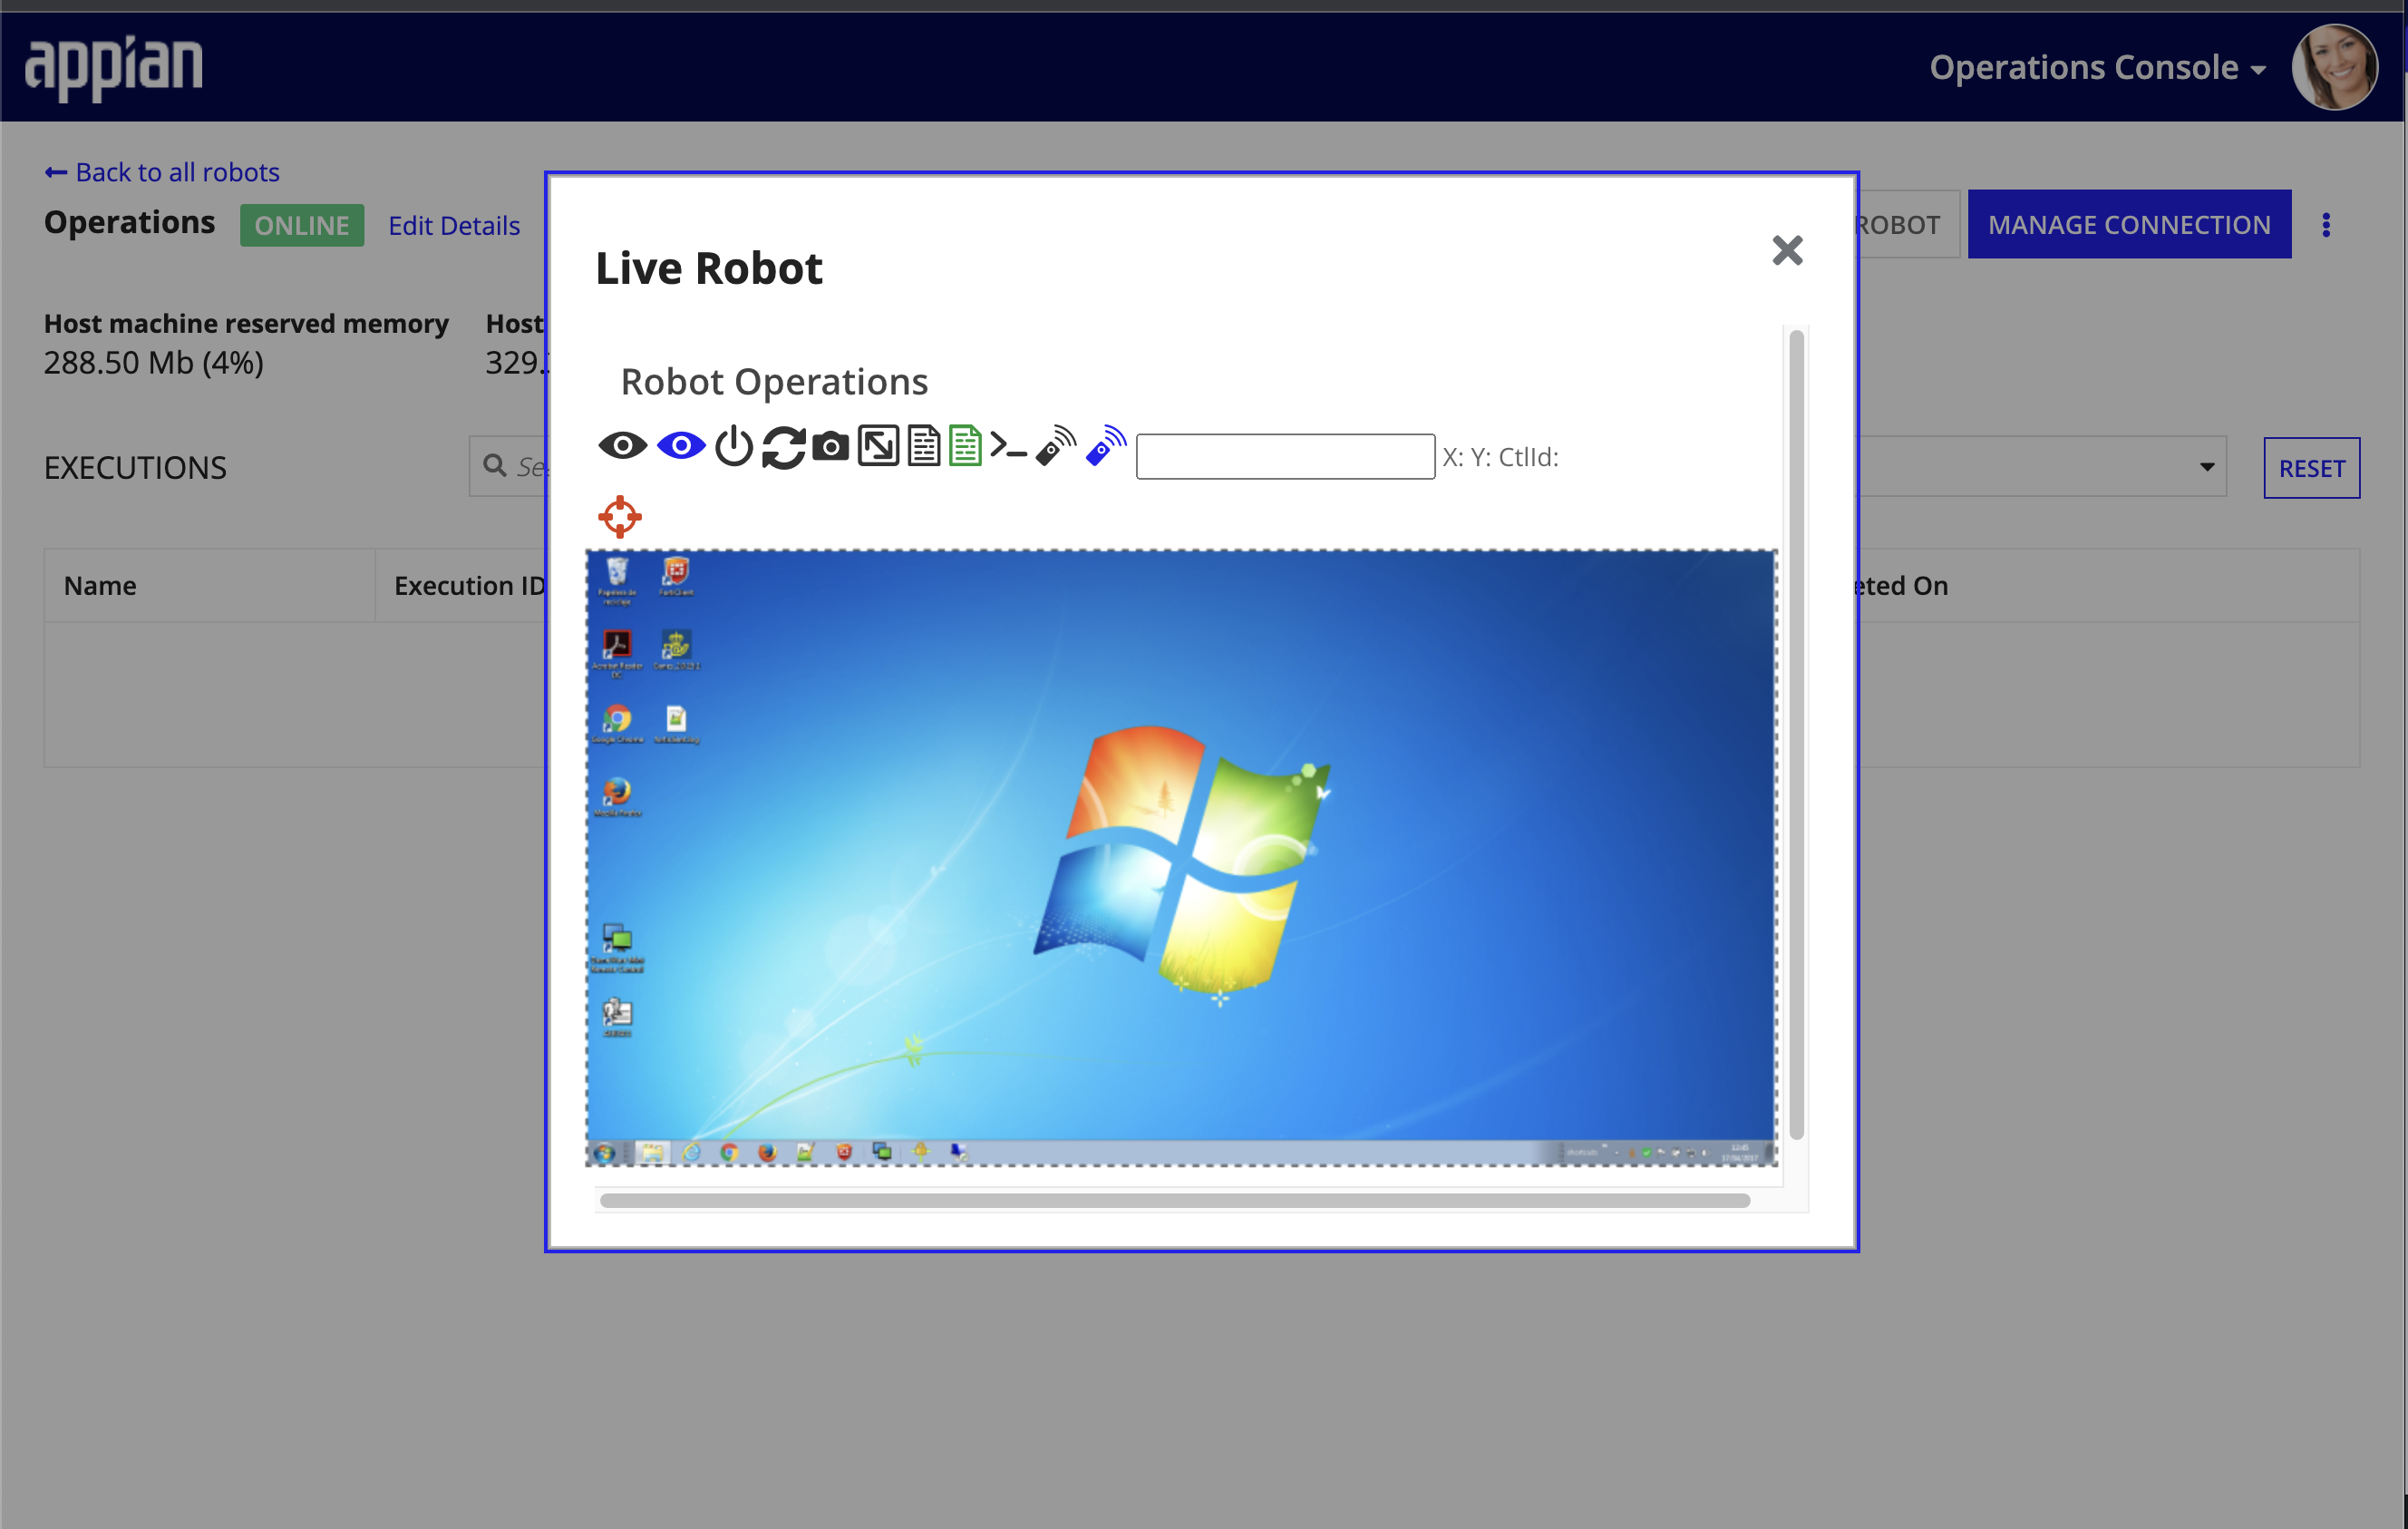
Required role: Developer or Administrator
You can remotely view the desktop where the robotic task is running.
To start monitoring, click VIEW LIVE ROBOT.
For a robot to test, record, or execute robotic tasks, you need to install and launch the agent on the host machine. The agent enables the robot to communicate with Appian, so it's an essential part of the setup process.
You can download the installer when you create the robot. Or, you can download the installer at a later time through the MANAGE CONNECTION menu. Launch the guided installer to complete robot setup.
Required role: Administrator
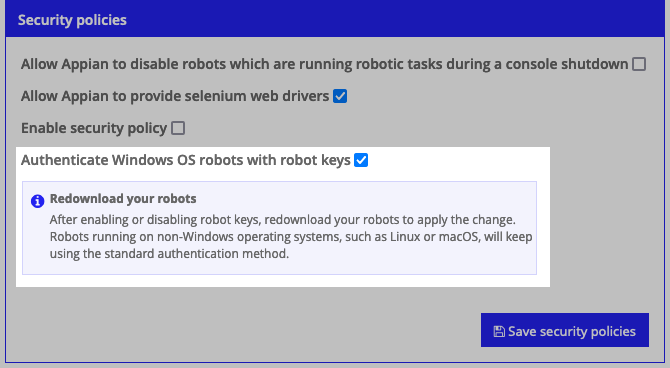
Automating the installation of agents and the auto-login service on your Windows host machines, especially on virtual machines that frequently terminate, can be a tedious process. To streamline this process, consider using robot keys. Robot keys encapsulate a robot's unique identity in a single credential that can be incorporated into your custom scripts. This not only facilitates the seamless automation of agent installations but also enables auto-login services on Windows OS.
You can store robot keys in your own secure credentials manager and you have the convenience of rotating these keys on demand, ensuring that your systems are always operating with updated and secure credentials. Robot keys are optional, allowing you the flexibility to choose between using robot keys or continuing to use the standard authentication and installation process.
Tip: Robot keys are not for robots running on non-Windows operating systems, such as Linux or macOS.
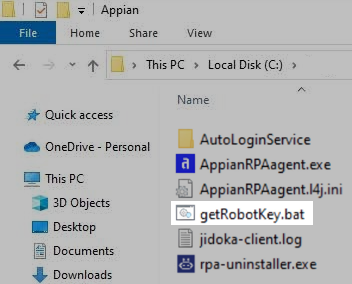
When you enable robot keys, it's your job to place a .bat script, named getRobotKey.bat, in the same directory where your configuration file is located. During the installation process, the software is automatically installed in a folder named "Appian RPA," located in the user's Local App Data folder. If you need to locate this folder, you can open a command prompt window in the user's session and enter the command echo %LOCALAPPDATA%. When needed, the RPA agent or the auto-login service executes your getRobotKey.bat script. The robot key should be the last line in the output of the script. An agent or auto-login service can then use this key to authenticate itself with Appian RPA.
Example
Here are some considerations you should keep in mind when refreshing robot keys:
To allow the use of robot keys:
Periodically, you may need to refresh a robot key to you ensure that the security and integrity of your robots and systems are maintained.
Tip: Be sure to review the important notes for some considerations you should keep in mind before you refresh your robot keys.
To refresh a robot key:
Caution: This step is essential. The old key is immediately deactivated once a new key is generated. Any robots using the old key will fail to connect as intended.
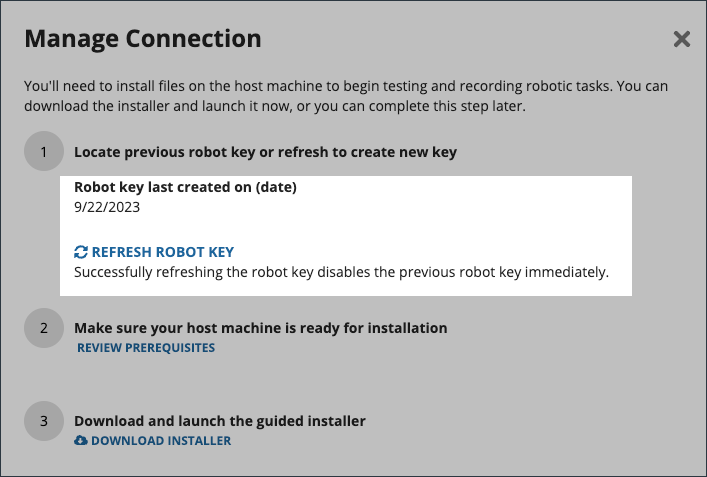
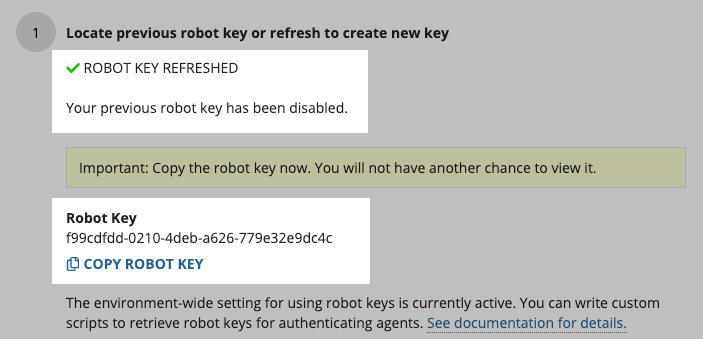
Tip: Be sure to copy the robot key now. You will not have another chance to view it.
getRobotKey.bat script is dynamic enough to retrieve the updated key.Robotic tasks consume memory and generate artifacts on the host machine during each execution. Over time, this data may start to degrade the host machine's performance. The host machine may benefit from restarting the robot to help free up additional memory.
When you restart a robot, Appian sends a request to the agent to try to restart its connection. You can relaunch the agent from the Operations Console or manually restart the agent by clicking Quit in the agent menu when you detect any issue with its operation.
You can also restart the robot automatically.
To prevent having too much of your host machine's memory occupied, you can configure a robot's agent to restart automatically when a specified percentage of the host machine's total memory is exceeded.
For example, if the host machine has a 2GB memory, you can set up the agent to restart whenever 80% of the memory is used (1.6GB).
This configuration triggers an event to restart the agent whenever the reserved memory is exceeded. Events are explained in detail on the Monitoring page.
Required role: Administrator
In the event the server goes down unexpectedly, administrators can configure Appian RPA to disable robots upon restart of the RPA server to ensure robotic tasks do not run until an administrator has verified the robot is in a clean state.
To allow Appian to disable unclean robots on start up:
Security for robots consists of the following:
| Action | RPA Operations Manager | Designer |
|---|---|---|
| Access the Operations Console and view the Robot Management page | Yes | Yes |
| Create a new robot | Yes | No |
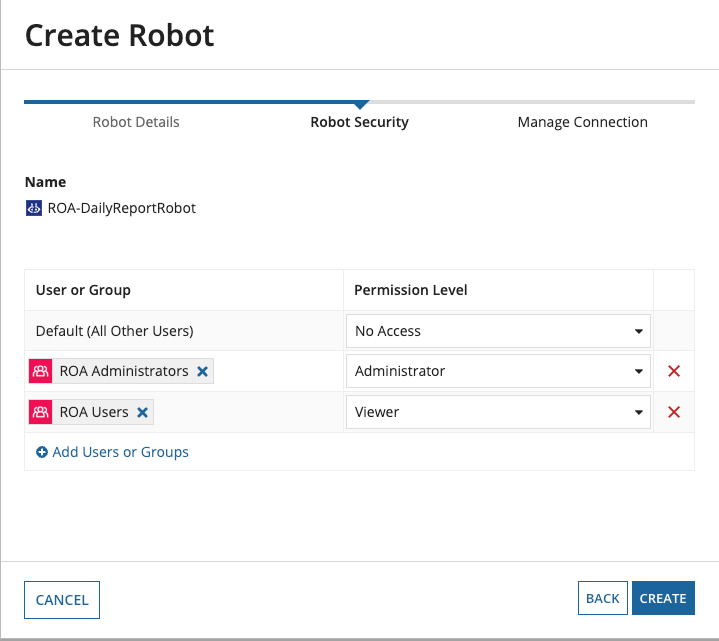
Starting from the Appian 23.4 release, newly created robots can only be secured using role maps. The security role map of a robot controls whether users can view or modify it and its properties. Unlike some other objects, Robots never inherit security.
The following table outlines the actions that can be completed for each permission level in a robot's security role map:
| Robot Actions | Administrator | Editor | Viewer | Deny |
|---|---|---|---|---|
| Monitor executions (Also requires Viewer, Editor, or Admin permission on the robotic task) |
Yes | Yes | Yes | No |
| View list of robots | Yes | Yes | Yes | No |
| View robot dashboard (robot details) | Yes | Yes | Yes | No |
| Edit properties | Yes | Yes | No | No |
| View security | Yes | Yes | No | No |
| Edit/Enable/Disable auto login | Yes | Yes | No | No |
| Update security | Yes | No | No | No |
| Download and install agents | Yes | No | No | No |
| Download and install auto-login | Yes | No | No | No |
| View live robots | Yes | No | No | No |
| Enable / Disable robot | Yes | No | No | No |
| Lock / Unlock robot input | Yes | No | No | No |
| Restart robot | Yes | No | No | No |
| Delete robot | Yes | No | No | No |
If you are using Appian 23.4 or later, you can permanently switch your robots from using permission tags to role maps. Follow these steps in the Operations Console to transition a robot to security role maps and remove permission tags.
Use one of the following methods to navigate to the robot Robot Security screen from the Robot Management screen.
| Method | Example |
| Select the checkbox next to the robot then click SECURITY. |  |
| Select the robot you want to change. Result: The Robot Detail page displays. Select Security from the action menu. |
 |
 button. Click Create when you are done creating the group.