When you run through your document extraction process, most of the work occurs in the background. It's only after the Start Doc Extraction Smart Service extracts data from a document that the Reconcile Doc Extraction Smart Service generates a task for a user to validate the data.
The reconciliation task plays an important role in making auto-mappings smarter. As you complete reconciliation tasks, Appian learns how to map the data in your documents to the proper fields in your data type. Over time, this will make auto-extraction more accurate and reconciliation easier and less frequent.
Note that learned mappings are dependent on the data type's fields, so if you change the fields or make a new data type, it will not use the learned mappings. Learning also happens independently in each environment. When deploying your application to another environment, you may see different behavior for auto-extraction depending on which documents have been processed and how they have been reconciled by users.
The reconciliation task is auto-generated by the Reconcile Doc Extraction Smart Service.
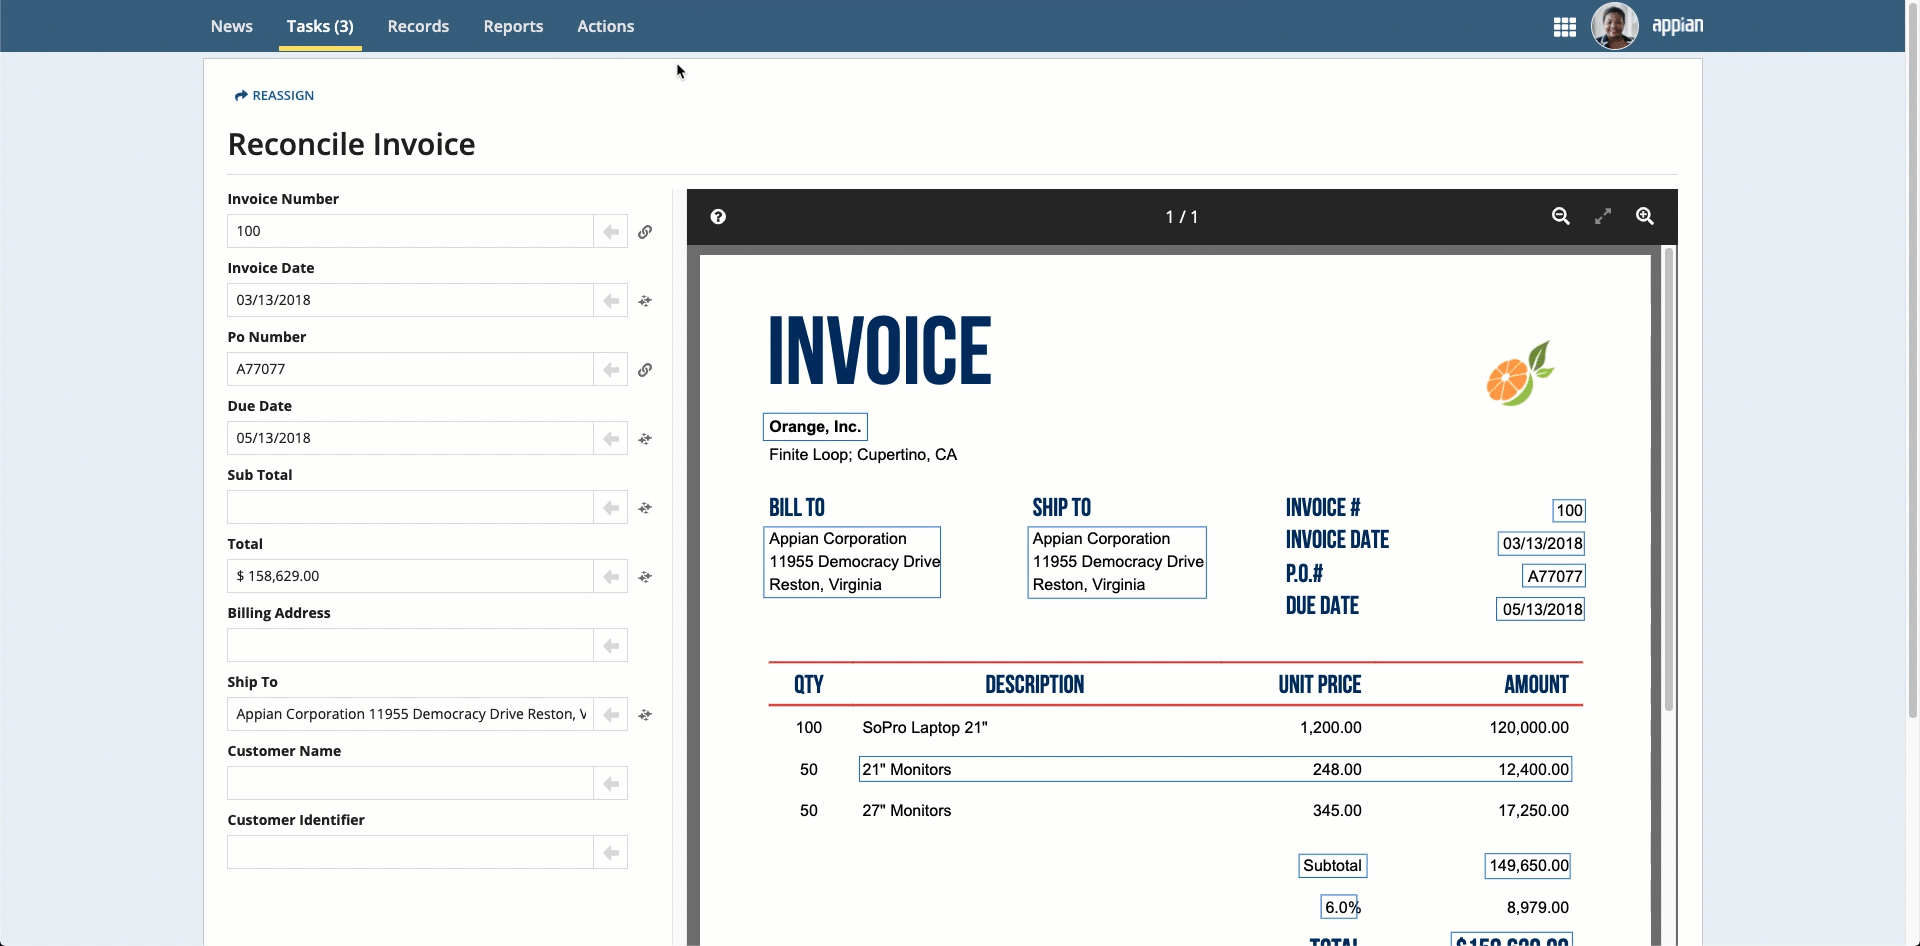
To complete the reconciliation task, users will compare the data that was extracted to an image of the uploaded document. They can use the information that displays in the document preview to update any incorrect or missing information.
To complete the reconciliation task:
Note: To see where the information in the fields came from, select the field and the value is automatically highlighted in the document preview.

If any information is missing, you can populate the information in three ways:
Tip: Values selected from the document preview will improve data extraction results. Values entered manually will not. For example, if you select the value for a PO number from the document preview in two different documents, it can learn that PO No. and PO # both mean PO Number. If you have the option, you should select correctly labeled values from the document preview instead of entering them manually.
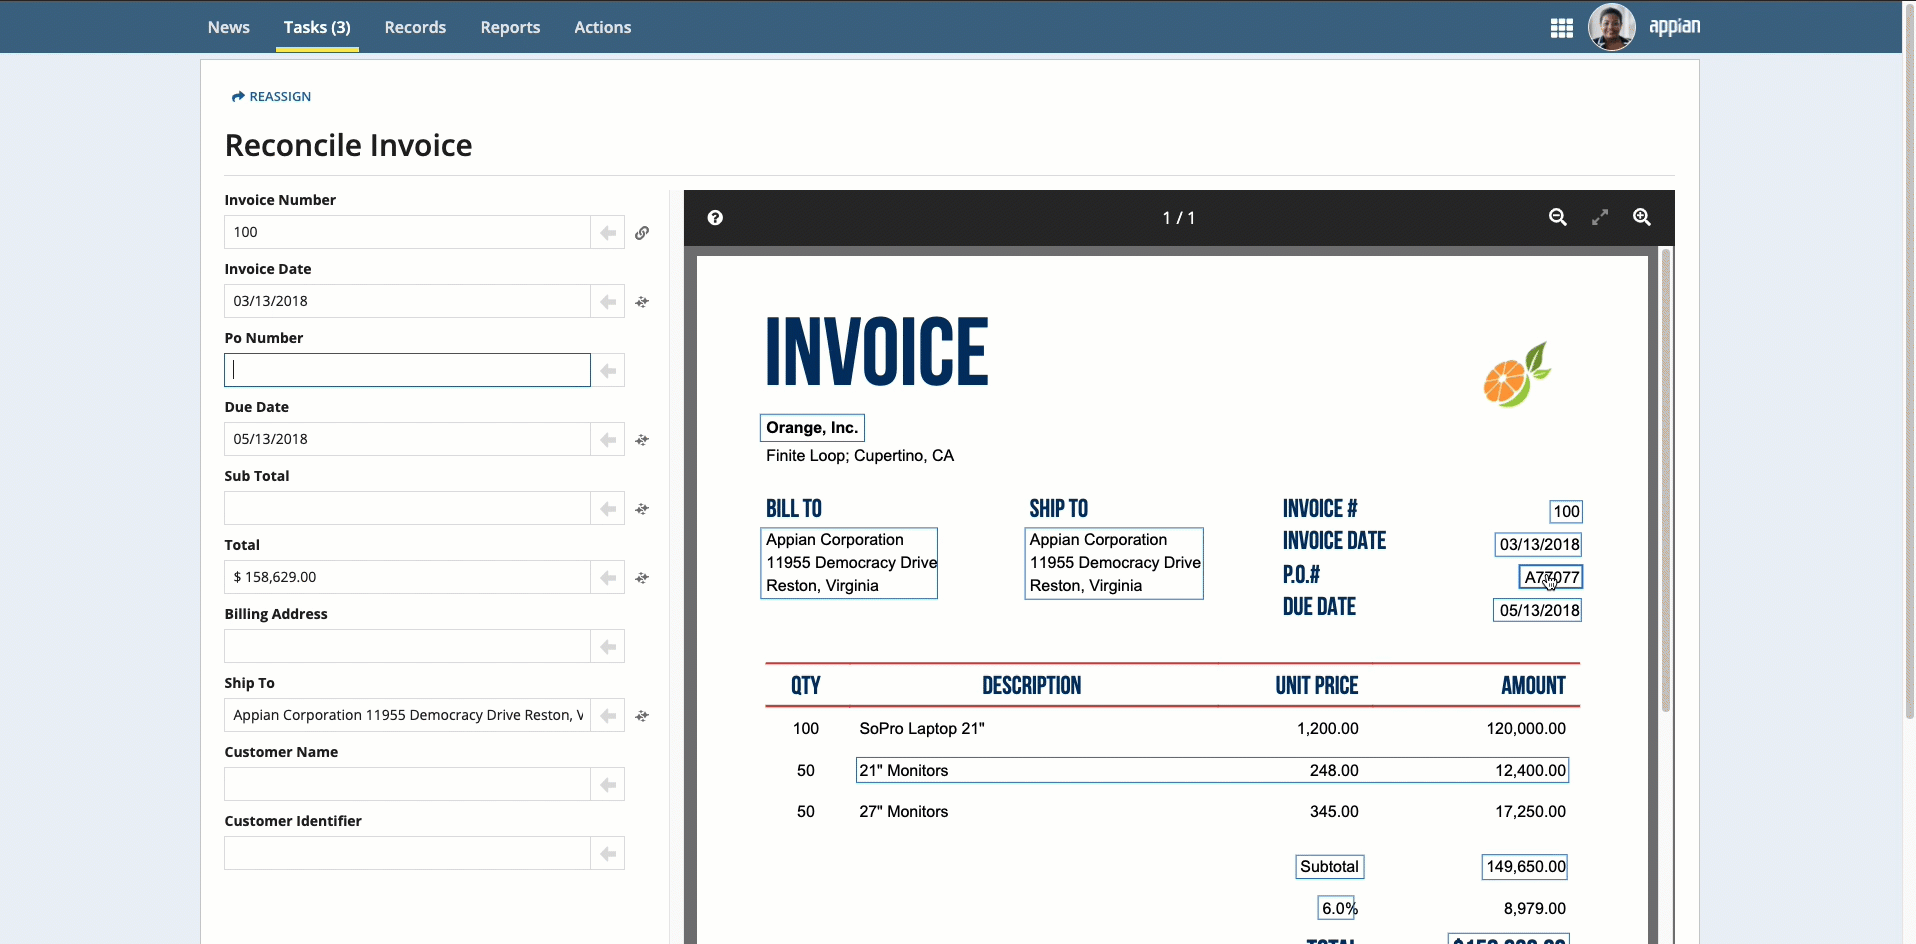
Place your cursor in the field, then click the box that surrounds the desired value.
Click the box that surrounds the desired value in the document preview on the right, then click the arrow next to the field to populate the field.
To select text that was not automatically extracted, press and hold the Shift key while dragging the mouse.

Perform additional reconciliation for tables, if they appear in the document preview.
While you are reconciling the data, icons indicate how the information was entered for each field:
![]()
There are multiple ways to integrate document extraction into an Appian process. No matter the method you use, you may be curious how it works. This section provides more detail on how Appian extracts and maps data from your documents.
First, it's important to remember that Appian document extraction is powered by pre-trained machine learning (ML) models, allowing you to get started quickly. When you extract document data in Appian, you aren't creating a model or training one on data you provide. Instead, Appian learns about your data via reconciliation tasks. Appian applies this learning in subsequent extractions of the same document type, but the model is not retrained.
The document extraction process – either within the Extract from Document or Start Doc Extraction smart services – consists of three parts:
Tip: See the Document Extraction glossary for a refresher on the terms used on this page.
Who: Appian
Input: PDF
Output: Identified text, key-value pairs, checkboxes, and tables
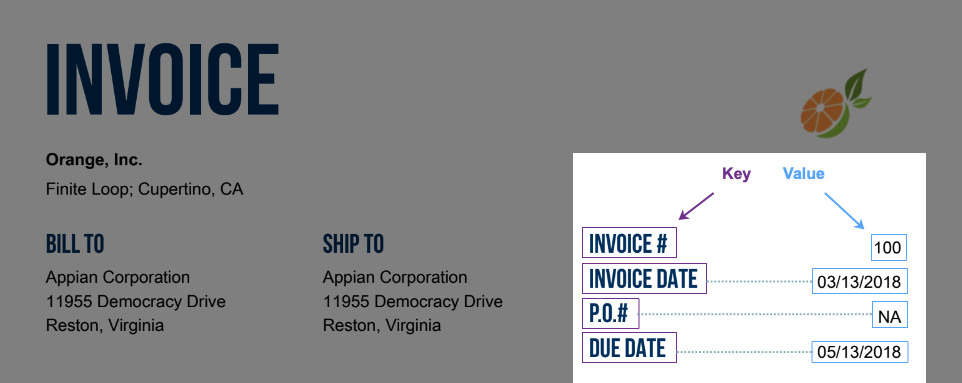
In the first step, the PDF goes to a pre-trained ML model to run optical character recognition (OCR), extract key-value pairs, and identify special document formatting checkboxes and tables. The model returns all identified values (represented by blue bounding boxes in the image below). Keys are represented by purple bounding boxes for reference, but they do not appear in Appian.
Who: Appian
Input: Identified text, key-value pairs, checkboxes, and tables from step 1
Output: Reconciliation user input task
Next, Appian leverages previous mappings stored in the customer's environment to know which extracted data to map to the document structure. These mappings are stored in a dictionary as you complete reconciliation tasks over time (step 3). So, the more mappings and reconciliation tasks you complete for a given document type, the better Appian is at mapping that data. Each subsequent reconciliation task is faster and more accurate.
If your Appian environment has previously mapped values to your structured fields, Appian leverages those previous keys to assist in mapping the data before assigning a reconciliation task.
Example
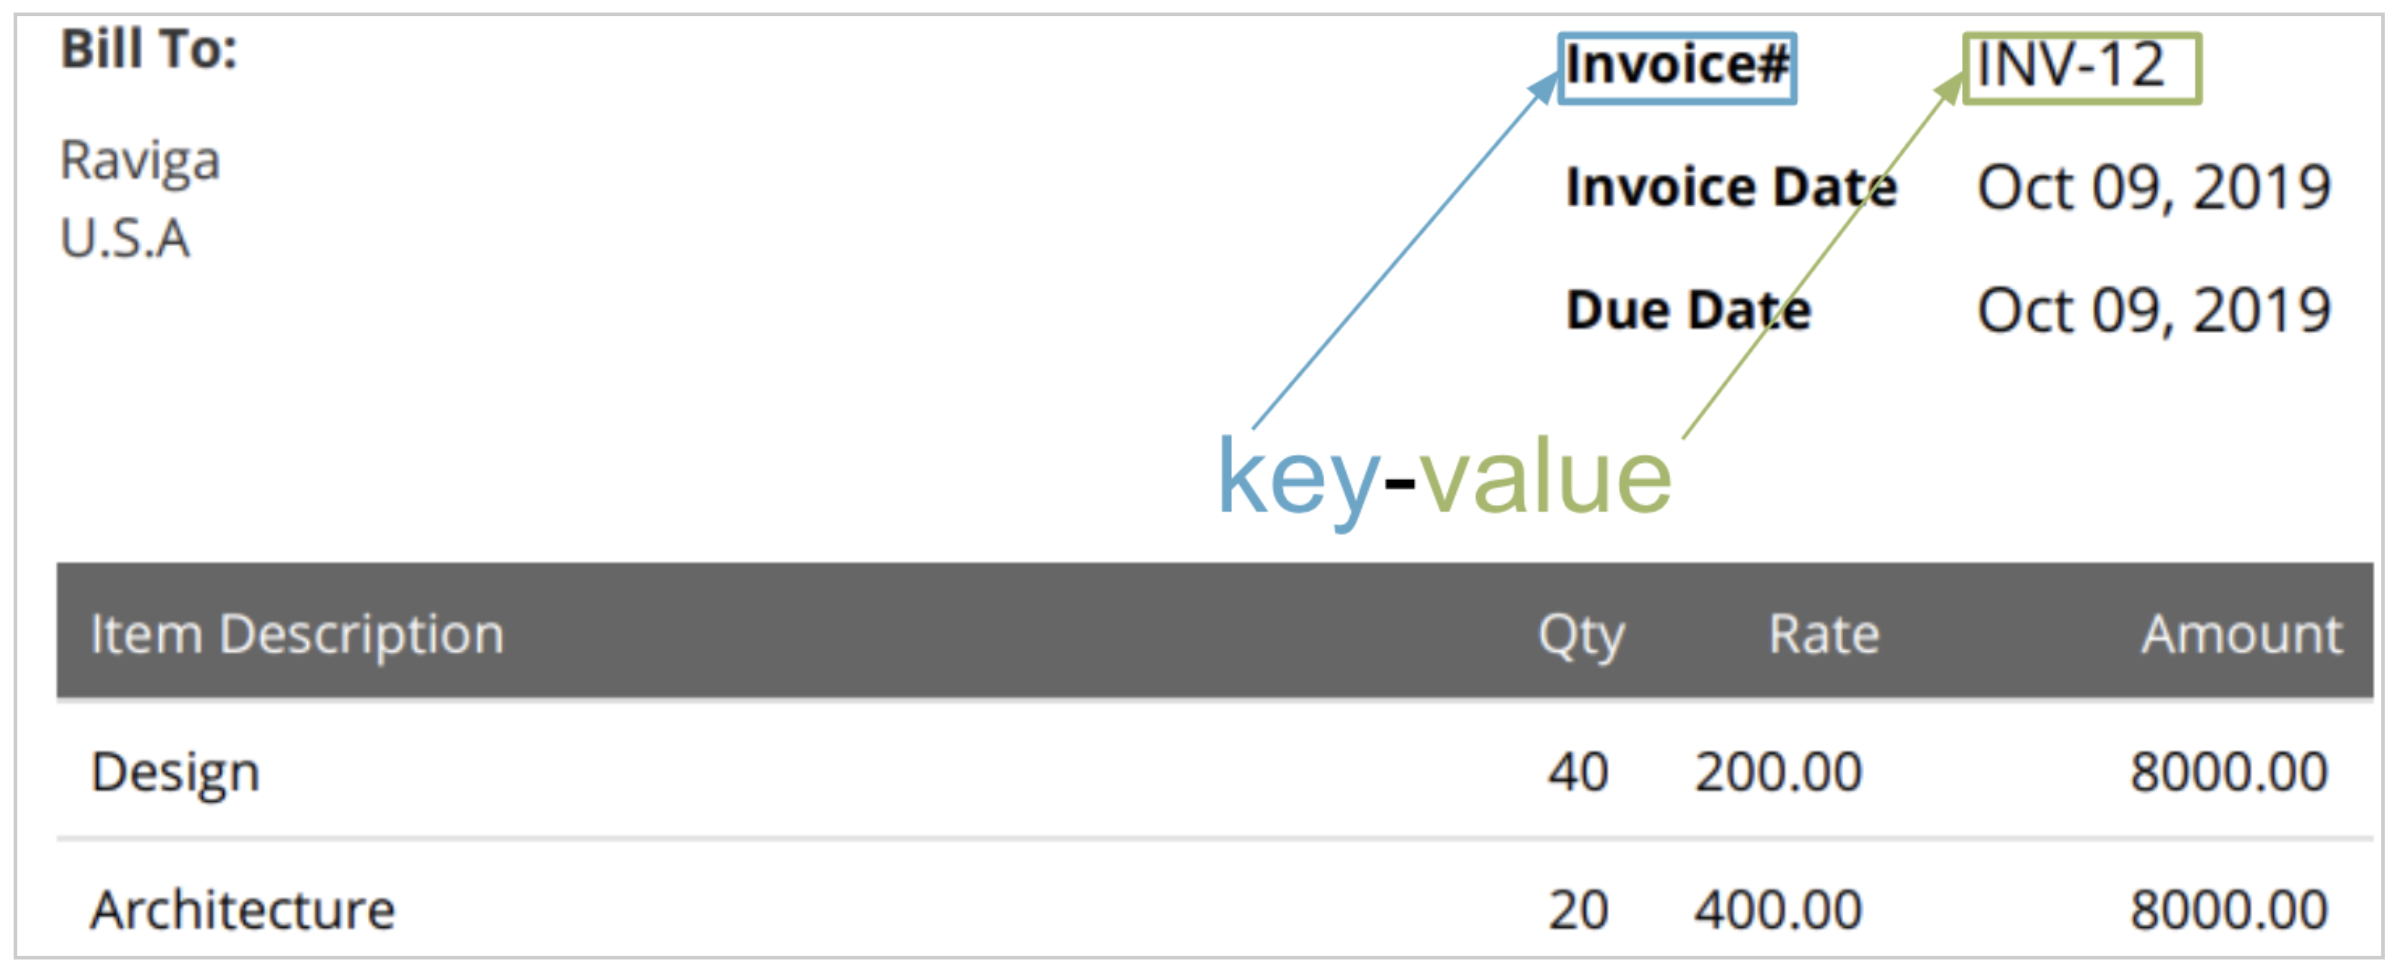
In the image above, Appian extracted Invoice# as the key and INV-12 as the value in this document. In the document structure, there is a field named invoiceNumber. Invoice# and invoiceNumber don't match, but that's okay! If you previously mapped the Invoice# key to the invoiceNumber field in a reconciliation task, Appian should automatically map this data for you.
Each time a user completes a reconciliation task, Appian stores updated mappings in a simple dictionary of terms (keys and positions) to use next time it has to map data from the pre-trained model (output of step 1) to the structured fields in your application.
Who: User
Input: Identified and mapped text, key-value pairs, checkboxes, and tables from step 2
Output: Auto-extracted fields to Appian process model for use in your application
Finally, a user completes a reconciliation task to confirm that the mappings from step 2 are correct. When a user maps data to a field and submits the reconciliation task, Appian stores the label for the key that was mapped. For example, if you provide mappings, Appian will recognize that P.O. #, and PO No. both map to the poNumber Appian data type field.
Reconciliation helps Appian manage variations in semi-structured and structured forms. In this way, reconciliation helps document extraction learn more about your data.
As you complete reconciliation tasks, data mapping in step 2 improves because Appian can match the keys to more options. However, the model in step 1 does not get retrained when you submit a reconciliation task with updated mapping. This means that if the ML model misses a field in step 1, Appian will continue to miss that field in step 2, and that there are some forms where auto-extraction will not extract the data desired. In these situations, customers can use manual extraction in step 3 to get the last pieces of information.
Reconcile the Results
