A decision is a grouping of business rules that determines output values based on a set of inputs.
Unlike expression rules, which primarily calculate or manipulate data, decisions are best used to encapsulate complex, business-specific logic. Decisions are configured in the decision designer, which enables fast, intuitive implementation of business logic without using expressions by way of decision tables.
Decisions can be called from any expression, so they can be reused across multiple objects throughout the system.
Each time you modify and save a decision, a new version is created. All expressions that use the decision use the latest version. All versions are accessible to designers who can view the decision, and a decision can be reverted back to a previous version at any time.
For step-by-step guidance on how to build your first decision, see the Create a Decision page.
For examples of different decision use cases, see the Appian Decisions page. These examples will help you understand how you can leverage decision objects in your applications.
Each decision object has the following properties:
| Property | Description |
|---|---|
| Name | The name that is used when evaluating the decision. This name must be unique in your Appian environment. This property is case-insensitive, but we recommend that you follow the recommended naming standard. |
| Description | Supplemental information about the decision that is displayed in the expression editor and in the objects grid of some Designer views. |
| Save In | The rule folder that the decision is saved into. |
| Inputs | Inputs are used to pass data into the decision.
|
| Decision Outputs | Decision outputs are the values that are returned when a decision is evaluated.
|
| Decision Definition | The business logic that is defined as a decision table. The input values passed into the decision are used to evaluate this logic to determine what rules in the table match. More information about how to specify this logic is below. |
| Hit Policy | Determines what a decision returns when more than one business rule matches the inputs. |
To create a decision object:
In the Create Decision dialog, configure the following:
| Property | Description |
|---|---|
| Name | The name that is used when evaluating the decision. |
| Descriptions | A short description about the decision object. |
| Save In | The rule folder that the decision is saved into. |
The decision object opens in a new tab or window.
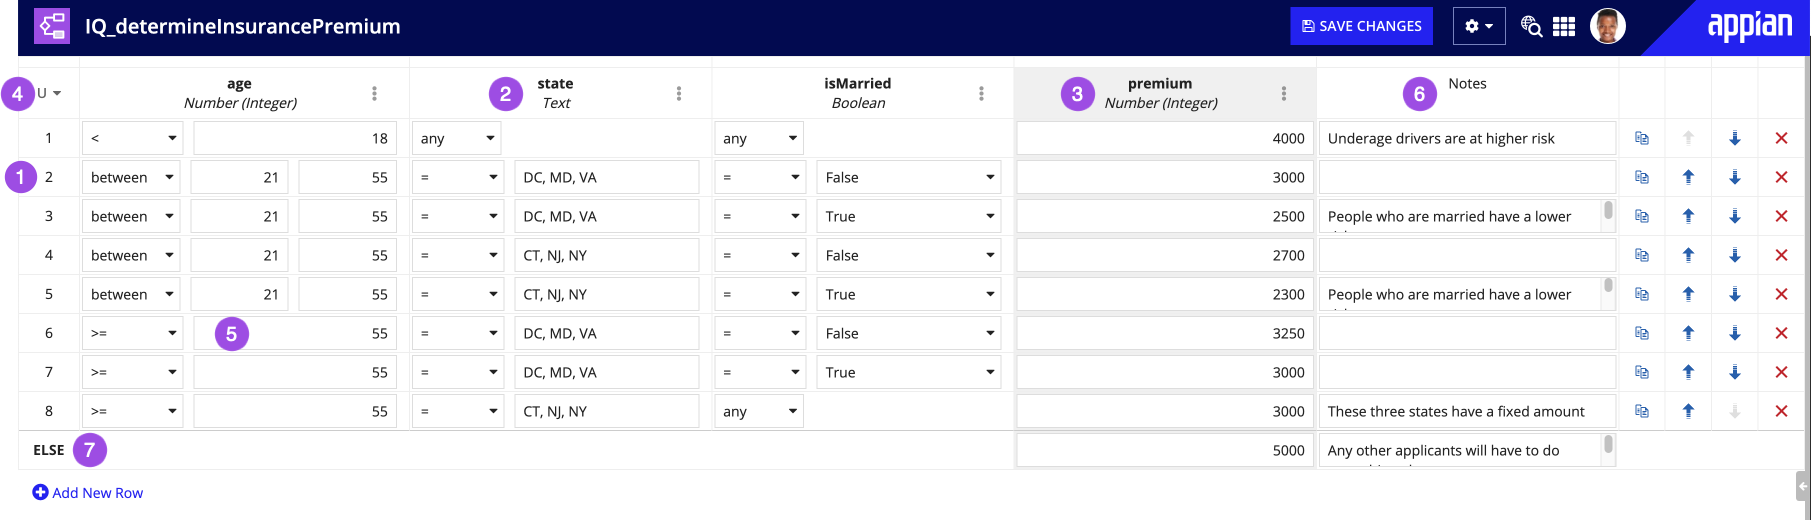
The logic of a decision is configured using a decision table.
In a decision table, each column is either an input to the decision or one of its outputs. Each row in the table represents a decision rule, in which each cell is a logical operation. When all the cells' conditions for a particular row are true, the decision will return the output values specified for that row.

< 10.The following types are available for decision inputs:
A decision is invalid if not all of its input values are defined. When a decision with undefined values is evaluated, it will fail to return a value. The decision designer helps you identify if there are any missing or invalid values when you test and save your decision.
The decision output is used to specify what the decision returns if a particular row's logic matches the passed in input values. Decision output columns are indicated by a gray background.
The following types are available for decision outputs:
Note: Decisions that are defined with Appian Objects as output values will have these objects identified as precedents to the decision. Appian recommends only using objects that will exist in all of your environments for your decisions.
Like inputs, a decision can have multiple outputs. This is considered a compound output. When a decision has a compound output, it will return a dictionary with fields that correspond to each output column of the decision. The field names in the dictionary are the output names specified in the decision.
Decisions have an explicit return type, this helps designers understand what to expect when integrating the decision into their applications. The return type is displayed in the inline help within expression editors along side the decision's description and inputs. A decision's return type depends on the type of output, whether it has a compound output, and its hit policy.
| Hit Policy | Compound Output | Output Type |
|---|---|---|
| Unique, First | No | The type defined in the decision's single output column. Available types are listed above. |
| Unique, First | Yes | Map |
| Rule Order | No | The type defined in the decision's single output column. decisions with the Rule Order hit policy must output an array type. |
| Rule Order | Yes | List of Map |
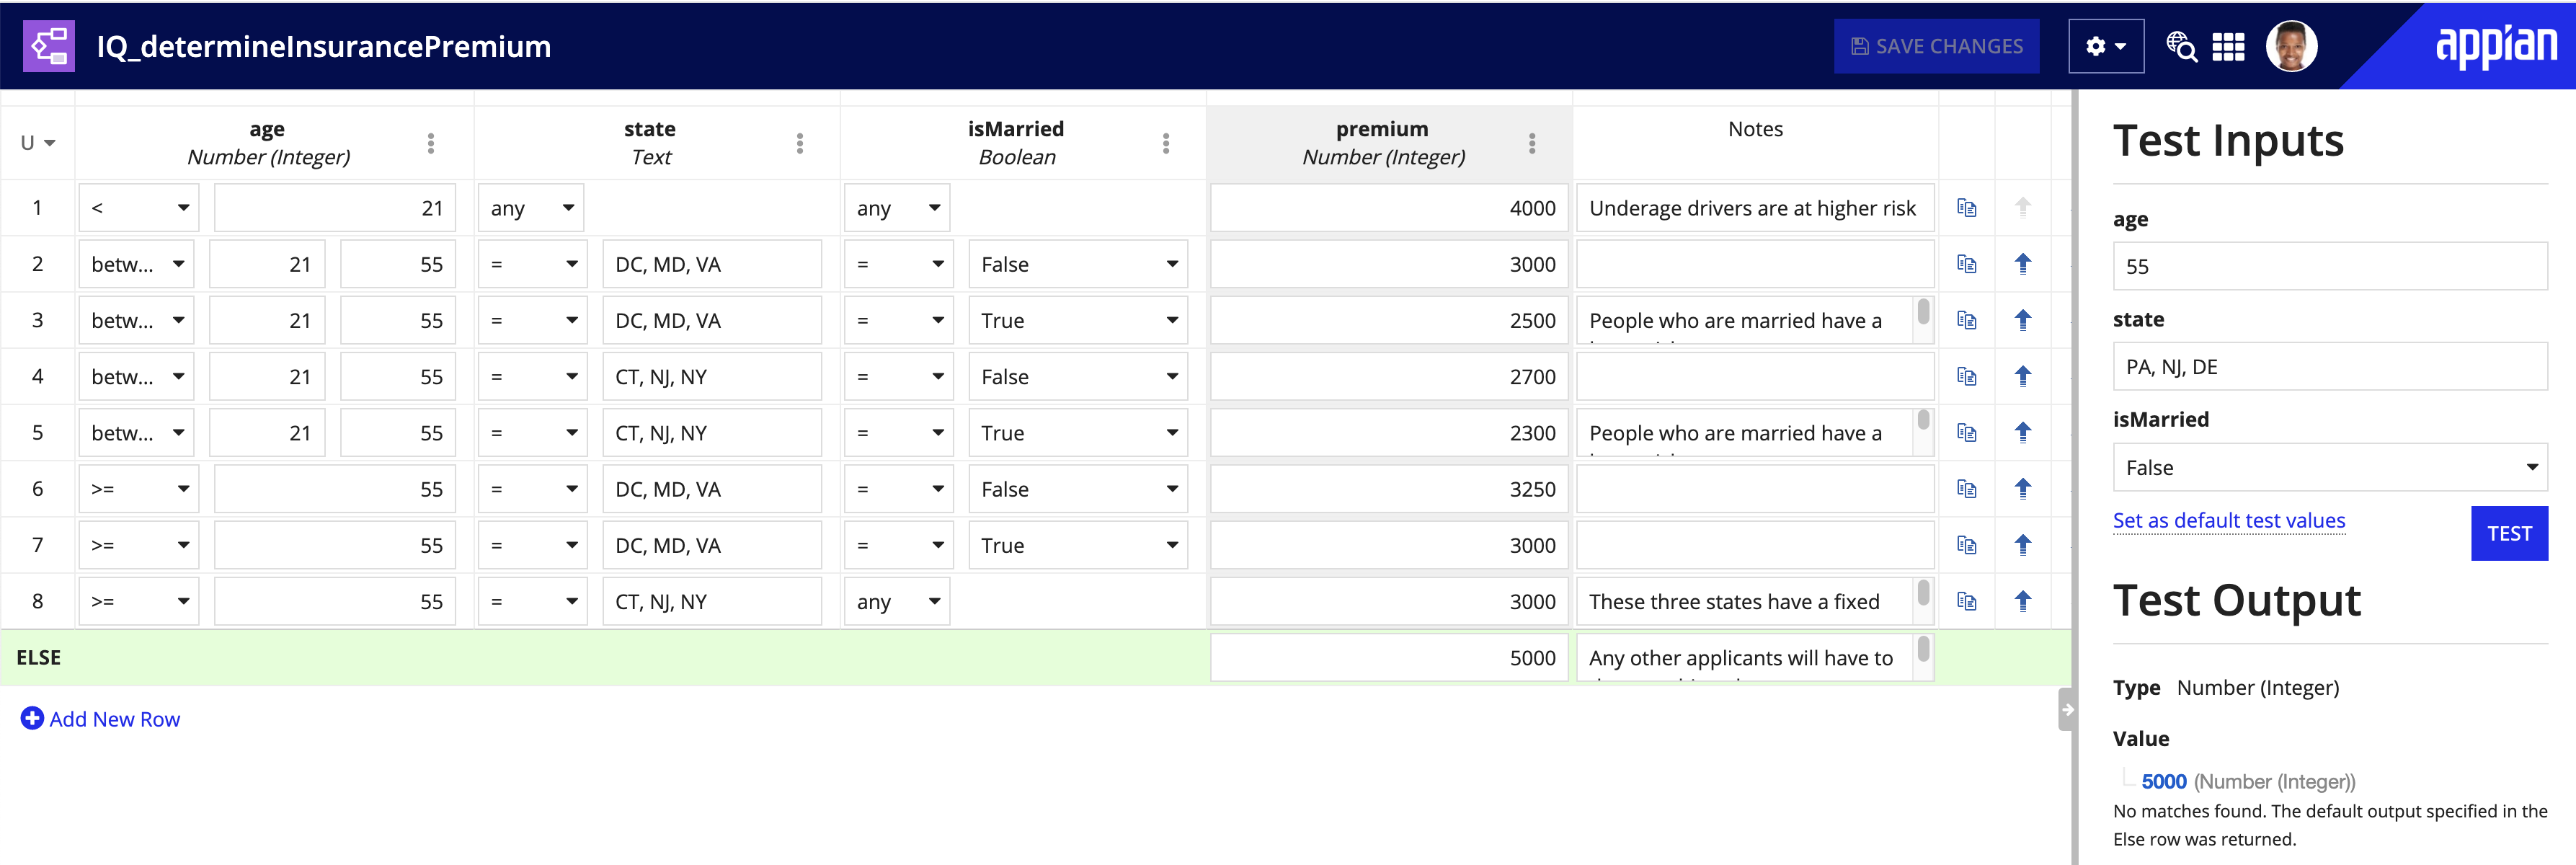
When a decision is evaluated but there are no matching rows and no default output is defined, the decision will return either a null of its output type or an empty list of its output type if it is an array type (which is determined by the scenarios outlined in the table above).
In the Decision Model and Notation (DMN) standard, you can specify a default output for your decision.
In the decision, the last row in the decision table is used to define the default output. The default output will be returned when the decision is evaluated but there are no matching rows.
Values for an input or output can be selected from a list instead of being specified free-form.
Note: This configuration only constrains the experience of configuring the decision, and has no effect on how the decision evaluates.
To use a defined list to configure an input or output:
In the Edit Input dialog, select the Use a dropdown to list values you can select for this input/output checkbox.

Note: The defined expression is not evaluated when executing the decision, it only gets evaluated when opening the decision in the designer and saving the individual input or output. When using this option, only reference values that will be consistent across all of your environments.
Decisions are defined in the decision designer by specifying logic in the decision table located in the main pane of the designer.
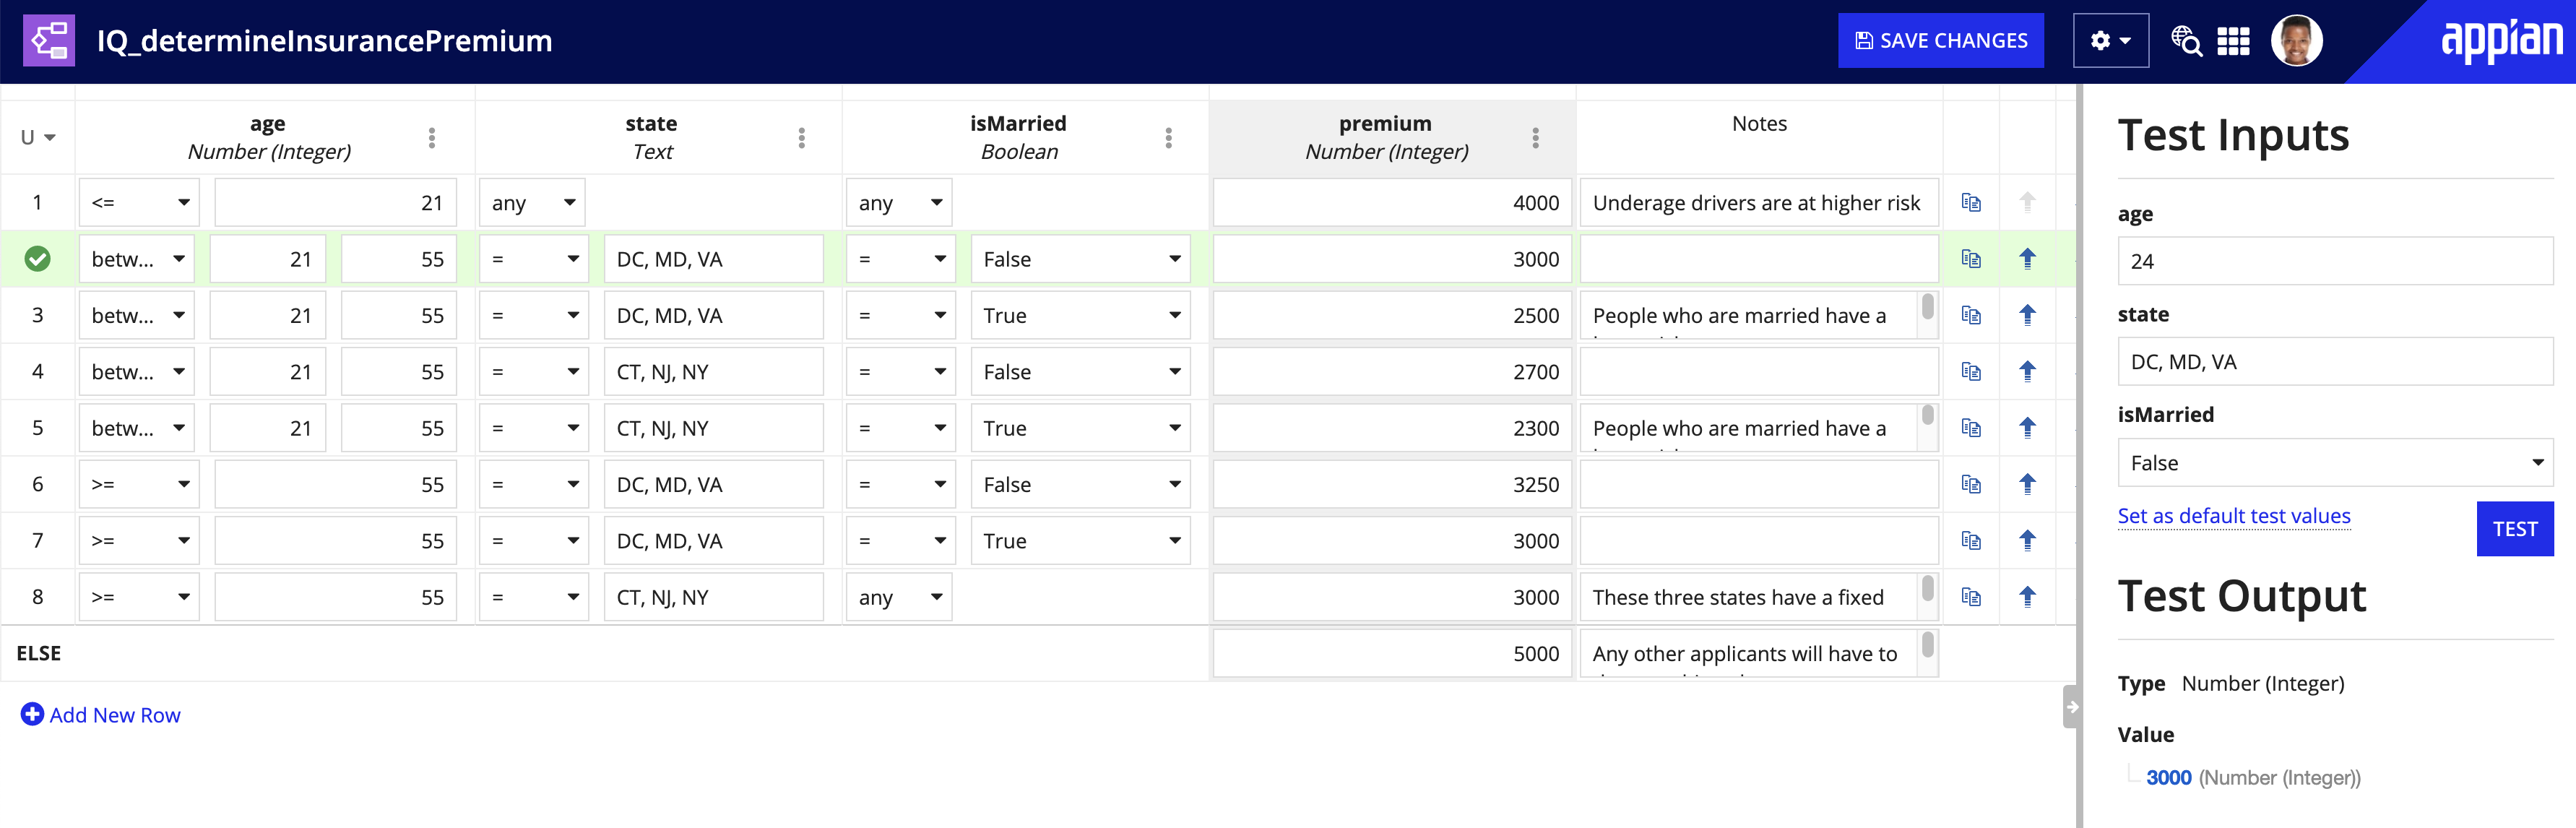
Each input cell in the decision table corresponds to a logical operation that is evaluated with the value passed into the input at execution time. When called, the decision evaluates each row in order. If any cell in the row evaluates to false then the decision stops evaluating that row.
If all the logical conditions for a row evaluate to true, then that row is said to be a hit, or a match, and the decision will result in the defined output value for that row. The decision's hit policy determines whether it will continue to evaluate rows or finish once it has found a match.
The following logical operations are available per input type:
| Logical Operator | Description | Available Types |
|---|---|---|
| = | Equals. When using the list of values feature with Text and Integer types, multiple values can be selected and the operation will check if the Inputs equals any of the selected values. | All |
| not | Does not equal. When using the list of values feature with Text and Integer types, multiple values can be selected and the operation will check if the Inputs does not equal any of the selected values. | All |
| is null | The input value is null | All |
| not null | The input value is any value but null | All |
| any | The input can be any value, it is irrelevant in this row of logic. The cell will always evaluate to true. | All |
| < | Less than Note: For Date inputs, the operator's label is "before" |
Date, Number (Decimal), Number (Integer) |
| > | Greater than Note: For Date inputs, the operator's label is "after" |
Date, Number (Decimal), Number (Integer) |
| <= | Less than or equal to | Number (Decimal), Number (Integer) |
| >= | Greater than or equal to | Number (Decimal), Number (Integer) |
| from | Inclusive range of values. Specify two numbers, and all values in that range, including those numbers, will be in the set. For example, "from 1 to 3" means the numbers 1, 2, and 3 are in the set. | Date, Number (Decimal), Number (Integer) |
| between | Exclusive range of values. Exclusive range of values. Specify two numbers, and all values strictly between those two numbers will be in the set. For example, "between 1 to 3" means only the number 2 is in the set. This is most useful for certain types of decimal value ranges. | Date, Number (Decimal), Number (Integer) |
The hit policy of a decision specifies what the result of a decision is in the cases of overlapping rules, that is, when more than one row matches the input data.
Hit policies are configured by clicking the U in the top left cell of the decision table in the decision designer. Appian supports a number of hit policies defined in the Decision Model and Notation (DMN) standard:
| Hit Policy | Description |
|---|---|
| Unique | Overlapping rules are not allowed. Only a single rule can ever be matched and all rows must be unique. Unique is the default hit policy for decisions. The decision designer indicates which rows in your decision overlap when using this hit policy. Decisions with the Unique hit policy will fail to evaluate if they contain overlapping logic. The decision stops evaluating after finding the first match (in rule order). |
| First | Multiple (overlapping) rules can match. The first match by rule order is returned and the decision stops evaluating. |
| Rule Order | Evaluates the entire decision and returns outputs for all matches in row order. decisions with the Rule Order hit policy must always return an array type. |
Testing your decision in the decision designer gives you rapid feedback on what a given set of inputs will evaluate to, allowing you to quickly understand and adjust the decision to produce the exact results required.
In the Test Inputs pane, add sample test values for each input and click Test to evaluate the decision and display the type and value of the result.
To save a default value for your test inputs, click Set as default test values. Default test values are always exported with the decision, but can only be imported if the destination environment has the Allow Test Values to Be Imported with Design Objects setting enabled. For more about this configuration, see the Deployment section of the Admin Console.
When testing your decision, additional design information and validations are run and displayed on the decision table itself. See the Design Guidance and Validations section below.
While editing your decisions you may encounter guidance. Appian design guidance reinforces best practice design patterns that should be implemented in your objects. Guidance is calculated while editing expressions within the decision or when a precedent of the decision is updated.
In addition to supporting general expression guidance, the decision designer helps you create smarter decisions with the following decision specific functionality:
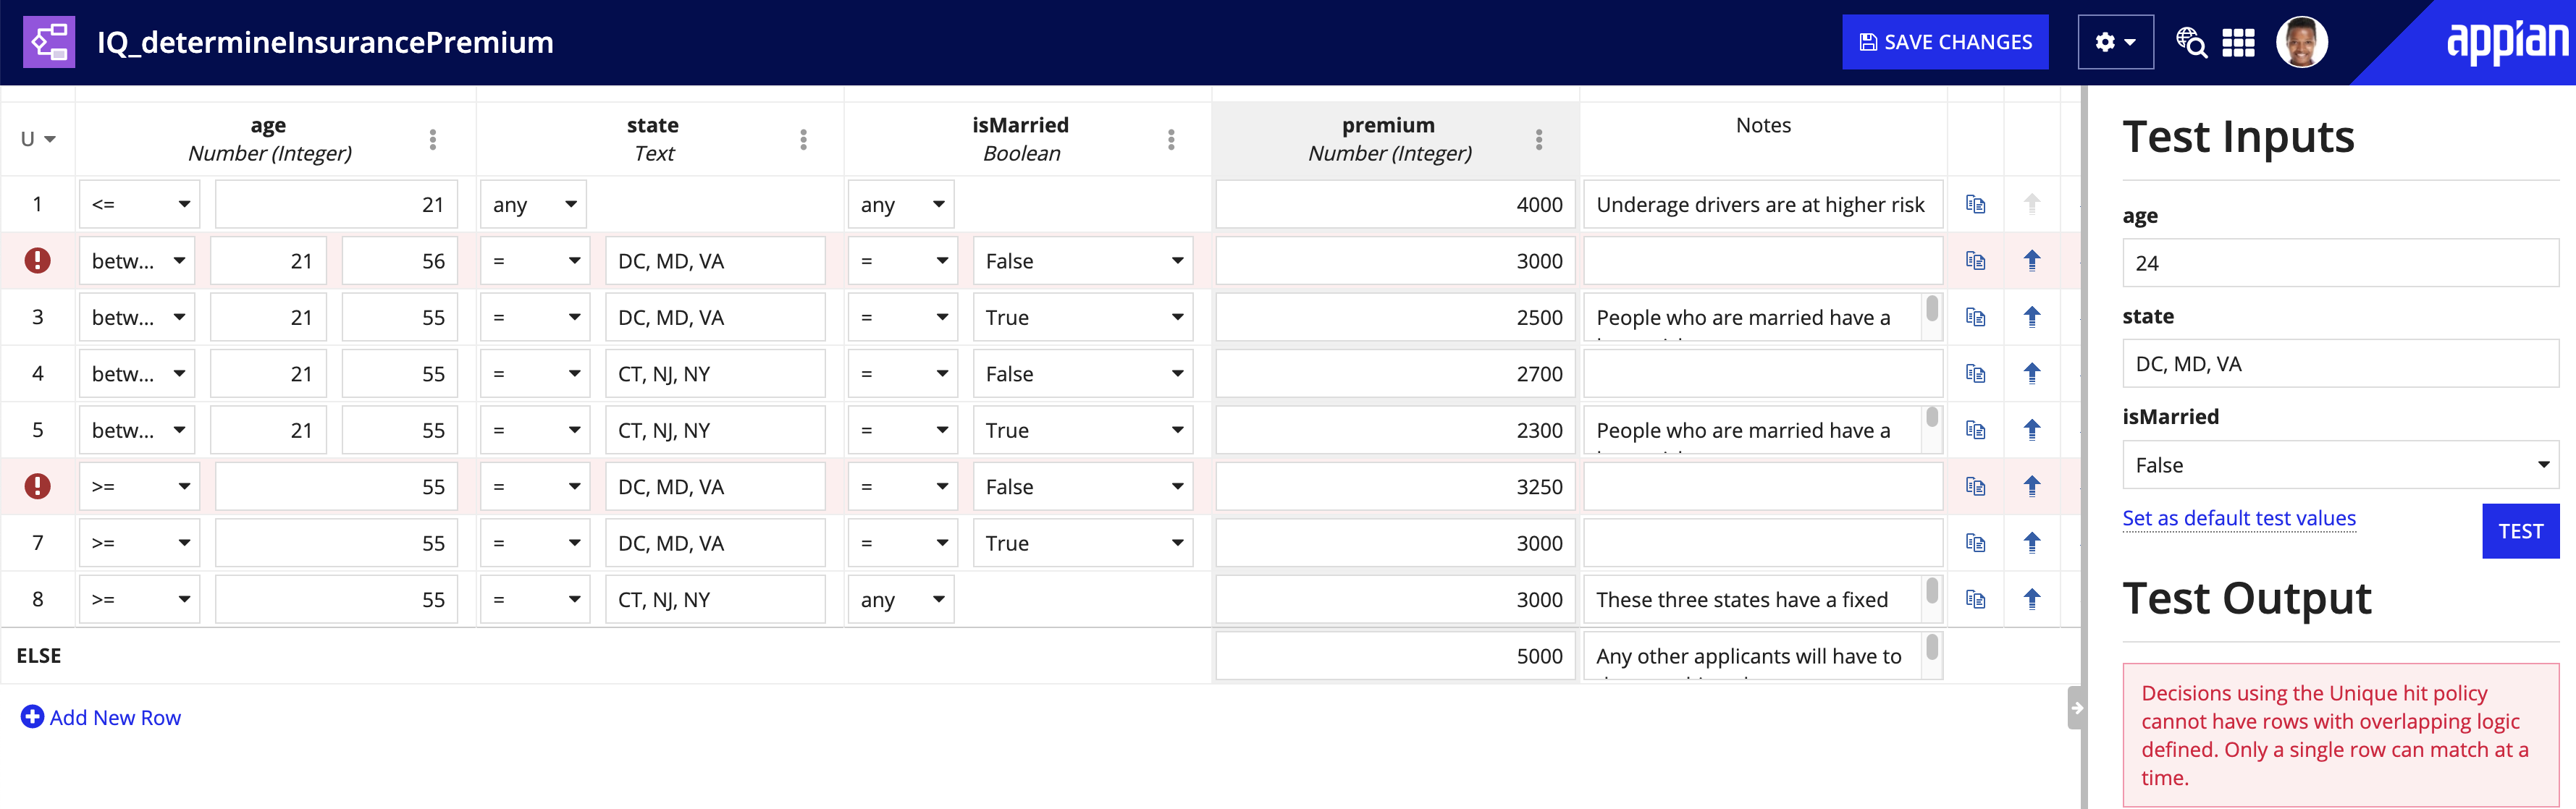
When using the Unique hit policy, the designer will highlight which of your rows overlap with each other to identify when rules won't ever be matched.
When a Unique hit policy Decision has overlapping rules, it will fail to evaluate. Overlapping rules are highlighted red on the decision table and when you hover over the error icon for that row, a tooltip will appear identifying which rows it overlaps with.
The designer also checks for completeness of your decision logic and identifies gaps in your logic. This design information is meant as a suggestion for helping you craft more robust decisions and does not affect the evaluation of a decision.
The completeness check icon will appear on the left side of an input's column header when there are gaps in the logic you defined for that input. Hover over the icon to display a tooltip that identifies values which that input does not have logic accounting for.
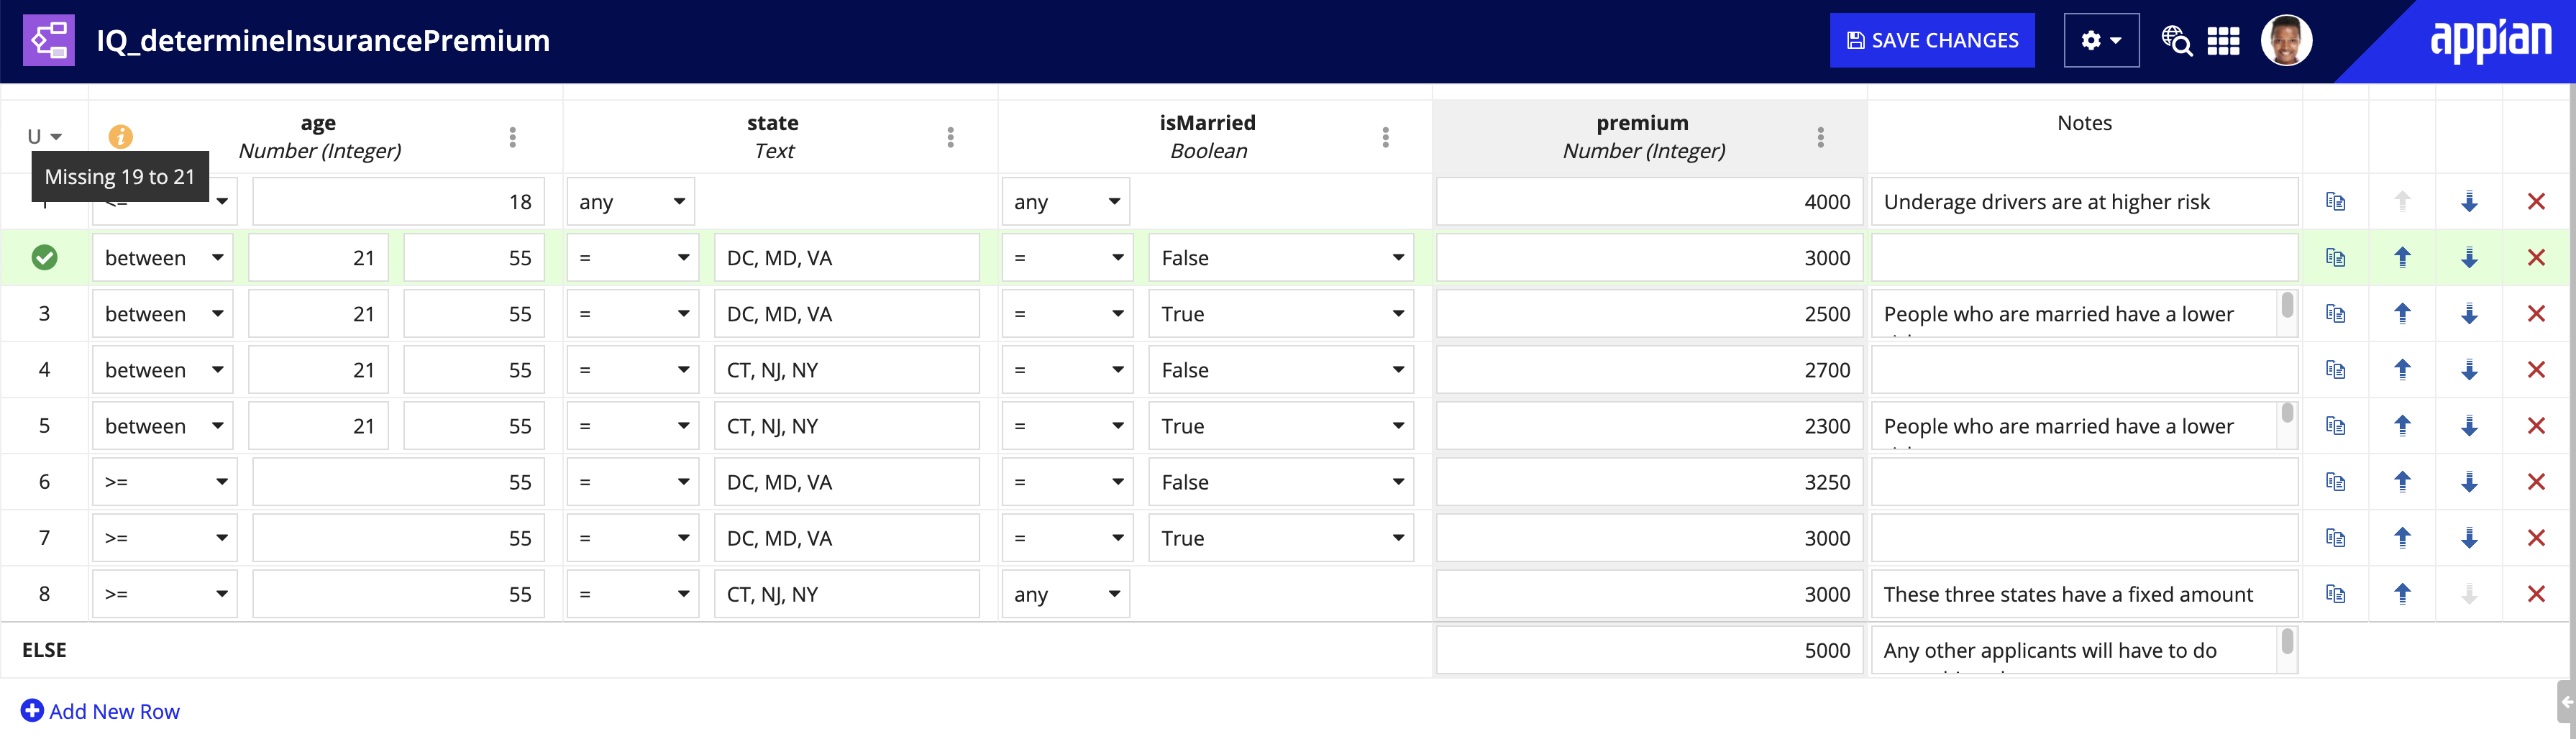
Completeness check identifies the following gaps:
The completeness check icon disappears once the identified missing gaps are covered.
Decisions are called using the rule! domain. When calling a decision, values, or variables must be passed to the Inputs by keyword, as shown below.
1
rule!IQ_determineCarInsuranceQuote(age: pv!age, state: pv!state)
Decisions cannot be used inside process events, process report column definitions, or web content channels.
Each time you modify and save a decision, a new version is created. All objects that use the decision will use the latest version. All versions are accessible to designers who can view the decision, and a decision can be reverted back to a previous version at any time.
For information on how to manage object versions, see Managing Object Versions.
Users with Administrator permission to this object or rule folder can move it to another folder:
Use the folder picker or browser to select the new parent folder.
Tip: You can also create a new folder in the browser, if you have Editor permissions to its parent folder.
Note: Any objects that are configured to inherit the security of the parent folder assume the security rights of the target folder.
Developers with Viewer permissions to this object can duplicate it. There are two ways to duplicate an object:
Once you select the Duplicate option, you will see the following dialog:
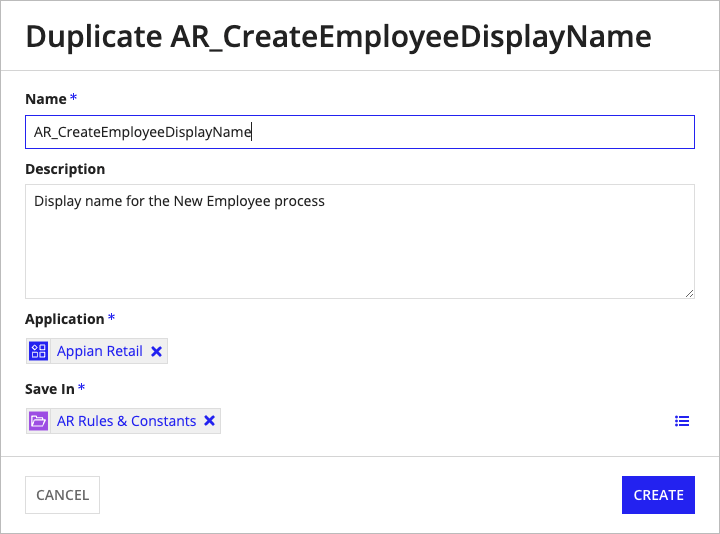
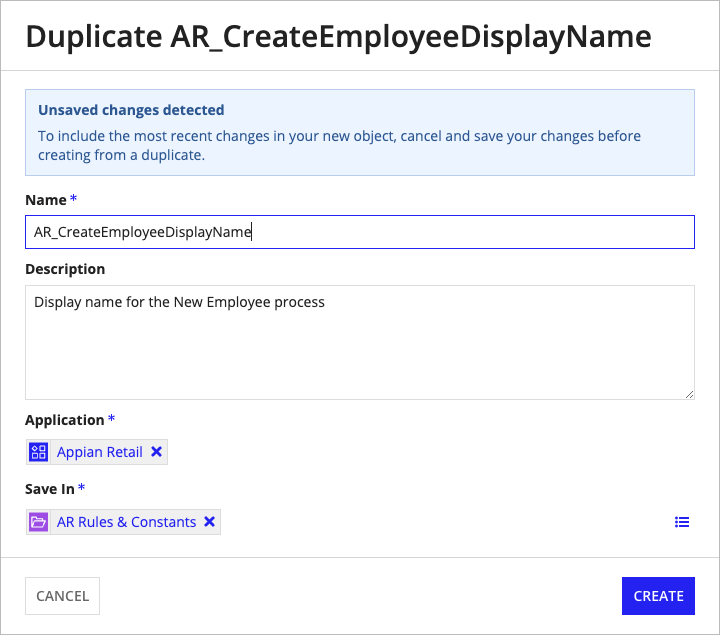
You can only duplicate the most recent version of an object. If you have unsaved changes and attempt to duplicate the object from within the designer, the most recent saved version of the object will be duplicated without the unsaved changes. A banner appears when there are unsaved changes to remind you before duplicating.
Deleting an decision prevents users from further viewing or editing it. However, the last version of the decision is still available to be used in processes, record views, and reports.
Decisions can be deleted by users with Administrator permissions to it. Appian does not recommend deleting decisions that are in use because the decision can no longer be exported.
To delete a decision:
Note: System administrators have the ability to delete decisions (and other objects) in bulk by selecting them and clicking Delete in the toolbar.
Tip: Any user can invoke any decision that is used by an interface or process they can access.
The security role map of a decision controls which developers can see or modify it and its properties. By default, decisions inherit the security of the folder that they are saved in. However, after creating the decision, you can disable that inheritance and modify the decision's security. See Editing Object Security to modify a decision's security.
The following table outlines the actions that can be completed for each permission level in a decision's security role map:
| Actions | Administrator | Editor | Viewer | Deny |
|---|---|---|---|---|
| Evaluate the decision | Yes | Yes | Yes | Yes |
| View the decision definition | Yes | Yes | Yes | No |
| Duplicate the decision | Yes | Yes | Yes | No |
| Test the decision | Yes | Yes | Yes | No |
| Add, reorder, or delete rows in the decision | Yes | Yes | No | No |
| Update values for existing inputs and outputs | Yes | Yes | No | No |
| View the security | Yes | Yes | No | No |
| Rename the decision | Yes | Yes | No | No |
| Add, edit, or delete inputs and outputs | Yes | No | No | No |
| Edit the decision's hit policy | Yes | No | No | No |
| Delete the decision | Yes | No | No | No |
| Update the security | Yes | No | No | No |
