| The capabilities described on this page are included in Appian's standard capability tier. Usage limits may apply. |
Your automation practice might involve a lot of people, technologies, and data. To ensure the right people have access to the right parts of an automation, it's important for you to establish security in Appian RPA with careful consideration and thoughtfulness.
This page describes how to secure a robotic task, as well as the data that flows into and from Appian RPA. It also covers how to set up security between robotic tasks and other application objects.
It is very important to keep in mind that any security changes, on any component, can make a user lose access to a robotic task they've created, or prevent that user from executing or editing a robotic task. For this reason, it is important that you carefully consider any changes you make.
Appian recommends that you document your security settings to more easily reproduce in the future. For example, you may need to recreate security settings in a target environment when you deploy a robotic task.
Tip: As of the Appian 23.3 and RPA 9.3 releases, Appian RPA uses standard object security and a flexible permissions mechanism based on permission tags. This approach to security is different than previous releases. See the Unification Guide for a detailed explanation regarding the differences. It's important for you to familiarize yourself with what has changed and make necessary adjustments to your configuration and user management practices.
Robotic tasks use role maps to determine which users have access and robot pools to determine which robots can execute the robotic task.
The security role map of a robotic task controls which developers can see or modify it and its properties. Unlike some other objects, Robotic Tasks never inherit security.
The following table outlines the actions that can be completed for each permission level in a robotic task's security role map:
| Robotic Task Actions | Admin | Editor | Viewer | Deny |
|---|---|---|---|---|
| View definition | Yes | Yes | Yes | No |
| Export | Yes | Yes | Yes | No |
| Duplicate | Yes | Yes | Yes | No |
| Edit definition | Yes | Yes | No | No |
| Import new version | Yes | Yes | No | No |
| View security | Yes | Yes | No | No |
| Edit security | Yes | No | No | No |
| Delete | Yes | No | No | No |
| Execution Actions | Admin | Editor | Viewer | Deny |
|---|---|---|---|---|
| Execute robotic task | Yes | Yes | Yes | No |
| Debug a robotic task | Yes | Yes | Yes | No |
| View list of executions | Yes | Yes | Yes | No |
| View execution details | Yes | Yes | Yes | No |
| Download execution artifacts | Yes | Yes | Yes | No |
| Query execution info | Yes | Yes | Yes | No |
| View robotic task schedule | Yes | Yes | Yes | No |
| Create or edit new robotic task | Yes | Yes | Yes | No |
| Pause execution | Yes | No | No | No |
| Stop/Abort execution | Yes | No | No | No |
| Delete execution | Yes | No | No | No |
Tip: If your robotic task interacts with other design objects, you need to set up permissions so these objects can be accessed as needed. See the Securely Access Appian Design Objects section on this page for more instructions.
Robotic tasks access machines, software, and data in ways similar to your human workforce. It's crucial to embed data privacy and security during the design, execution, and review stages for every robotic task. When designing a secure robotic task, consider how Appian stores or shares data and how the robotic task stores execution metadata. RPA's advantage is the ability to interact with multiple systems, so it's also important to know that some security aspects fall outside of Appian's control.
This section describes data security aspects you should consider in the design, execution, and review of robotic tasks.
Developers can include logging in the robotic task code to record information in the execution log, which is helpful for debugging processes or making results more readable. Be mindful of including potentially sensitive information in this log. Users with access to the robotic task can also see execution logs. Never log personally identifiable information (PII), protected health information (PHI), decrypted values, or passwords as plain text.

Any data that is written to Appian Cloud databases during the execution of a robotic task adheres to our existing data privacy and retention standards.
Data flow from Appian
If your robotic task accesses existing data in an Appian database, consider where that data will be used and how it might be stored elsewhere. For example, if you use a robotic task to send Appian data to your HR system, you'll need to evaluate that software vendor's data privacy and storage practices prior to deployment.
Additionally, it's important to regularly evaluate and monitor the security of the robots where your robotic tasks are being executed. Consider who has access to files that the robotic task regularly generates, updates, or moves on these robots. If the files contain sensitive information, consider cleaning or removing the files appropriately.
Data flow to Appian
On the Appian side, if the robotic task is executed as part of a process model, any data passed back from the robotic task may be stored in the Process Details area during monitoring. Administrators should consider who has access to the application and process models if this data is sensitive and shouldn't be easily accessible.
You may also configure your robotic tasks to write or retrieve information in other databases. However, this type of access falls outside of Appian's security perimeter, and implementation must be tested for security independently.
You can control the information that is captured when manually executing a robotic task. In the Execution options, choose to record the execution and take screenshots along the way. If you're concerned about the information contained in the execution video or screenshot, disable these options when manually executing the robotic task.
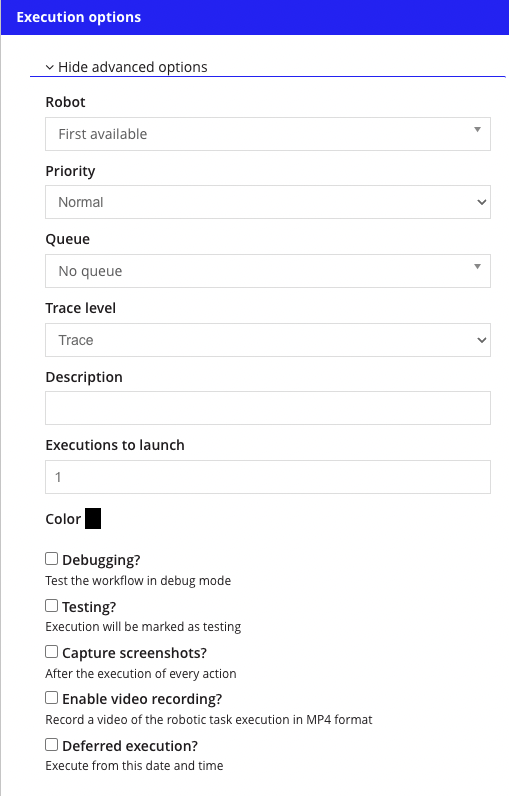
However, there are robotic task actions that enable you to take screenshots during execution, which could override the manual execution option. Communicate with developers to ensure security concerns and guidelines are also respected in the robotic task code.
Execution results (including video and images, if captured) are visible to users who share permissions with the robotic task, so administrators can configure security by changing role maps as necessary.
If a robotic task is tasked with logging into another program or a website, it should use credentials to input the username and password. Credentials store this information securely and retrieve it from the server when needed.
When you want a robotic task to have access to a login credential, the credentials must have at least one permission tag in common with that component.
Note: Never store usernames, passwords, or other sensitive information as plain text. If you use the task recorder to record login actions, remember to always remove the username and password values before saving the recording and update the generated actions to use credentials.
All RPA credentials use AES 256-bit encryption, and follow the FIPS Security Model for Cryptographic Modules standard. When credentials are created or updated, they are securely encrypted and stored in a database. The encryption key used for credentials is unique not only to each environment, but also separate from the other keys that are used to encrypt other fields. Each key is stored securely in the Java KeyStore, the password for which is uniquely generated at site startup.
Robot pools use role maps to determine which users have access.
The security role map of a robot pool controls whether users can modify it and its properties. Unlike some other objects, Robot Pools never inherit security.
The following table outlines the actions that can be completed for each permission level in a robot pool's security role map:
| Actions | Administrator | Viewer |
|---|---|---|
| View robot pool membership | Yes | Yes |
| Add and remove robot pool members | Yes | No |
| View and modify robot pool security | Yes | No |
| Configure membership rules | Yes | No |
| Configure properties and attributes | Yes | No |
| Create a new pool as a child of the current pool | Yes | No |
| Delete the robot pool | Yes | No |
In the Appian 23.4 release, there was a change in how robot security is handled. Before this release, robots were secured using permission tags. However, starting from the Appian 23.4 release, newly created robots can only be secured using role maps.
You can easily manage your robots by using group-based role maps that include permission levels such as administrator, editor, viewer, and deny. This lets you mirror your existing design object security. And when you're in the robot management view or checking out robot details, you can quickly add or swap out security roles, making it simple to tap into your existing security groups and roles.
Security for robots consists of the following:
| Action | RPA Operations Manager | Designer |
|---|---|---|
| Access the Operations Console and view the Robot Management page | Yes | Yes |
| Create a new robot | Yes | No |
Starting from the Appian 23.4 release, newly created robots can only be secured using role maps. The security role map of a robot controls whether users can view or modify it and its properties. Unlike some other objects, Robots never inherit security.
The following table outlines the actions that can be completed for each permission level in a robot's security role map:
| Robot Actions | Administrator | Editor | Viewer | Deny |
|---|---|---|---|---|
| Monitor executions (Also requires Viewer, Editor, or Admin permission on the robotic task) |
Yes | Yes | Yes | No |
| View list of robots | Yes | Yes | Yes | No |
| View robot dashboard (robot details) | Yes | Yes | Yes | No |
| Edit properties | Yes | Yes | No | No |
| View security | Yes | Yes | No | No |
| Edit/Enable/Disable auto login | Yes | Yes | No | No |
| Update security | Yes | No | No | No |
| Download and install agents | Yes | No | No | No |
| Download and install auto-login | Yes | No | No | No |
| View live robots | Yes | No | No | No |
| Enable / Disable robot | Yes | No | No | No |
| Lock / Unlock robot input | Yes | No | No | No |
| Restart robot | Yes | No | No | No |
| Delete robot | Yes | No | No | No |
If you are using Appian 23.4 or later, you can permanently switch your robots from using permission tags to role maps. Follow these steps in the Operations Console to transition a robot to security role maps and remove permission tags.
Use one of the following methods to navigate to the robot Robot Security screen from the Robot Management screen.
| Method | Example |
| Select the checkbox next to the robot then click SECURITY. | 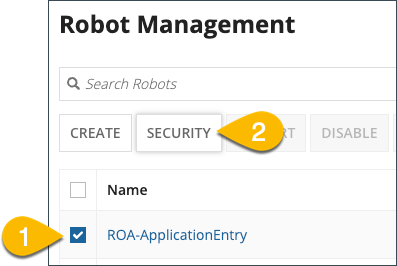 |
| Select the robot you want to change. Result: The Robot Detail page displays. Select Security from the action menu. |
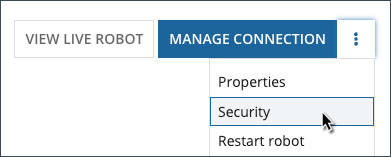 |
 button. Click Create when you are done creating the group.
You can also securely automate the installation of agents and the auto-login service on your Windows host machines by using robot keys. A robot's unique identity is encapsulated in a single robot key, allowing you to store these keys in your own secure credentials manager and rotate them on demand. Robot keys are optional, so you have the flexibility to choose between using robot keys or continuing to use the standard installation process. For complete information about enabling and using robot keys, see the Use robot keys for authentication topic on the Manage Robots page.
Permission tags are used to:
Different users can access the same robot, queue, or credential no matter what their role is – they just need to share a tag with that component.
There are two types of permissions in Appian RPA:
operations permission tag, the user can see the robot.operations permission tag, but the robot also has an hr! tag that the user doesn't have, then the user won't be able to interact with the robot.To make a user, robot, queue, or credential visible to another component, both must share at least one permission tag. If a component has more than one mandatory permission tag, the components must share all mandatory permission tags.
Required role: Developer or Administrator
Note: Only administrators can create permissions in Appian RPA.
When you want a user to have access to a robot in Appian 23.3 and earlier, they must have at least one permission in common. You can assign permissions to users and robots in similar ways.
Based on your role, you can assign permission tags as follows:
| Role | Assign Permissions to Users | Assign Permissions to Robots (Appian 23.3 and earlier) |
|---|---|---|
| Operations Manager | No | No |
| Developer | No | Yes (if permissions in common) |
| Administrator | Yes | Yes |
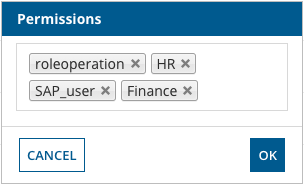
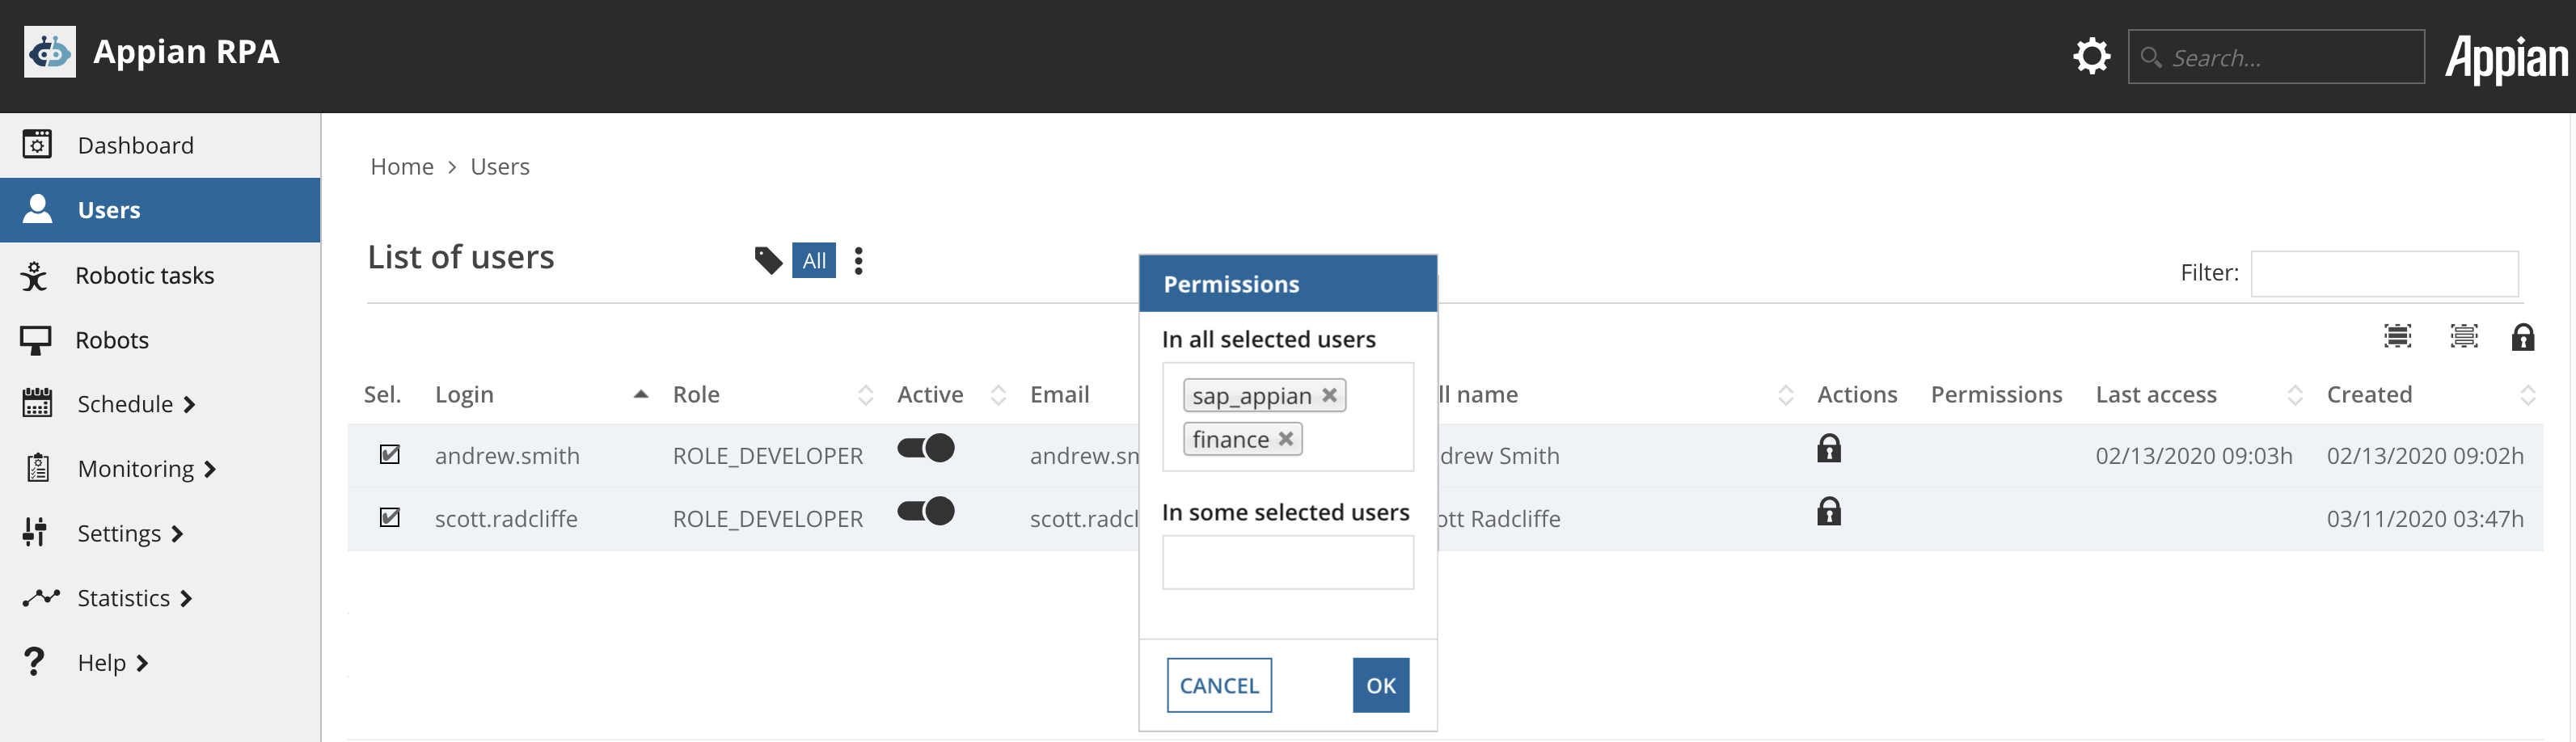
Complete the following steps to assign or edit user permissions.
In the Actions column for that row, click the lock icon  . The Permissions window displays.
Tip: To assign or modify robot permissions, go to the Robot Management screen in the Operations Console.
Required role: Administrator
As more people access the Appian RPA console, security is important to consider. Administrators can add or remove permissions for multiple users at once:
If your robotic task interacts with other design objects, you'll need to set up permissions so these objects can be accessed as needed.
To demonstrate how permissions work between Appian RPA and other design objects, we'll use an example:
Suppose your robotic task executes within a process model that processes internal transfer requests. The process model is in an Appian application called RP_Company Transfers. The robotic task will interact with the PeopleSoft user interface to gather data about the employee who requests a transfer and then send it back to the process model to write it into the datastore. The application has three security groups: Administrators (with admin privileges), HR Managers (with editor privileges), and All HR Users (with view privileges).
For robotic tasks to write data into the datastore, they should be associated with a security group that has adequate permissions. Since the datastore security setup lists HR Managers as editors, assigning HR Managers to the robotic task's role map allows it to inherit the editor privileges for the datastore and any additional permissions configured for the group. This configuration means that robotic tasks assigned the HR Managers group can gather and write data seamlessly. Alternatively, if you make the service account an Administrator, it will have universal access.
Ensure that your objects are assigned appropriate role maps aligning with their functions and required access levels to maintain secure and efficient operations.
