| This content applies solely to Connected Claims, which must be purchased separately from the Appian base platform. This content was written for Appian 21.4 and may not reflect the interfaces or functionality of other Appian versions. |
IntroductionCopy link to clipboard
Business users with the appropriate group access can set up the claims journey for a line of business directly from another claims process, like FNOL, SIU & Fraud Case Management, Claims Lifecycle, Litigation, Field Inspection, Customer Service and more. Setting up a claims journey includes creating a new process workflow, including the case properties, and process workflow properties, phases, and visuals that define how the claim will move through the journey steps and publishing the process workflow so your team can begin using it..
In this section, we’ll walk you through the actions you can take to set up and manage journeys, phases, and phase steps for your lines of business, including:
- Creating a new process workflow from scratch or copying an existing one for a line of business.
- Editing or removing a process workflow for a line of business journey.
Note that before you can create a new process workflow for any LOB, you must first create the LOB from the Manage New Line Of Business configuration. (Placeholder: Add reference link to that section)
Configure a new claims journeyCopy link to clipboard
Creating a new claims journey with Connected Claims is simple and easy. You can create a new claims journey from scratch by filling in the workflow properties, case properties, and advance parameters for your claims journey or copying an existing process workflow by providing two methods with easy to fill in fields that you with two methods for creating a new claims
To configure a new claims journey from scratch:
- From the HOME page, select the CONFIGURATION tab.
- Click Claim Journey Setup.
- Click the Create New Process Workflow link.
- Select Create a new Process Workflow from Scratch.
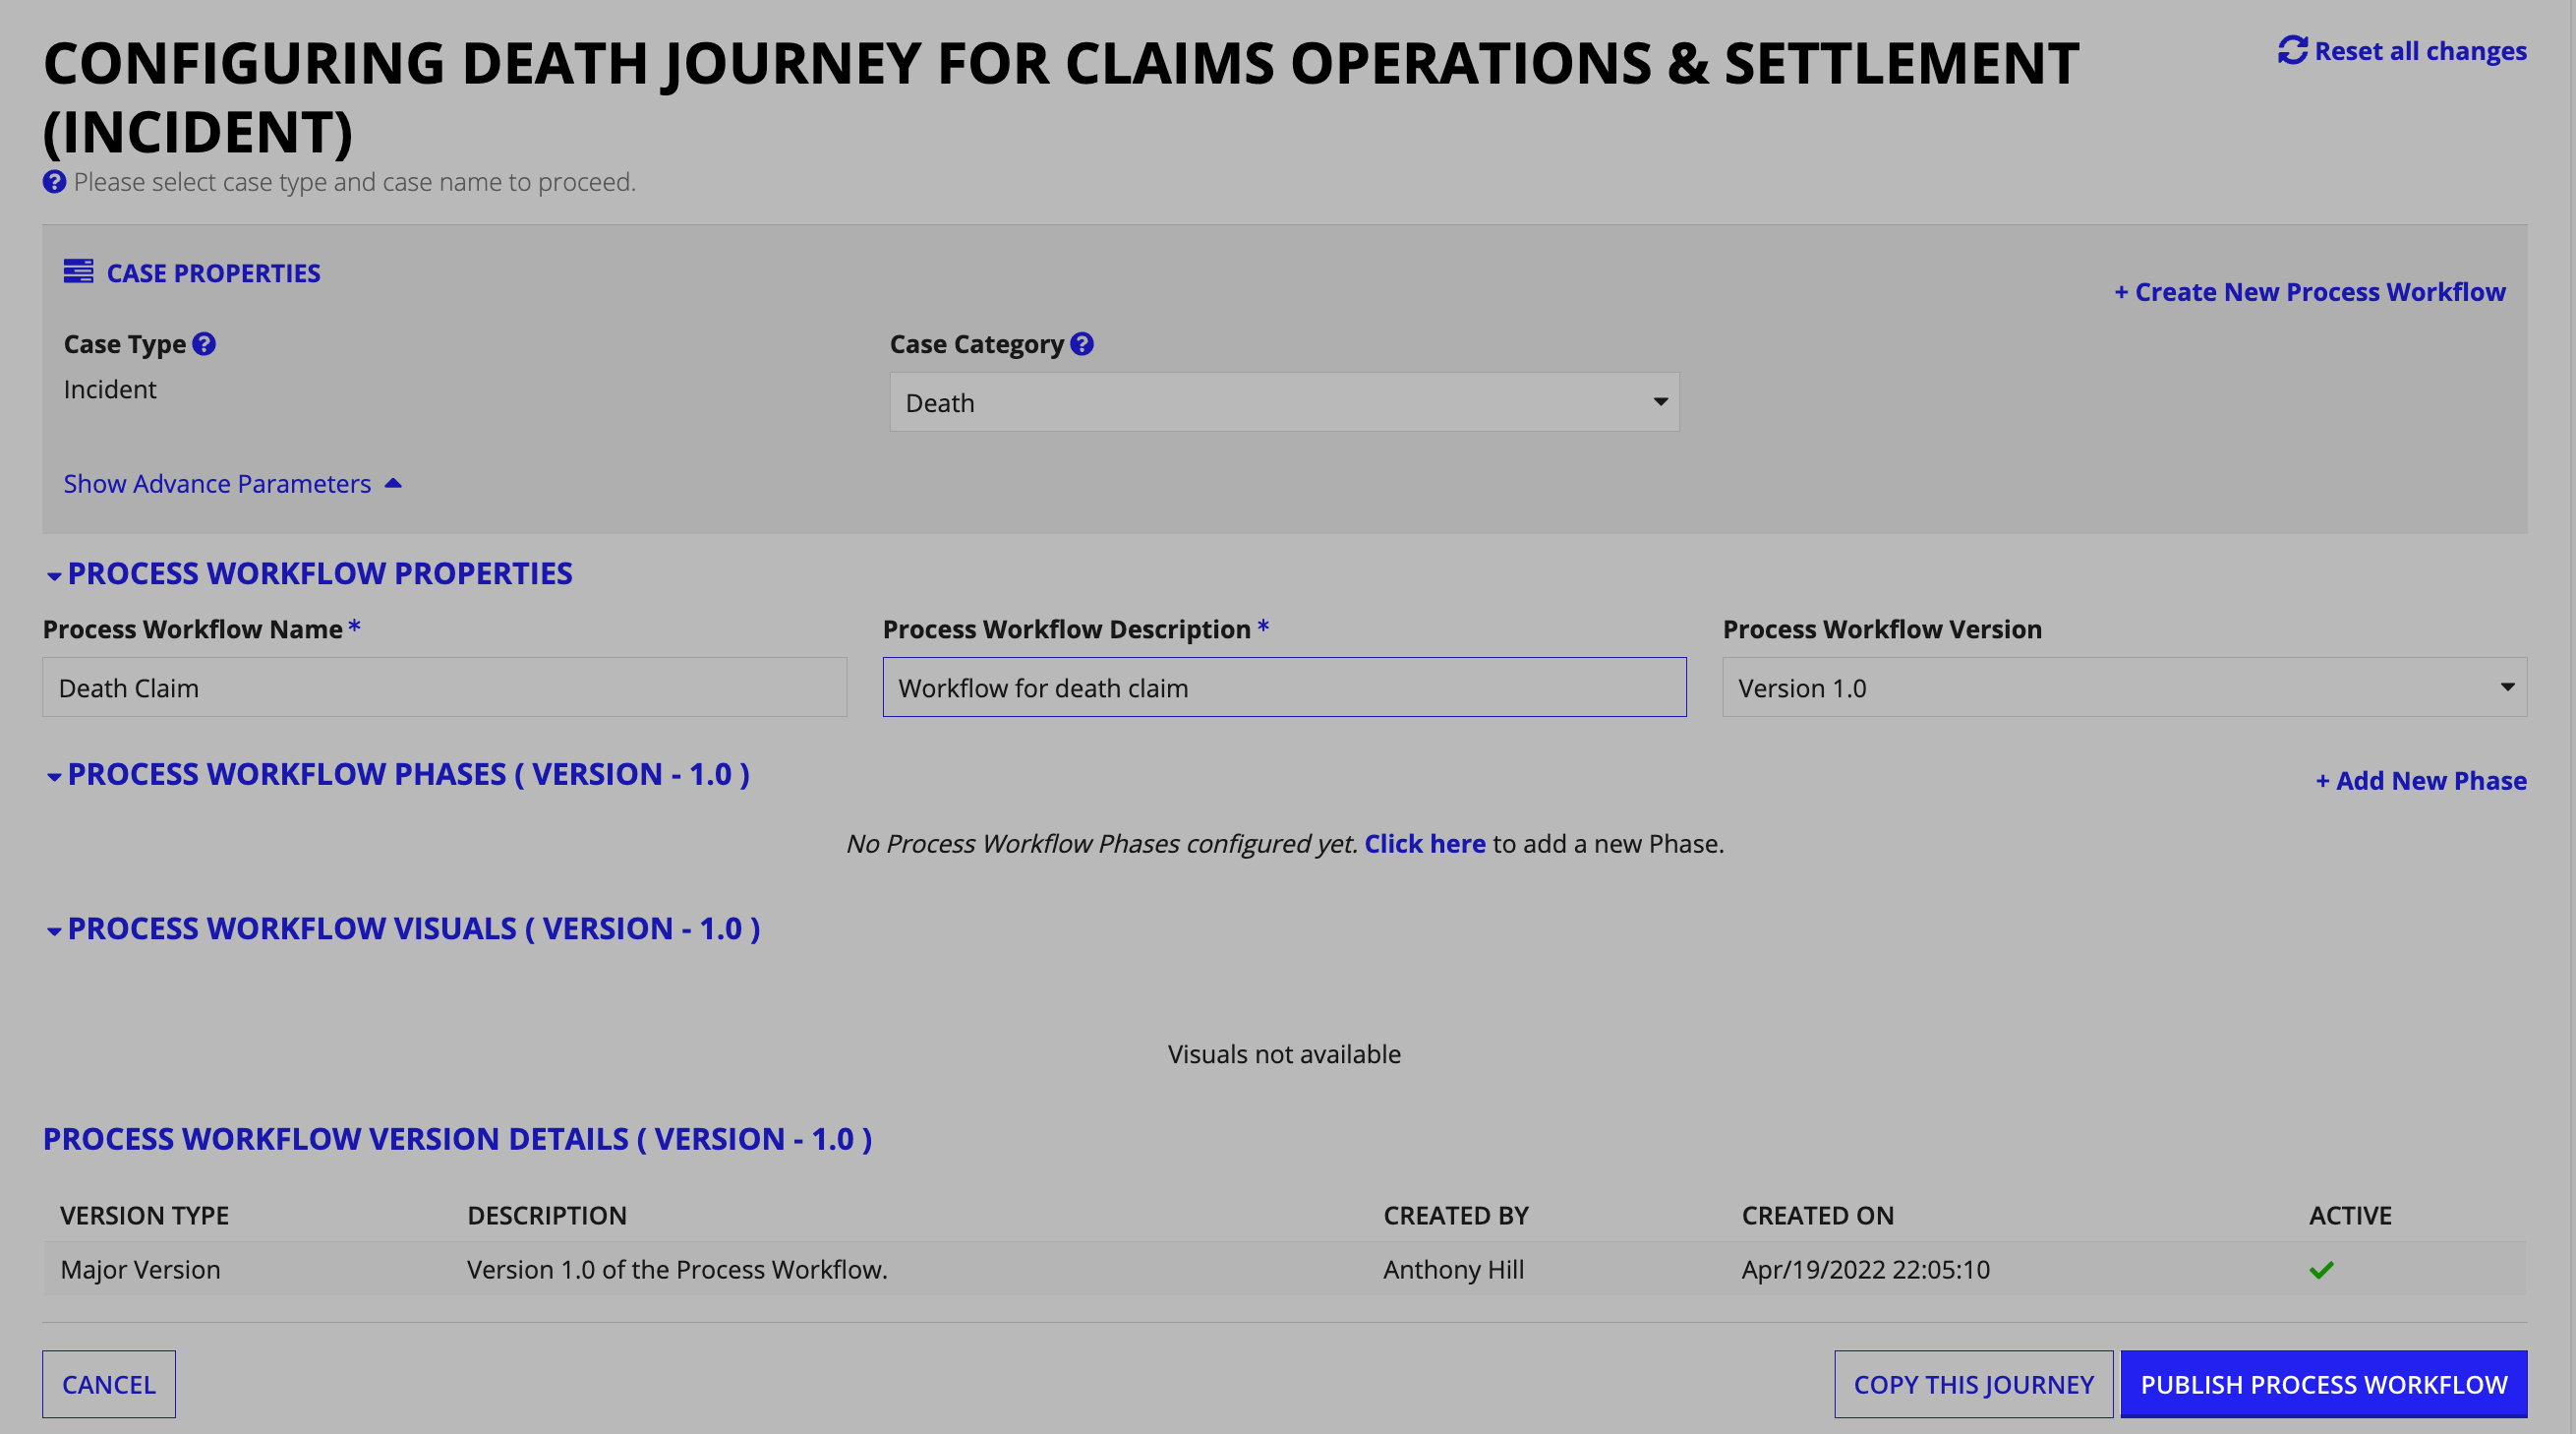
- Under PROCESS WORKFLOW PROPERTIES, enter the following information:
- Process Workflow Name: Designate a unique name for the new process workflow.
- Process Workflow Description: Enter a description that explains the purpose of the process workflow.
- Under CASE PROPERTIES, select a value for the following properties from the corresponding dropdown menu:
- Case Type: The case type assigned to this process workflow.
- Case Category: The case category assigned to this process workflow.
- (Optional) Under ADVANCE PARAMETERS, enter the following information:
- Against Product: The product, when selected, will trigger the process workflow.
- For Country: The country you want to configure this process workflow (Domicile Country of the Legal Entity).
- Click CREATE PROCESS WORKFLOW.
To configure a new claim journey by copying an existing one:
- From the HOME page, select the CONFIGURATION tab.
- Click Claim Journey Setup.
- Click the Create New Process Workflow link.
- Select Copy an existing Process Workflow.
- Under CASE PROPERTIES, use the dropdown menus to select a value for the following properties for an existing process workflow:
- Case Type: The case type assigned to this process workflow.
- Case Category: The case category assigned to this process workflow.
- Under PROCESS WORKFLOW PROPERTIES, enter the following information:
- Process Workflow Name: Designate a unique name for the new process workflow.
- Process Workflow Description: Enter a description that explains the purpose of the process workflow.
- (Optional) Under ADVANCE PARAMETERS, enter the following information:
- Against Product: The product, when selected, will trigger the process workflow.
- For Country: The country you want to configure this process workflow (Domicile Country of the Legal Entity).
- Click CREATE PROCESS WORKFLOW.
After successfully creating a new process workflow, Connected Claims will configure the new line of business.
Add a new journey phaseCopy link to clipboard
Now you can start setting up and adding the journey phase, phase steps, and other configurations for your organization's processes. A phase is a logical grouping of the actual steps in a claims journey process workflow.
Note that when setting the phase step and determining if it requires human intervention or is executed by the system is dependent on the Execution Process you select for the corresponding phase step. For example, if you select Human Intervention, then the corresponding step is classified as one requiring human intervention.
To add a new journey phase and phase steps follow the below steps:
- Click the Add New Phase link.
- In Phase Name, enter a name for the journey phase. The phase name must be unique.
- In Phase Description, enter a description for the journey phase.
- Click the Run this Phase Asynchronous checkbox if you want the phase to run independent of the start of the upcoming phase in the claims journey.
- Under PHASE STEP DETAILS, click Add New Phase Step.
- In Phase Step Name, enter the name of the phase step.
- In Execution Process, start entering the execution process for the phase step and Connected Claims will auto-suggest execution processes that you can select. The execution process you select will determine if this step is automatically executed or requires human intervention.
- In Default Assignee, start entering a default assignee for the phase step and Connected Claims will auto-suggest individual users or groups that you can select.
- Note: This field becomes disabled in case of Automated Phase Steps or Dynamic assignment on the Phase Steps.
- Click SAVE CHANGES.
After completing all the above steps to configure the claim journey, Connected Claims will create the phase step based on the requirement. You can repeat the steps in this section to add additional phase steps to the claims journey or publish the claims journey process workflow.
Publish the claims journeyCopy link to clipboard
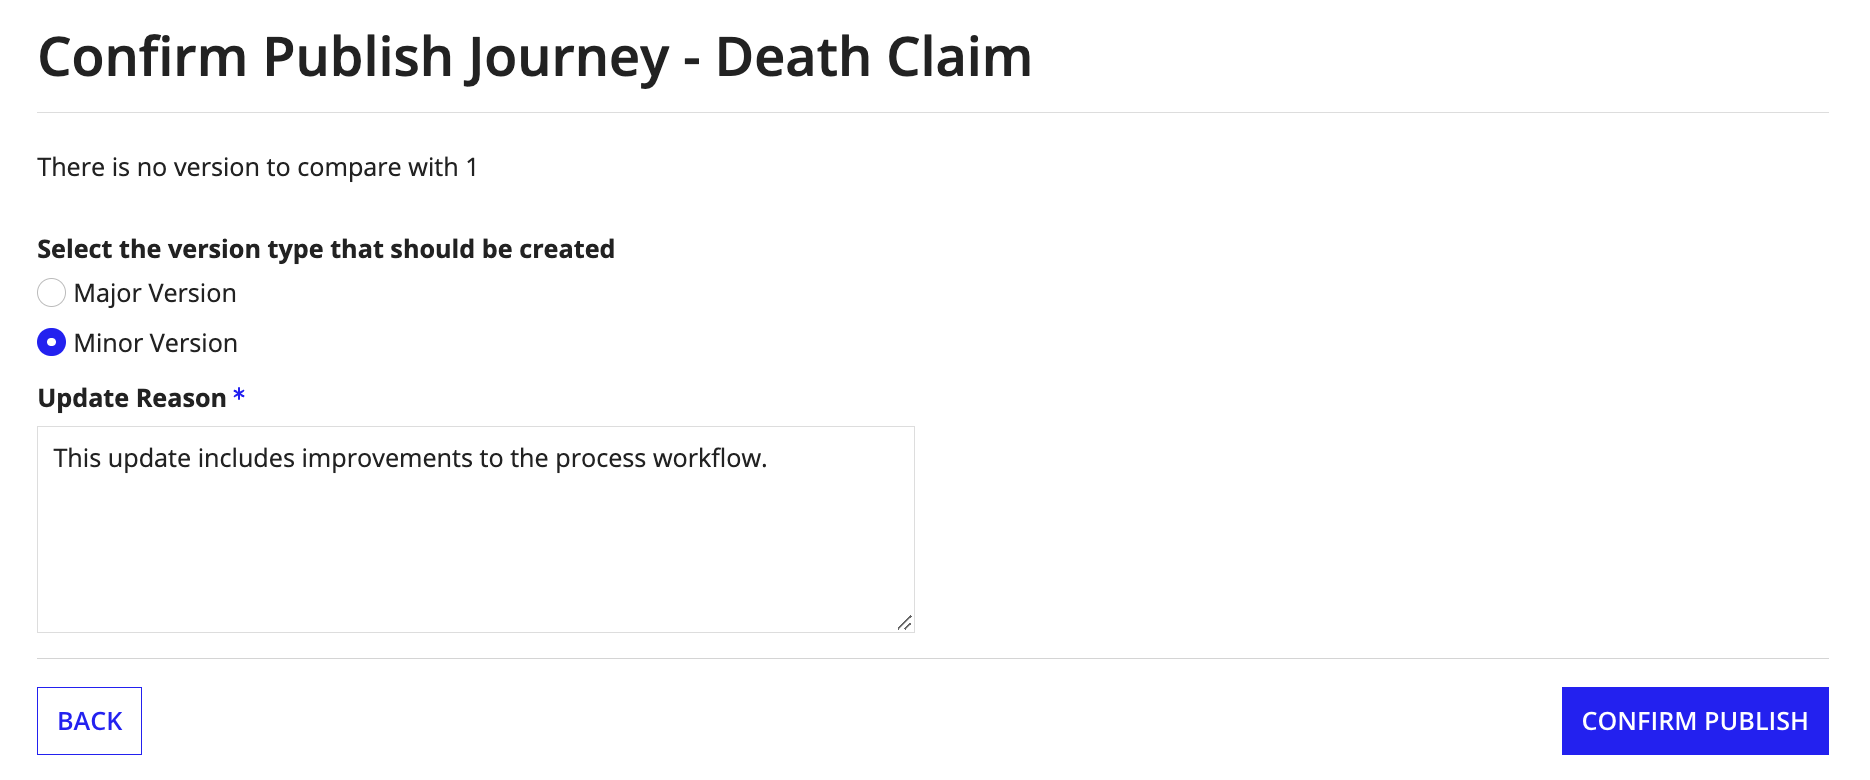
When you are ready to publish the workflow process, you must indicate if you want Connected Claims to classify the update as major or minor and the reason for the update, and confirm that you want to publish the updated version.

To publish the new claims journey:
- From the Claims Journey page, click PUBLISH PROCESS WORKFLOW.
- From the confirmation page, select the version type under Select the version type that should be created. Options include Major Version or Minor Version.
-
In the Update Reason, enter a reason for the latest version update.

- Click CONFIRM PUBLISH.
- On the Are you sure you want to publish the journey? dialog, click YES to confirm that you want to publish the process workflow update.
Review the claims journeyCopy link to clipboard
You can review details for each previous version of the process workflow from the Process Workflow Version Details grid, including:
- The process workflow version type.
- A description of that version of the process workflow.
- The creator of that version of the process workflow.
- The date and timestamp when that version of the process workflow was created.
- Active status for that version of the process workflow was created.

