
OverviewCopy link to clipboard
The Send E-Mail smart service is used to send an email to one or more recipients. The message body of the email supports HTML, in addition to normal text.
Data transferred using the Send E-Mail smart service is not encrypted. Exchange of unencrypted sensitive or confidential data is not a recommended practice. Application-level security is the responsibility of each customer.
PropertiesCopy link to clipboard
- Category: Communication
-
Icon:

- Assignment Options: Unattended
Note: Use the Run as whoever designed this process model option if you are using an email to start another process model.
See also: Smart Services
Configuration optionsCopy link to clipboard
This section contains tab configuration details specific to this smart service. For more information about common configurations see the Process Node Properties page.
Setup tabCopy link to clipboard
Email Configuration sectionCopy link to clipboard
From: Select one of the options listed below to display as the sender of the email.
- Process - Displays the email address of the specific process instance with the display name taken from the process display name.
- Process Model - Displays the email address of the process model with the display name taken from the process model display name.
- Process Initiator - Displays the email address and display name of the user who started the process.
- Process Designer - Displays the email address and display name of the user who last published the process.
- Custom Sender - Allows the designer to specify an email address and display name from which an email should be sent via Appian. Selecting this option requires the designer to configure the Sender Display Name and Sender Email Address fields, which are used to construct the
Fromemail header. The email's domain will be sent in theSenderandReturn-Pathheaders to specify that the email was sent from a system on behalf of theFromaddress. To learn more, see Configuring Custom Email Senders.
To: Enter the Appian user and group names to receive the email.
- You can add users or groups by typing the names and selecting them from the auto-complete list, typing a literal email address, selecting them from the Directory, or creating an expression that defines the addressee(s).
- If entered manually or selected from the Directory, multiple display names and addresses must be separated by a semi-colon (
;). - If entered as an expression, you can convert user names, group names, and process actors to type Email Recipient using the toemailrecipient() function. For example, if you want to send an email to the Process Initiator, enter the following:
toemailrecipient(pp!initiator). Appian, however, automatically casts values of type User, Group, or People to Email Recipient. - If users and groups have already been entered in the textbox, the users and group are replaced with the expression.
- NOTE: If you send an email to a Personal or Restricted group or one that has a High Privacy Policy, the other users within that group appear as "Undisclosed Recipients" in the To: field of the email when it is delivered.
Cc: Click Add Cc to enable the Cc: field and enter the Appian user and group names to receive a courtesy copy of the email.
- This field behaves in the same manner as the To: field.
Bc: Click Add Bc to enable the Bc: field and enter the Appian user and group names to receive a blind courtesy copy of the email.
- This field behaves in the same manner as the To: field.
Attachments: Click Add Attachments to enable the Attachments: field and add an attachment.
- You can add an attachment by typing the name of a document stored in Document Management and selecting it from the auto-complete list, selecting it from a directory, or creating an expression that defines the document.
======= Reply To: (Optional) In certain circumstances it's desirable to send an email that, by default, directs replies to a different address while retaining the original From address.
For example, emails originating from a process may default to <process-instance>@<site-url>, however that address is not capable of receiving replies.
In this case, a Reply To address can be specified so that when a user clicks Reply in a mail client the address that will be defaulted into the recipient field in the client will be the specified Reply To address rather than the address that they received the email from.
Subject: (Optional) Enter the desired subject line for the email or enter an expression that defines the subject.
Priority: (Optional) Select High or Low to define the priority of the email.
Message Body sectionCopy link to clipboard
Message Body: Select Enter text here to type the message directly in the field using the Rich Text Area, or select Use a text or HTML template to look up and select a file to use as the message template.
Avoiding malicious HTMLCopy link to clipboard
If the Message Body of the email contains information that is input by an end user, wrap any user-entered process variables in fn!stripHtml. Otherwise an end user could try to send malicious HTML to the email recipients.
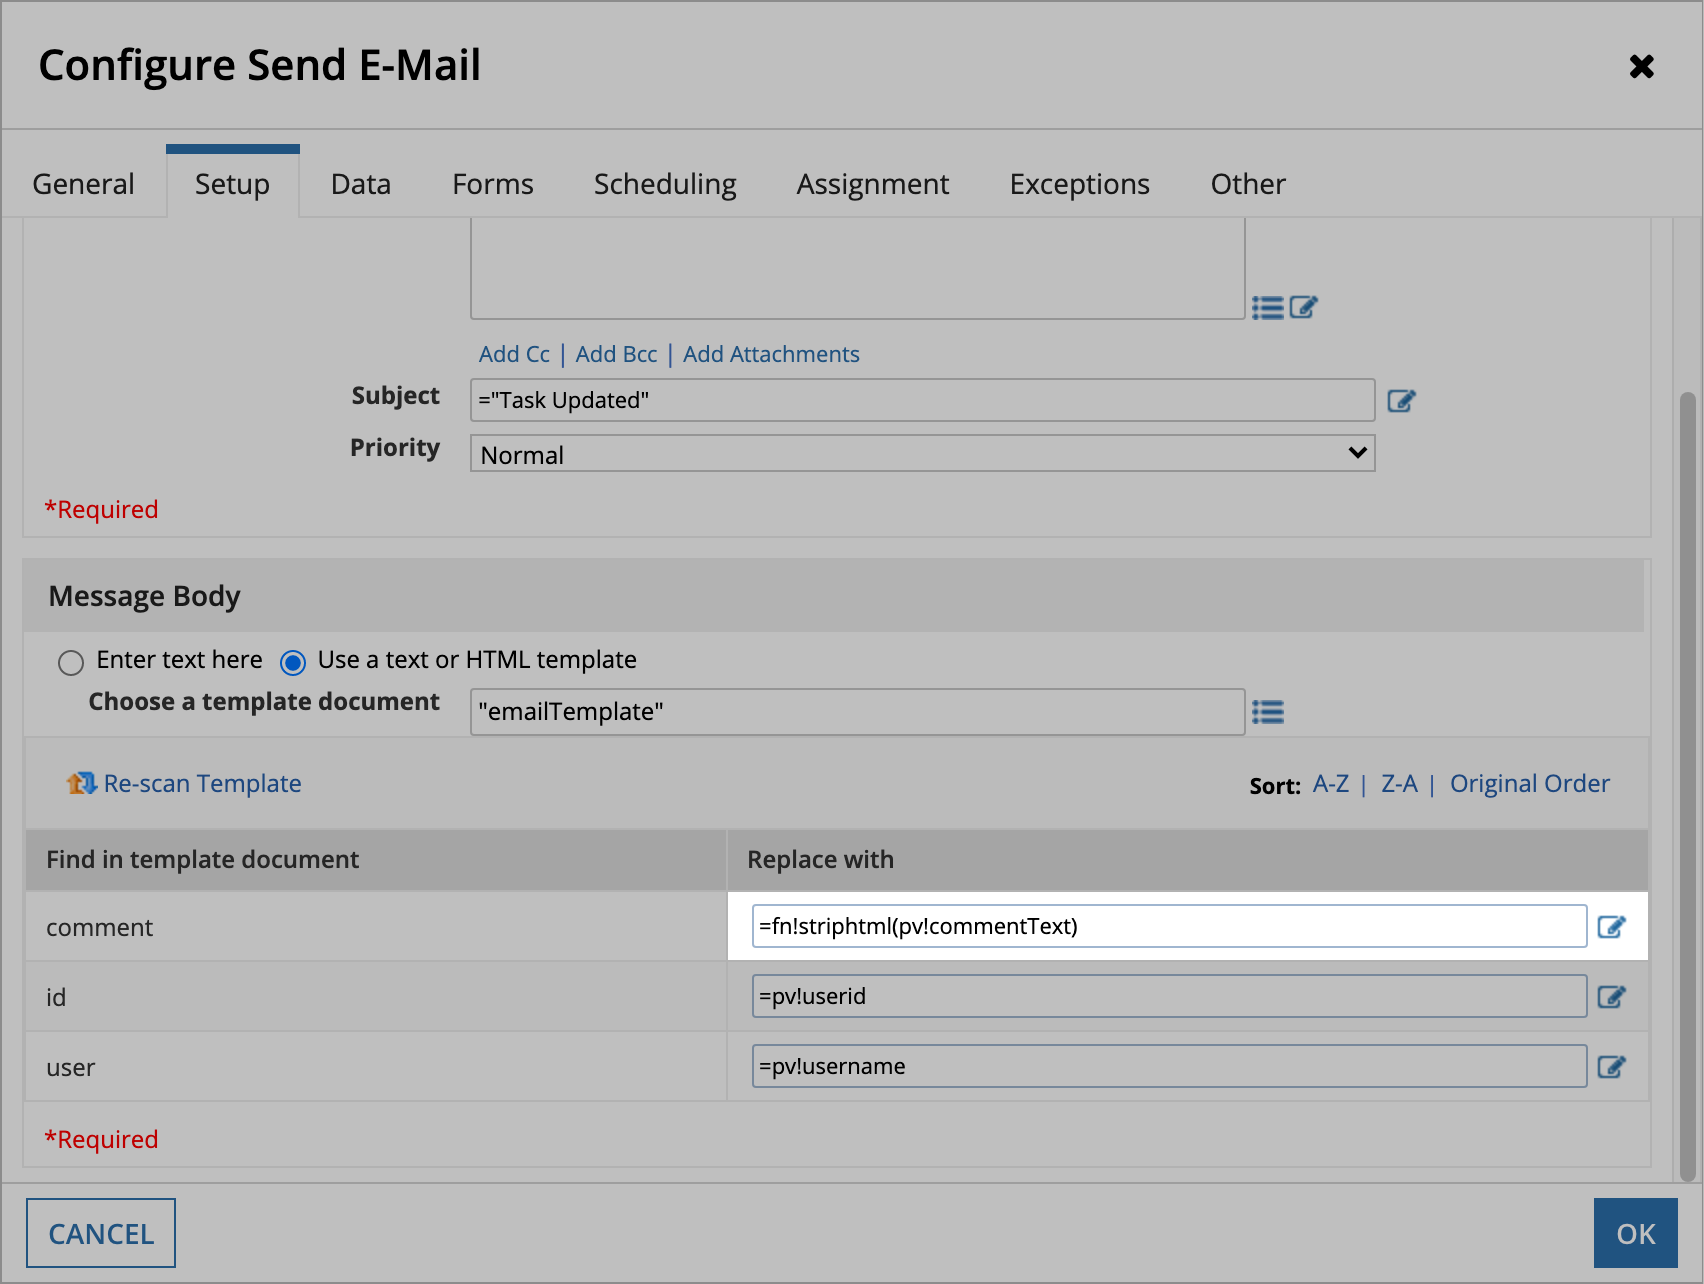
For example, say your process model has a Send E-Mail node and the body of the email displays information from a User Input Task. In the form for that User Input Task, a user could enter HTML into a paragraph field that includes something like a phishing message. You could avoid this by wrapping the process variable for that paragraph field in fn!stripHtml.
Entering text manuallyCopy link to clipboard
If entering the message manually, click the Use Header Template and Use Footer Template links to look up and select a file to use as a template for the header and/or footer. A template file is specified by default from the E-mail Templates folder of the System Knowledge Center.
Using a templateCopy link to clipboard
Instead of a static message configured in the Message Body section, you can specify both a base template and a runtime template for the send e-mail smart service to use when the node executes.
Using a template gives you the ability to identify and define substitution keys. These keys will be used to automatically populate details and data in e-mails generated by the smart service. This can be useful when you want to send e-mails with information that may be specific to the recipients or other business needs.
With runtime templates, you even have the ability to use an expression that will tell the smart service node which template to use depending on the evaluation criteria. This additional layer of control allows you to dynamically choose between multiple different templates at runtime.
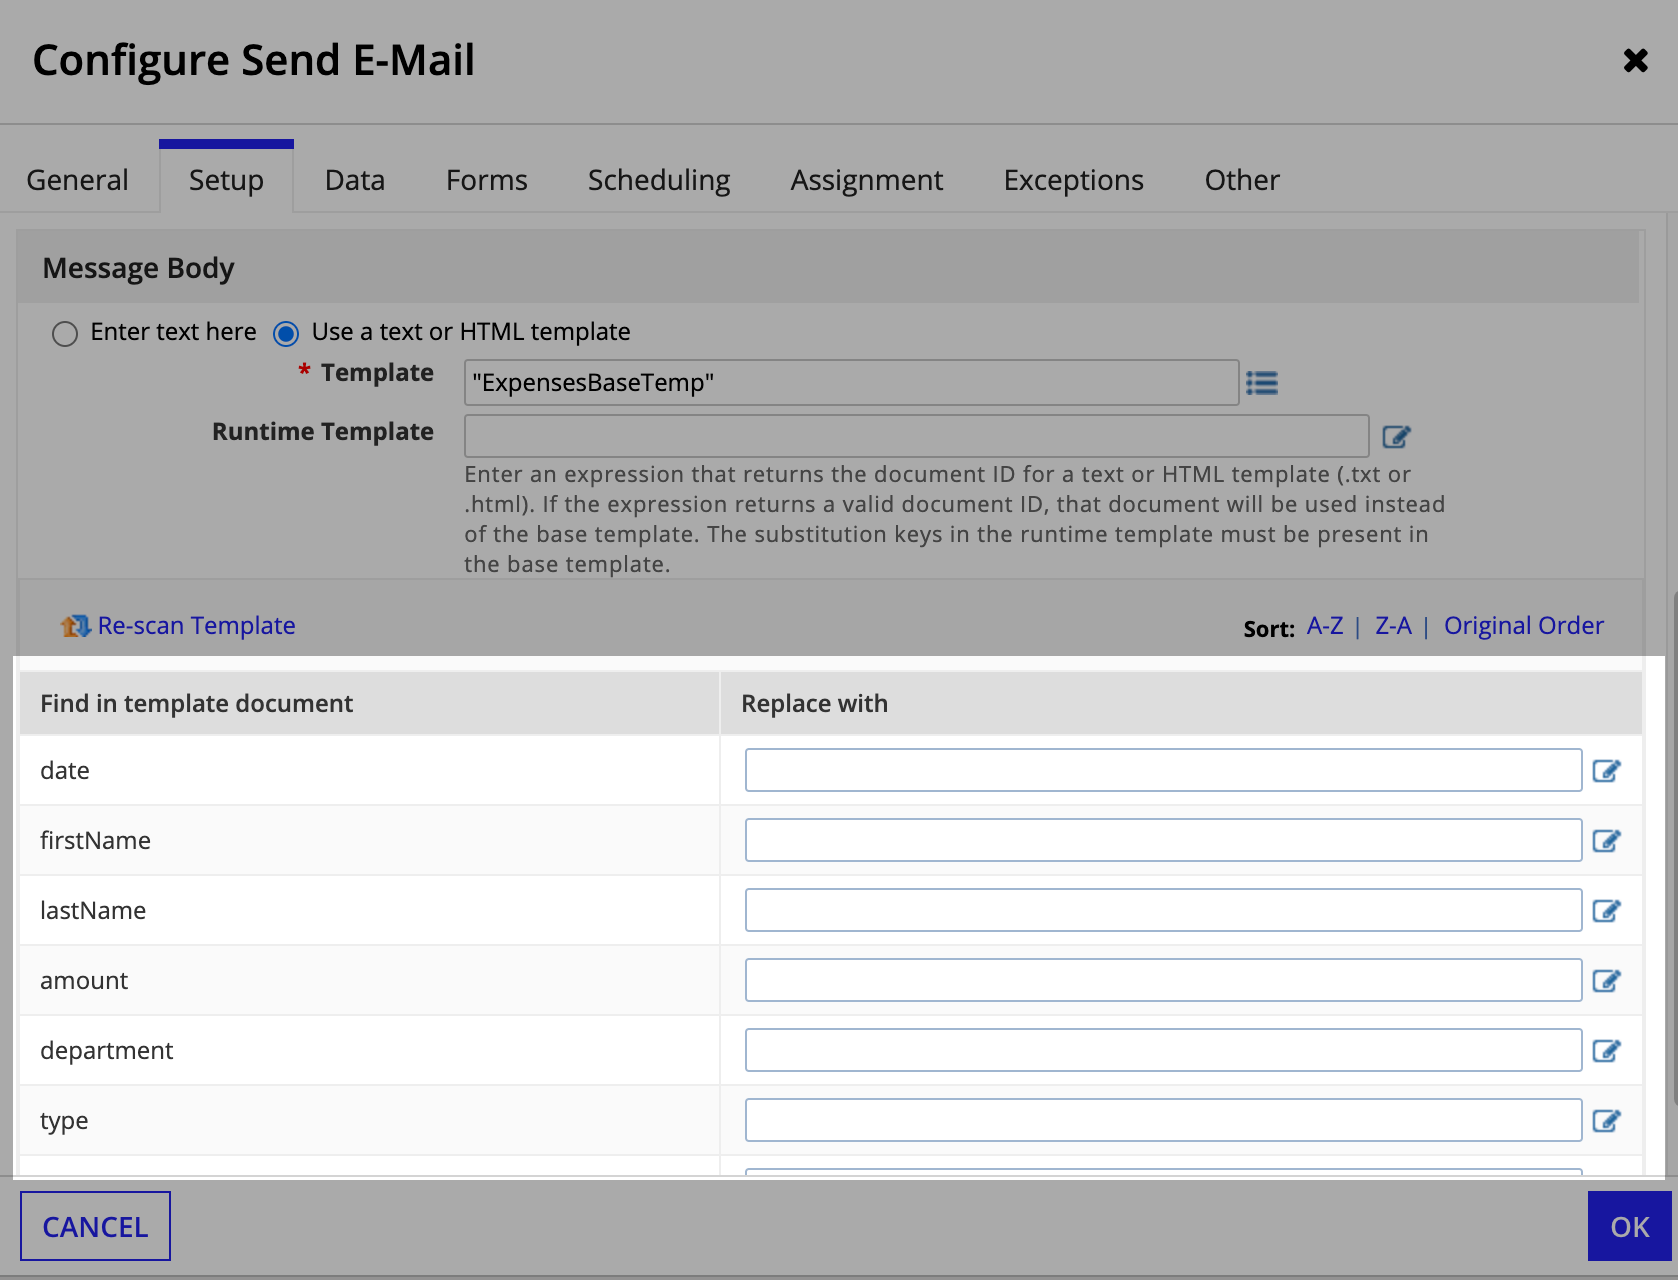
Base templateCopy link to clipboard
The base template must be in text or HTML format (.txt or .html).
Any information in template you would like to define as a substitution key must start with ### and end with ###, resulting in the following format: ###key name###.
When you select a valid file as the base template, it will be scanned for substitution keys which will then be populated on the subsitution grid.
To use a base template:
- Select Use a text or HTML template.
- In Template, type the name of your template document or click to browse the list of available documents. Only documents with .txt or .html extensions can be used.
- The document you select is scanned for substitution keys starting with
###and ending with###. Keys found in the template document appear in the Find in template document column. - In the Replace with column, enter the text or expression you want to replace the substitution key with.
- If you make any updates to your template and reupload it, click Re-Scan Template to parse the template again to add or remove substitution keys as appropriate.
Runtime templateCopy link to clipboard
The runtime template must also be in text or HTML format (.txt or .html).
While the substitution keys in the runtime template don't have to match the base template exactly, any keys present in the runtime template must also be present in the base template. See Runtime behavior for more information on how subsitution keys are handled.
To use a runtime template:
- In Runtime Template, enter an expression that returns the document ID for a valid text or HTML template (.txt or .html). If the expression returns a valid document ID, that document will be used instead of the base template.
- The document you select is scanned for substitution keys starting with
###and ending with###. Any keys used in the runtime template must be present in the base template.
Substitution keysCopy link to clipboard
Substitution keys identified from the base template file appear under Find in template document.
Enter an expression in the Replace with column to define replacement values for each substitution key. For example, you may want to replace the ###firstName### and ###lastName### keys with a process variable so the email is populated with the first and last name values from a form the user submits.
When the node executes, each expression is evaluated and its result is displayed in the email. This field can be left blank, in which case the key is replaced with a blank space.
If you make changes to the template document, click Re-scan Template. The template is then rescanned for substitution keys and the grid is repopulated. Whenever the template path is changed, the specified document is parsed for substitution keys. Any matching keys in the new document are retained in the grid, and their corresponding mappings are also retained. If, at runtime, the template document is found not to include any of the keys, processing continues normally — the appropriate substitutions are not performed.
Base template exampleCopy link to clipboard
Sample HTML base template:
1
2
3
4
5
6
7
8
9
10
11
12
13
14
15
16
17
18
19
20
21
22
23
24
25
26
27
28
29
30
31
32
33
<!DOCTYPE HTML>
    <HTML>
        <BODY>

        <h2>Report Confirmation Notice</h2>

        Hello, ###firstName### ###lastName###!<br><br>

        We've received your expense report and will begin processing your request shortly.<br><br>

        You should receive a confirmation email within 48 hours if your reimbursement request is accepted.<br><br>

        If there are any issues with your request or additional details are needed, a member of our team will reach out.<br><br>

        <h3>Claim Details</h3>

        Name: ###firstName### ###lastName### <br>
        Department: ###department### <br>
        Date: ###date### <br>
        Expense Type: ###type### <br>
        Amount: ###amount### <br>
        Estimated Decision Date: ###decisionDate### <br><br>

        If you have any questions, please don't hesitate to ask!<br><br>

        Thank you and have a wonderful day.<br><br>

        Very sincerely,<br><br>

        Accounting Department<br>

    </BODY>
</HTML>
Copy
Runtime template expression exampleCopy link to clipboard
Sample runtime template expression:
1
2
3
4
5
6
7
8
a!localVariables(
 local!spanish: cons!ES_RUNTIME_TEMP,
  if(
    userlocale(pv!employee) = "es",
    local!spanish,
    null
  )
)
Copy
In this example, we're defining a local variable with a constant that evaluates to the document ID for an HTML template. With this expression entered in the runtime template field, the smart service will send the document defined in the constant rather than the base template whenever the logged in user's locale is set to Spanish [es]. Otherwise, the base template will be sent.
Putting it all togetherCopy link to clipboard
As an example, let's say you have a process model that handles the submission of expense reimbursement requests and has a send e-mail node that sends a confirmation e-mail to the employee who submitted the request.
But rather than sending a generic, static message that is the same for each person, you want to send a personalized confirmation message with pertinent details from the reimbursement form they submitted.
In addition to that, you want to localize your confirmation e-mails so that users in Spanish speaking locales receive a different e-mail than your base English template.
Using the previous examples, here are the basic steps to configure your send e-mail smart service to achieve just that:
- Create two different templates using the sample HTML document as a guide.
- Upload both templates to the appropriate folder in your application and create a constant for each.
- Select the template you want to use for the base template in Template. The substitution keys will populate on the grid below.
- Enter the runtime template expression example in the Runtime Template. Replace the constant in the example with the constant you created when you uploaded the document.
- Select the corresponding process variable in the Replace with column for each substituion key you want replaced in the template.
Your final setup should look something like this:

Runtime behaviorCopy link to clipboard
Runtime behavior considerations:
- If there are substitution keys in the runtime template that are not present in the base template, then those values will be returned as is. For example,
###extraKey###will be returned if there is no###extraKey###in the base template. - If the expression entered in the runtime template doesn't evaluate to a valid document ID, the base template will be sent.
- If substitution keys match, but no Replace with value is specified, it is treated as a blank space.
Data tabCopy link to clipboard
Node OutputsCopy link to clipboard
Error Log Outputs
| Name | Data Type | Description |
|---|---|---|
| Users with invalid email addresses | User array | List of Appian users with missing email addresses. |
| Invalid email addresses | Text array | List of invalid email addresses (per RFC822). For more information on the RFC 822 Standard, see also: http://www.faqs.org/rfcs/rfc822.html. |
Additional Outputs
| Name | Data Type | Description |
|---|---|---|
| Valid To email addresses | Email Recipient array | List of valid email addresses included in the email. |
| Valid Cc email addresses | Email Recipient array | List of valid email addresses included as a Cc in the email. |
| Valid Bcc email addresses | Email Recipient array | List of valid email addresses included as a Bcc in the email. |
Apart from these outputs, you can also specify any kind of expression as a node output. Node outputs can be stored in process variables of the same data type for use elsewhere in the process model.
ExceptionsCopy link to clipboard
Note: Email messages that are larger than allowed by your mail server or service provider fail without error notification, and do not trigger an activity exception.
- An exception pauses the process at this node if you run it as a user that doesn't have the right to view the members of a group specified as recipients.
- The node cannot automatically handle bounced-back emails. If your server administrator has a custom email sender defined in the
From:field that has a valid and existing email address, bounce notifications are sent to this email address. - If the email addresses cannot be resolved (or if an invalid expression has been specified in the
To:,Cc:, andBcc:fields,) the process is paused at this node. A notification is then sent to all process administrators and the process initiator. - An exception pauses the process at this node if an expression used to specify your attachment doesn't return a document. This can also happen if you run the node under a user account that does not have the right to retrieve the documents included as attachments.
- An exception pauses the process at this node if your template file is missing, or if the user selected to run the node does not have the right to access the template.
- If you are unable to receive an email message sent through the Send E-Mail activity, contact your network administrator to ensure that your spam filters and security software are not blocking these messages (or communication with the SMTP server.)