OverviewCopy link to clipboard
Timer events can either be added to the process flow by themselves, or they can be added within an Appian Smart Service to trigger an Exception Flow or an Escalation.
In the process flow, timer events can be used to schedule a process activity, or to only continue the flow when certain conditions are met. (If the event is configured in an escalation or an exception, the configuration settings list different wordings.)
- The delay or schedule added to an activity or a process flow only begins once the node or event has been activated.
- The timer event must be active in order for the schedule to be triggered. If an End Event is configured to terminate the process, the timer is also terminated.
Configuring a timer eventCopy link to clipboard
- In the Process Modeler Palette, click the Events category.
- Click the Timer node and drag it onto the Process Modeler canvas.
- Configure the Timer node.
- Double-click the Timer node on the Process Modeler canvas.
- or - - Right-click the Timer and select Timer Properties. The Timer Event dialog is displayed.
- Double-click the Timer node on the Process Modeler canvas.
-
Click the Setup tab.

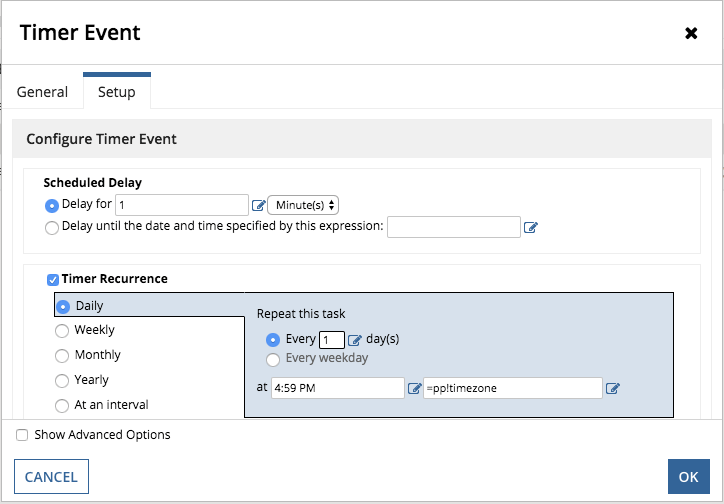
- In the Scheduled Delay section, you can determine a timed delay by entering a number or using a logical expression:
- Select Delay for to enter a timed delay. Enter a number or click the Expression Editor button to use an expression. Select Minute(s), Hour(s), Day(s), or Month(s) from the time-span list.
Tip: To schedule a delay that is less than 1 minute, enter the following expression in the Delay until the date and time specified by this expression field:
=now() + intervalds(0,0,x)wherexis the number of seconds to delay.To keep timer events from counting weekends, use the a!addDateTime() function. For example, if you want to trigger an event after four days, excluding weekends, enter the following expression in the Delay until field:
=a!addDateTime(days: (pp!starttime, 4), useProcessCalendar: true). You must also ensure your process calendar excludes weekends from your environment's working hours.- Select Delay until to enter a future date and time for the timer to evaluate the timer conditions. You can choose either of the following options:
- Set a future date to resume the process by entering a date and time using the following format: dd/mm/yyyy hh:mm a.
- Click the Expression Editor button to calculate a date using one of the date and time functions available on the Functions tab.
-
(Optional) Click Timer Recurrence to trigger the event on a repeating schedule by selecting from the following options:
To repeat the task Select Every n number of days, every weekday, or at a certain time of day, in a specific time zone. Daily Every n number of weeks, at a specific time and time zone, on a specific day of the week. Weekly At a certain time, in a certain time zone, on the nth day of the nth month, or on the nth day of the week (such as the 3rd Sunday) of the nth month. Monthly At a certain time and time zone, every year: on the nth day of a month, or on the nth day of the week(such as the 3rd Sunday) of the nth month. Yearly Every n number of minutes (minimum 5 minutes) or n number of hours. At an interval
Configuring the time zone usedCopy link to clipboard
The time zone used in a recurring event can be configured in the following different ways.
- You can configure the time zone context for each process of a process model in its Process Model Properties. This is indicated by the timezone process property (pp!timezone) listed as a default value of the expressionable combination box in the Timer Recurrence group box.
- You can also type the name of a time zone ID to use in the expressionable combination box. When selecting a Continental US time zone, we recommend using the following standard time zone IDs.
| Time Zone | Time Zone ID |
|---|---|
| Eastern | America/New_York |
| Central | America/Chicago |
| Mountain | America/Denver |
| Pacific | America/Los_Angeles |
The available time zone IDs appear using autocomplete.
You can create an expression that returns the proper time zone to use, using the Expression Editor.
Creating a timer conditionCopy link to clipboard
- Select the Show Advanced Options checkbox in the lower margin of the Timer Event dialog. The Timer Conditions group of options is displayed.
- Click the New Condition button on the toolbar. A row is added to the Event Conditions list, containing three fields to configure.
- Click the first list box and select the process variable you wish to use for comparison.
- In the second list box, select the operator you wish to use for the condition. The following options are available:
| Selecting | Means |
|---|---|
| = | equal to |
| <> | not equal to |
| < | less than |
| > | greater than |
| <= | less than or equal to |
| >= | greater than or equal to |
- In the third condition field, type the value you wish to compare against a process variable. If these values match, the condition evaluates as true and the timer event starts.
- Note that timer event conditions are only evaluated once the delay time has been met or the future date and time has been reached.
Usage considerationsCopy link to clipboard
LimitationsCopy link to clipboard
You cannot use a record data type in this event. This means you cannot reference a process variable of type record data type, use a record field reference, or use a record type constructor; otherwise, an error will occur.
