|
| This content applies solely to Contract Writing, which must be purchased separately from the Appian base platform.
|
Introduction
One of the main differentiators of Appian Contract Writing (CW) is its ability to empower business users to manage their procurement workflows without having to rely on their IT departments. In the Contract Writing Settings Site, users can configure categories, checklists, checklist items, and document and ad-hoc review processes that run automatically for specific documents or records.
Through the Contract Writing Settings site, business users can:
- Manage categories that group checklist items together.
- Manage checklist items that can be chosen for award checklists.
- Manage award checklists that assign default checklist items for a type of award or award event.
- Manage document review processes that assign default review trees for a type of document or a document template.
- Manage Ad-hoc Review processes for solicitations and awards.
Accessing the Contract Writing Settings site
The Contract Writing Settings is a separate site in the CW application. Only business users with the appropriate group membership are able to access it. This ensures that only a select few have the access to sensitive processes and information.
To access the Contract Writing Settings site:
- Make sure you are in the
AS CW Contract Writing Settings Site Access group.
- From the Contract Writing site, select the navigation menu > Contract Writing Settings.
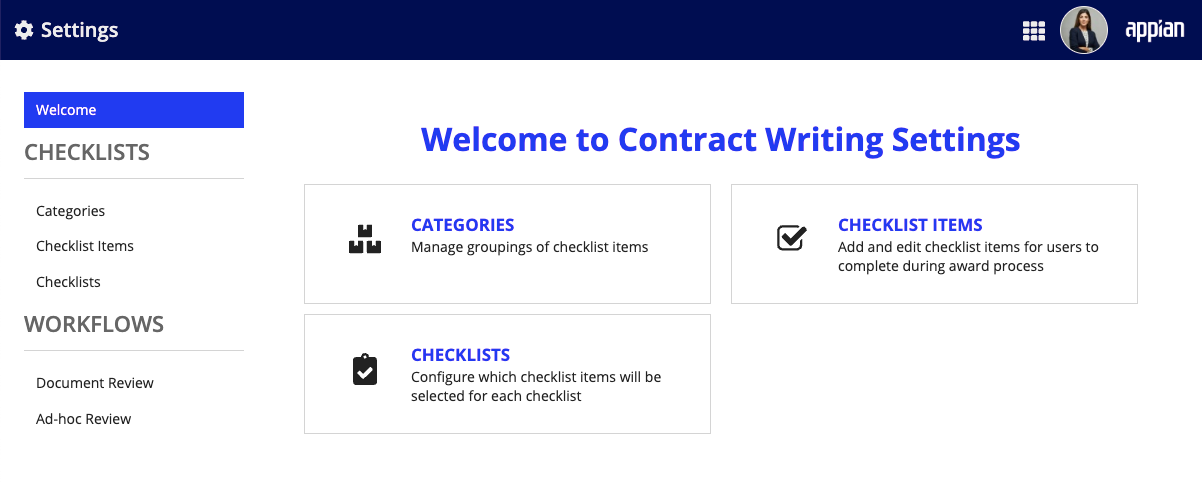
The Welcome to Contract Writing Settings page displays. You can click a card to choose an Contract Writing Settings page, or navigate to a page from the left navigation menu.
Categories
Categories group checklist items together, usually by the function of the items or the group that performs the items. We have provided some categories out-of-the-box that are completely configurable to meet the needs of your organization's award process. To view categories, click Categories from the welcome page, or Categories from the navigation menu.
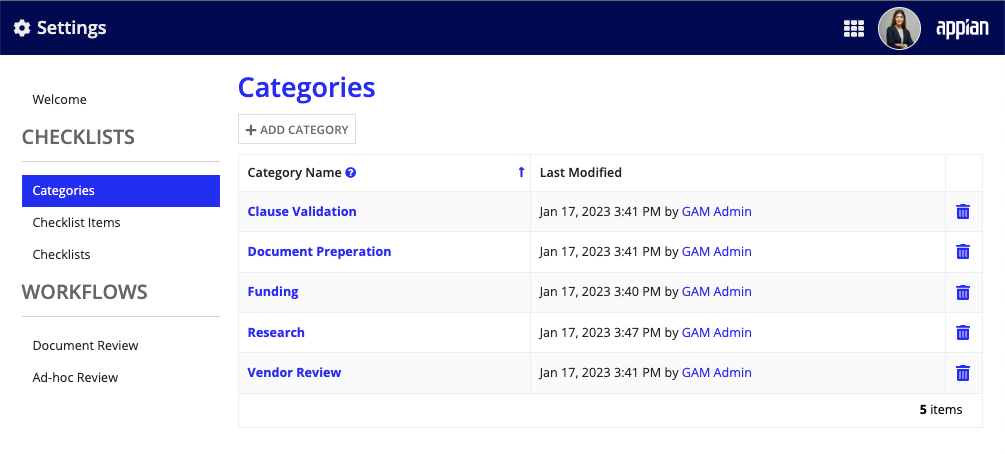
Managing categories
You can create and edit the categories on this page. If a category no longer fits your needs, you can also remove it from the Categories page.
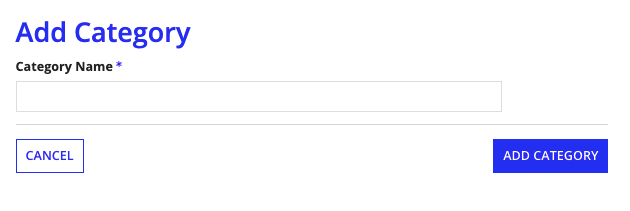
Add a category
You can create a new category whenever you need a new way to group items. For example, you can create a category for post-award checklist items.
To add a category:
-
From the Categories page, click ADD CATEGORY.
-
Enter a Category Name and click ADD CATEGORY.
The new category will display in all new Award and Solicitation Checklist Setup items and when adding a new checklist or additional items to an existing award checklist.
Edit a category name
You can change the names of any category. The new name will display in all new and existing checklist items that reference it.
To edit a category name:
- From the Categories page, select the category you want to modify.
- Enter a new Category Name and click SAVE CHANGES.
Remove a category
You also have the option to remove existing categories. However, if any checklist items reference the category, you cannot remove them. Make sure you complete or cancel all checklist items that reference the category you want to delete.
To remove a category:
- Click the delete icon next to the category you want to remove. The category will no longer display in Checklist items and checklists.
Checklist Items
Checklist items are the individual tasks within a checklist. To add items to an award checklist, you must create a library of checklist items. You can view Checklist Items by clicking CHECKLIST ITEMS from the Welcome page, or Checklist Items from the navigation. In the checklist item list, you can filter the items, select a category from the dropdownlist, or enter a search term in the Search Items field.
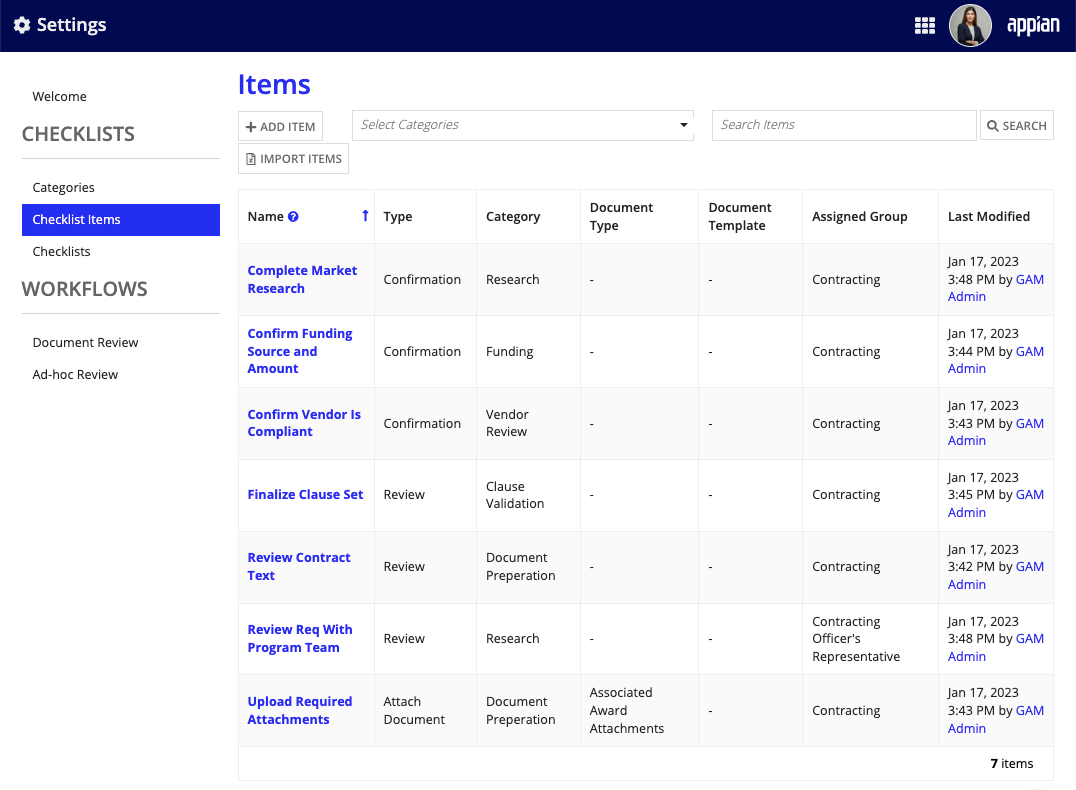
Checklist item types
Checklist items can be one of four types:
- Confirmation: This type of item requires a user to enter a date to confirm the checklist item has been completed.
- Attach Document: This type of item requires a user to upload a specific document.
- Review: This type of item requires a user to approve, reject, or request changes on a checklist item.
- Create Document from Template: This type of item requires a user to create a specific document from the provided document template.
Managing checklist items
You can add an individual item or import multiple items from an Excel spreadsheet. You can also edit existing items.
Add an individual item
If you only need to add a few items, you can add them one at a time.
To add an individual item:
-
From the Checklist Items page, click ADD ITEM.
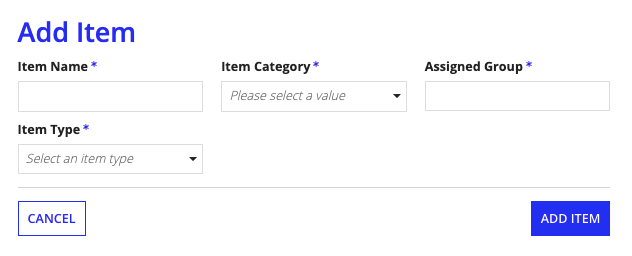
- Enter the following details:
- Item Name.
- Item Category.
- Assigned Group: Select the group that should be responsible for the checklist item.
- Item Type
- If the Item Type is Attach Document, select a Document Type.
- If the Item Type is Create Document from Template, select a Document Type and a Document Template.
- Click ADD ITEM.
The new checklist item will be available in all new award checklist setup items and new and existing award checklists.
Add multiple items by importing from Excel
If you want to add many items at once, you can import items from an Excel spreadsheet.
To add multiple items:
- From the Checklist Items page, click IMPORT ITEMS.
-
Download and open the Sample Import Excel File.
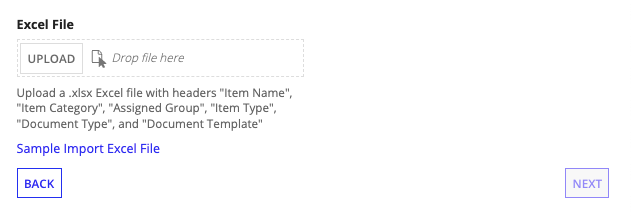
- Add items to the spreadsheet by filling out the following fields:
- Item Name: The display name for the item. There is a 50-character limit. Item names must be unique to import successfully.
- Item Category: The category that the item should be grouped with. The valid values are any category listed on the Category page.
- Assigned Group: The group automatically assigned to the task. The valid values are all business groups that are in the CW application. For example, Contracting Officer or Contract Specialist. See the Groups Reference Page for a list of the out-of-the-box groups.
- Item Type: The type of item. Out-of-the-box, the valid values are: Confirmation, Attach Document, Review, and Create Document from Template.
- Document Type: Only required if Item Type is Document Upload or Create Document from Template. If the Item Type is something else and a value is entered in this field, it will be ignored. Out of the box, the valid values are: Award Document, Memo, Justification Document, Determination, Waiver, Research, Checklist, Evaluation, Briefing, Notification, Appointment, Other.
- Document Template: Only required if Item Type is Create Document from Template. If the Item Type is something else and a value is entered in this field, it is ignored. Out-of-the-box, the valid values are: Exercise Option Letter Template and COR Appointment Letter Template.
- Save the spreadsheet.
- On the Checklist Items page, click UPLOAD and select the
AS TMG Sample Task Import.xlxs file that you just modified.
- A list of the columns from the spreadsheet displays. Map the columns from the Excel sheet to the item fields. If you used the template without modifying the column headers, these should all match up automatically. Click NEXT.
- The items fields that you entered display. Verify all of the fields are correct and there are no validation errors.
- To create a new checklist with the items you just imported, click ADD ITEMS TO CHECKLISTS.
- To add the items to the library of items, click ADD ITEMS.
Edit items
To edit an item:
- From the Items page, click the name of the checklist item you want to modify.
- Modify the Item Name, Item Category, Assigned Group, Item Type, and/or Document Type or Document Template.
- Click SAVE CHANGES.
All award checklists that reference the item will be updated. Awards that are in progress will not be affected.
Checklists
Awards and solicitations require a different set of checklist items depending on who it is for and the total amount of the award or solicitation. This is where checklists come into play. A checklist is all the checklist items that need to be done during the award or solicitation life cycle. To access the Checklist page from the Contract Writing Settings site, click CHECKLISTS from the Welcome page, or click Checklist from the navigation menu.
You can search this list for a particular checklist. Clicking the history icon will take you to the Checklist History for that checklist with a list of all the changes that have been made to it.

Creating a new checklist
To create a new checklist:
- Make sure any items you want to add are on the Checklist Items page.
- From the Checklists page, click ADD CHECKLIST.
-
Enter a Checklist Name and Description.
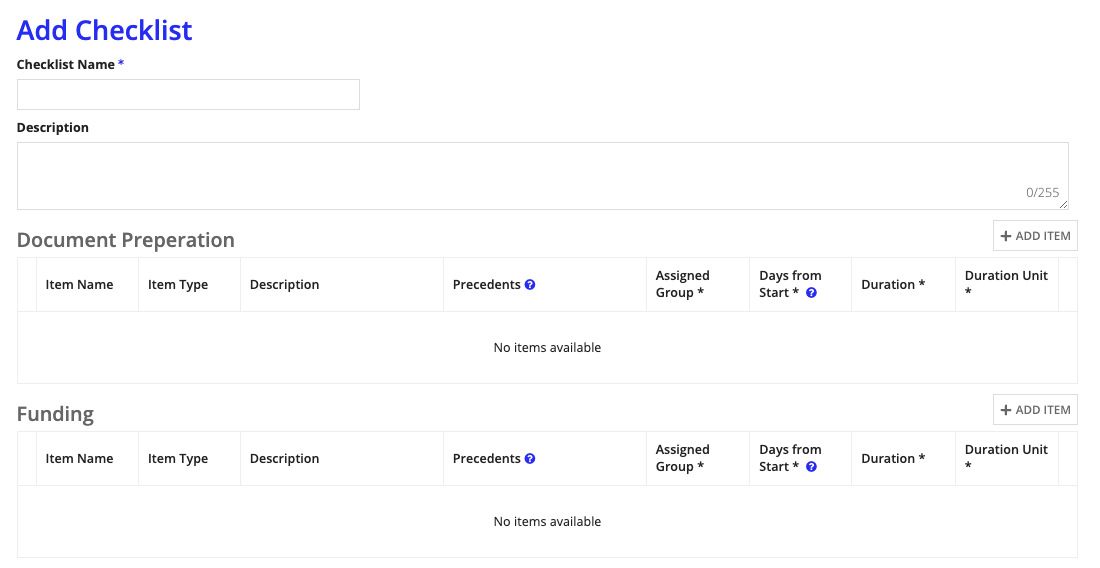
- Add the items that will be the default checklist items for the checklist. The items in your checklist will be grouped by category.
- Click ADD ITEM for the desired category.
- Select the item or items that you want to add to the category. You can use the Search Items box to find items.
- Click ADD ITEMS.
- Modify the items. You can do this in the following ways:
- Add a default Description to any item.
- Modify the default Precedents.
- Note: A precedent is an item that must be completed before another item can be assigned.
- Modify the default Assigned Group for the item.
- For Days from Start, enter the number of days from the checklist start date that this item is expected to begin.
- For Duration, enter a number to indicate how long that item will take to complete once it's started.
- For Duration Unit, select whether the Duration is for Hours, Days, or Weeks.
- Remove tasks by clicking the red X.
- After you have added checklist items for the desired categories, click ADD CHECKLIST.
Updating an existing checklist
With the Contract Writing Settings site, checklists can be easily updated.
To update a checklist:
- Make sure any items you want to add are on the Checklist Items page.
- From the Checklists page, click the checklist name that you want to update.
- Update the Checklist Name and/or Description.
- Add items to any category.
- Click ADD ITEM for the desired category.
- Select the item or items that you want to add to the category. You can use the Search Items box to find tasks.
- Click ADD ITEMS.
- Modify the tasks. To see descriptions of how to modify checklist items, go to step 5 of creating a new checklist.
- Click SAVE CHANGES.
All future awards and solicitations will use the modified checklist. Awards and solicitations that are already in process or completed will not be affected.
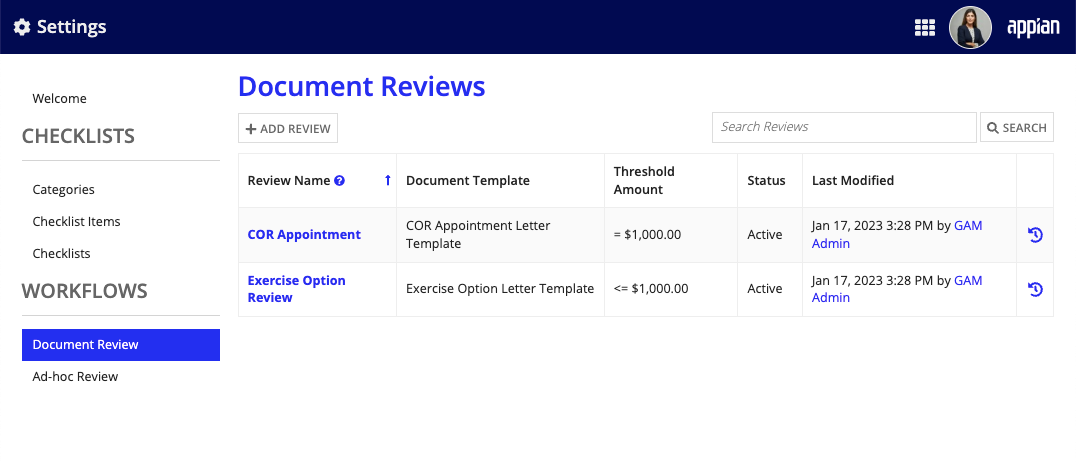
Document Reviews
In the Contract Writing Settings site, business users can view, add, and edit the document review processes that assign default review trees to a document template. The Document Review page displays all the information pertinent to document reviews in a grid list. Users can use this information to determine which reviews already exist and when they were last updated.
You can search this list for a specific review and click the history icon to see the Review History. This view shows a list of all the changes made to the review. Clicking a review name displays the review tree for that review process and allows you to edit it.
Creating a new review
To create a new document review:
- From the Document Review page, click ADD REVIEW.
- Enter the following information for your review:
- Review Name.
- Document Template. The default document types are Exercise Option Letter Template or COR Appointment Letter Template. See Modifying document templates for instructions on how to modify these values.
- Select the Operation and enter the Threshold Amount to configure the award funding amount that qualifies a document for the review process.
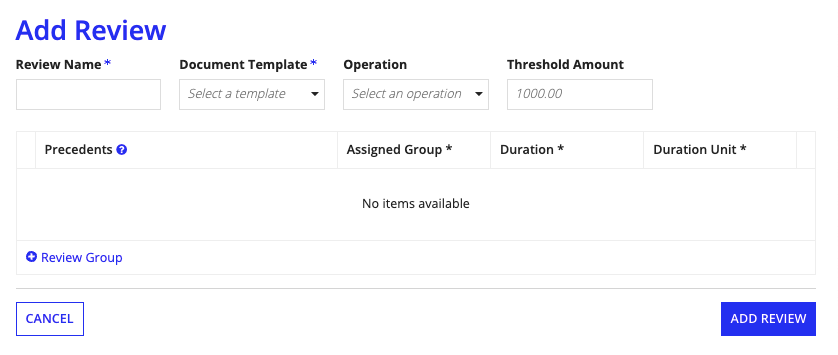
- Click Review Group to add review groups that will default review for that document type.
- Modify the review groups. You can do this in the following ways:
- Modify the default Precedents.
Note: A precedent is a review group that must complete the review before another group begins reviewing.
- Modify the default Assigned Group.
- For Duration, enter a number to indicate how long that item will take to complete once it's started.
- For Duration Unit, select whether the Duration is for Hours, Days, or Weeks.
- Click X to delete review groups.
- After you have added and modified the desired review groups, click ADD REVIEW.
Updating an existing review
The Contract Writing Settings site allows you to easily update document reviews.
To update a Document Review:
- From the Reviews page, click the review name that you want to update.
- If desired, update the Review Name, Document Type, Operation, Threshold Amount, Status, or any combination of these review parameters.
- Add the groups that will perform the default review for a specific document type.
- Click Review Group to add review groups to the review.
- Modify the review groups. You can do this in the following ways:
- Modify the default Precedents.
Note: A precedent is a review group that must complete the review before another group begins reviewing.
- Modify the default Assigned Group.
- For Duration, enter a number to indicate how long that item will take to complete once it's started.
- For Duration Unit, select whether the Duration is for Hours, Days, or Weeks.
- Click X to delete review groups.
- Click SAVE CHANGES.
All future documents will use the modified document review. Documents that are already in process or completed will not be affected.
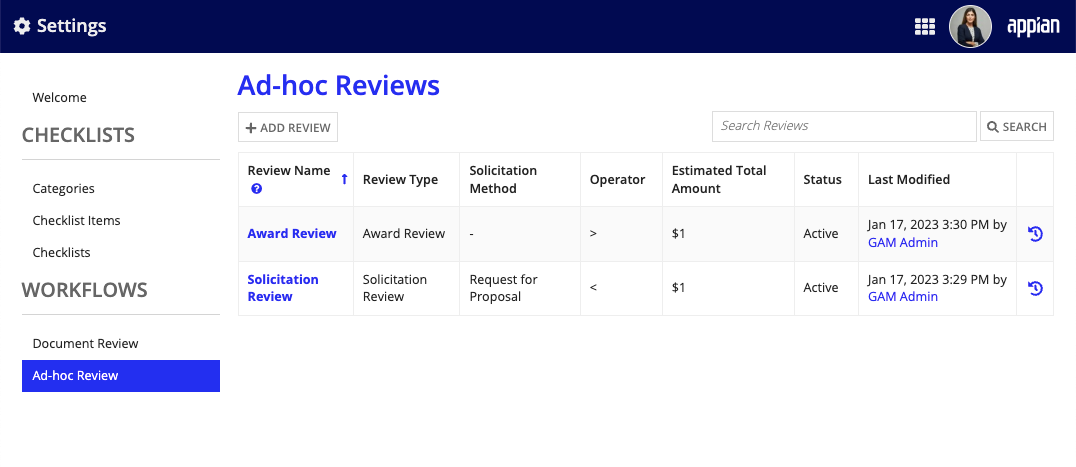
Ad-Hoc Reviews
Business users can view, add, and edit the ad-hoc review process that assigns default review trees to awards and solicitations. The Ad-hoc Review page displays all of the information pertinent to Ad-hoc in a grid list. Users can use this information to determine which reviews already exist and when they were last updated.
You can search this list for a particular review and click the history icon for that review to see the Review History. This view shows a list of all the changes made to the review.
Creating a new Ad-Hoc Review
To create a new review:
- From the Ad-Hoc review page, click + ADD REVIEW.
- Enter the following information for your review:
- Review Name.
- Review Type: The options are Solicitation Review, Award Review, Amendment Review, and Modification Review.
- Solicitation Method: A solicitation method can be chosen if the Review type is Solicitation Review or Amendment Review.
- Operator and Estimated Total Amount: Add this information to configure the amount that qualifies an award or solicitation for the review process.
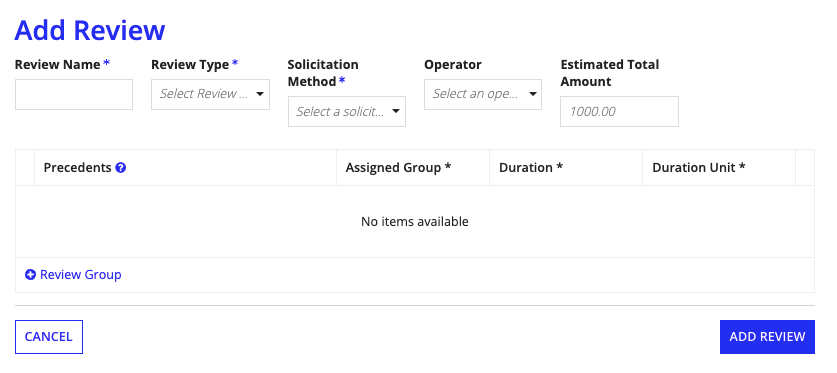
- Click Review Group to add review groups that will perform the default review.
- Configure the review groups. You can do this in the following ways:
- Modify the default Precedents.
Note: A precedent is a review group that must complete the review before another group begins reviewing.
- Modify the default Assigned Group.
- For Duration, enter a number to indicate how long that item will take to complete once it's started.
- For Duration Unit, select whether the Duration is for Hours, Days, or Weeks.
- Click X to delete review groups.
- After you have added and modified the desired review groups, click ADD REVIEW.
Updating an existing Ad-Hoc review
The Contract Writing Settings site allows you to easily update document reviews.
To update an Ad-hoc Review:
- From the Ad-hoc Reviews page, click the review name that you want to update.
- If desired, update the Review Name, Review Type, Solicitation Method (if applicable), Operation, Threshold Amount, and/or Status.
- Click Review Group to add review groups that will perform the default review.
- Modify the review groups. To learn how to modify the review groups, view step 4 of Creating a new review.
- Click SAVE CHANGES.
All future solicitations and awards will use the modified ad-hoc review. Solicitations and awards that are already in process or completed will not be affected.
