| The capabilities described on this page are included in Appian's standard capability tier. Usage limits may apply. |
Appian Portals allows you to take advantage of the Appian low-code platform to design feature-rich experiences for your external users. They enable you to create public serverless web apps that are separate from Appian but still connected to the information and processes that are already stored in Appian.
Because published portals are run separate from your Appian environment, they don't automatically connect to Appian. They are also special because your users are anonymous so you don't know anything about them right away, like their name, preferred language, or time zone.
Because of this, designing a portal is a bit different from designing an authenticated application. This page provides some user experience and design best practices for creating a portal.
Note: Appian Portals is currently only supported for Appian Cloud customers. Additionally, if your environment is behind a VPN, you cannot connect a portal to it to read or write data.
The way you work with data and documents in a portal is a little different than how you work with them in an authenticated Appian application. See the following pages for more information on how to work with data and documents in a portal.
Additionally, to define what to do when you think a bot is using your portal, check out Configuring reCAPTCHA.
For a full list of what you can do in a portal, see Portal Capabilities.
Because creating a portal is a bit different from creating an authenticated application, there are some things you'll need to take into account when planning for and designing your portal.
Setting up a portal is similar to setting up a site. When you set up your site pages, you select one primary interface for each page. Similarly, when you publish a portal, you select one primary interface.
Additionally, just like with sites, you can only use local variables on the primary interface of a portal. But the supporting interfaces, expression rules, and other design objects can use both rule inputs and local variables.
To summarize:
When you're designing an interface for a portal, you can use most of the components, functions, and designs that you know and love.
However, there are some components and function that are incompatible with portals.
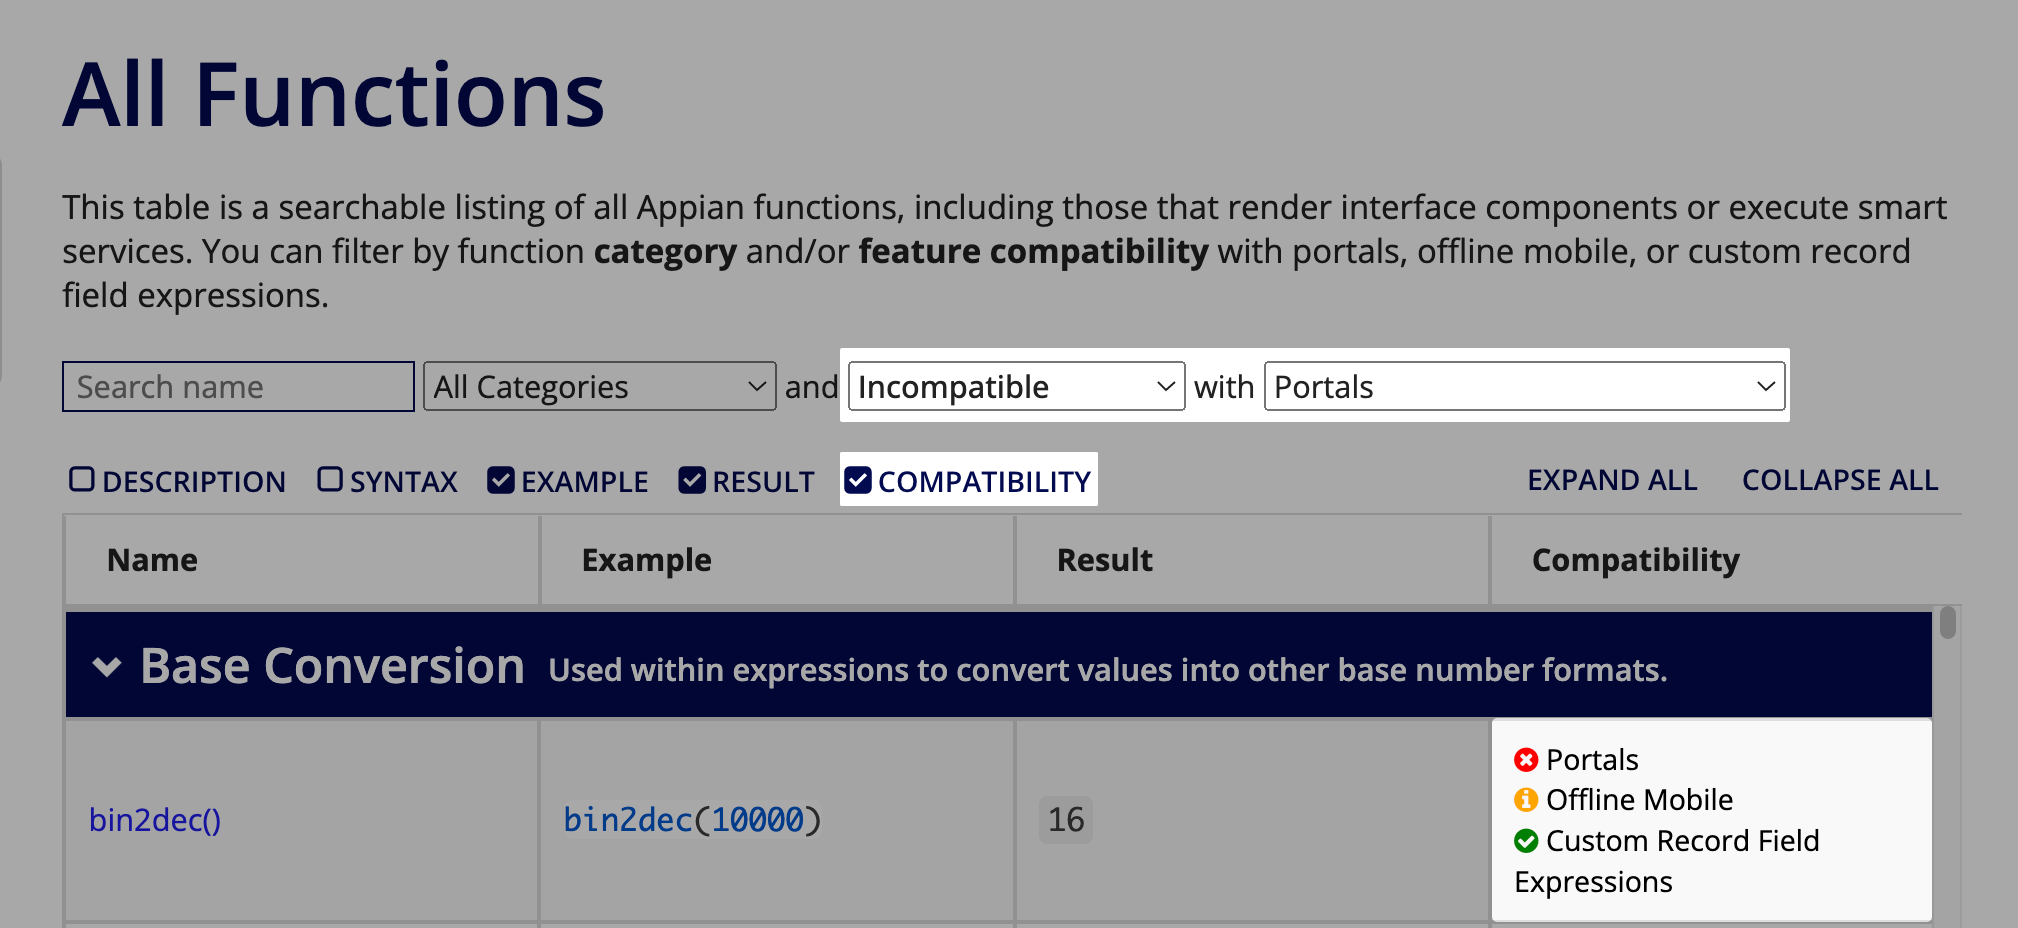
To find out if a function is compatible with portals, use the filters on the Appian functions table.
Just change the dropdown list from Any Compatibility to Incompatible or Compatible, then choose Portals from the next dropdown list. To view the portal compatibility in the table, toggle on the Compatibility column.
Because a portal can connect to your Appian environment through integrations and web APIs, you can use this method to access capabilities that can't be used directly in a portal.
This includes the following capabilities:
To do this, follow similar steps to working with data in portals, but call your design object in your web API.
For example, if you want to create a portal that allows users to self register for an Appian account, you could use the a!startProcess function to kick off a process model to create a user.
However, a!startProcess() is a partially compatible function. If you tried to call it from an interface for your portal, it would error after you publish the portal and try to test it. The good news is, you could use a web API to call a!startProcess().
Your web API expression could look something like this:
1
2
3
4
5
6
7
8
9
10
11
12
13
14
15
16
17
18
19
20
21
22
23
24
25
26
a!startProcess(
  processModel: cons!SPA_StartProcess,
  processParameters: a!fromJson(
    http!request.body
  ),
  onSuccess: a!httpResponse(
    statusCode: 200,
    headers: {
      a!httpHeader(name: "Content-Type", value: "application/json")
    },
    body: a!toJson(
      fv!processInfo
    )
  ),
  onError: a!httpResponse(
    statusCode: 500,
    headers: {
      a!httpHeader(name: "Content-Type", value: "application/json")
    },
    body: a!toJson(
      {
        error: "There was an error starting the process"
      }
    )
  )
)
Then you would create an integration object that uses the POST method to modify data and rule inputs for the first name, last name, and email address. Be sure to use a connected system object for authentication.

Then you can reference the integration in the saveInto parameter of your submit button.
1
2
3
4
5
6
7
8
9
10
11
...
a!buttonWidget(
        label: "Submit",
        saveInto: rule!SPA_startProcessIntegration(
            firstname: local!firstname,
            lastname: local!lastname,
            email: local!email
        ),
        style: "PRIMARY"
      )
...
You can modify this method to reference the other partially compatible capabilities that can be used with this work around.
As with all Appian applications, you should always fully test your interface objects to make sure everything is functioning correctly. Be sure to test all input and selection fields, as well as all queries.
With a portal however, it is also important to fully test your portal after it is published. Be sure to fill out all of the fields, whether they are required or not, and go through all of the steps in your portal.
This will help mitigate the following concerns:
With portals you need to consider a user type that you don't deal with in an authenticated interface—anonymous users. These users will likely access your portal from many different locations on many different device types. Since the users aren't a part of your organization, you know a lot less about them than your typical Appian users. Additionally, since they aren't logged in, you don't automatically know information about them like their preferred language or time zone.
Because users of your portal aren't logged in with a user account, you can't access their time zone and location preferences.
To create the best experience for your users across locations and time zones:
For any component that displays time or asks users to enter a time, always display the time zone that your portal is using.
Create a separate portal for each language and include a way for users to choose their language.
Tip: Portals use the primary locale, time zone, and calendar settings that are configured in the Administration Console for the environment.
Keep in mind that your users will likely be accessing your portal from many different types of devices. Make sure you design your portal so that it looks good on any screen size. For more guidance, check out our content on Responsive Design.

Additionally, to change the design based on the page width, be sure to use the a!isPageWidth() function. The a!isNativeMobile() function will not work with portals since portals don't display in the Appian Mobile application. You can also use the stackWhen parameter in columns layouts and side by side layouts to make your design look great on any screen size.
Note that the page width for a portal is equivalent to "Full" in a site page.
If you want a header for your portal, you can create one using a Header Content Layout component. Use this to create a navigation menu or to incorporate your logo and branding in a header.
When creating a header like this, we recommend using the isHeaderFixed parameter to fix your header to the top of the page.