| This content applies solely to Vendor Management, which must be purchased separately from the Appian base platform. This content was written for Appian 22.4 and may not reflect the interfaces or functionality of other Appian versions. |
Installing Vendor Management (VM) consists of five main steps:
Before starting the installation process, review the System Requirements to make sure all minimum requirements are met.
Note: Instructions below are tailored for MariaDB or Oracle databases. For use with other databases, the SQL scripts used in Step 3 will need to be modified.
To install VM, you'll need to download the software package that contains the following files you'll use in the remaining set up steps.
To download the software package:
VendorManagementv1.3.0.zip to access the software installation files.For the VM application to work, you must deploy the Appian Solutions, Content Tools, Regular Expression Functions, and Rich Text Editor plug-ins. The steps for deploying plug-ins are different for an Appian Cloud or self-managed environment. Be sure to note which set of deployment steps you need for your environment.
To deploy the plug-ins for an Appian Cloud environment:
Appian Solutions.To deploy the plug-ins for a self-managed environment:
appian-solutions-1.18.6.jar plug-in files that were downloaded in Step 1.To create the structure for the database tables, views, and other objects that are a part of the VM application, you will need to run a DDL script in your database.
To create the database objects:
VendorManagementv1.3.0.sql DDL file that was downloaded in Step 1.The next step needed is to install the VM application by importing the application files into the target environment.
To import the application:
VendorManagementv1.3.0.zip file that was downloaded in Step 1.VendorManagementv1.3.0.properties file that was downloaded in Step 1.
Note: If the business database is not called Appian, a warning will occur when importing the data stores. To fix this, after the import is complete, open each data store object and update the Data Source dropdown list.
Once you have finished installing the Vendor Management solution, you can install portals.
To install portals for VM:
Create a new API key. Copy the API key and save it securely for future reference.
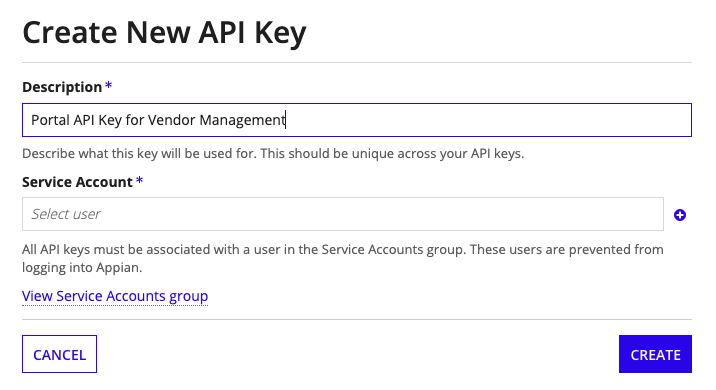
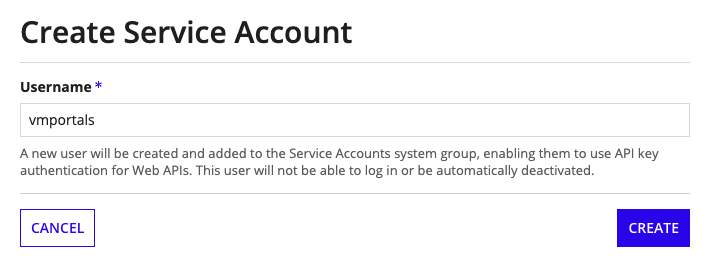
Create a new service account and name it vmportals.
AS VM CS Portals Connected System.
site url + /suite/webapi/. Example: https://examplesite.appiancloud.com/suite/webapi/.AS_VM_Portal Portal Object in Designer.AS_VM_PORTAL_FM_homePageWithoutRecaptcha.Installing Vendor Management
