| The capabilities described on this page are included in Appian's standard capability tier. Usage limits may apply. |
Although Appian RPA is currently available only for Appian Cloud sites, we understand that customers may be interested in using its capabilities in their self-managed environments. This page describes how a hybrid configuration for Appian RPA works, how to set it up, and how to use robotic tasks in your applications. We've also included tips for maintenance.
Tip: Appian RPA works best in a native Appian Cloud environment, but can be accessed from a self-managed environment using a hybrid configuration. Some Appian RPA capabilities aren't available in a hybrid configuration.
In the context of Appian RPA, a hybrid configuration refers to the connection between a self-managed Appian site and a separate Appian Cloud site, where Appian RPA is available.
You can continue to build and deploy apps in the environments you're used to, while the robotic tasks are created and executed in the Appian Cloud. The two environments are integrated using an HTTP connected system. With the connected system, business applications can communicate with robotic tasks in your Appian Cloud environment. The connected system enables you to execute robotic tasks and retrieve results.
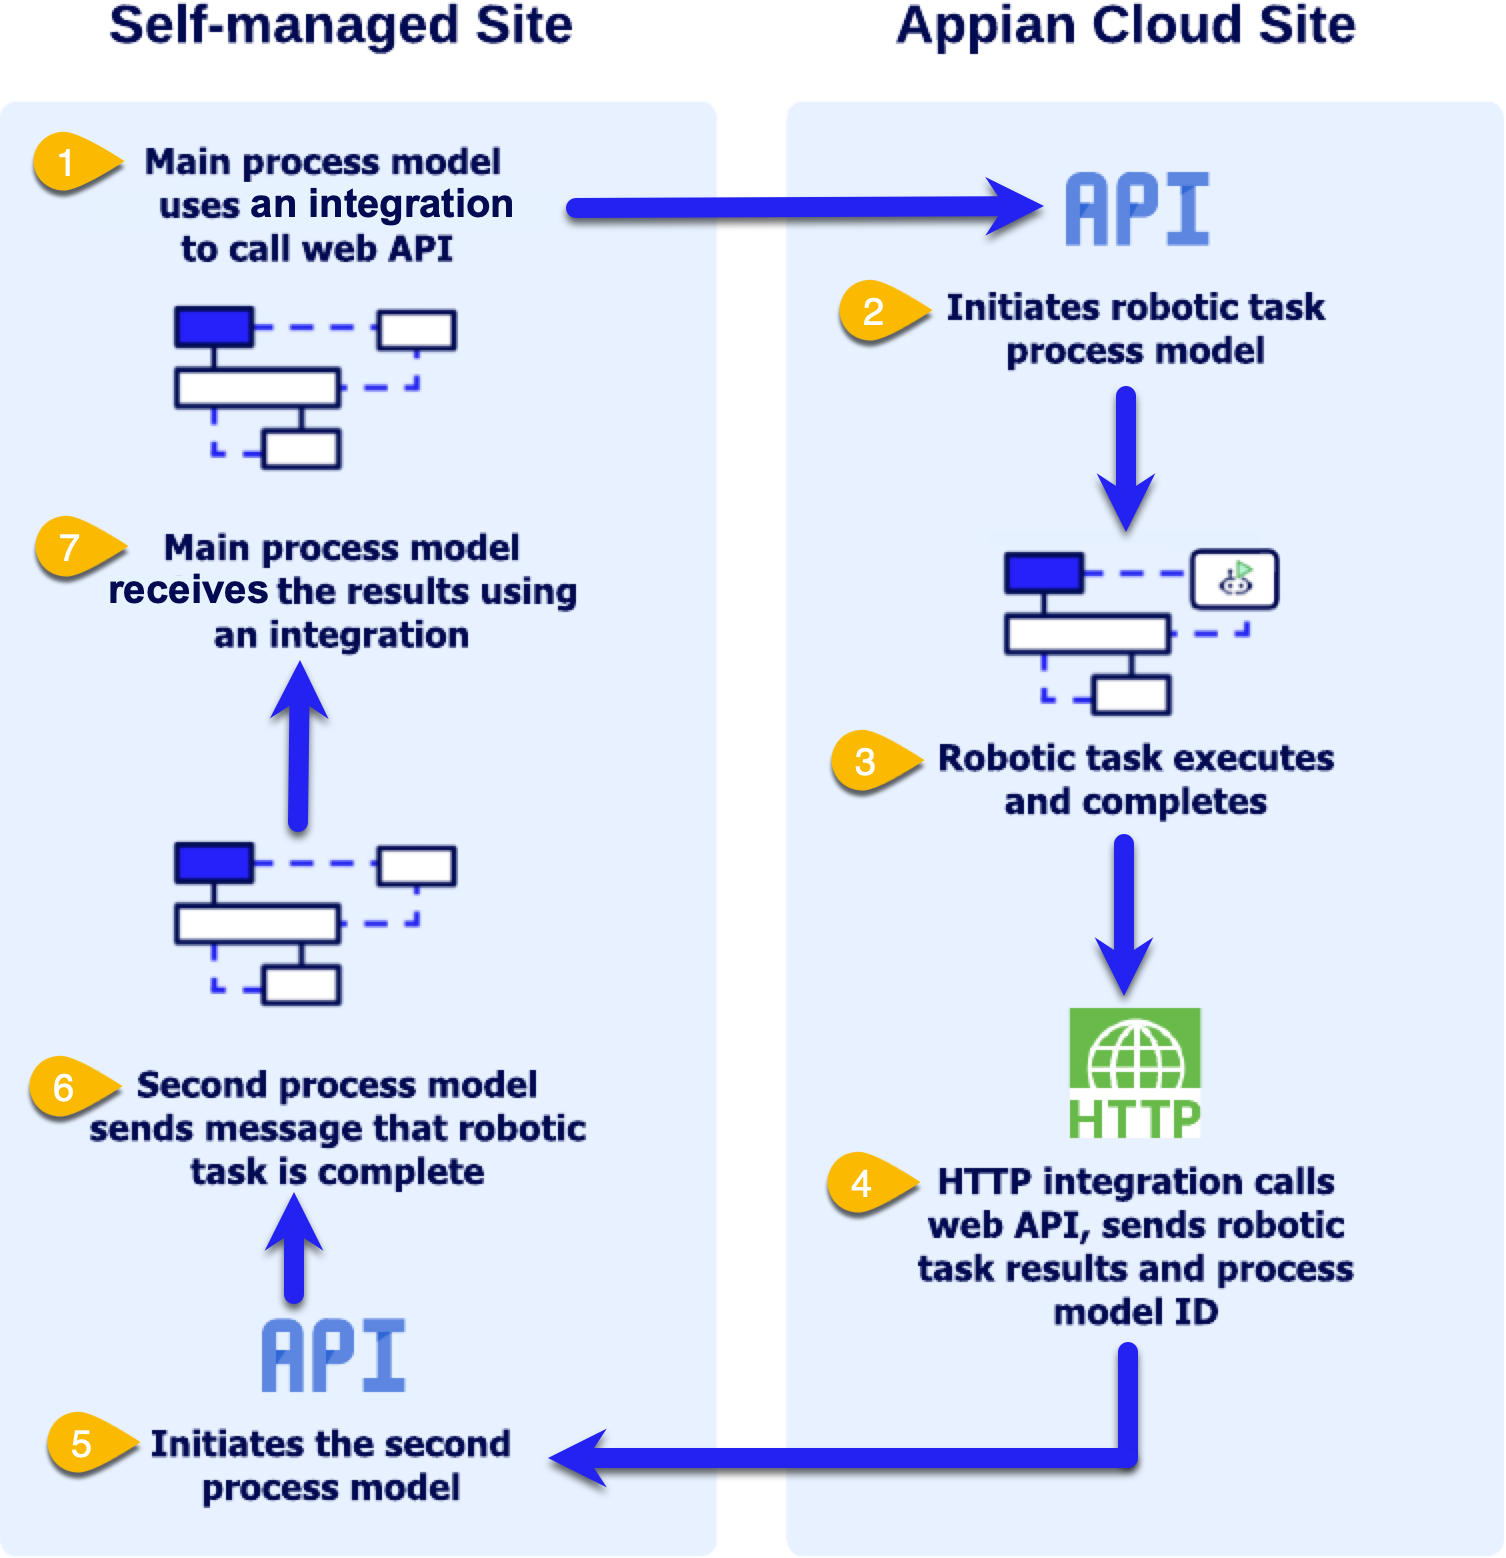
Simply put, the self-managed site initiates a request to the Appian Cloud site. The Appian Cloud site then executes the robotic task and communicates the results back to the self-managed site. This back-and-forth ensures asynchronous, or potentially synchronous, execution and reporting.
When creating process models to carry out robotic tasks, it's important to note that the execution of these tasks within a process model is synchronous. However, if you're running the process model in a self-managed site and integrating it with a cloud site, the execution becomes asynchronous. Therefore, you'll need to set up the process model on the self-managed site to pause and wait for completion of the process model running in the cloud site. Once completed, the results can then be fetched separately before moving on.
Note: While you could use a polling pattern to continually check the status of the robotic task, this is not recommended because it could cause your process to reach the 1000-node limit and/or dramatically increase the size of your process history.
The steps on this page aim to help you execute a robotic task from a self-managed site and retrieve the results of the execution once the robotic task is finished. Most of these objects are reusable, so you can create them once and apply them to future robotic task and process model configurations.
Data passes between objects in the following way:
The steps outlined on this page provide you with a fully synchronous application that includes the following objects.
 Appian Cloud site
 Self-managed site
Below is a table that outlines the essential steps for setting up a hybrid configuration.
| Step | Action |
|---|---|
| 1 | Create service accounts |
| 2 | Deploy CDTs |
| 3 | Create a group |
| 4 | Configure a robotic task |
| 5 | Configure a connected system |
| 6 | Create an integration to execute the Appian Cloud robotic task |
| 7 | Create the process model to execute the integration |
| Note | This marks the end of the instructions if you want to execute robotic tasks asynchronously. If you need your process model to wait for the robotic task results before continuing, you need to complete the additional steps outlined below. |
| 8 | Create a process report |
| 9 | Update the process model |
| 10 | Create send completion message process model |
| 11 | Create a Web API |
| 12 | Create a connected system to the self-managed site |
| 13 | Create integration to call the web API |
| 14 | Execute the integration |
| Note | This marks the end of the instructions if you only want to resume the self-managed process model when the robotic task completes. If you need to send the results of the execution to the self-managed site, continue to Step 15. |
| 15 | Send results to the self-managed process model |
Where: Appian Cloud site and Self-managed site
Complete these steps to create a service account.
Next, you need to export the relevant CDTs from your self-managed site and import those to the Cloud environment.
In a hybrid configuration, the self-managed Appian site communicates with the Appian Cloud site to execute a robotic task and retrieve the results. Robotic tasks usually interact with Appian data in some way. Therefore, the Appian Cloud site and the self-managed site must have the same CDTs if they're being used in a robotic task. The robotic task uses the Appian Cloud site CDT in the robotic task, but once complete, returns the updated data to the self-managed site. It's important that any data used by the robotic task uses the appropriate structure so it can be sent back to the self-managed site.
You can import CDTs to the Appian Cloud environment as part of a deployment package. Learn more about deployment considerations regarding CDTs.
Where: Appian Cloud site
Create a group to secure the application objects you'll create in the following steps.
Where: Appian Cloud site
Create a process model to execute the robotic task: In this step, you need to create a process model to execute the robotic task from Appian Cloud then create a constant pointing to this process model.
| If the robotic task has… | Then… |
|---|---|
| Inputs | define the variable in the process model and include it as an input in the Execute Robotic Task smart service node. |
| Outputs | create a new variable in the process model (type Map) and include it as an output in the Execute Robotic Task smart service node. 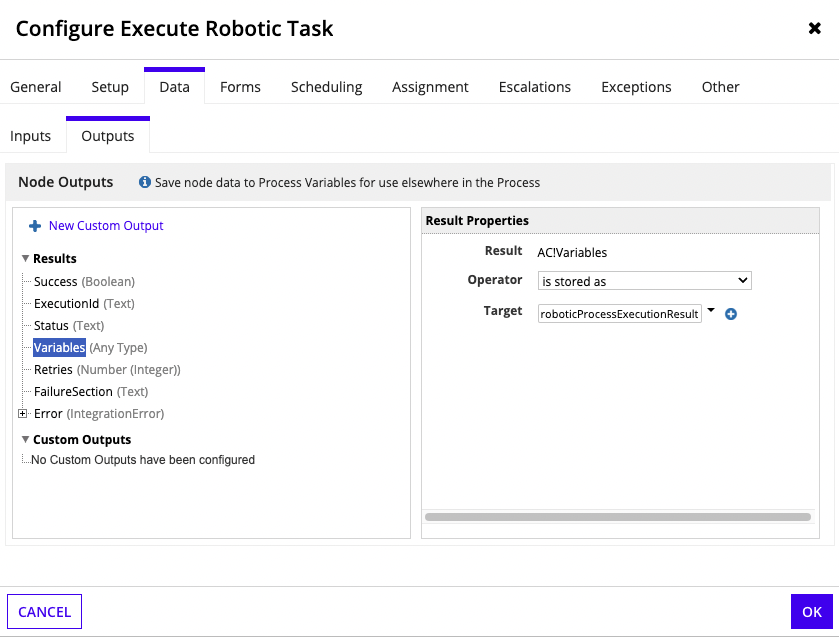 |
Where: Self-managed site
To communicate with the integration on the Appian Cloud site, you need to configure an HTTP connected system on your self-managed site. This connected system is used to call the robotic task.
/suite/webapi. For example: https://www.example.com/suite/webapi/.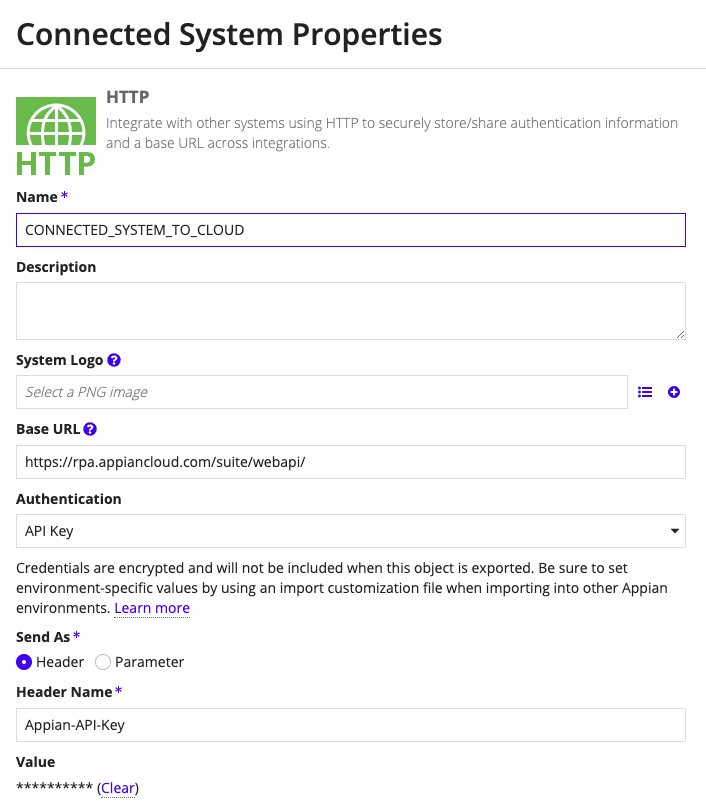

Where: Self-managed site
To execute a robotic task or retrieve its results from the Appian Cloud site, you need to create a corresponding integration in your self-managed site. This HTTPS integration is used to call the Execute robotic task Web API.
Configure the following parameters:
| Parameter | Action |
|---|---|
| Relative Path | Enter the cloud endpoint you created in Step 5. |
| Method | Select POST. |
| Usage | Select Queries data |
| Content Type | Select JSON (application/json) |
| Response Body Parsing | Select Convert JSON to Appian Value |
Where: Self-managed site
Now you can asynchronously execute the Appian Cloud robotic task from a process model on the self-managed site. When you create the process model, remember to include the inputs on the integration call.

Tip: This marks the end of the instructions if you want to execute robotic tasks asynchronously. If you prefer to execute robotic tasks synchronously, complete the additional setup steps provided in the next section.
Note: Be sure to complete Steps 1-7 before you begin.
Where: Self-managed site
Create a process report that looks up the ID of the process instance that executed the robotic task.
Click New Data and add two new columns: one for the process instance ID (pp!id) and one for the execution ID (pv!cloudProcessId). The second column will be blank for any robotic tasks from process models without this variable.
Note: It's important that this report only contain two columns. If additional columns exist, the query breaks in the web API (detailed below).
INSTANCE_EXECUTION_MAPPING_REPORT. Select Document for the constant type.Where: Self-managed site
ac!Result.body.pp.id, andcloudProcessId variable, which is defined in the report.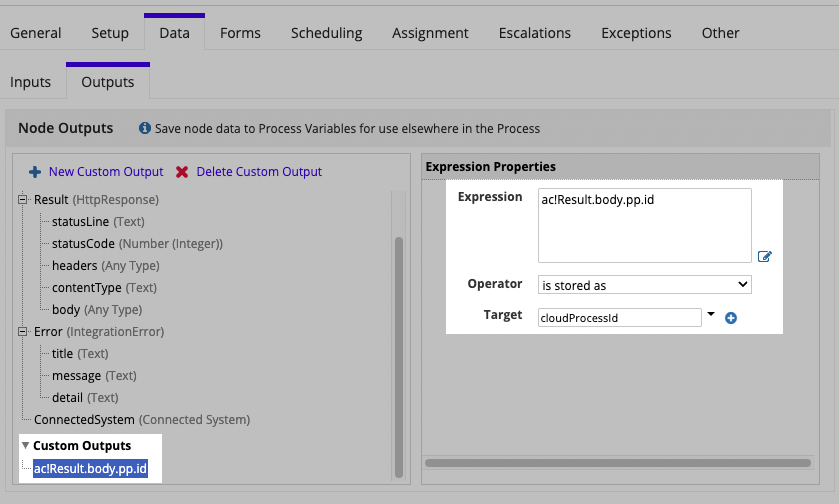
Where: Self-managed site
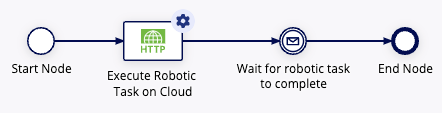
Next, create the process model to send a message to the main process model when the robotic task execution finishes.
This process is started by the notifyProcessOfCompletion web API (described below) and takes in a specific process instance ID to send a message to. The process ID is crucial here to ensure that the process-to-process message is targeted rather than just sending a massive message to any listening process model.
This process model contains three nodes: Start, Send Message, and End.

processInstance of type Number (Integer). Parameter should be set to Yes.DestinationProcessID row, map the Value to the processInstance process variable (=pv!processInstance).After you save the process model, create a constant called SEND_COMPLETION_MSG_PM pointing to it. You'll use this constant in the web API.
Where: Self-managed site
Next, create the web API object. This web API is called from the Appian Cloud process model to notify the originating process that it has completed. It is designed to be generic, so that all you need to pass in is the cloudProcessID and the API sends the message to the correct process instance.
ONPREMISE_WEBAPI.send-completion-msg.
The code below uses two constants:
ONPREMISE_PROCESS_REPORT_CONSTANT points to the process report you created in step 8. The report maps process instances with execution IDs.ONPREMISE_PROCESS_MODEL_NOTIFY_CONSTANT points to the Send Completion Message process model. The web API initiates this process model when it receives a process ID as input.After you've created the object, use the following expression to configure the web API:
1
2
3
4
5
6
7
8
9
10
11
12
13
14
15
16
17
18
19
20
21
22
23
24
25
26
27
28
29
30
31
32
33
34
35
36
37
38
39
40
41
42
43
44
45
46
47
48
49
50
51
52
53
a!localVariables(
  local!processId: index(
    a!queryProcessAnalytics(
      report: cons!ONPREMISE_PROCESS_REPORT_CONSTANT,
      query: a!query(
        /* Filter the query results by the execution ID */
        filter: a!queryFilter(field: "c1", operator: "=", value: a!fromJson(http!request.body).processId),
        pagingInfo: a!pagingInfo(1, 1)
      )
    ).data,
    /* Index to receive only the process instance ID */
    "c0",
    {}
  ),
  if(
    length(local!processId)=0,
    /* If the query returned no results, there are no active processes waiting on that robotic process */
    a!httpResponse(
      statusCode: 200,
      headers: {
        a!httpHeader(name: "Content-Type", value: "application/json")
      },
      body: "There are no active processes to notify of the completion"
    ),
    /* Otherwise, start the process to send a message to the process instance */
    a!startProcess(
      processModel: cons!ONPREMISE_PROCESS_MODEL_NOTIFY_CONSTANT,
      processParameters: {
        processInstance: local!processId
      },
      onSuccess: a!httpResponse(
        statusCode: 200,
        headers: {
          a!httpHeader(name: "Content-Type", value: "application/json")
        },
        body: a!toJson(
          fv!processInfo
        )
      ),
      onError: a!httpResponse(
        statusCode: 500,
        headers: {
          a!httpHeader(name: "Content-Type", value: "application/json")
        },
        body: a!toJson(
          {
                        error: "There was an error starting the process"
          }
        )
      )
    )
  )
)
Where: Appian Cloud site
/suite/webapi. For example: https://www.example.com/suite/webapi/.Where: Appian Cloud site
Configure the following parameters:
| Parameter | Action |
|---|---|
| Relative Path | Enter send-completion-msg. |
| Method | Select POST. |
| Usage | Select Queries data |
| Content Type | Select JSON (application/json) |
| Response Body Parsing | Select Convert JSON to Appian Value |
cloudProcessId and include it in the Request Body.Where: Appian Cloud site
Add a new action in the Appian Cloud process model to call the integration when the robotic task's execution ends.
Tip: This concludes the steps if you only want to resume the self-managed process model when the robotic task completes. If you need to send the results of the execution to the self-managed site, continue to Step 15.
Tip: This step is optional and should be completed only if you need to send the results of the execution to the self-managed site.
Where: Appian Cloud site
1
2
3
4
   a!toJson({
     "processId" : rilcloudProcessId,
     "result" : rilroboticProcessExecutionResult
   })
1
2
3
4
5
6
a!startProcess(
processModel: cons!ONPREMISE_PROCESS_MODEL_NOTIFY_CONSTANT,
processParameters: {
processInstance: local!processID,
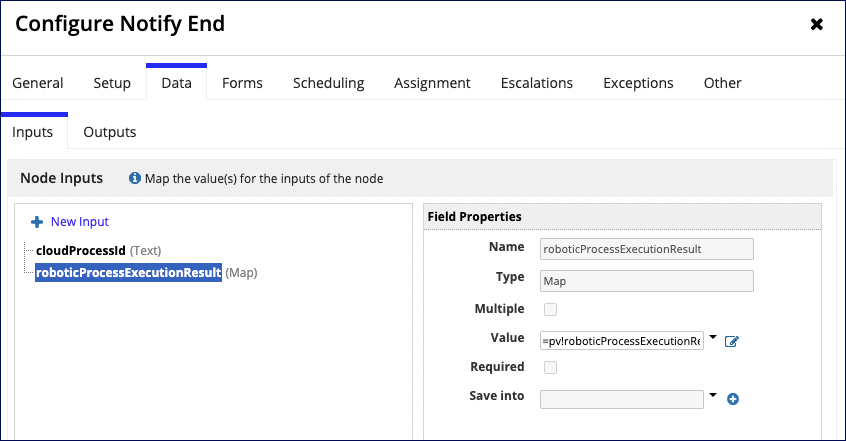
roboticProcessExecutionResult: a!fromJson(http!request.body).result
},
roboticProcessExecutionResult as an input parameter. Then, use this value to add a new message to the Send Message Event on the send completion message process model.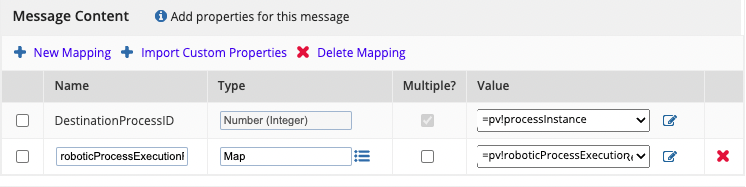
Once you have all objects configured and connected, you're ready to test. Use the Start Process for Debugging option in the process model to get started.
If the process model doesn't proceed past the Receive Message Event, check these common issues:
executeRoboticTask integration object to confirm the desired robotic task is selected.Send Completion Message process model? It could be that the process report isn't set up properly. In Appian RPA, go to the robotic task's execution log. If you see a line that says "Response body: There are no active processes to notify of the completion," check the process report to confirm that the robotic task execution ID is properly matched with the process model instance.Now that your hybrid configuration is set up, you and your team can focus on developing robotic tasks. To do that, you'll need to grant developers access to your Cloud site. User accounts aren't automatically synched between your self-managed site and your Cloud site, so you may also want to evaluate the available user authentication mechanisms. Synching certain user accounts automatically can help save you time by managing user accounts in just one environment.
Routinely evaluate data integrity and security in your Appian RPA implementation. Securing data in a robotic task is an important consideration in all environments.
Consider your deployment strategy when you're integrating robotic tasks with your applications. You'll likely have development, test, and production environments for both of your self-managed and Appian Cloud sites, so it's important to have a thorough understanding of how your deployment process works with hybrid configuration in place.
