Tip: Interface patterns give you an opportunity to explore different interface designs. Be sure to check out How to Adapt a Pattern for Your Application.
Present two buttons to the end user that, based on the selection, will validate only after a particular button is clicked.
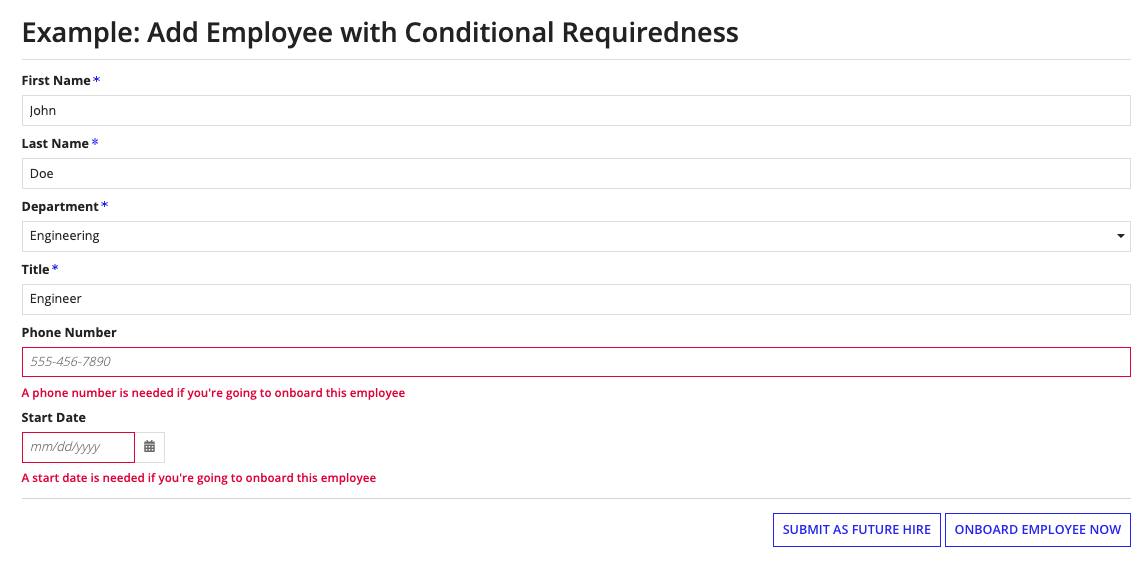
This scenario demonstrates how to use validation groups in an interface.
1
2
3
4
5
6
7
8
9
10
11
12
13
14
15
16
17
18
19
20
21
22
23
24
25
26
27
28
29
30
31
32
33
34
35
36
37
38
39
40
41
42
43
44
45
46
47
48
49
50
51
52
53
54
55
56
57
58
59
60
61
62
63
64
65
66
67
68
69
70
71
72
73
74
75
76
77
78
79
80
81
82
83
84
85
86
87
88
89
90
91
92
93
a!localVariables(
  /*
   * All of these local variables could be combined into the employee CDT and passed into
   * a process model via a rule input
   */
  local!firstName,
  local!lastName,
  local!department,
  local!title,
  local!phoneNumber,
  local!startDate,
  /*
  * local!isFutureHire is a placeholder varaiable used to set the validation group trigger.
  * When isFutureHire is set to true, a user can skip phone number and start date.
  */
  local!isFutureHire,
  local!isNumberValid:if( len( local!phoneNumber ) <= 12, true, false ),
  a!formLayout(
    label: "Example: Add Employee with Conditional Requiredness",
    contents: {
      a!textField(
        label: "First Name",
        value: local!firstName,
        saveInto: local!firstName,
        required: true
      ),
      a!textField(
        label: "Last Name",
        value: local!lastName,
        saveInto: local!lastName,
        required: true
      ),
      a!dropdownField(
        label: "Department",
        choiceLabels: { "Corporate", "Engineering", "Finance", "Human Resources", "Professional Services", "Sales" },
        placeholder: "-- Please Select a Department -- ",
        choiceValues: { "Corporate", "Engineering", "Finance", "Human Resources", "Professional Services", "Sales" },
        value: local!department,
        saveInto: local!department,
        required: true
      ),
      a!textField(
        label: "Title",
        value: local!title,
        saveInto: local!title,
        required: true
      ),
      /*
     * When a field has a validation group set, the required parameter and any validations
     * are deferred until the validation group is triggered by a button or link.
     *
     * Multiple validations are added to the phone number field by adding a local variable
     * that turns off required and validation group, but triggers a standard validation
     * upon unfocus from the field (rather than the onboard button click).
     */
      a!textField(
        label: "Phone Number",
        placeholder: "555-456-7890",
        value: local!phoneNumber,
        saveInto: local!phoneNumber,
        required: local!isNumberValid,
        requiredMessage:"A phone number is needed if you're going to onboard this employee",
        validations: if(local!isNumberValid,"","Please enter a valid telephone less than 12 digits long."),
        validationGroup:if(local!isNumberValid,"Future_Hire","")
      ),
      a!dateField(
        label: "Start Date",
        value: local!startDate,
        saveInto: local!startDate,
        required:true,
        requiredMessage:"A start date is needed if you're going to onboard this employee",
        validationGroup:"Future_Hire"
      )
    },
    buttons: a!buttonLayout(
      primaryButtons: {
        a!buttonWidget(
          label: "Submit as Future Hire",
          value: true,
          saveInto: local!isFutureHire,
          submit: true
        ),
        a!buttonWidget(
          label: "Onboard Employee Now",
          value: false,
          saveInto: local!isFutureHire,
          submit: true,
          validationGroup: "Future_Hire"
        )
      }
    )
  )
)
validationGroup parameter controls requiredness of the field, not the validation message."validation group" is not a valid value. You must use "validation_group".*) that normally denotes a field's requiredness.Use Validation Groups for Buttons with Multiple Validation Rules
