Tip: Interface patterns give you an opportunity to explore different interface designs. Be sure to check out How to Adapt a Pattern for Your Application.
Configure a record action with the Sync Records smart service so users can sync a set of records on demand.
This pattern focuses on re-syncing (or refreshing) a set of records that already exist in Appian. It also provides a sample scenario to show why you might use this pattern in your application.
The Appian Retail Company uses a record action to create all new orders in the Order record type. Since this action uses a Write to Data Store Entity smart service, all new orders are automatically synced in Appian. Although new orders are created and synced using the Write to Data Store Entity smart service, some orders are updated using a third-party system. As a result, not all order changes are automatically synced in Appian.
To sync changes made by the third-party system, you will use the Sync Records smart service to re-sync the existing orders so they display the latest order information.
In this scenario, you will create a record action that allows end users to re-sync orders placed this month in the Northwest sales region. This way, users viewing a read-only grid with the monthly Northwest sales can ensure they see the latest order information.
Note: This pattern will not sync any new records created by a third-party system; it will only re-sync existing records that are already synced in Appian. To sync new and updated records created by a third-party system, consider generating a web API to sync records when notified by your system.
This pattern uses data from the Appian Retail application, available for free in Appian Community Edition. To follow along with this pattern, log in to Appian Community to request the latest Appian Community Edition site.
If you do not see the Appian Retail application available in your existing Appian Community Edition, you can request a new Appian Community Edition to get the latest application contents available.
This pattern will use data from the following record types in the Appian Retail application:
To create this pattern:
To configure the Sync Records smart service, you need to provide the identifiers of the records you want to sync.
In this pattern, you'll create an expression rule that queries the Id field from the Order record type to return all orders placed in the Northwest sales region this month. You'll use this expression rule later in a process model when you configure the Sync Records smart service.
To get the order Ids:
In the Create Expression Rule dialog, configure the following properties:
| Property | Value |
|---|---|
| Name | Enter AR_getNorthwestOrders. |
| Description | Enter Get the order Ids for Northwest orders made this month. |
| Save In | Select Rules & Constants. |
Copy and paste the following expression. This returns the Ids of orders created this month in the Northwest sales region.
Note: These record type references are specific to the Appian Retail application. If you're following along in the Appian Retail application, you can copy and paste this expression without updating the record type references.
1
2
3
4
5
6
7
8
9
10
11
12
13
14
15
16
17
18
19
20
21
22
23
24
25
26
 a!queryRecordType(
   recordType: 'recordType!{ad898682-e651-4b2d-af67-47c1fcb1171f}Order',
   fields: {
     'recordType!{ad898682-e651-4b2d-af67-47c1fcb1171f}Order.fields.{262bb249-cf34-4171-a573-54831d0958dd}orderId'
   },
   filters: a!queryLogicalExpression(
     operator: "AND",
     filters: {
       a!queryFilter(
         field: 'recordType!{ad898682-e651-4b2d-af67-47c1fcb1171f}Order.relationships.{ae938f73-f61f-483d-8ca0-65d3c911abae}salesRegion.fields.{2aadab0c-4cbe-4ed4-ad0a-d6da6e08e2f2}name',
         operator: "=",
         value: "Northwest"
       ),
       a!queryFilter(
         field: 'recordType!{ad898682-e651-4b2d-af67-47c1fcb1171f}Order.fields.{fbcc99f6-1ddf-4923-903b-18122a1737c6}orderDate',
         operator: "between",
         value: /* Month-to-Date */{
           toDatetime(eomonth(today(), - 1) + 1),
           now()
         }
       )
     },
     ignoreFiltersWithEmptyValues: true
   ),
   pagingInfo: a!pagingInfo(startIndex: 1, batchSize: 500)
 ).data['recordType!{ad898682-e651-4b2d-af67-47c1fcb1171f}Order.fields.{262bb249-cf34-4171-a573-54831d0958dd}orderId']
Click TEST RULE to verify the query.
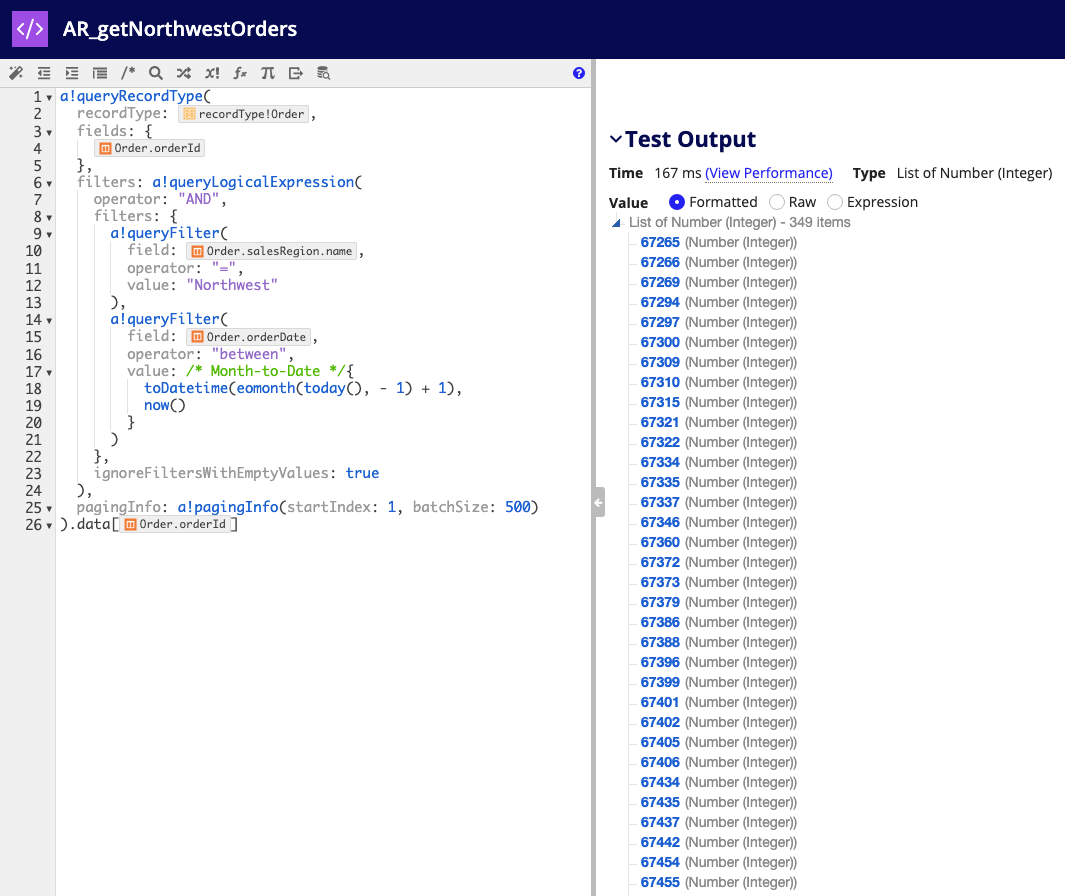
Note: Your query may return different results from the image above since the query is filtered by the current month.
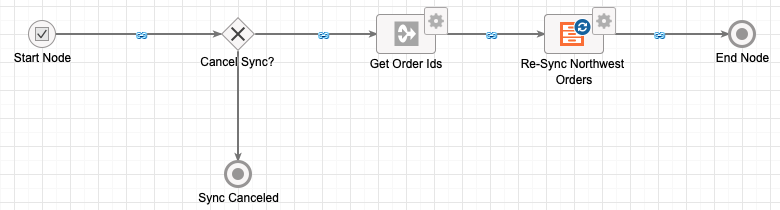
Now that you have the order identifiers, you can configure a process model that uses the Sync Records smart service.
The process model will use a start form so users can confirm that they want to re-sync records. The workflow will include a cancel flow to end the process if the user ends the action. Additionally, you'll add a script task that calls the AR_getNorthwestOrders expression rule so you can pass the returned identifiers in a process variable to the Sync Records smart service.
When you're finished, the process model will look like this:
Before you build the process model, you'll start by creating a start form that asks users to confirm that they want to re-sync records.
To create the start form:
In the Create Interface dialog, configure the following properties:
| Property | Value |
|---|---|
| Name | Enter AR_confirmSync. |
| Description | Enter A start form to confirm that users want to sync record data. |
| Save In | Select Rules & Constants. |
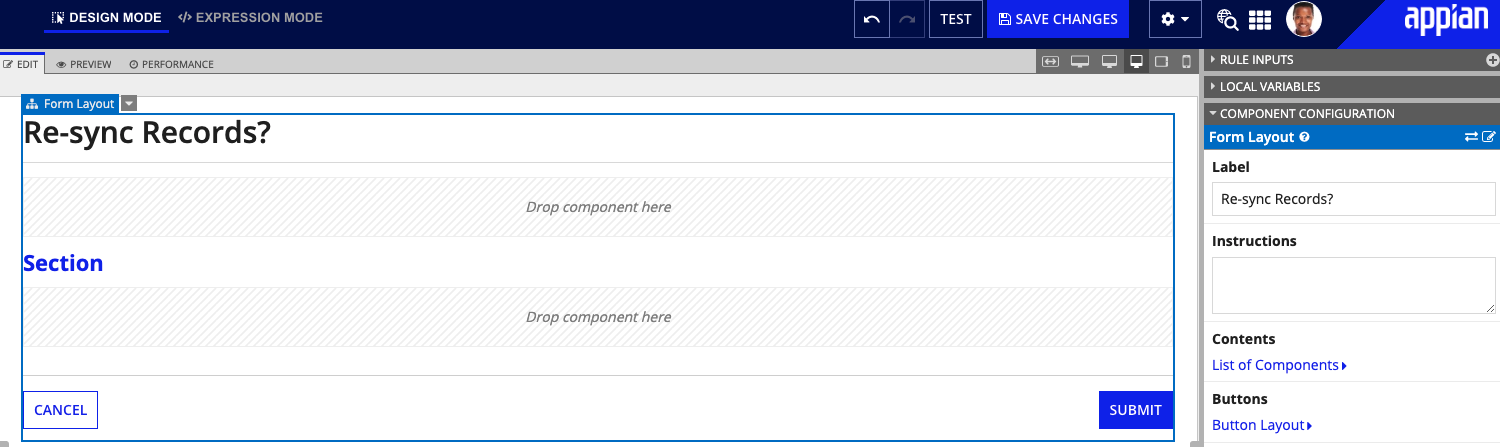
In the COMPONENT CONFIGURATION pane, replace the default Label value with Re-sync Records?.
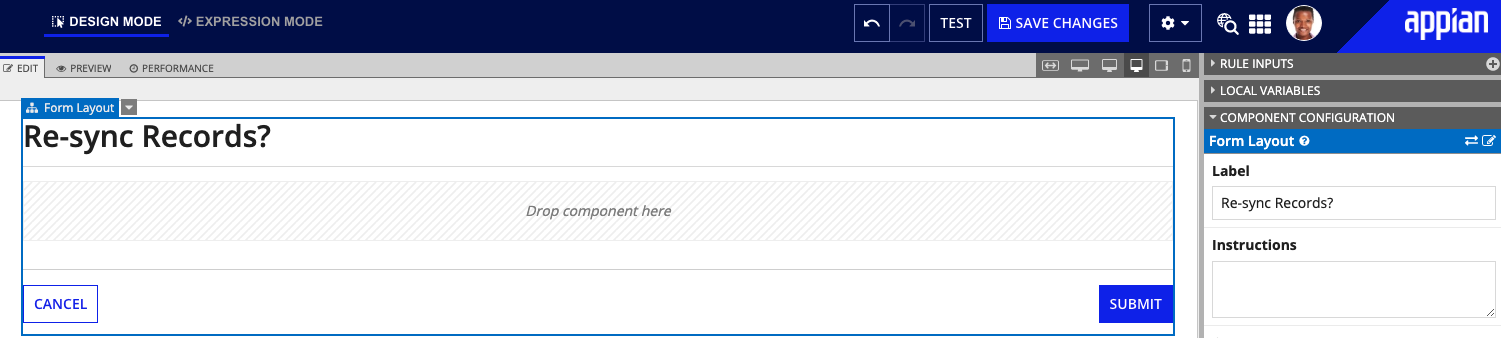
From the context menu, select Delete to remove this component.
In the COMPONENT CONFIGURATION pane for the new Rich Text component, enter the following in the Display Value:
This will re-sync all existing Northwest orders submitted this month. Do you want to re-sync these records?
 Size and select Medium Text.
Re-sync.Click SAVE CHANGES. The interface should look like this:

Now that you have a start form interface, you will create a new process model and configure the start form.
To create a process model:
In the Create Process Model dialog, configure the following properties:
| Property | Value |
|---|---|
| Name | Enter AR Sync Northwest Orders. |
| Description | Enter Process to sync Northwest orders placed this month. |
| Save In | Click Create New Process Model Folder and name the folder AR Process Models. |
Once inside the process modeler, configure the start form:
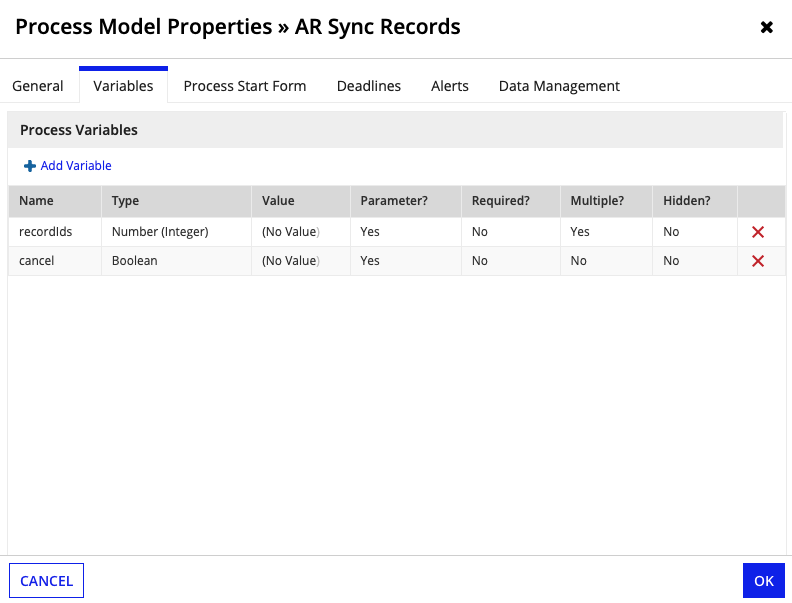
AR_confirmSync.In addition to the cancel process variable, you'll create another process variable called recordIds to store the record identifiers that you want to re-sync.
To create the recordIds process variable:
In the New Process Variable dialog, configure the following properties:
| Property | Value |
|---|---|
| Name | Enter recordIds. |
| Type | Select Number (Integer). |
| Parameter | Select the Allow the value for the variable to be provided when starting a process checkbox. |
| Multiple | Select the Variable can store multiple values checkbox. |
Click OK. You now have two process variables:
Next, you'll create a cancel flow to terminate the process if a user clicks CANCEL on the start form.
To create a cancel flow:
Sync Canceled.Cancel Sync?pv!cancel to reference the process variable cancel.For the Else if no rules are TRUE condition, select End Node.
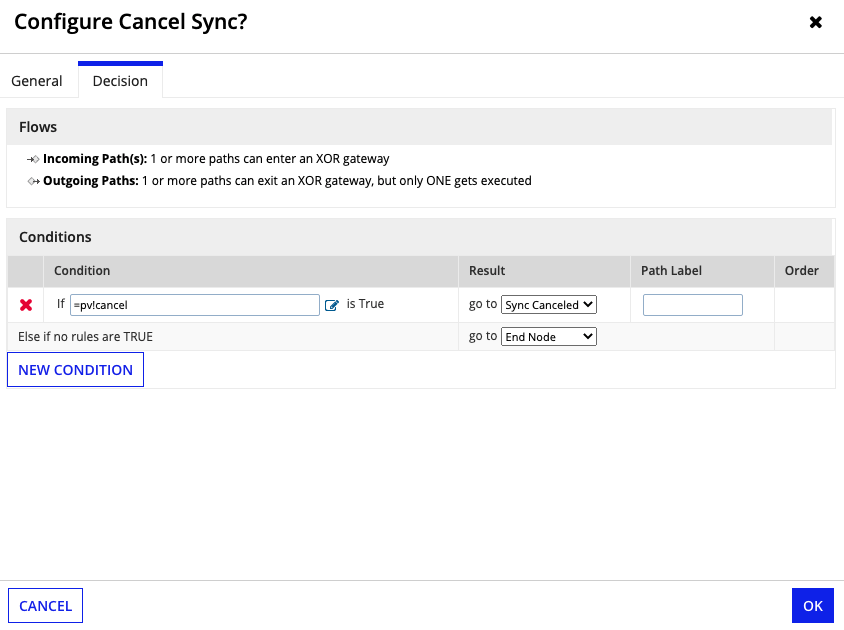
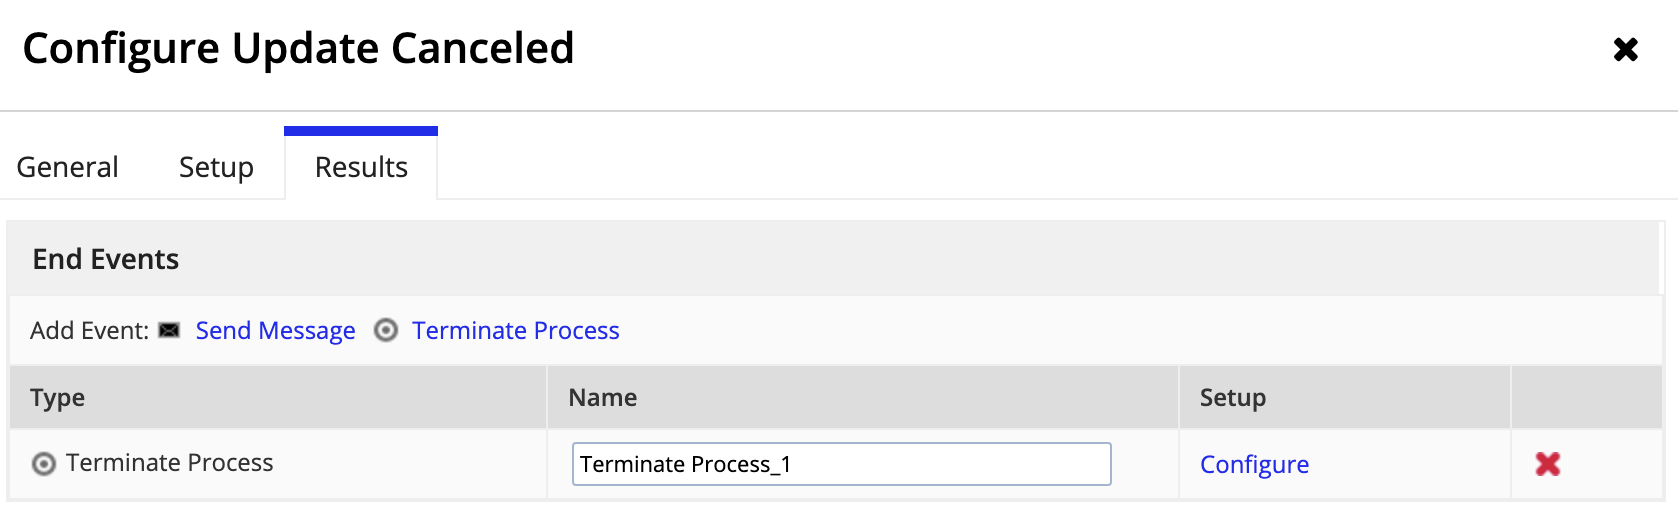
When a process has multiple end nodes, the different branches of a process remain active until each active path reaches one of the multiple end nodes. To stop all branches of a process, even those that have not yet reached an end node, you should add a Terminate Process event to each end node.
To add a terminate process event:
Click the Terminate Process link. A Terminate Process row is added to the End Events list.
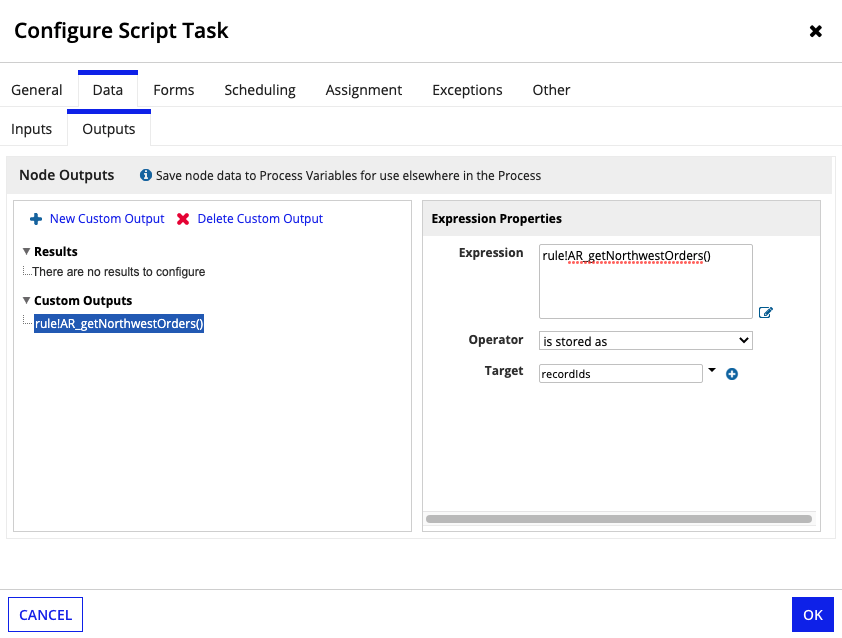
To pass the record identifiers to the Sync Records smart service, you need to configure a script task to call the AR_getNorthwestOrders expression rule and save the results in the recordIds process variable.
To configure the script task:
Get Order Ids.rule!AR_getNorthwestOrders().For Target, select the recordIds process variable.
Now that you have the record identifiers stored in a process variable, you can reference the process variable in a Sync Records node.
To configure the Sync Records smart service:
Re-sync Northwest Orders.recordType!Order.Now that your process model is nearly complete, you will add activity chaining to allow the process to move more quickly between nodes, and then save the process model.
To add activity chaining and save the process model:
Repeat these steps on the remaining nodes. The final process should look like this:
Next, you'll use the process model in a record action so users can re-sync this month's Northwest orders with the click of a button.
To configure a record action:
In the Create New Action dialog, configure the following properties:
| Property | Value |
|---|---|
| Display Name | Enter Re-sync Records. |
| Key | Leave as the default value. |
| Icon | Search for the repeat icon and select the icon. |
| Dialog Box Size | Select Small. |
| Process Model | Select the AR Sync Northwest Records process model. |
Lastly, you'll add the record action to a read-only grid so users can re-sync this month's Northwest orders to see the latest data in the grid.
To create a read-only grid with the record action:
In the Create Interface dialog, configure the following properties:
| Property | Value |
|---|---|
| Name | Enter AR_NorthwestOrdersGrid. |
| Description | Enter Grid display Northwest orders made this month. |
| Save In | Select Rules & Constants. |
Although the record action automatically displays on the grid, you'll want to filter the grid so it only displays orders placed in the correct sales region and during the current month.
To filter the grid:
Click Add Filter and configure the following properties:
| Property | Value |
|---|---|
| Field | Enter salesRegion.name. This selects the name field from the Region record type. |
| Condition | Leave the default equal to. |
| Value | Enter Northwest. |
Click Add Filter again and configure the following properties:
| Property | Value |
|---|---|
| Field | Enter orderDate. |
| Condition | Select Date Range. |
| Value | Select Month-to-Date. |
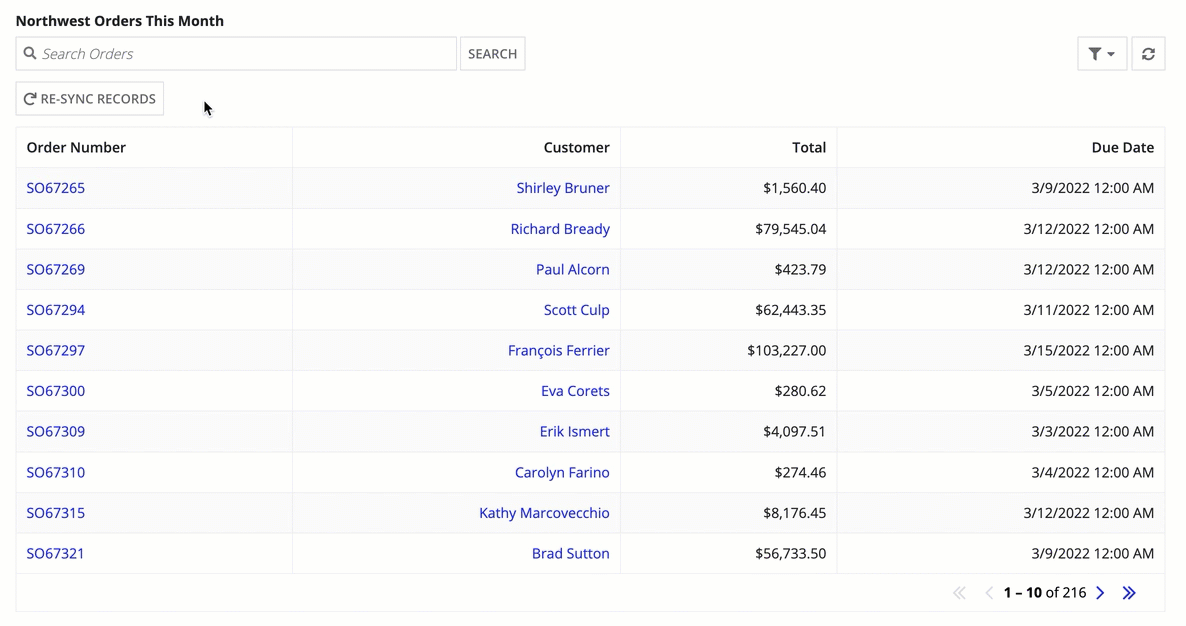
Northwest Orders This Month.Click SAVE CHANGES. The interface should look like this:
To verify that the pattern works as expected, you can update a row of data directly in the database and then use the RE-SYNC RECORDS action to re-sync the existing records and display the changed data in the grid.
To update data directly in the database:
SalesOrderHeader.SO67265.2000.00.Once you update the row in the database, you can use the RE-SYNC RECORDS button to sync your changes.
To test the RE-SYNC RECORDS button:
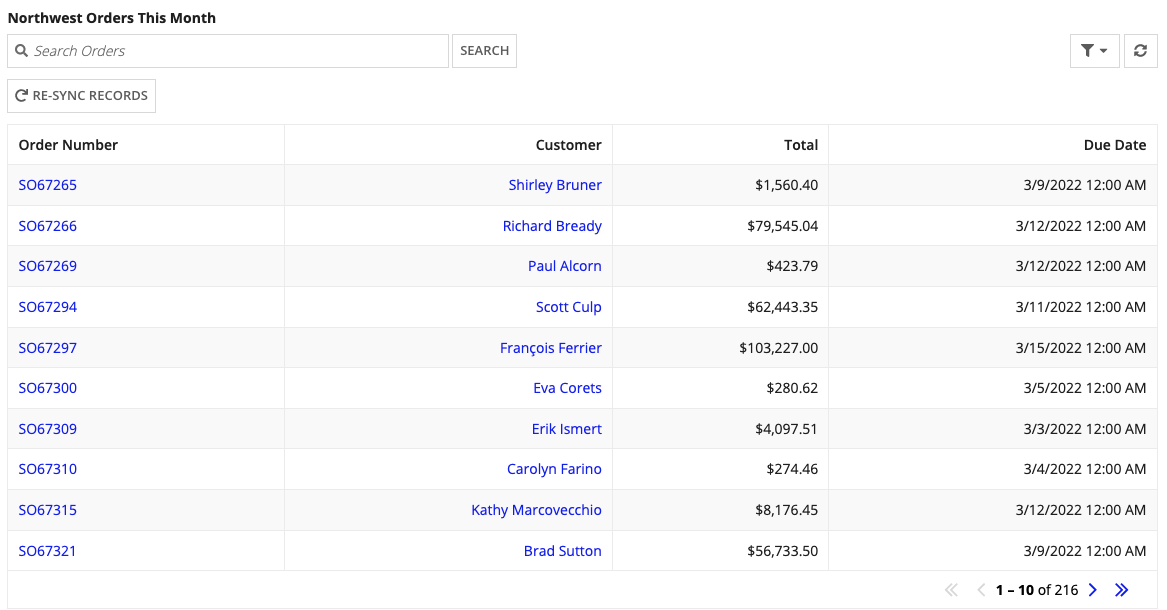
The table should update to display your data changes. For example, the grid below shows the order SO67265 update to now displays $2,000.00 as the total.