Queries are the unseen driver of the robust grids, charts, and other reporting features available to users, and the query editor ensures you can quickly and easily develop the interfaces needed for your application.
For example, let's say you need to build a form that lets customers update their billing address. Using the query editor, you can create a query that pre-populates the form with that customer's latest data so they can make the necessary changes. The query editor enables Appian developers to preview their query results and generate powerful queries and provides additional query-building guidance to novice Appian developers.
But queries can do more than just help you present data. They can also make your application simpler and easier to use. If your form captures customer data, you may need to know the customer's preferred pickup store. A basic version of this form lets the user type the store, but it would be easy for users to enter an incorrect or invalid location. Using a query, you can get the current list of stores to populate a dropdown component instead.
You can query a record type to return record data or you can query a database directly:
This page describes all of the features of the query editor and outlines its supported functionality and limitations.
For instructions on how to use the query editor, see Using the Query Editor.
You can open the query editor using any of the following options:
| To query data from a... | Go to... | Open by... |
|---|---|---|
| Record type | Expression editor of any empty rule or interface | Clicking the query editor icon. |
| Pressing Alt+V (Command+Option+V for Mac). | ||
| Record type | Expression editor of any rule or interface that contains an empty a!queryRecordType() function | Placing your cursor in the function and then clicking the query editor icon. |
| Placing your cursor in the function and then pressing Alt+V (Command+Option+V for Mac). | ||
| Ctrl+Click (Command+Click for Mac) the function. | ||
| Data store entity | Expression editor of any empty rule or interface | Clicking the query editor icon. |
| Pressing Alt+V (Command+Option+V for Mac). | ||
| Data store entity | Expression editor of any rule or interface that contains an empty a!queryRecordType() function | Placing your cursor in the function and then clicking the query editor icon. |
| Placing your cursor in the function and then pressing Alt+V (Command+Option+V for Mac). | ||
| Ctrl+Click (Command+Click for Mac) the function. | ||
| Data store entity | Design Mode of an interface with a read-only grid | Clicking CREATE QUERY or EDIT QUERY in the component configuration for the grid. |
| Data store entity | Design Mode of an interface with local variables | Hovering over the variable and clicking the query editor icon in the component configuration for local variables. |
See Supported Logic and Parameters for more information on what types of queries are supported.
There are many situations when you'd need to query data from your record types.
For example, in a case management application, warehouse employees need to report any safety concerns they have about their work location. As part of that form, you want users to easily pick the warehouse they are associated with. To use that data with a dropdown or radio button component, you'd need to create a query that returns the warehouses in the employee's state.
It's easy to query your records and related records with the query editor. You can use the editor to configure all aspects of your query:
As you build a query, you can test it at any time and preview the results to verify your configuration.
Once you open the query editor, choose the data source you want to get data from.
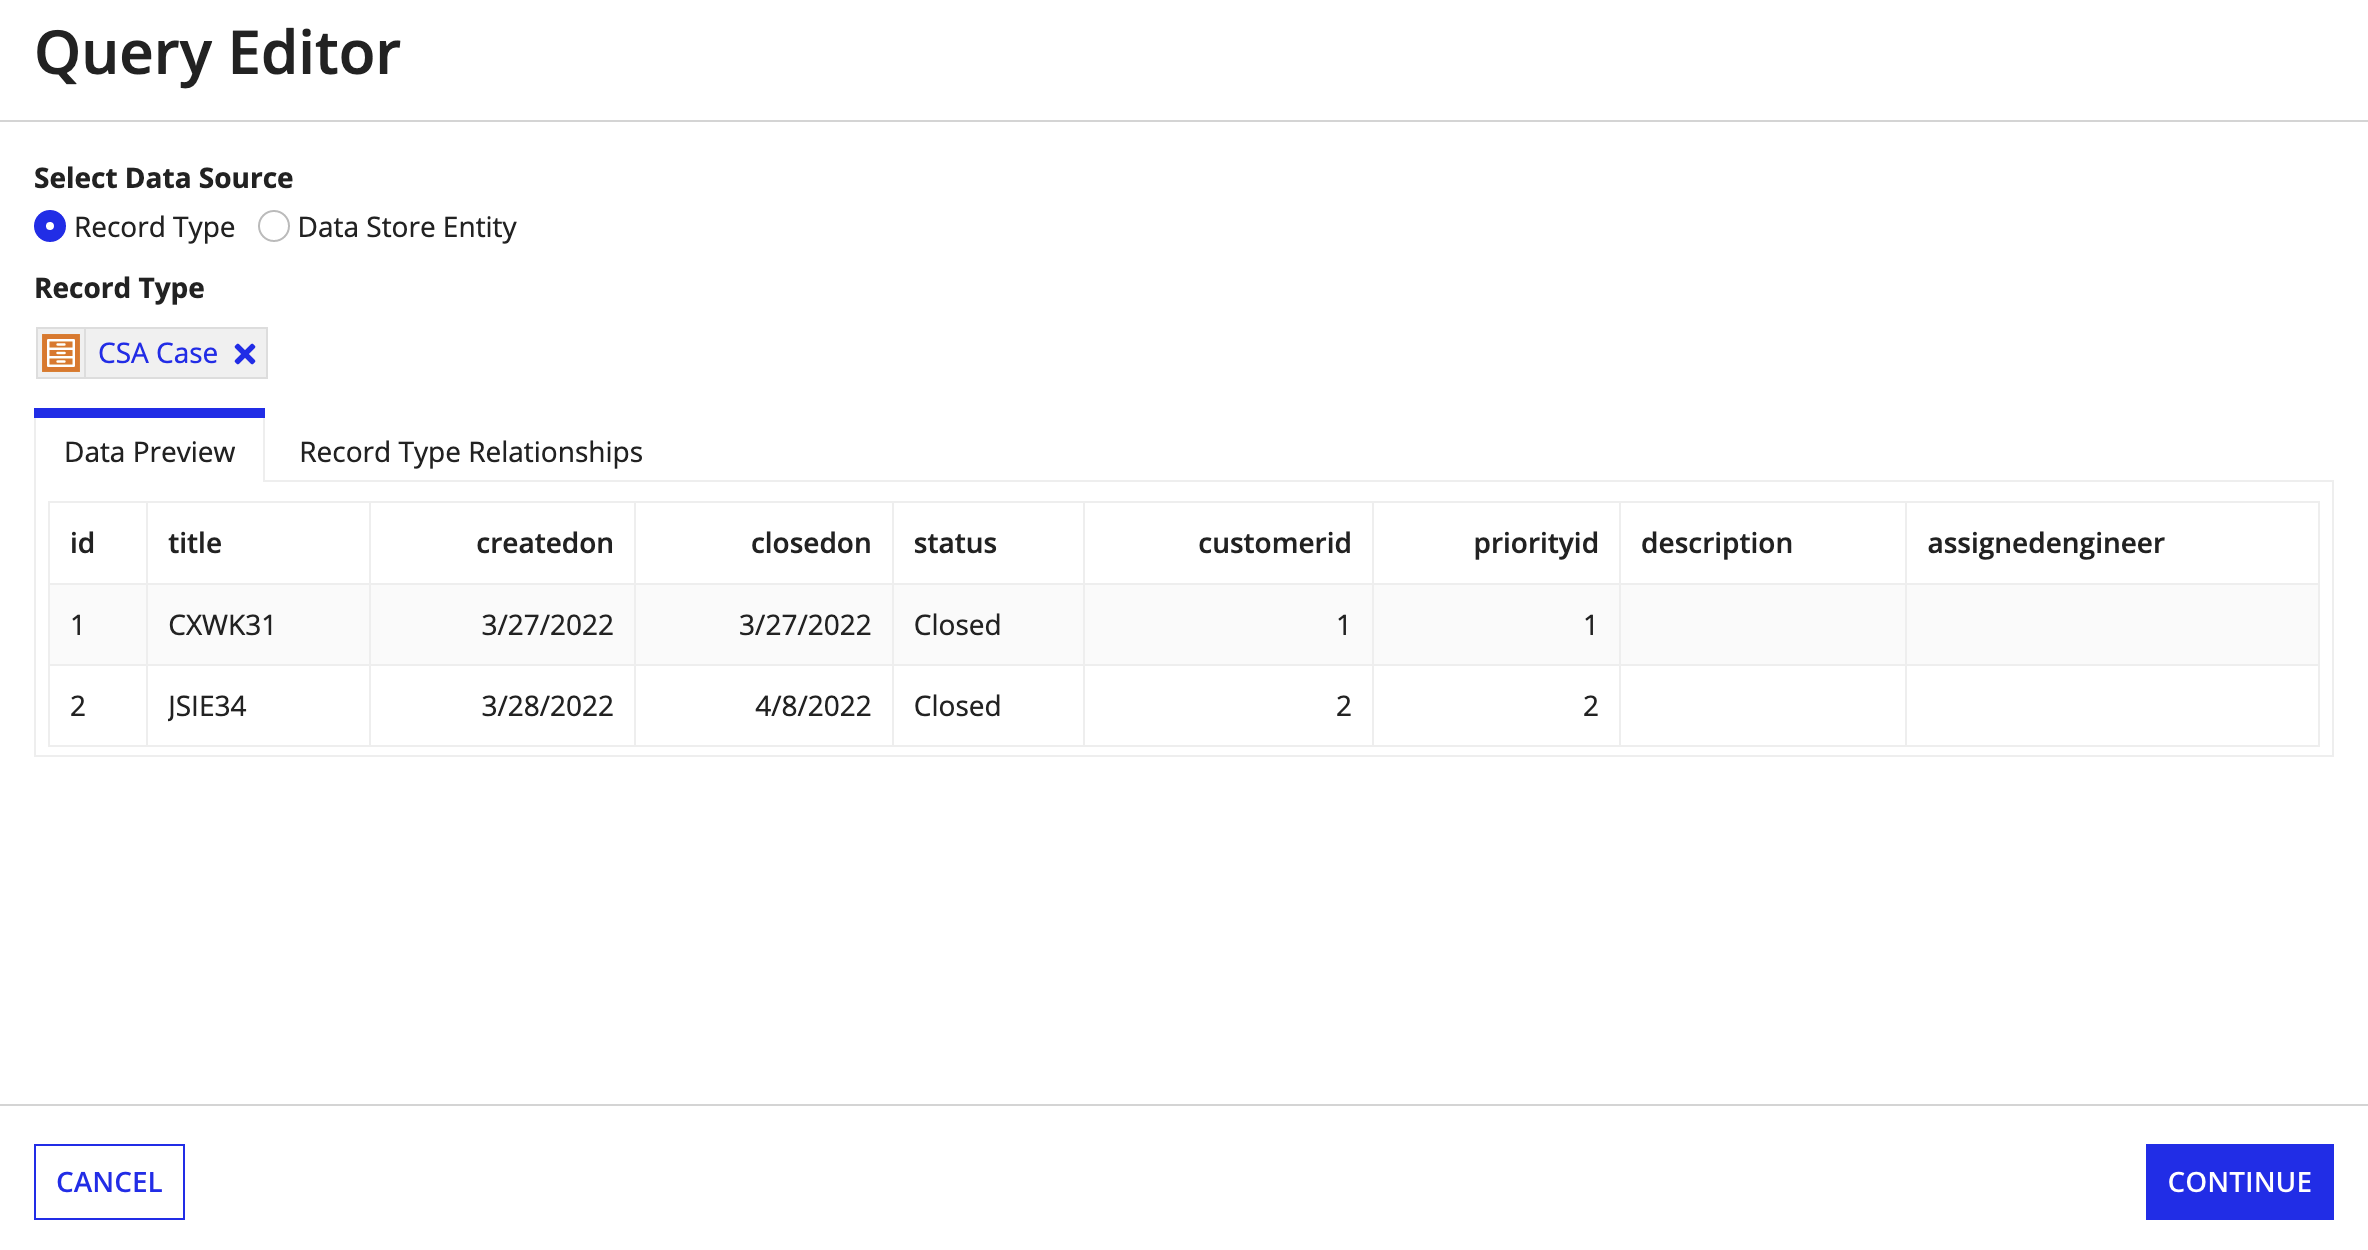
To use a record type, select Record Type as the data source, then use the search to select your record type. Note that you cannot select the following record types:
By default, the Data Preview tab appears showing a snippet of the available data to confirm you've selected the correct record type. Select the Record Type Relationships tab to see the relationships available on the selected record type.
After selecting your record type, the query editor configuration screen appears. This screen provides the tools to select, aggregate, filter, and sort the data, as well as the ability to create rule inputs and preview the data returned by the query. Each section of the query editor corresponds to a different part of the generated query.
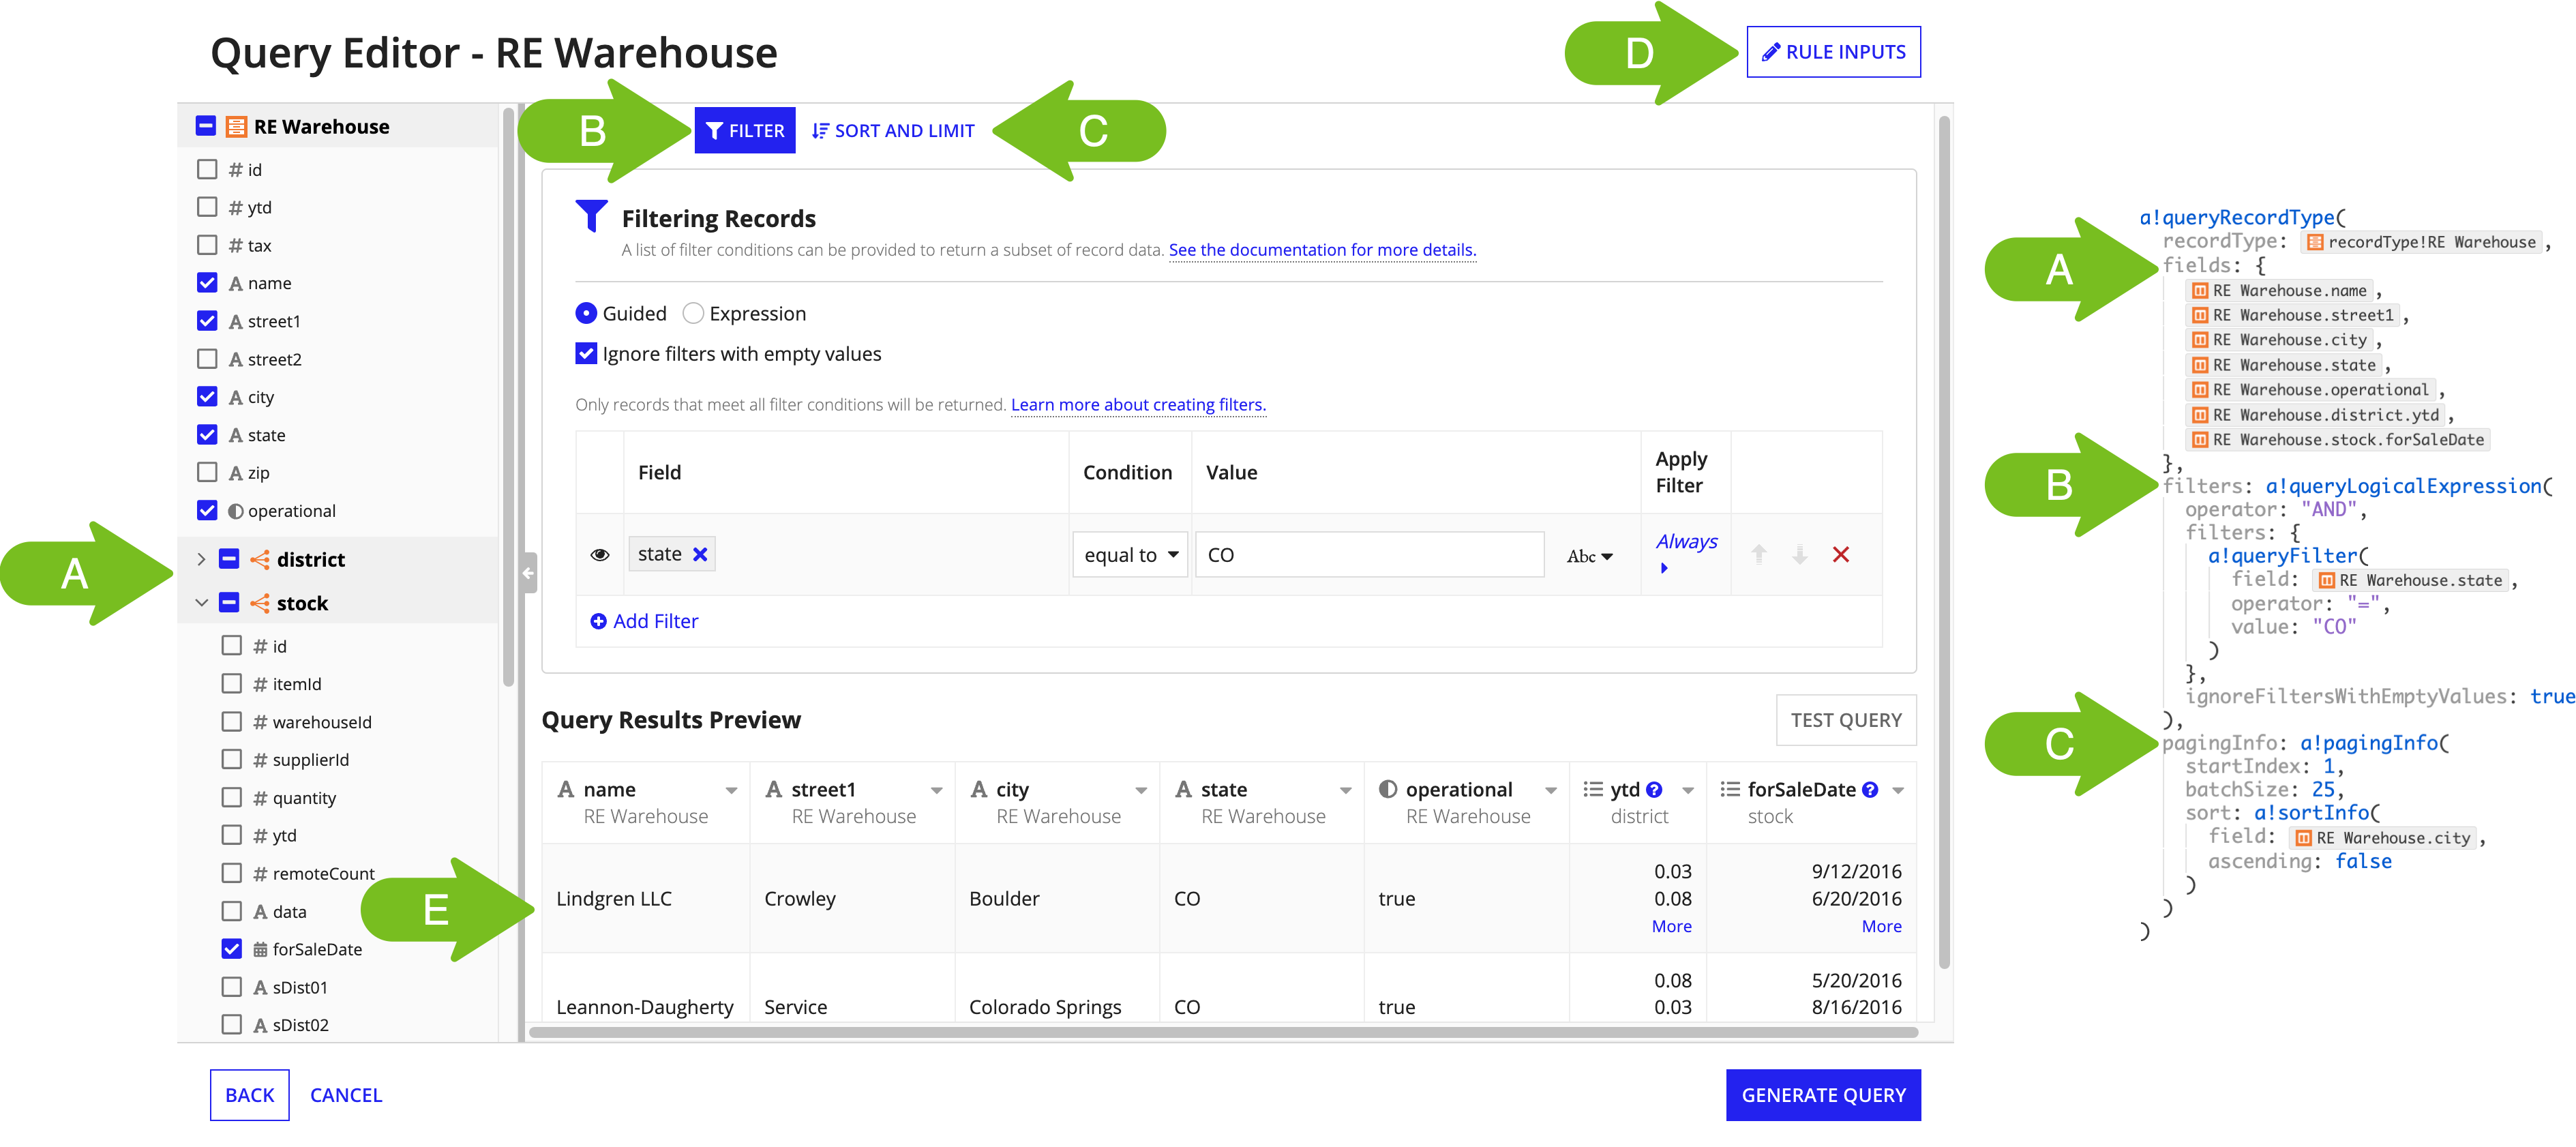
For selection queries, the query configuration screen is made up of five main sections:

| Call Out Letter | Section Name | Function Parameter | Function | Description |
|---|---|---|---|---|
| A | Fields | fields | – | Defines the record fields and related record fields to return. |
| B | Filter | filters | a!queryLogicalExpression() | Defines which rows of data to return based on conditions you specify. |
| C | Sort and Limit | pagingInfo | a!pagingInfo() | Defines how many rows to return, as well as how to sort those rows. |
| D | Rule Inputs | – | a!queryRecordType() | Defines context-specific values that can be used as inputs in your query. |
| E | Preview grid | – | a!queryRecordType() | Previews the results of the query and contains field configuration options in the context menu . |
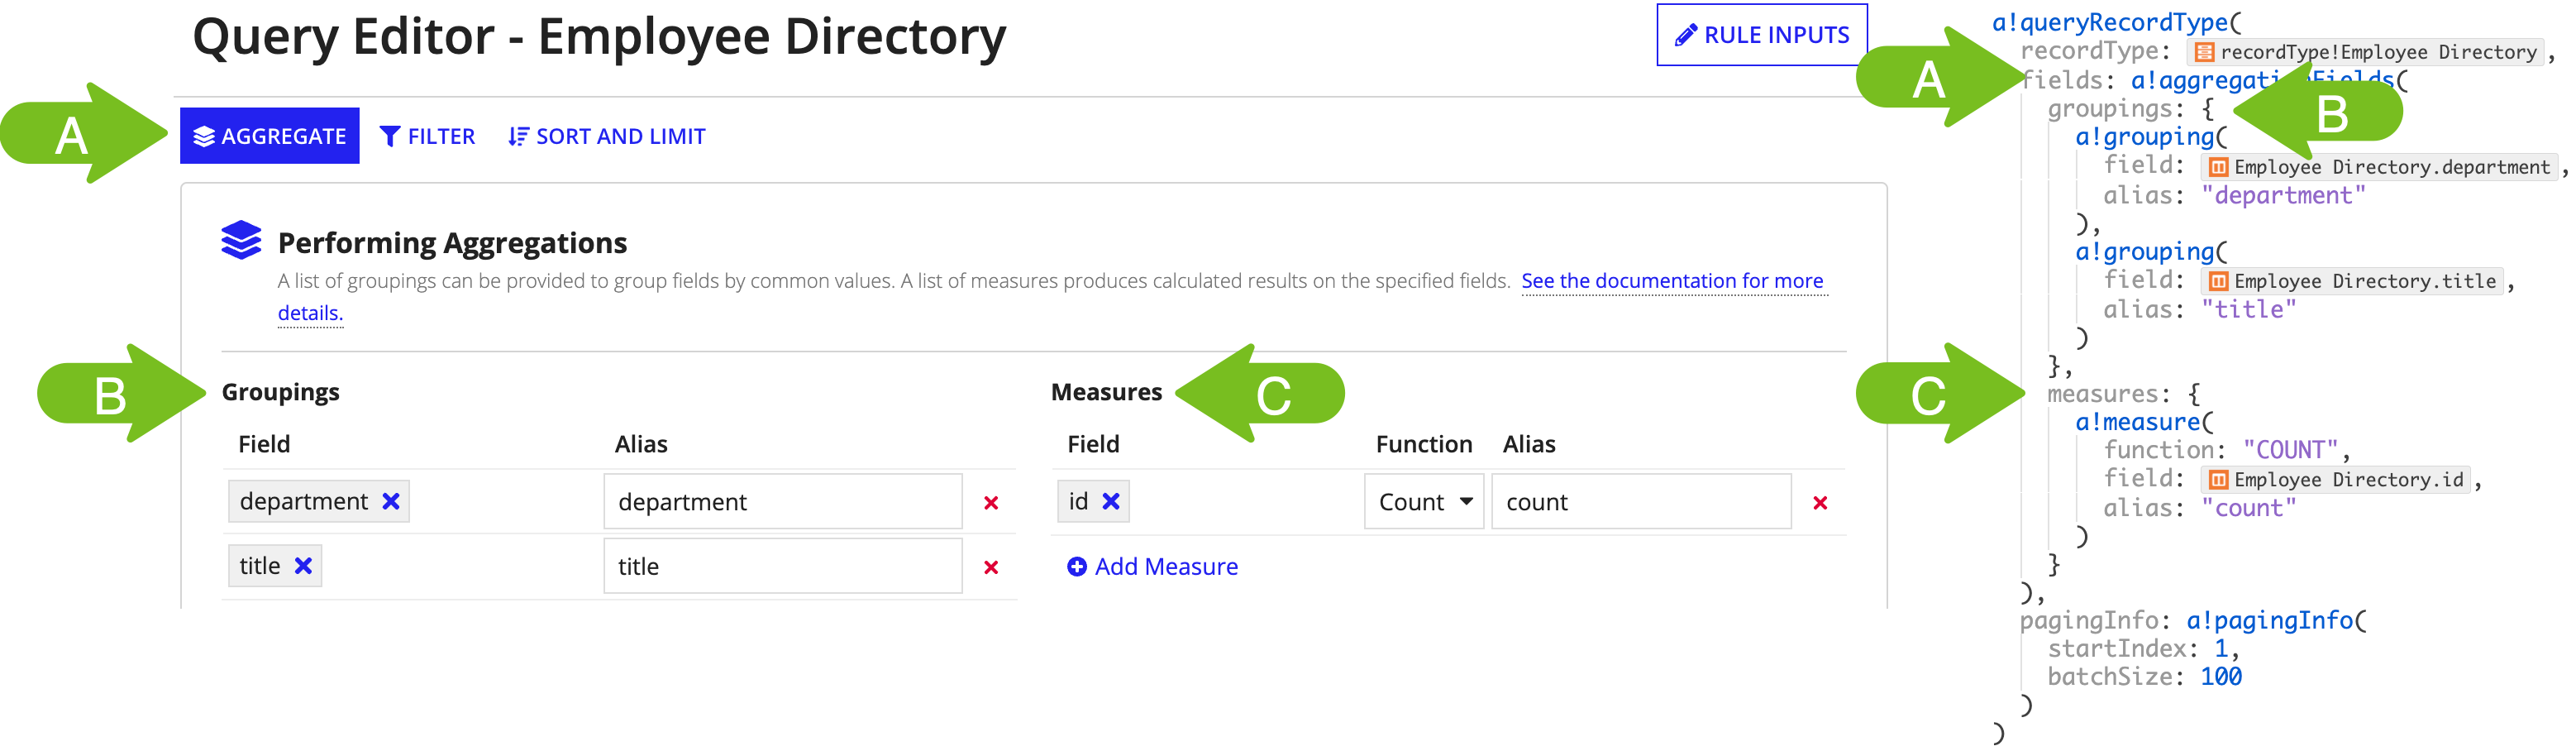
Aggregation queries are made up of the same five sections as selection queries, however, the fields are configured on the Aggregate tab:
| Call Out Letter | Section Name | Function Parameter | Function | Description |
|---|---|---|---|---|
| A | Aggregate | fields | a!aggregationFields() | Defines the record fields and related record fields to return. |
| B | Groupings | groupings | a!grouping() | Defines the fields to group by when aggregating record data. |
| C | Measures | measures | a!measure() | Determines the numerical or calculated values to return with the query. |
The fields section contains a field picker that allows you to select any fields from the record type.
If there are any record type relationships, you can click > to expand them and select related record fields to include in the query. The icon next to the related record field name indicates the type of data relationship.
This example shows how to choose both record fields and related record fields for your query.

By default, only the fields from the base record type are selected. You can add or remove individual fields that you want your query to return. You can also add or remove all fields for a record type or a relationship using the checkbox next to the record type or relationship name.
See Using the Query Editor for more information on how to add or remove fields from your query.
The order of the columns in the preview pane changes as you select and remove fields from the list. If you clear a column and re-add it, it will be added as the last column.
As an alternative to a selection query, the Aggregate section allows you to build an aggregation. In this section, you can create groupings that collect fields by common values and measures that produce a calculated result.
When building an aggregation, you can use any combination of groupings and measures or use only groupings or measures. Imagine you are working with an Order record type that has fields for order status, the total cost, and the sales region. The following examples show how to use various combinations of groupings and measures to aggregate this record data.
An alias is required for each grouping and measure. The alias is the short name by which the result of the grouping or the measure can be referenced in other parts of the a!queryRecordType() expression.
Rule inputs and local variables let you define context-specific values in your expression rule or interface.
The query editor parses these rule inputs and local variables so you can use them as part of your query. For example, you might use a rule input or local variable to store the value of a filter. When you open the query editor, the local variables and rule inputs are evaluated immediately.
Note: The query editor cannot be reopened once the a!queryRecordType() expression is generated.
The Filter and Sort and Limit sections have a Guided mode and an Expression mode.
Switching from Guided to Expression mode will not clear the current configurations. This allows you to use Guided mode to set up your initial configurations, then switch to Expression mode to add more advanced configurations.
If you make changes in Expression mode that cannot be made in Guided mode, you must continue in Expression mode since Guided mode will be disabled. See Supported Logic and Parameters for more information on what is supported in Guided mode.
The Filter section allows you to determine which records to return based on conditions you specify.
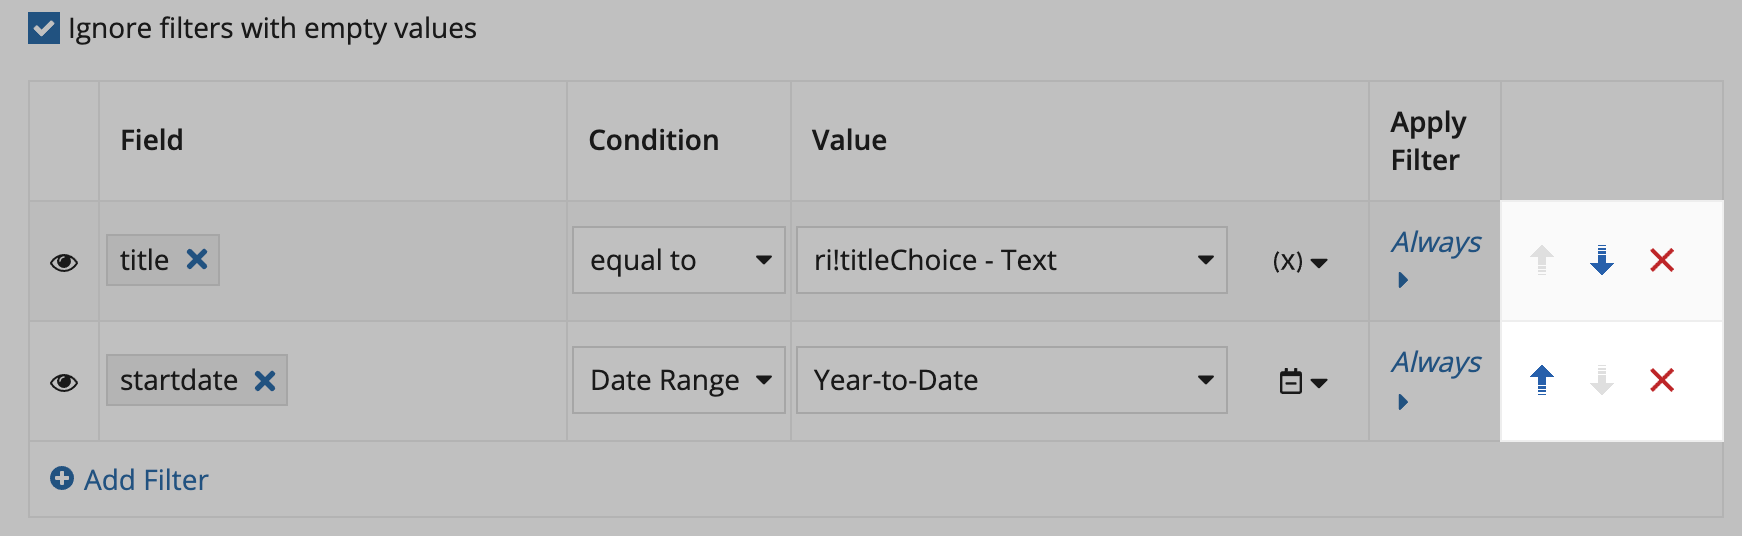
Selecting Guided allows you to easily set up filters using four criteria: Field, Condition, Value, and Apply Filter. Multiple filters are combined using the AND operator.
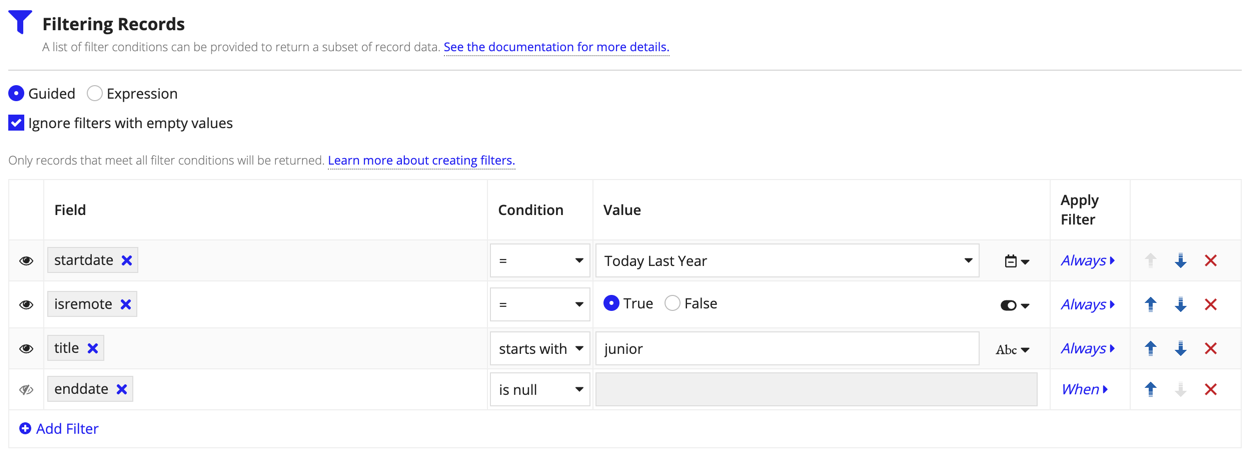
Ignore filters with empty values is selected by default. This means a filter will not be applied if its value parameter returns an empty value. This is useful when you have multiple filters that are all optional (for example, a grid that can be filtered by multiple selections).
If you don't select Ignore filters with empty values and the value for a filter is not supplied, the query will return an error.
The Field picker contains all the fields in the record type, as well as related record fields.
The Condition and Value options will change depending on the data type of the selected Field. Only the conditions and values that are compatible with the data type of the selected field will display.
The Condition list displays all of the operators that can be applied to the selected field. Only operators that are compatible with the data type of the chosen field display.
The following tables explains the behavior of each available operator:
| Operator | Description |
|---|---|
= |
Equal to |
<> |
Not equal to |
< |
Less than |
> |
Greater than |
<= |
Less than or equal |
>= |
Greater than or equal |
in |
Matches a value in a list of values |
not in |
Does not match a value in a list of values |
starts with |
Begins with |
not starts with |
Does not begin with |
ends with |
Ends with |
not ends with |
Does not end with |
includes |
Includes the specified character(s) |
not includes |
Does not include the specified character(s) |
is null |
Is null |
not null |
Is not null |
between |
Is greater than or equal to a minimum value and less than or equal to a maximum value |
Tip: The between operator requires a list of two values, with the lower value as the first item and the upper value as the second. For example: {10,20}. You can set up one rule input or local variable that contains a list of two values, or create a list of two values in expression mode.
Tip: Some databases can store empty text values as either null or as a zero-length string (usually described as ""). When querying against the Cloud Database using the is null operator on a text field, the result set will only return results that are explicitly set to null. In contrast, other databases may treat these zero-length strings as equivalent to null and thus return results for both null and empty values. Appian expressions do not distinguish between null and empty regardless of the underlying database. This means that when data is synced from a text field, values that were null or empty are both stored as null in the synced record type. Thus, when querying from a synced record type, the is null operator will then return values that were both null and empty in the database.
See Query Recipes for an example of how to use a!queryFilter() and a!queryLogicalExpression to query for both empty and null values.
The following table shows which operators can be applied to each data type.
| Data Type | Valid Operators |
|---|---|
| Text | =, <>, in, not in, starts with, not starts with, ends with, not ends with, includes, not includes, is null, not null |
| Integer, Float, Time | =, <>, >, >=, <, <=, between, in, not in, is null, not null |
| Date, Date and Time | =, <>, >, >=, <, <=, between, in, not in, is null, not null |
| Boolean | =, <>, in, not in, is null, not null |
Note: For Date and Date and Time data types, between is substituted with Date Range in the query editor dropdown list. This is just to indicate that you can select from a list of date presets for the filter's value. The parameter in the expression will still display between.
Tip: If the Condition column is set to is null or not null, the Value column is disabled.
You can select how you want to pass in the filter value using the Value context menu.
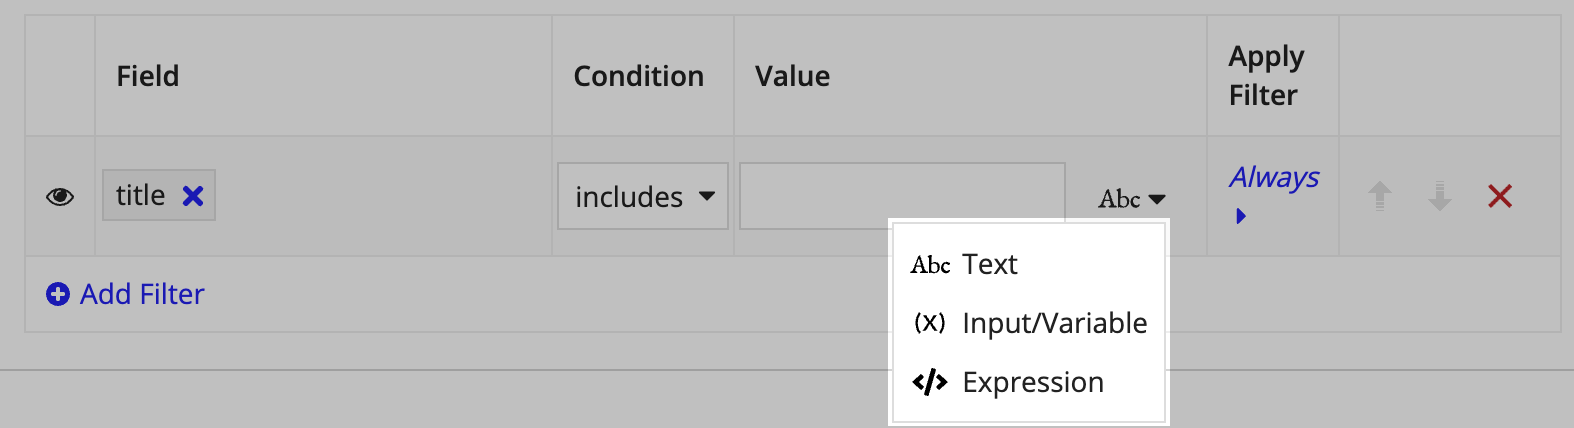
The options in the context menu change based on the data type of the selected field. In most cases filter values can be passed in using the following:
If you select Input/Variable, existing rule inputs and local variables appear in the Value list.
Only rule inputs and local variables that are compatible with the data type of the selected field will display. This includes:
For example, if you select a field that has a data type of Text, you can select rule inputs or variables of the same type or those that can be cast to the Text data type. See the list below for some examples of Appian data types that can be cast to primitive data types.
The Apply Filter decides when the filter in that row is applied to the query. Use this option only when you want to apply the filter when a particular condition is met, such as if the user belongs to a specific group.
The Apply Filter can be configured in an expression editor by clicking on the link in the Apply Filter column, shown as either Always or When. Always means the filter is always applied, and When means a condition expression exists. Enter an expression that returns a boolean value.
On the left side of each filter row, there is an icon that indicates whether or not the filter is applied based on the Apply Filter column. Each icon represents a different status determined by whether the filter is applied or not applied.
| Visual Icon | Filter Status |
|---|---|
| Applied | |
| Not Applied |
On the right side of each filter row, you can change the filter order using the up or down arrows, or delete the filter using the x icon.
Because filters are evaluated with the AND operator, the filter order can affect the speed of the query.
Tip: Generally, it is better to order your filters so that those removing the most options come first.
If you need to create more complex filters, you can start in Guided mode, then switch to Expression mode to configure them manually.
Select Expression and an expression editor box will display where you can modify the a!queryLogicalExpression() function.
For example, if you want to use OR to combine filters instead of AND, create all of your filters in Guided mode, then switch to Expression mode and change AND to OR for the a!queryLogicalExpression() operator parameter.
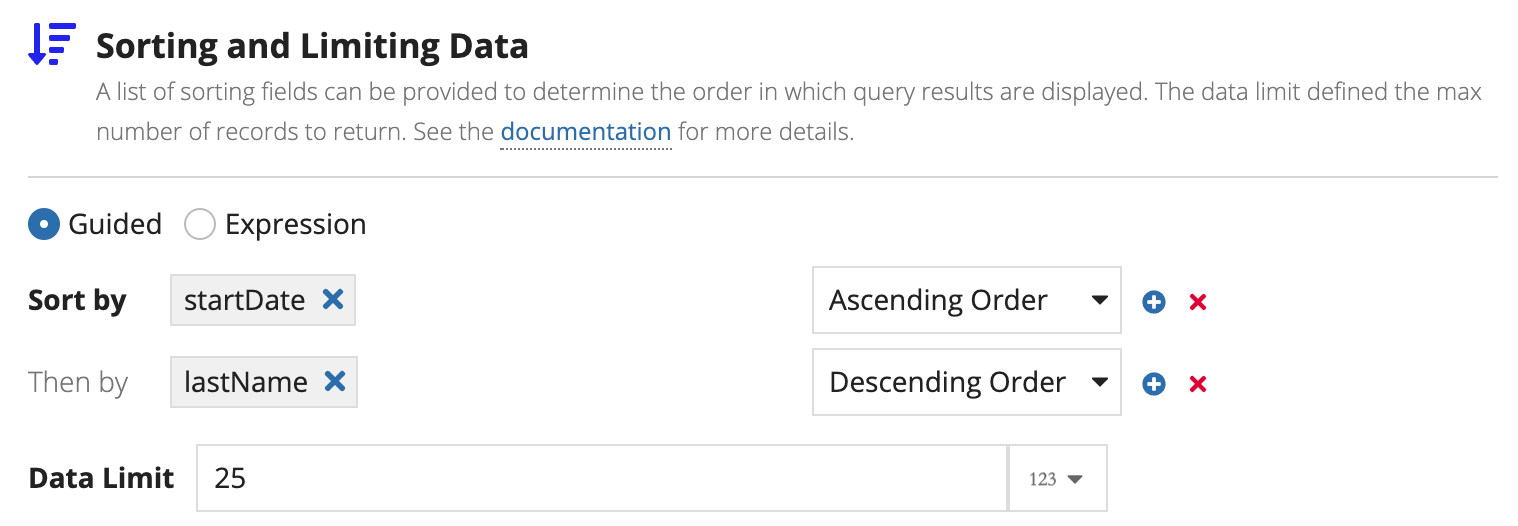
The Sort and Limit section allows you to determine the order of the records displayed for your query, and constrain the number of records returned.
In Guided mode, you can Sort by one or more fields in either ascending or descending order.
You can also set a Data Limit to restrict the number of records returned by the query.
If you need more advanced sorting or limiting conditions, you can configure them manually without closing the query editor.
Select Expression and an expression editor box prepopulated with the a!pagingInfo() function displays. This can be useful in certain situations, like when you want to use a rule input for your sorting and limiting.
The Query Results Preview section allows you to test and troubleshoot your query directly from the query editor.
From the preview, you can use the context menu to move fields left or right or to remove them from the query. Then, click TEST QUERY to run the current configuration and view the results in the preview grid.
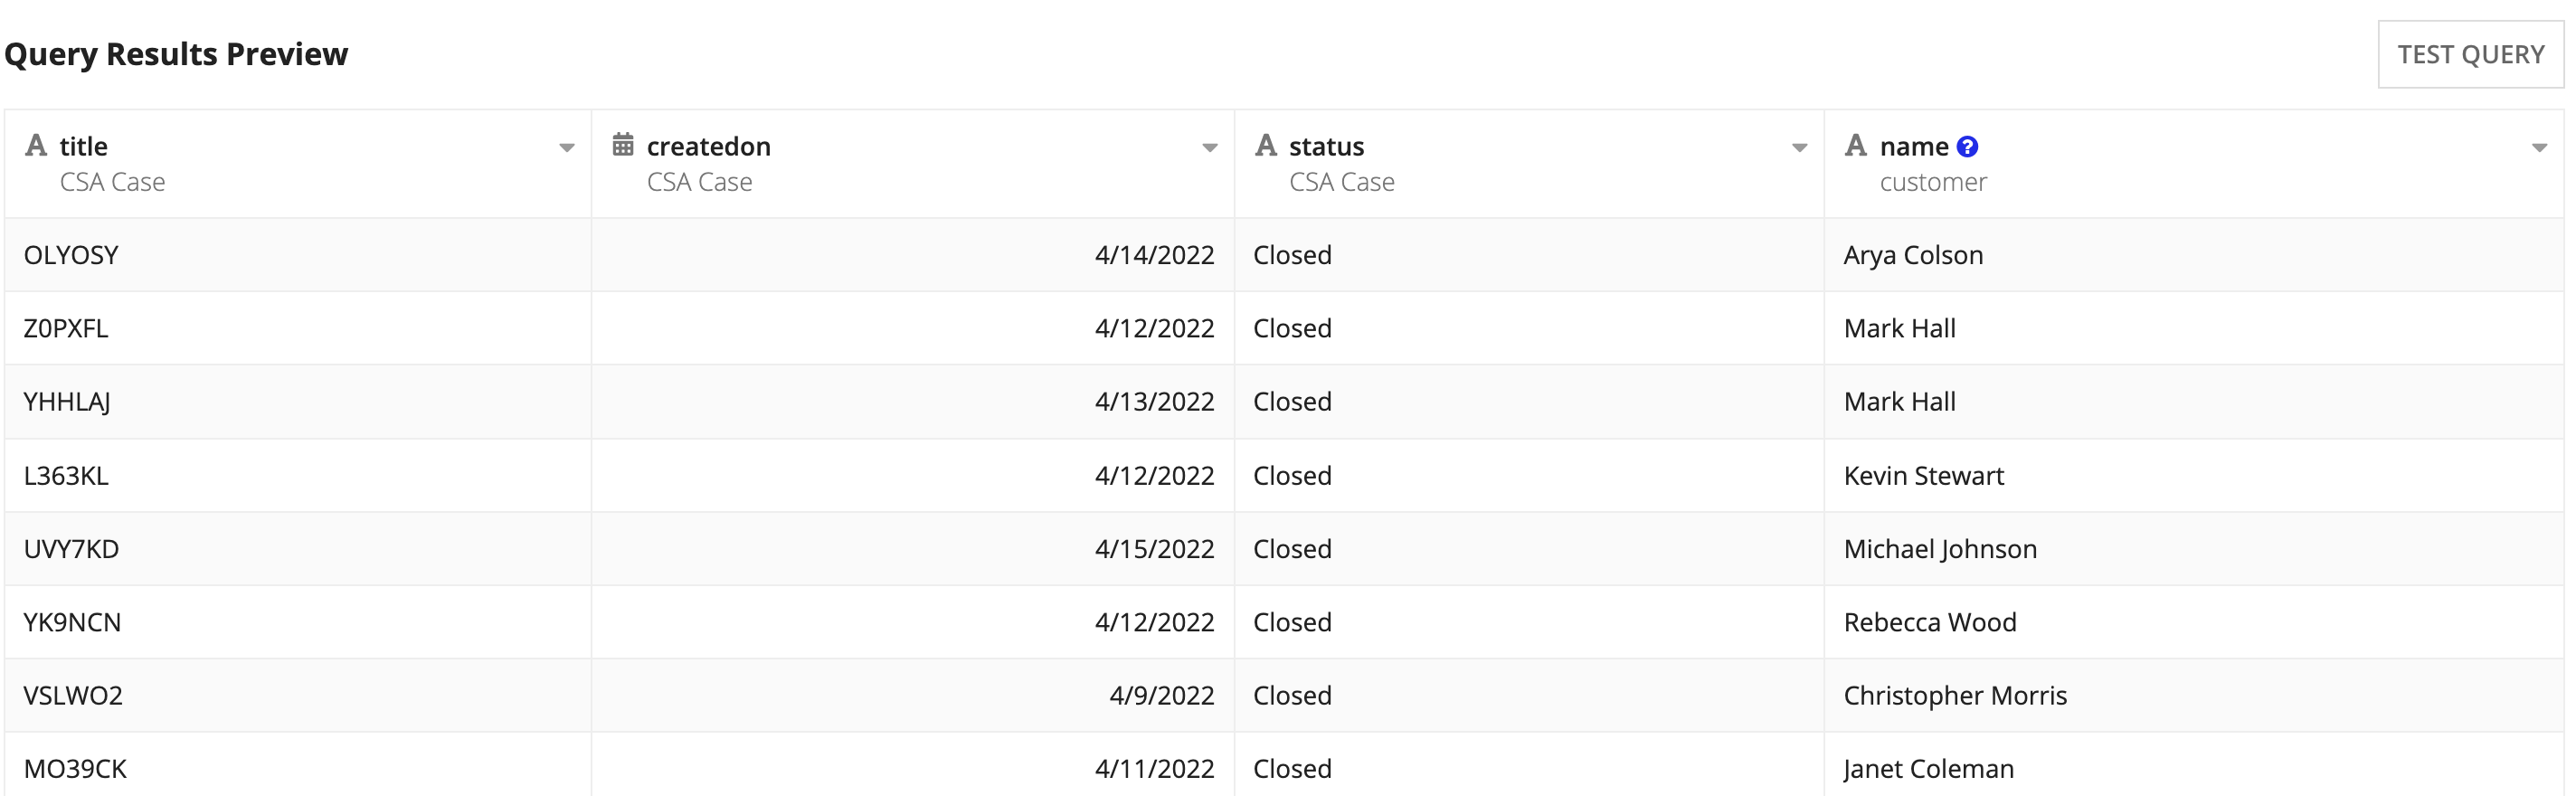
Tip: The query preview displays 10 records per page, and you can click through the pages to view all records returned by the query. The Data Limit value specified in the Sort and Limit section may be greater or less than 10, but the grid is only intended to provide a preview of the data.
The total count displays the number of records returned by your query. If your selected record type has data sync enabled, the total count is returned by default and displayed at the bottom of the preview grid. There is no additional performance cost to get the total count in this case.
If you selected a record type that does not have data sync enabled, the preview grid shows the number of records that will be returned. Once you generate the query, you can set the fetchTotalCount parameter to true.
If you do not need the total count for the query, it is recommended that you do not set this parameter in order to maximize performance.
Queries for data store entities are easy to set up with the query editor.
You can use the editor to configure all aspects of your query:
As you edit a query, you can test it at any time and preview the results to verify your configuration.
Once you open the query editor, choose the data source you want to get data from.
To use a data store entity, select Data Store Entity as the data source, then use the search to select a constant referencing your DSE. The Data Preview shows a snippet of the available data to confirm you've selected the correct constant.
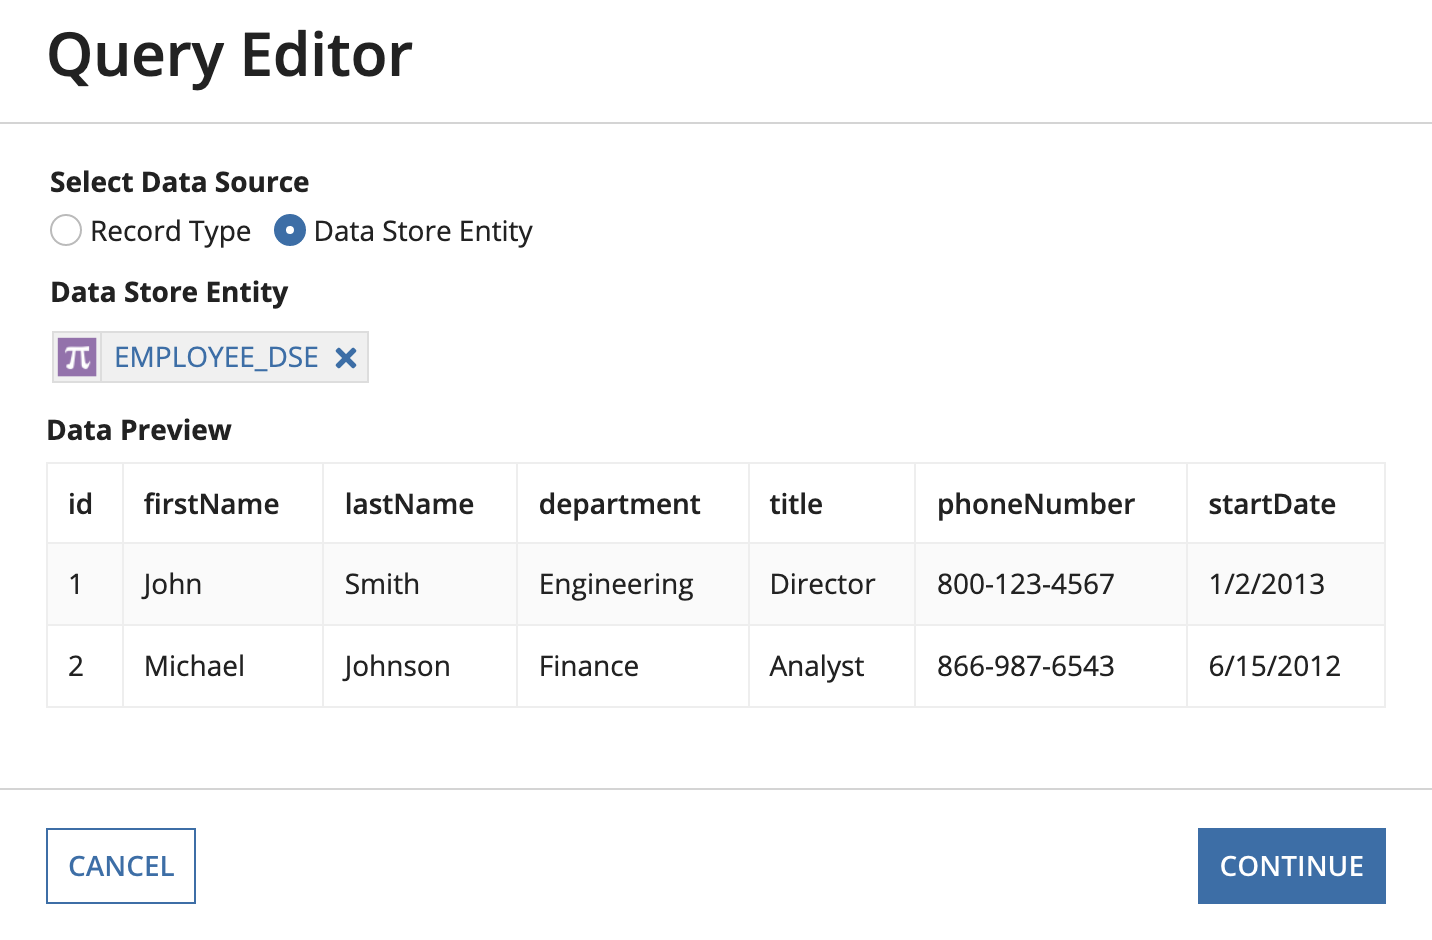
When you choose a constant, make sure it meets the following requirements:
Furthermore, you will not be able to edit a query in the query editor if there are no valid fields to configure. This will happen if there are no fields in your data store entity, or if all of the field names in the data store entity contain special characters.
After selecting the constant referencing your data store entity, the query editor configuration screen appears. This screen provides the tools to select, group, filter, and sort the data, as well as a preview of the data returned by the query.
Each section of the query editor corresponds to a different part of the generated query. For example, the information you input into the Filters section will generate the logicalExpression parameter in the query. See the following screenshot and table for a comparison of the query editor sections to the function parameters.

| Call Out Letter | Section Name | Function Parameter | Function | Description |
|---|---|---|---|---|
| A | Paging & Sorting | pagingInfo | a!pagingInfo() | Determines how many rows to return, as well as how to sort those rows. |
| B | Filters | logicalExpression | a!queryLogicalExpression() | Determines which rows of data to return based on conditions you specify. |
| C | Fields | selection | a!querySelection() | Determines which fields of the data to return. |
| D | Query Results Preview | fetchTotalCount | a!queryEntity() | Previews the results of the query and contains field configuration options in the context menu |
Clicking CHANGE DATA STORE ENTITY will take you back to the data source selection screen. Changing the data store entity will start your query over from scratch.
The query editor parses rule inputs and local variables that are present in your expression rule or interface so you can use them as part of your query. For example, you might use a rule input or local variable to store the value of a filter. When you open the query editor, the local variables and rule inputs are evaluated immediately so make sure that you initialize them correctly.
In the expression example shown, the ri!user rule input is empty. This will cause a runtime error when the query editor opens.
1
2
3
4
5
6
7
8
9
10
 a!localVariables(
   local!user: user(ri!user),
   a!queryEntity(
     entity: cons!SUPPORT_CASE_DSE,
     query: a!query(
       pagingInfo: a!pagingInfo(startIndex: 1, batchSize: 50)
     ),
     fetchTotalCount: false
   )
 )
To resolve this issue, make sure you create and save a test value for ri!user before saving and closing the expression.
The following sections describe how to create and save test values for rule inputs and local variables.
The RULE INPUTS button at the top of the query editor allows you to create rule inputs and change their test values without having to close the query editor. In order to save the rule input test values for future use, you must save the rule or interface. The query editor can change the test values, however it cannot save the test values for use after closing the rule or interface.
If your expression contains a local or function variable, a VARIABLES button will display next to RULE INPUTS. VARIABLES allows you to edit the test values of local variables and function variables. These test values are not saved to the rule or interface; they are there as a convenience so you can test your queries with different values.
See Using the Query Editor for more information on configuring rule inputs and variables.
The Paging & Sorting and Filter sections have a Basic mode and an Expression mode.
Switching from Basic to Expression mode will not clear the current configurations. This allows you to use Basic mode to set up your initial configurations, then switch to Expression mode to add more advanced configurations.
If you make changes in Expression mode that cannot be translated to Basic mode, you will not be able to use Basic mode to make further changes. When you open an existing query in the query editor that has information that cannot be translated in Basic mode, Expression mode will open by default. See Supported Logic and Parameters for more information on what is supported in Basic mode.
Paging and sorting sets limits on the amount of rows returned by your query and determines the order of the rows.
In Basic mode, you can either retrieve all rows, or you can limit the amount of rows returned per page to a certain number. You can also sort on multiple fields in either ascending or descending order.
If you need more advanced paging and sorting settings, you can configure them manually without closing the query editor. Simply select Expression and an expression editor box prepopulated with the a!pagingInfo() function displays. This can be useful in certain situations, such as if you want to use a rule input for your paging and sorting.
Filters allow you to determine which rows of data to return based on conditions you specify.
Selecting Basic allows you to easily set up filters using four criteria: Field, Condition, Value, and Apply Filter. Multiple filters are combined using the AND operator.
Ignore filters with empty values is selected by default. When selected, a filter will not be applied if its value parameter returns an empty value. This is useful when you have multiple filters that are all optional (for example, a grid that can be filtered by multiple selections). If you don't select Ignore filters with empty values and the value for a filter is not supplied, the query will return an error.
The Field picker contains all the fields in the data store entity, including nested data types. The Condition and Value options will change depending on the data type of the selected Field. Only the conditions and values that are compatible with the data type of the selected field will display.
Field names that include special characters in your data store entity cannot be configured using the query editor and will not display. Likewise, if your data contains nested data types, only fields with one-to-one or many-to-one relationships will display. Fields with one-to-many relationships are not displayed in order to avoid run time errors.
The Condition list displays all of the operators that can be applied to the selected field. Only operators that are compatible with the data type of the chosen field display.
The following tables explains the behavior of each available operator:
| Operator | Description |
|---|---|
= |
Equal to |
<> |
Not equal to |
< |
Less than |
> |
Greater than |
<= |
Less than or equal |
>= |
Greater than or equal |
in |
Matches a value in a list of values |
not in |
Does not match a value in a list of values |
starts with |
Begins with |
not starts with |
Does not begin with |
ends with |
Ends with |
not ends with |
Does not end with |
includes |
Includes the specified character(s) |
not includes |
Does not include the specified character(s) |
is null |
Is null |
not null |
Is not null |
between |
Is greater than or equal to a minimum value and less than or equal to a maximum value |
Tip: The between operator requires a list of two values, with the lower value as the first item and the upper value as the second. For example: {10,20}. You can set up one rule input or local variable that contains a list of two values, or create a list of two values in expression mode.
Tip: Some databases can store empty text values as either null or as a zero-length string (usually described as ""). When querying against the Cloud Database using the is null operator on a text field, the result set will only return results that are explicitly set to null. In contrast, other databases may treat these zero-length strings as equivalent to null and thus return results for both null and empty values. Appian expressions do not distinguish between null and empty regardless of the underlying database. This means that when data is synced from a text field, values that were null or empty are both stored as null in the synced record type. Thus, when querying from a synced record type, the is null operator will then return values that were both null and empty in the database.
See Query Recipes for an example of how to use a!queryFilter() and a!queryLogicalExpression to query for both empty and null values.
The following table shows which operators can be applied to each data type.
| Data Type | Valid Operators |
|---|---|
| Text | =, <>, in, not in, starts with, not starts with, ends with, not ends with, includes, not includes, is null, not null |
| Integer, Float, Time | =, <>, >, >=, <, <=, between, in, not in, is null, not null |
| Date, Date and Time | =, <>, >, >=, <, <=, between, in, not in, is null, not null |
| Boolean | =, <>, in, not in, is null, not null |
Note that for Date and Date and Time data types, between is substituted with Date Range in the query editor dropdown list. This is just to indicate that you can select from a list of date presets for the filter's value. The parameter in the expression will still display between.
Tip: If the Condition column is set to is null or not null, the value column is disabled.
You can select how you want to pass in the filter value using the Value context menu. The options in the context menu change based on the data type of the selected field.
In most cases filter values can be passed in using the following:
If you select Input/Variable, existing rule inputs and local variables appear in the Value list.
Only rule inputs and local variables that are compatible with the data type of the selected field will display. This includes:
For example, if you select a field that has a data type of Text, you can select rule inputs or variables of the same type or those that can be cast to the Text data type. See the table below for some examples of Appian data types that can be cast to primitive data types.
The Apply Filter decides when the filter in that row is applied to the query. Use this option only when you want to apply the filter when a particular condition is met, such as if the user belongs to a specific group.
The Apply Filter can be configured in an expression editor by clicking on the link in the Apply Filter column, shown as either Always or When. Always means the filter is always applied, and When means a condition expression exists. Enter an expression that returns a boolean value.
On the left side of each filter row, there is an icon that indicates whether or not the filter is applied based on the Apply Filter column. Each icon represents a different status determined by whether the filter is applied or not applied.
| Visual Icon | Filter Status |
|---|---|
| Applied | |
| Not Applied |
On the right side of each filter row, you can change the filter order using the up or down arrows, or delete the filter using the x icon.
Because filters are evaluated with the AND operator, the filter order can affect the speed of the query. Generally, it is better to order them so that filters that remove the most options come first.
If you need to create more complex filters, you can start in Basic mode, then switch to Expression mode to configure them manually. Simply select Expression and an expression editor box will display where you can modify the a!queryLogicalExpression function.
For example, if you want to use OR to combine filters instead of AND, create all of your filters in Basic mode, then switch to Expression mode and change AND to OR for the a!queryLogicalExpression() operator parameter.
The Fields section contains a field picker that shows all of the fields in the data store entity. If there is a nested data type, you can expand it by clicking >.
Note that some fields cannot be configured in the query editor. The following fields will not display:
You can add or remove the fields that you want your query to return. See Using the Query Editor for more information on how to add or remove fields from your query. The order of the columns in the preview pane changes as you select and remove fields from the list. If you clear a column and re-add it, it will be added as the last column.
Tip: By default, the query editor fetches all fields so you can see a query preview with all available fields. However, for performance reasons, the best practice is to only query the fields that you need.
The Query Results Preview section allows you to test and troubleshoot your query directly from the query editor. The TEST QUERY button populates the Query Results Preview section with the results of your query.
Tip: The query preview only displays 10 rows at a time. This may differ from the number of rows per page in the Paging & Sorting section as it is only intended to be a preview.
If Fetch total row count is selected, a parameter will be applied to the query that will retrieve the total number of rows that are returned. Note that Fetch total row count is applied to the query, not just the preview.
If you have a lot of data, it is recommended to turn off Fetch total row count to improve performance. In some cases, the total row count will be retrieved even if it is not selected. For more information on this, see a!queryEntity().
Normally, Fetch total row count is deselected by default. However, when launching the query editor from a read-only grid in design mode, it is automatically selected and cannot be changed.
When this setting is turned off, the total number of rows at the bottom of the Query Results Preview grid displays 1,000,000 to indicate the total is unknown.
You can use the context menu ![]() to move filters left or right, edit aliases, and set the visibility for fields. See Using the Query Editor for more information on how to configure fields.
to move filters left or right, edit aliases, and set the visibility for fields. See Using the Query Editor for more information on how to configure fields.
You can group your data and perform calculations with it by clicking GROUP DATA. When your data is grouped, the context menu provides additional options for calculating and grouping it. See Using the Query Editor for more information on data grouping.
The query editor can be opened from any a!queryEntity()function that is a part of a rule or interface that does not have any syntax errors. It can also be opened from an empty expression rule or interface, or an empty a!queryRecordType() function.
The following are some scenarios that will prevent the query editor from opening:
a!queryRecordType() function is not empty. The query editor cannot be used to modify existing record type queries.a!queryEntity() function. For example, the query parameter is missing or there is no cons! prefix for the data store entity constant.a!queryEntity() function.a!query(), a!querySelection(), or a!queryColumn() function is nested inside another function, such as if() or a!forEach().rule!myExampleQuery().a!queryColumn() is not a text literal. For example, it is a rule input or local variable.a!queryColumn() or a!queryAggregationColumn() does not evaluate correctly.Note: These scenarios may not cover every situation in which the query editor will not open.
If your expression contains a pagingInfo parameter that cannot be translated to Basic mode, the Expression mode will open by default.
To open in Basic mode, the pagingInfo parameter must meet the following requirements:
if(), where(), etc.If your expression contains a logicalExpression parameter that cannot be translated to Basic mode, the Expression mode will open by default.
To open in Basic mode, the logicalExpression parameter must meet the following requirements:
OR operator.if(), where(), etc.If the a!queryEntity() function uses the filter parameter instead of the logicalExpression parameter, the Filter section will automatically open in Expression Mode.
If you switch to Basic mode, the query editor will wrap your a!queryFilter() in an a!queryLogicalExpression().
